> ## Documentation Index
> Fetch the complete documentation index at: https://rasa.com/docs/llms.txt
> Use this file to discover all available pages before exploring further.
# How to Collect Information
> How your assistant can collect information in Studio.
This guide will teach you how to enable your assistant to gather user data through **Collect** steps.
You’ll learn how to set up slots, create prompts, and validate user inputs, enabling your assistant to handle interactions smoothly and accurately.
### What is a Collect Step?
The collect step helps your assistant gather and store information provided by the user. You define the type of data you want to collect—like a name, email, or date—as a slot, and this step helps you to get the answer you need to set the value.
This guide walks you through setting up a Collect step — from creating slots and designing prompts to advanced validation and slot-filling logic.
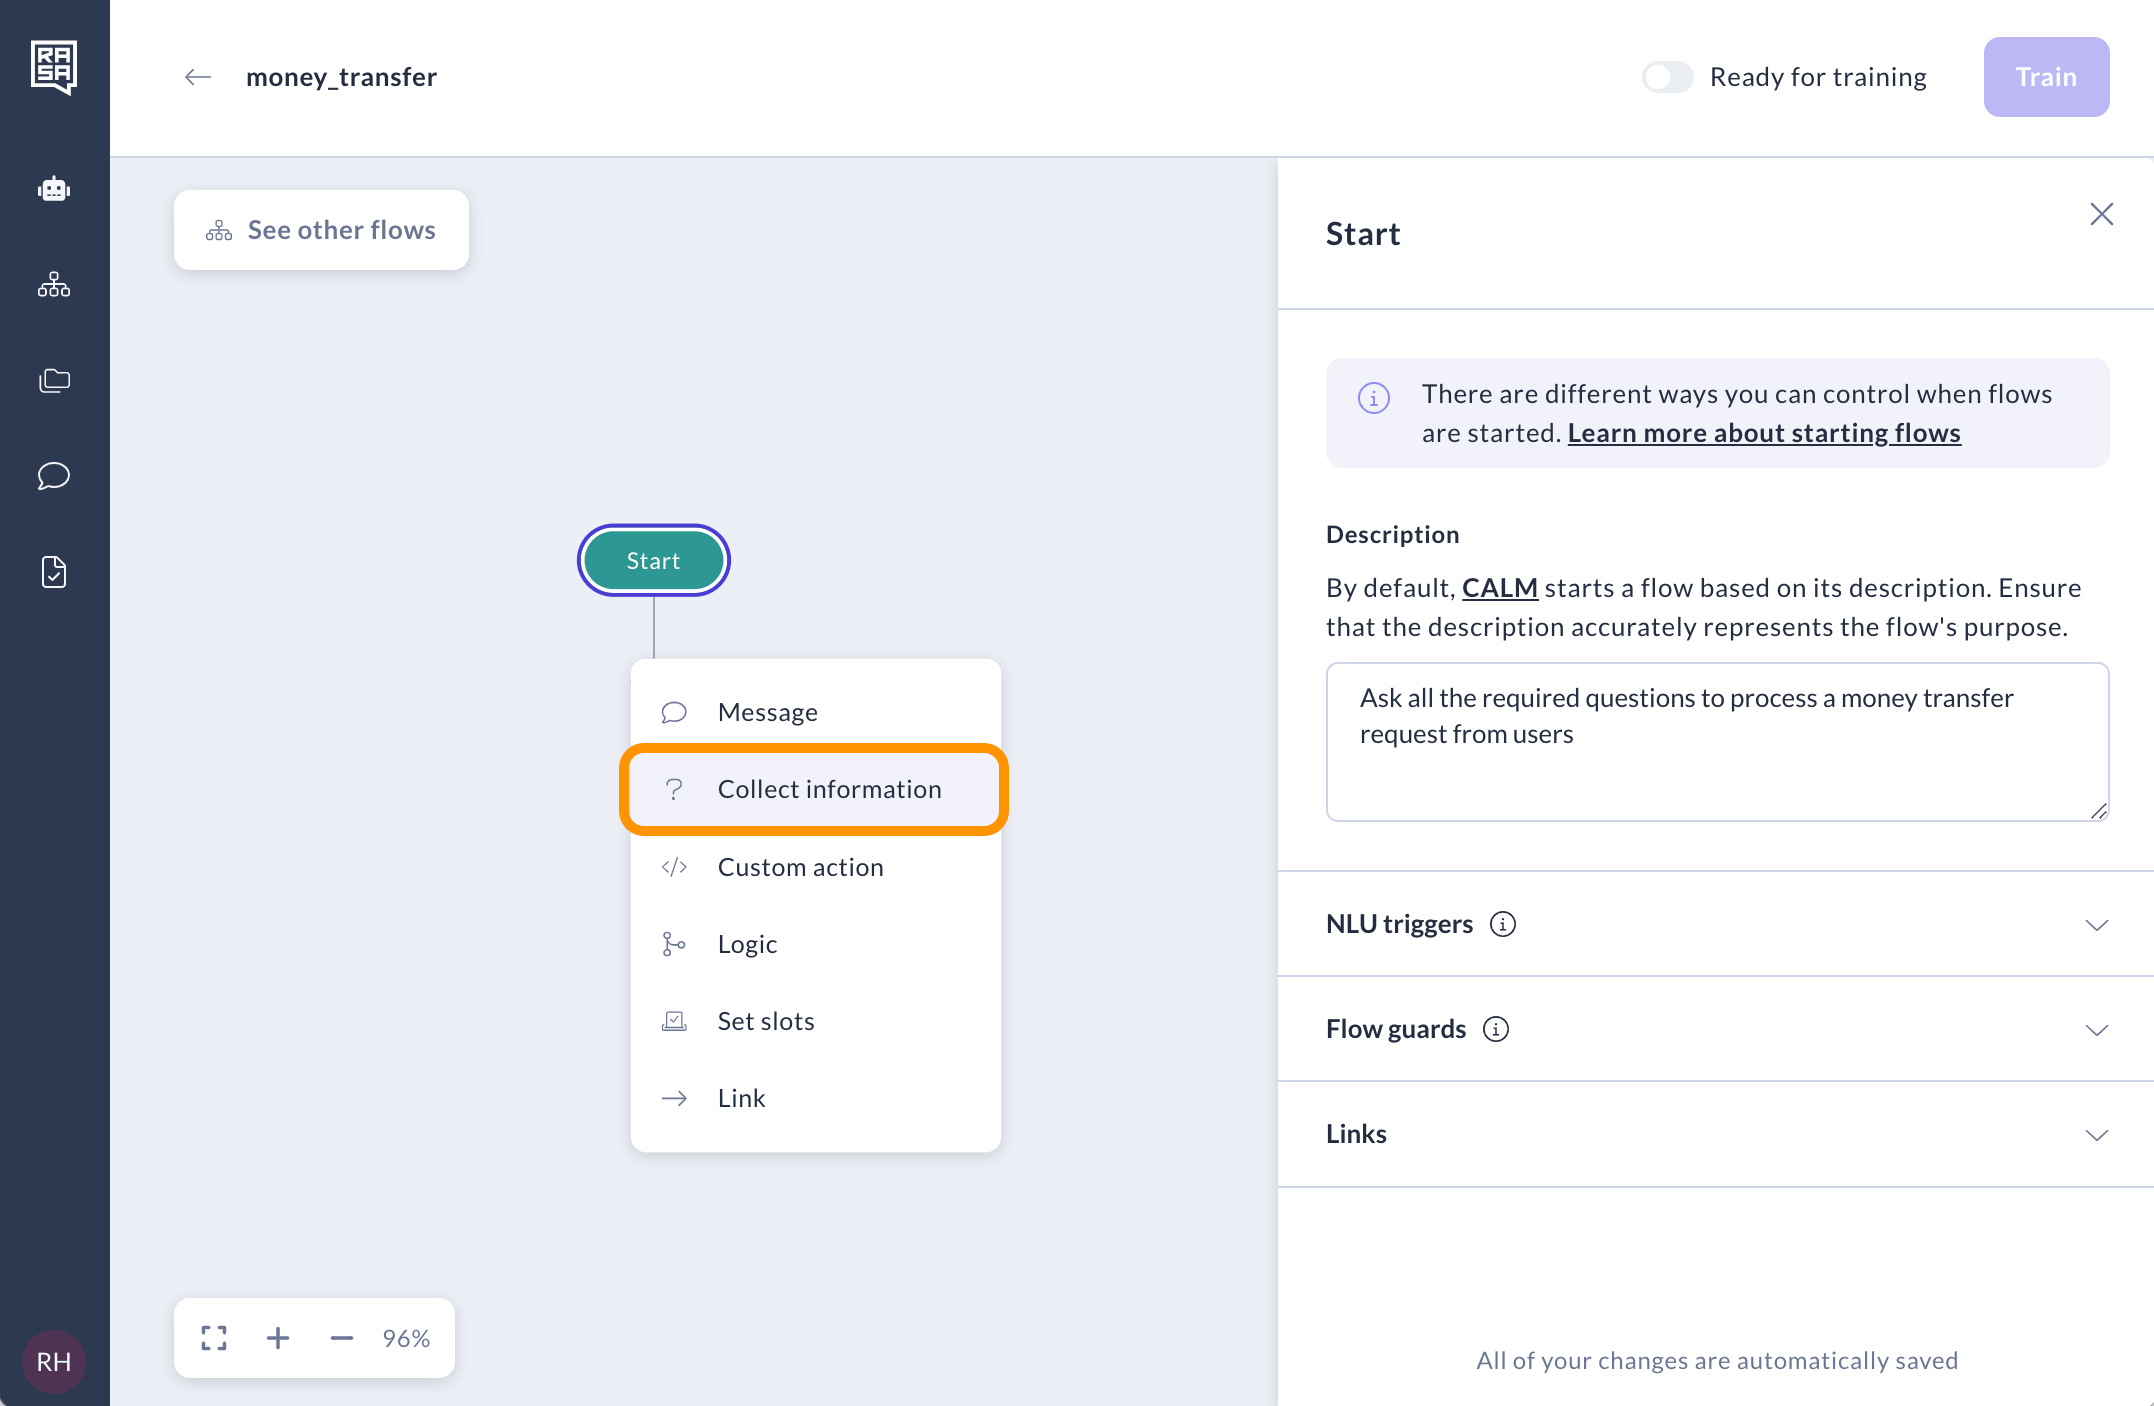 ## Create a Collect Step
Here's how to define what your assistant should ask and where to store the user's response.
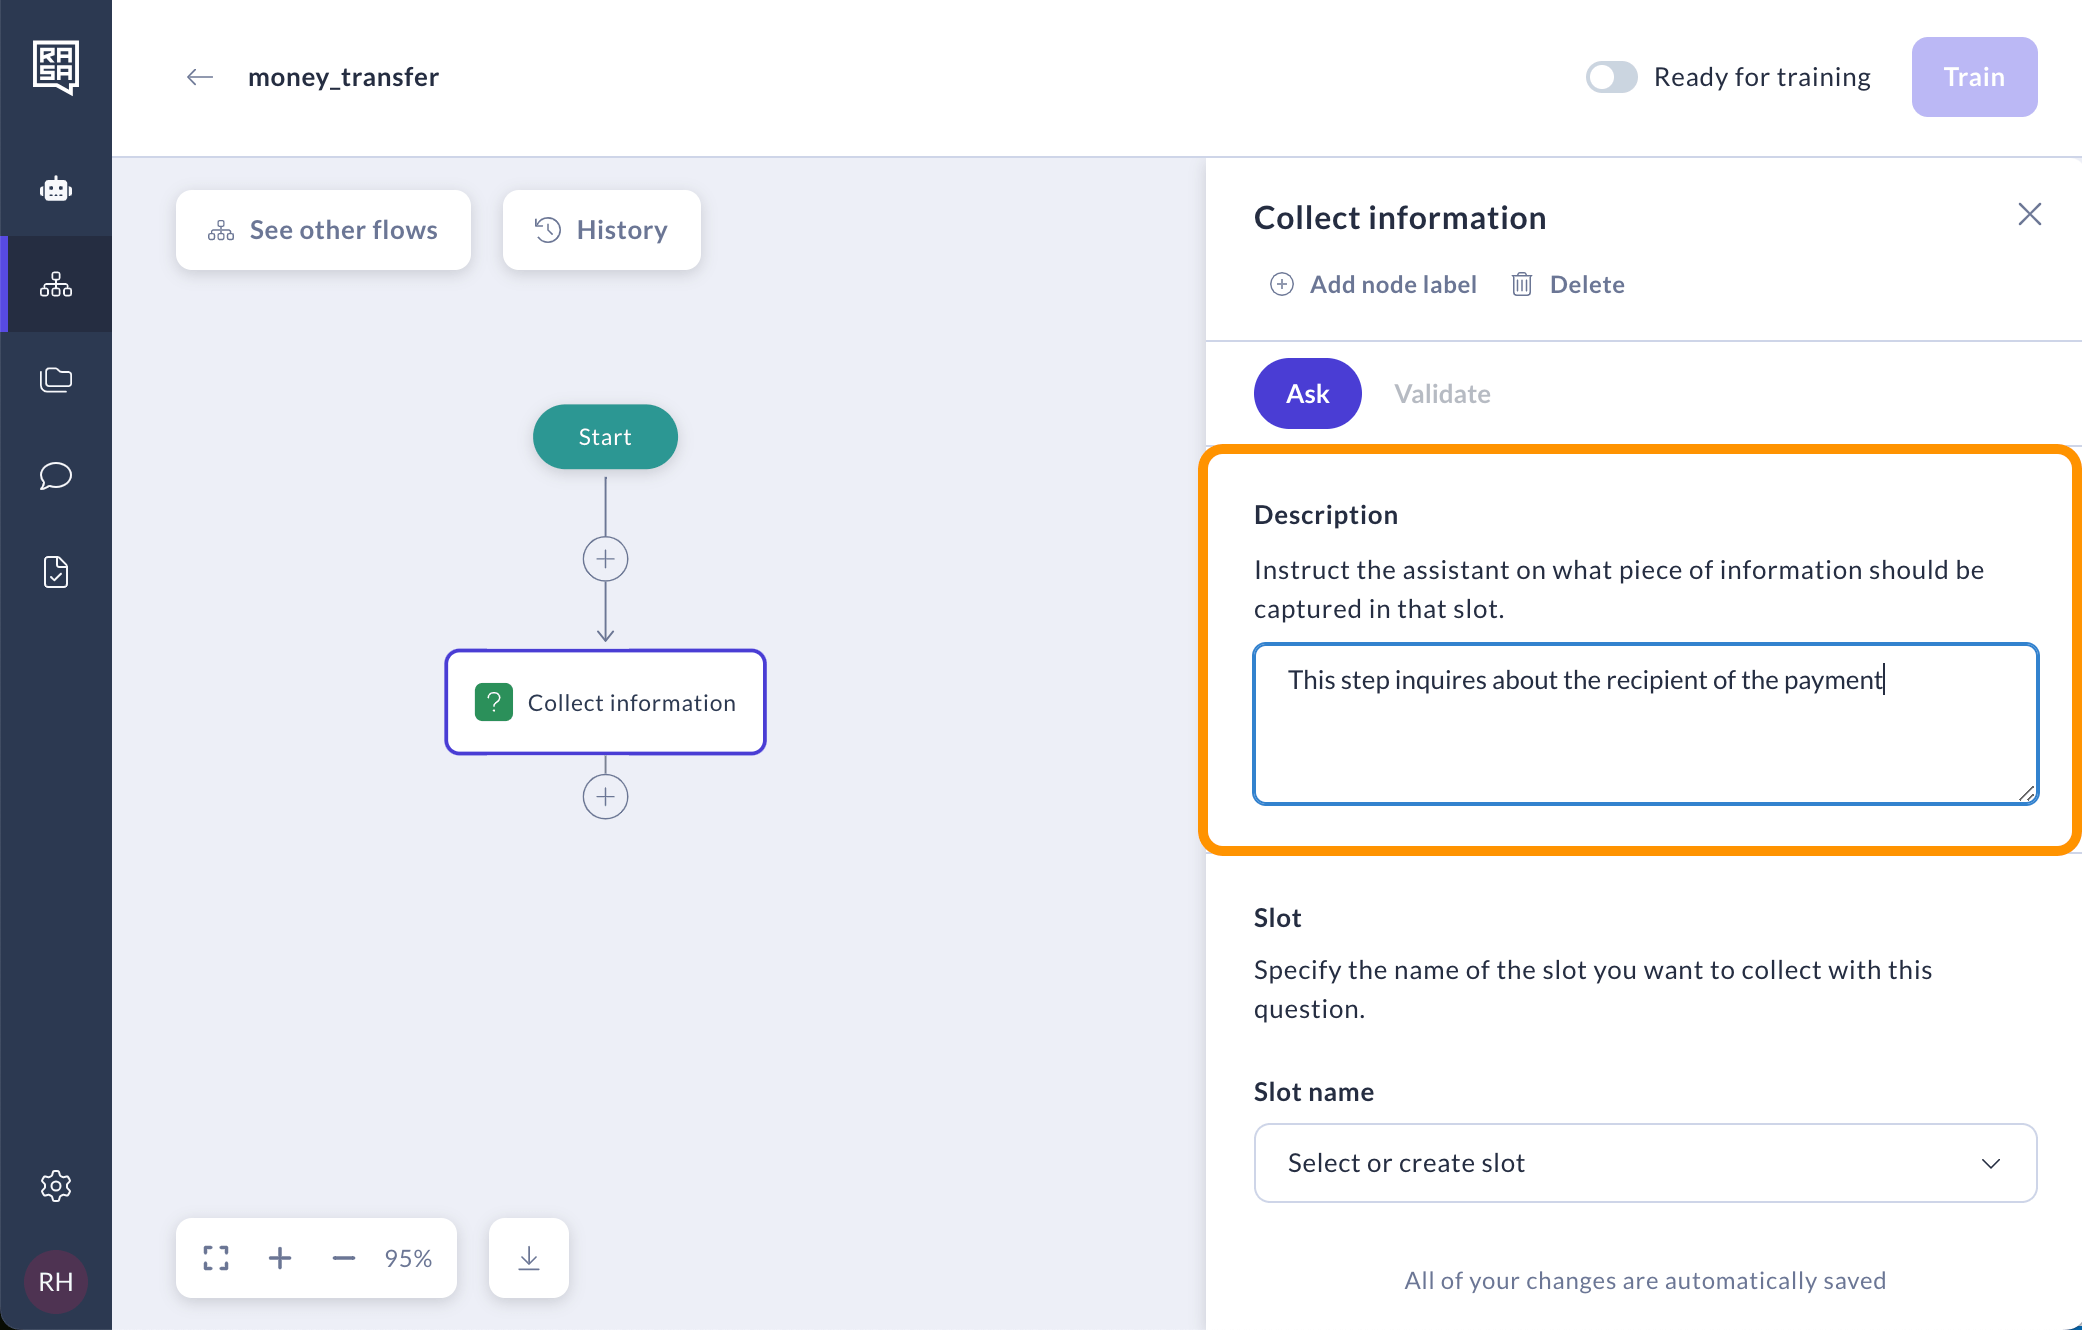
### 1. Describe What to Collect
Add a short description to instruct the assistant on what kind of information it should collect. Use a clear and consistent format.
## Create a Collect Step
Here's how to define what your assistant should ask and where to store the user's response.
### 1. Describe What to Collect
Add a short description to instruct the assistant on what kind of information it should collect. Use a clear and consistent format.
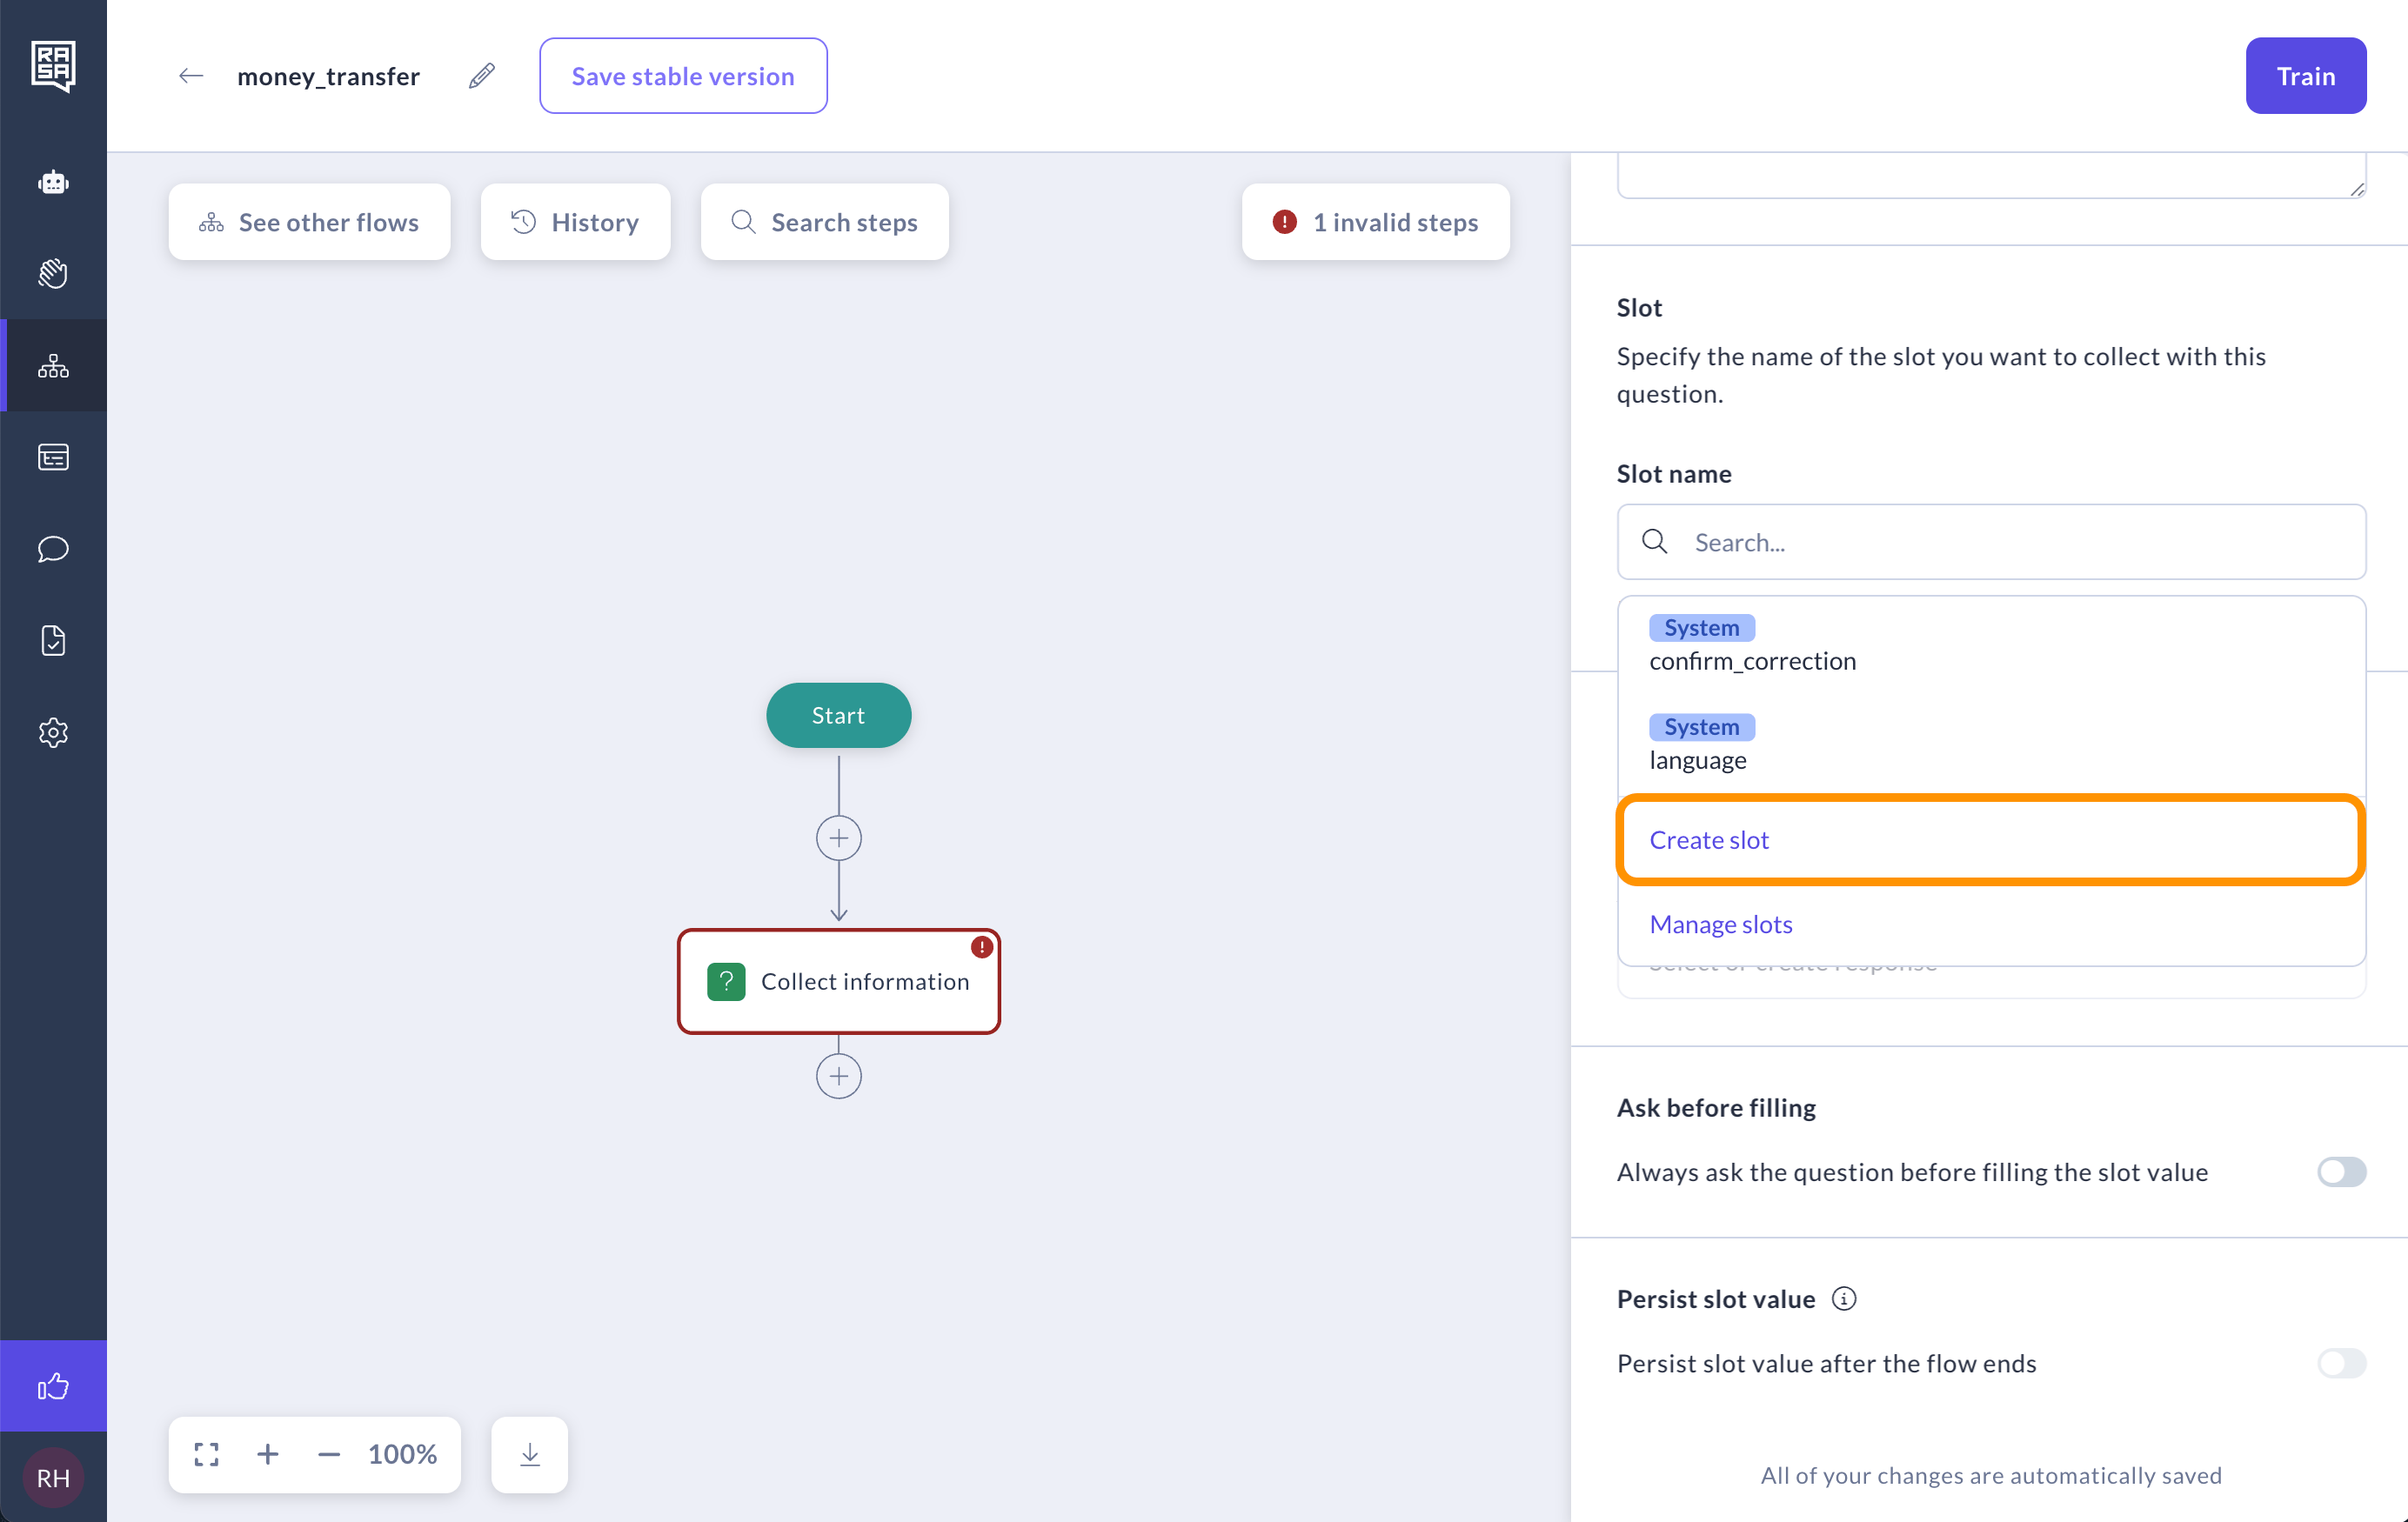
 ### 2. Store the Response
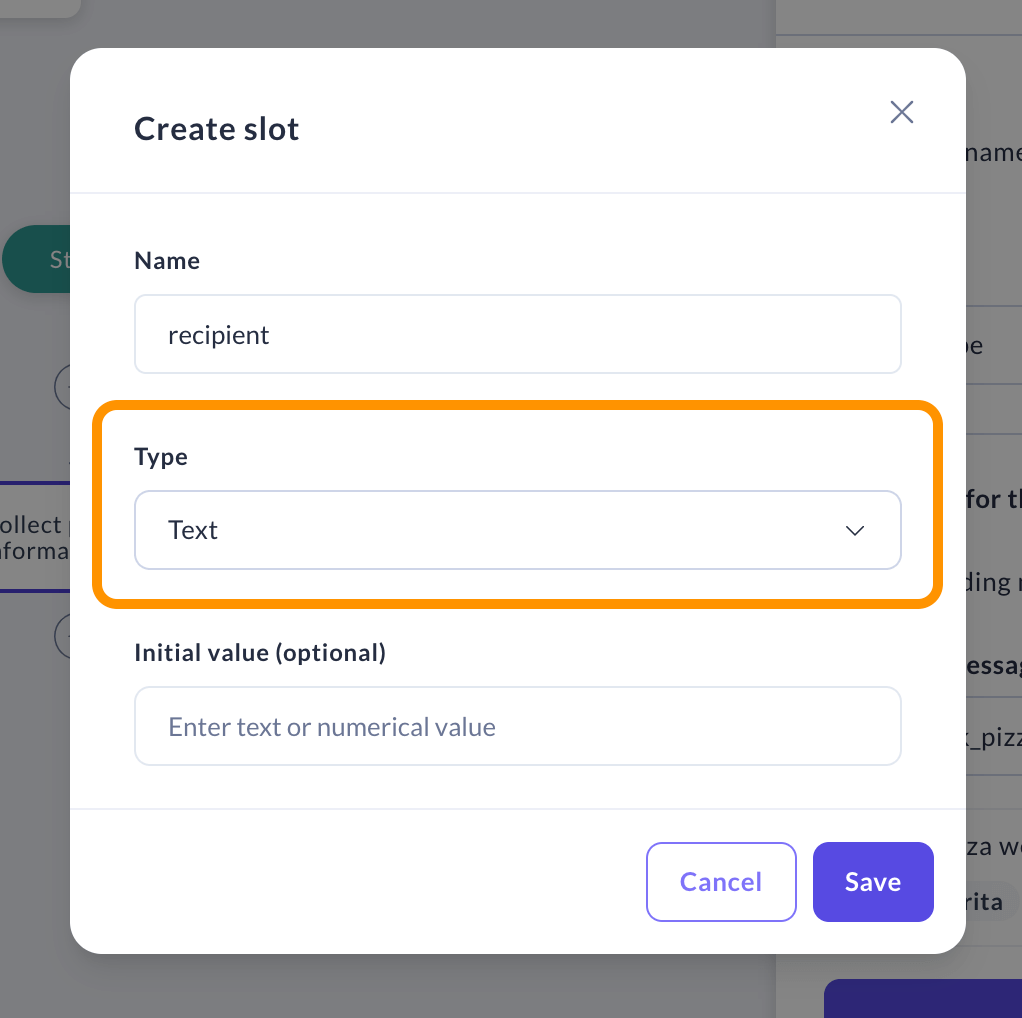
In order to be able to store the user's response, define a new [**slot**](/docs/studio/build/flow-building/collect#slots). Use descriptive names that clearly indicate the information you want to gather.
**📌 Tip:** To keep your slots organized - prefix flow-specific slots with the flow name ie. `money_transfer_` and global ones that are shared between flows with `global_`.
### 2. Store the Response
In order to be able to store the user's response, define a new [**slot**](/docs/studio/build/flow-building/collect#slots). Use descriptive names that clearly indicate the information you want to gather.
**📌 Tip:** To keep your slots organized - prefix flow-specific slots with the flow name ie. `money_transfer_` and global ones that are shared between flows with `global_`.
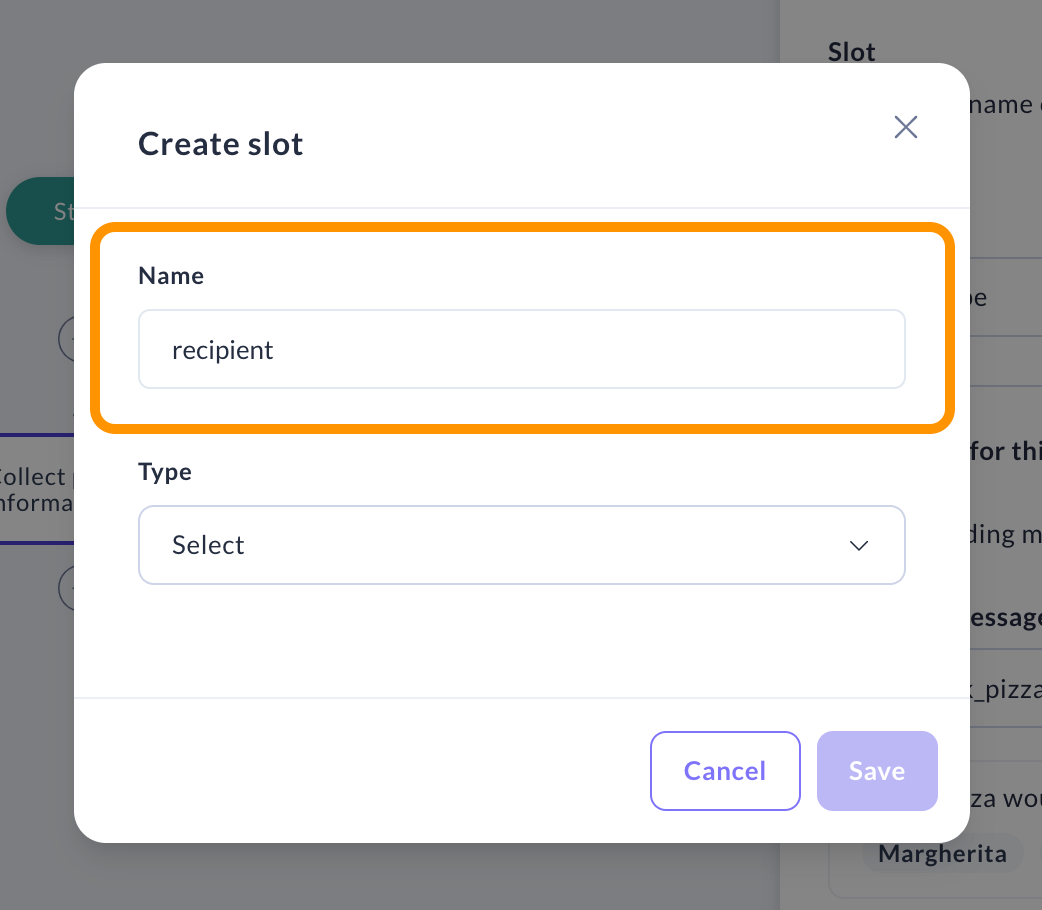 #### Choose the Type of Information
Pick the right slot type for the information you're collecting. Read more about the [**different types of slots here**](/docs/studio/build/flow-building/collect#slot-types).
#### Choose the Type of Information
Pick the right slot type for the information you're collecting. Read more about the [**different types of slots here**](/docs/studio/build/flow-building/collect#slot-types).
 ## Design How to Ask For Information
You can tailor how your assistant asks for information or presents options to your user.
### Option 1: Use a Response
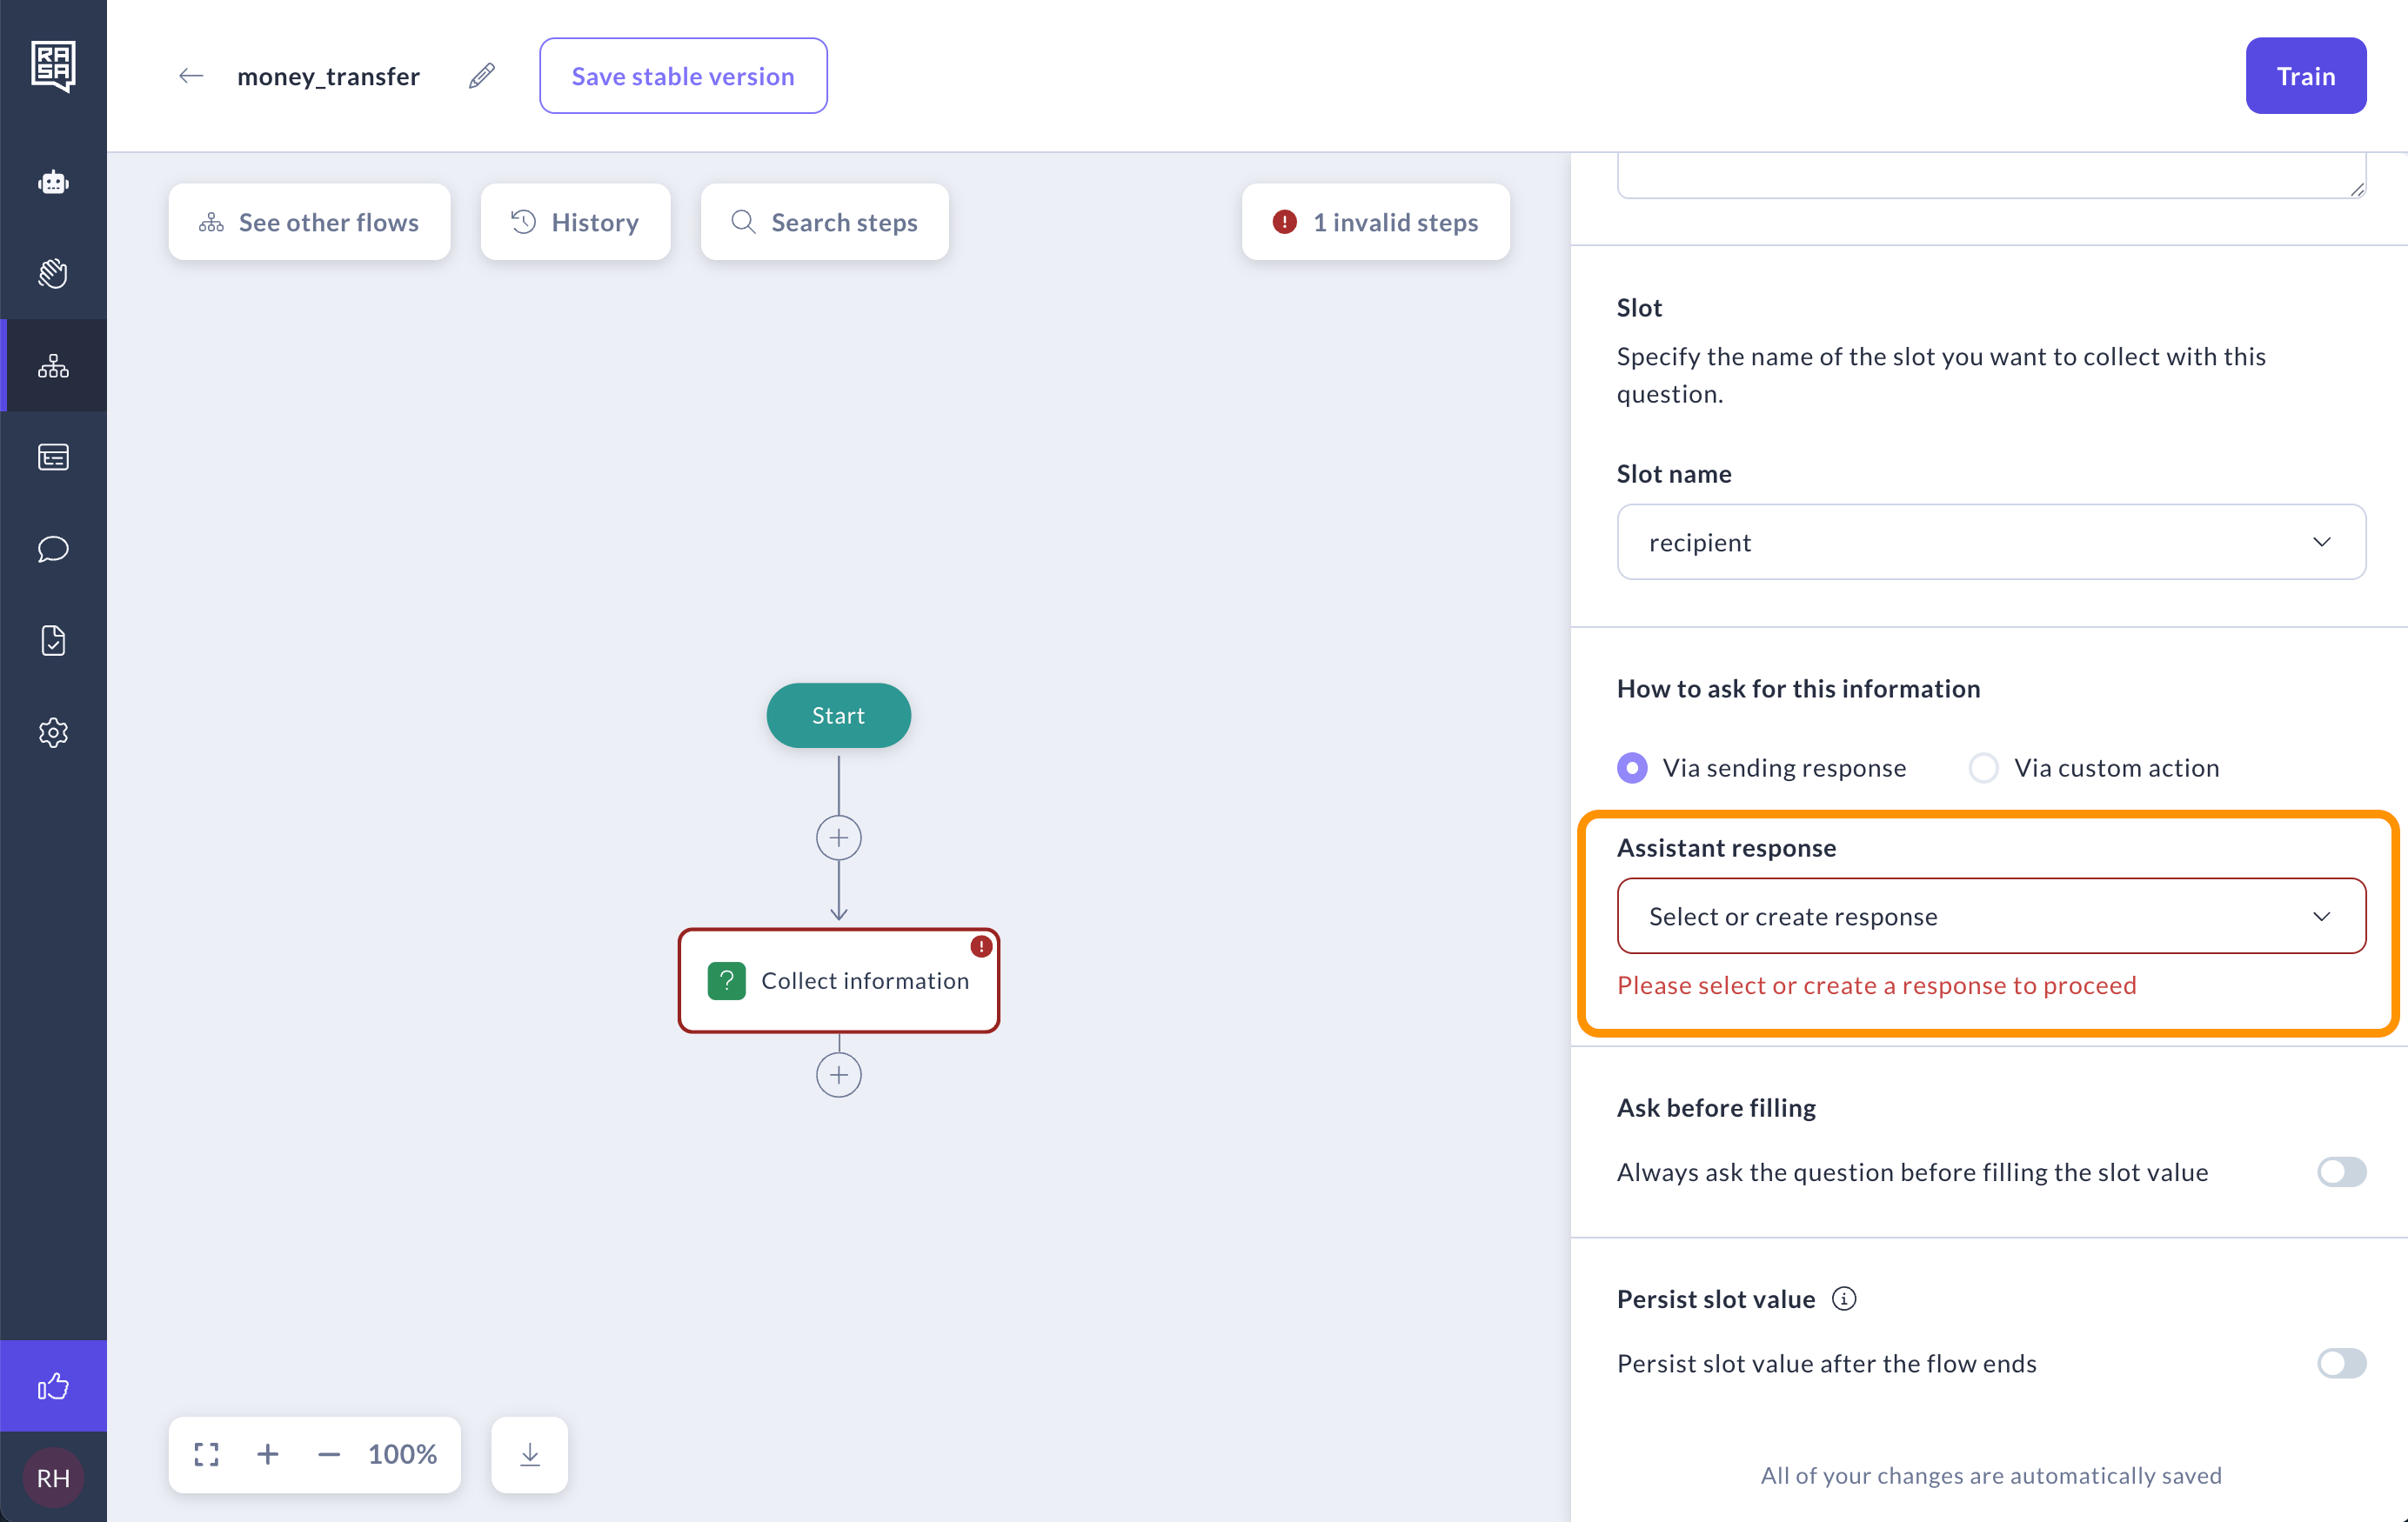
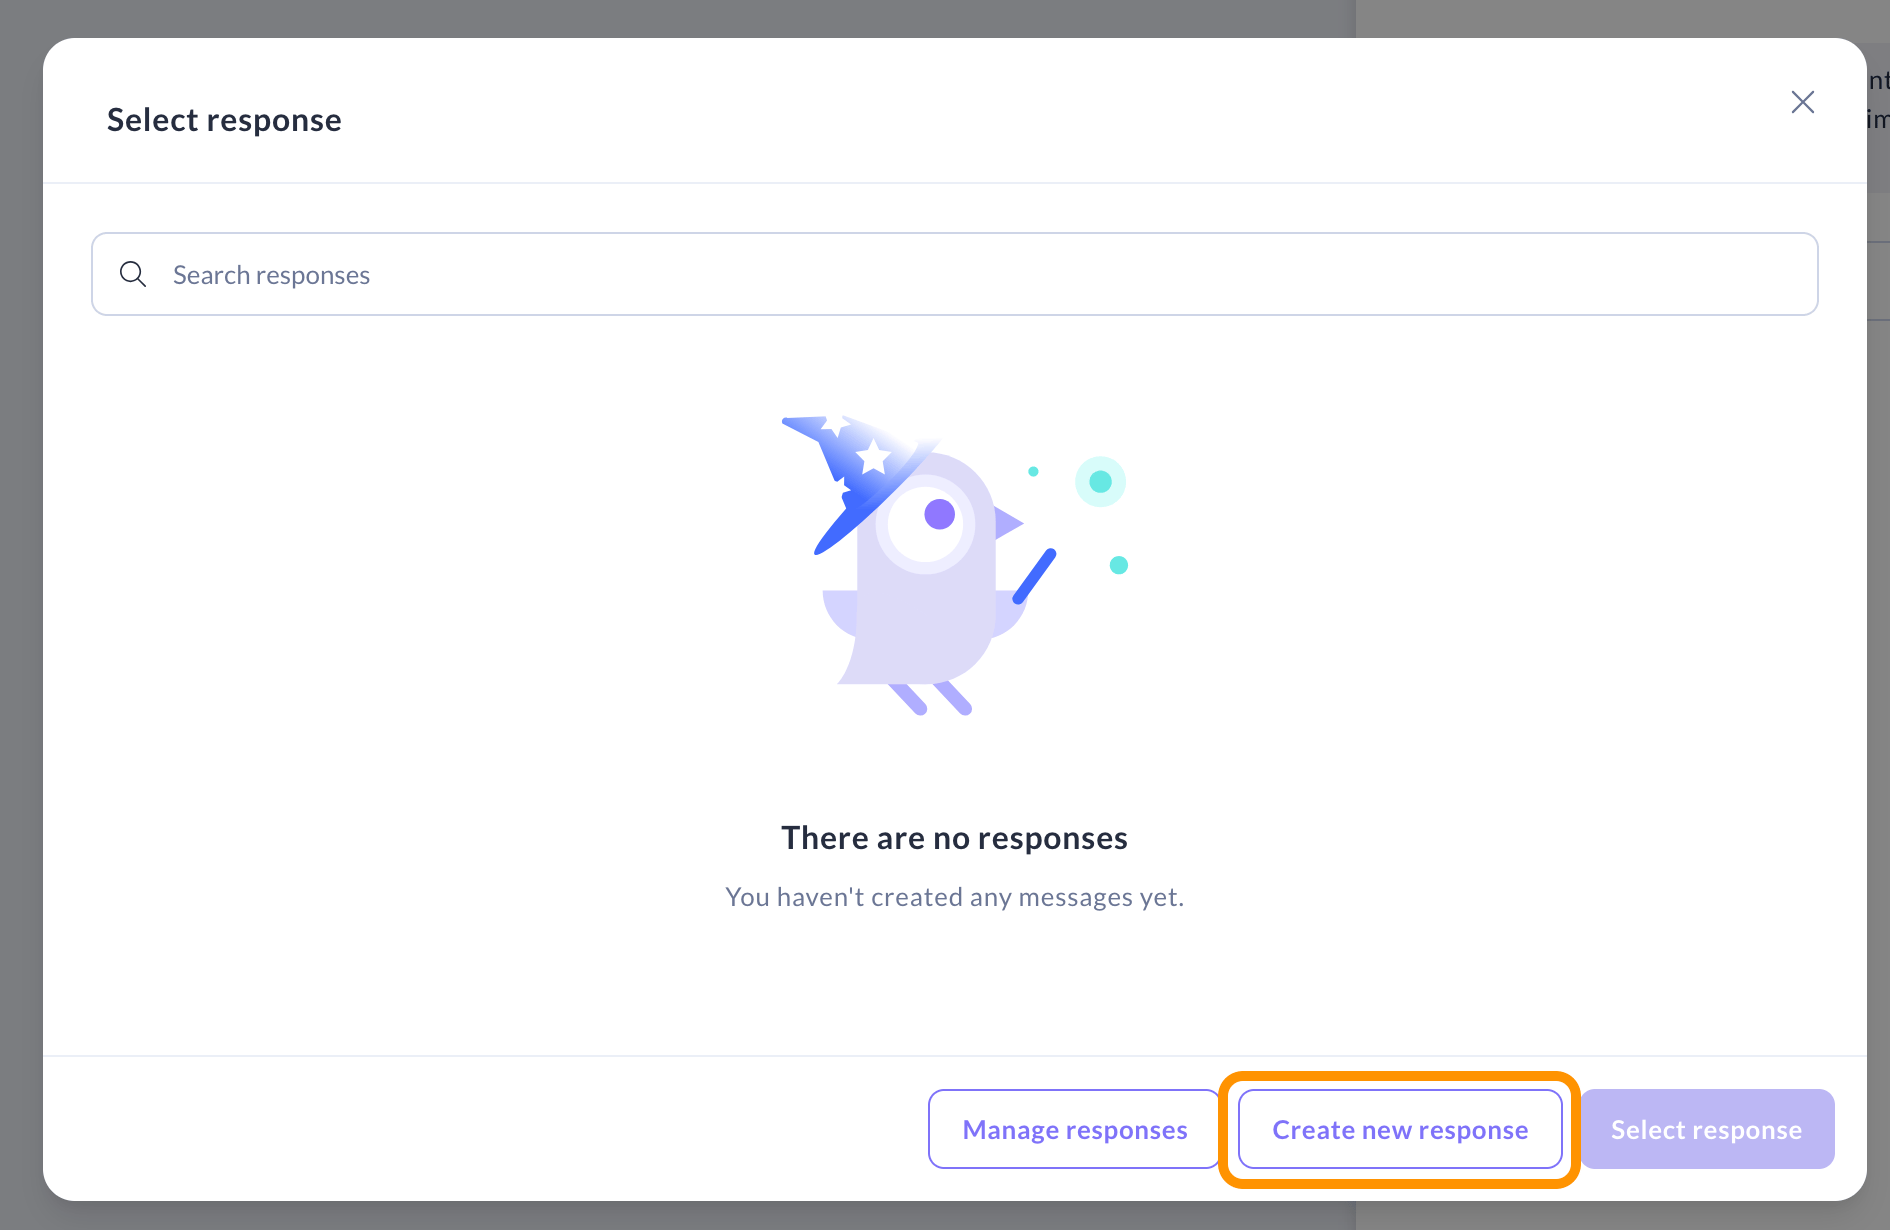
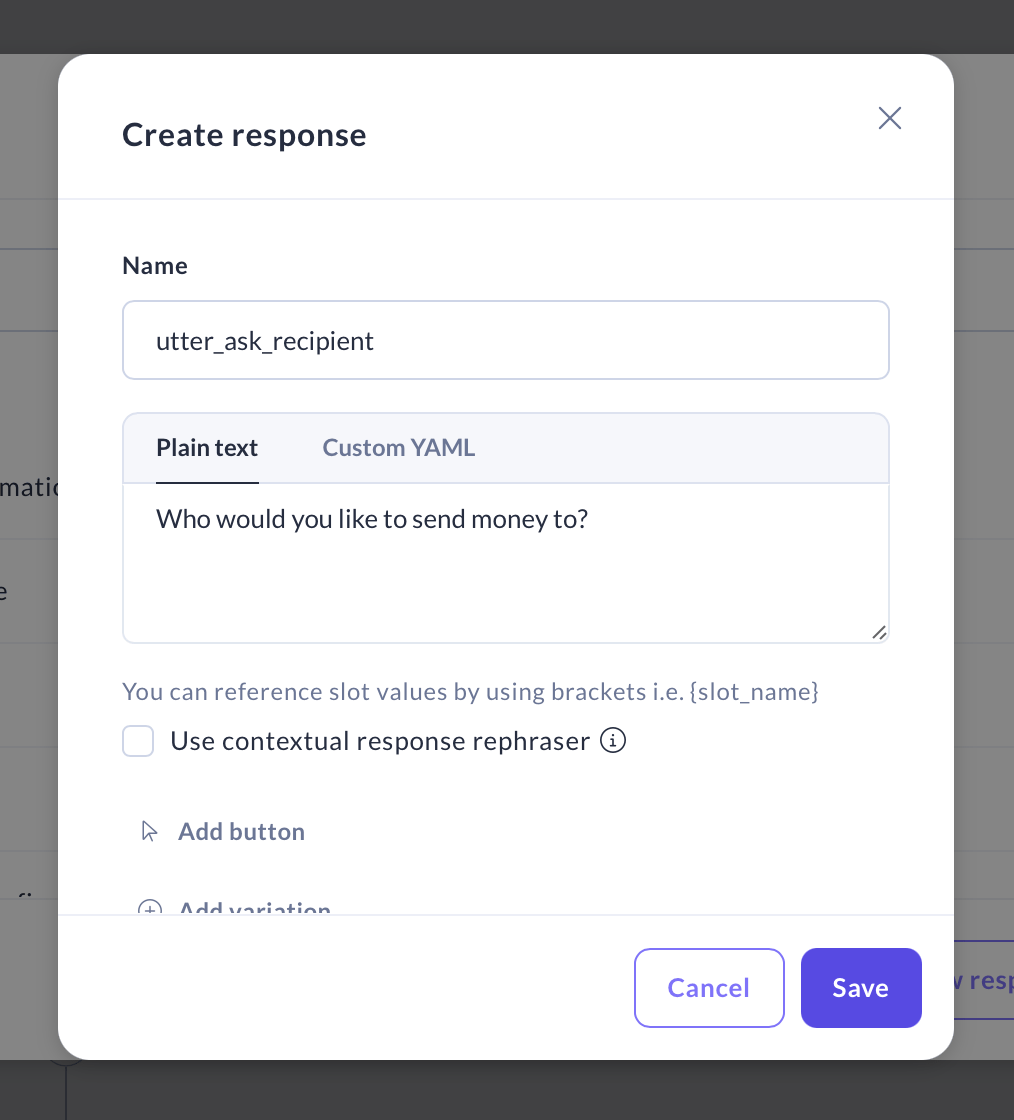
Click **Select or create response** and write what you'd like your assistant your assistant to say. The response name will default to `utter_ask_{slot_name}`.
## Design How to Ask For Information
You can tailor how your assistant asks for information or presents options to your user.
### Option 1: Use a Response
Click **Select or create response** and write what you'd like your assistant your assistant to say. The response name will default to `utter_ask_{slot_name}`.
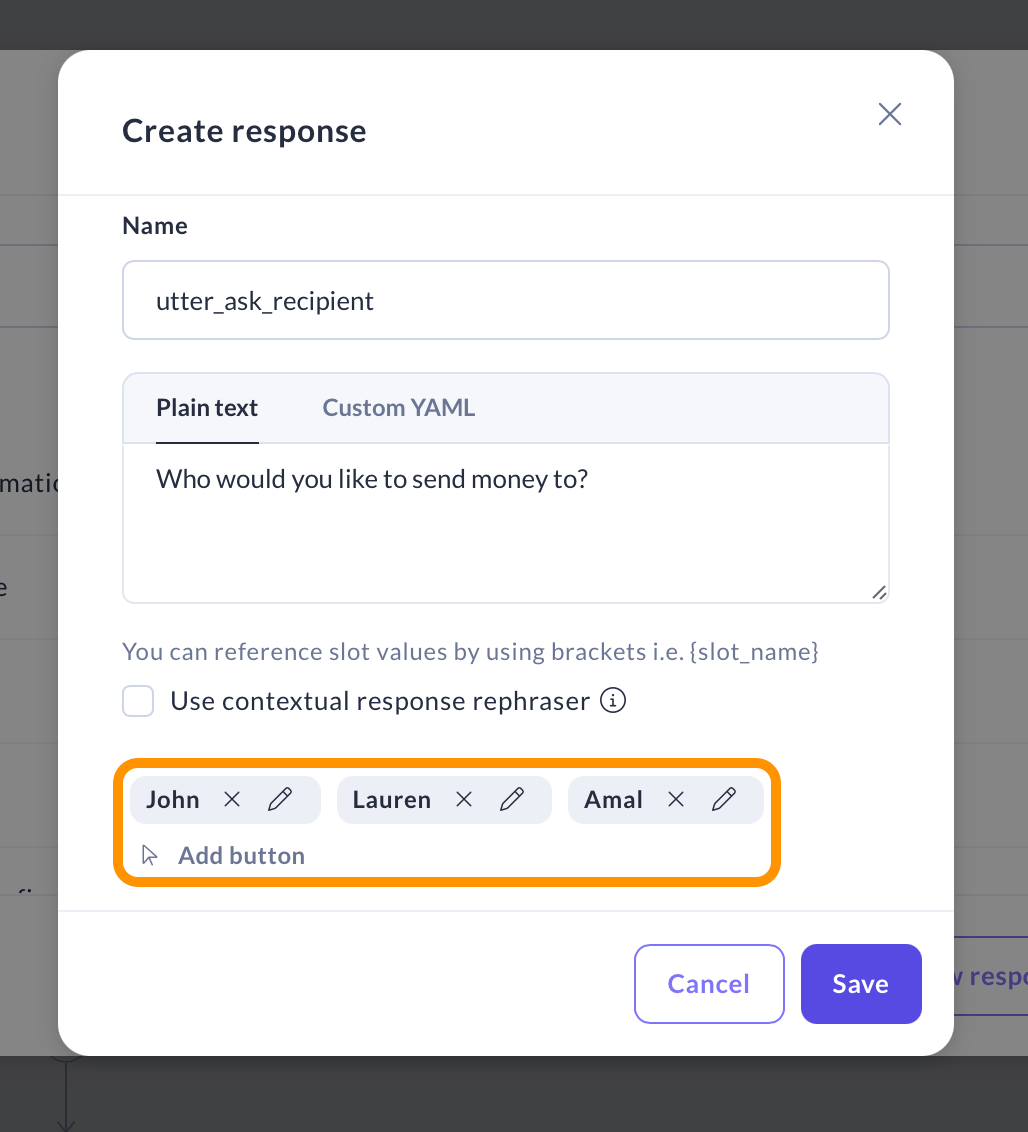
 #### Add Buttons (Optional)
Optionally, you can add buttons to allow the user to select an answer more quickly and present user with structured choices. This is particularly helpful for complex tasks or when the assistant needs specific information to proceed. [Learn more about buttons](/docs/studio/build/flow-building/collect#buttons).
#### Add Buttons (Optional)
Optionally, you can add buttons to allow the user to select an answer more quickly and present user with structured choices. This is particularly helpful for complex tasks or when the assistant needs specific information to proceed. [Learn more about buttons](/docs/studio/build/flow-building/collect#buttons).
 ### Option 2: Use a Custom Action
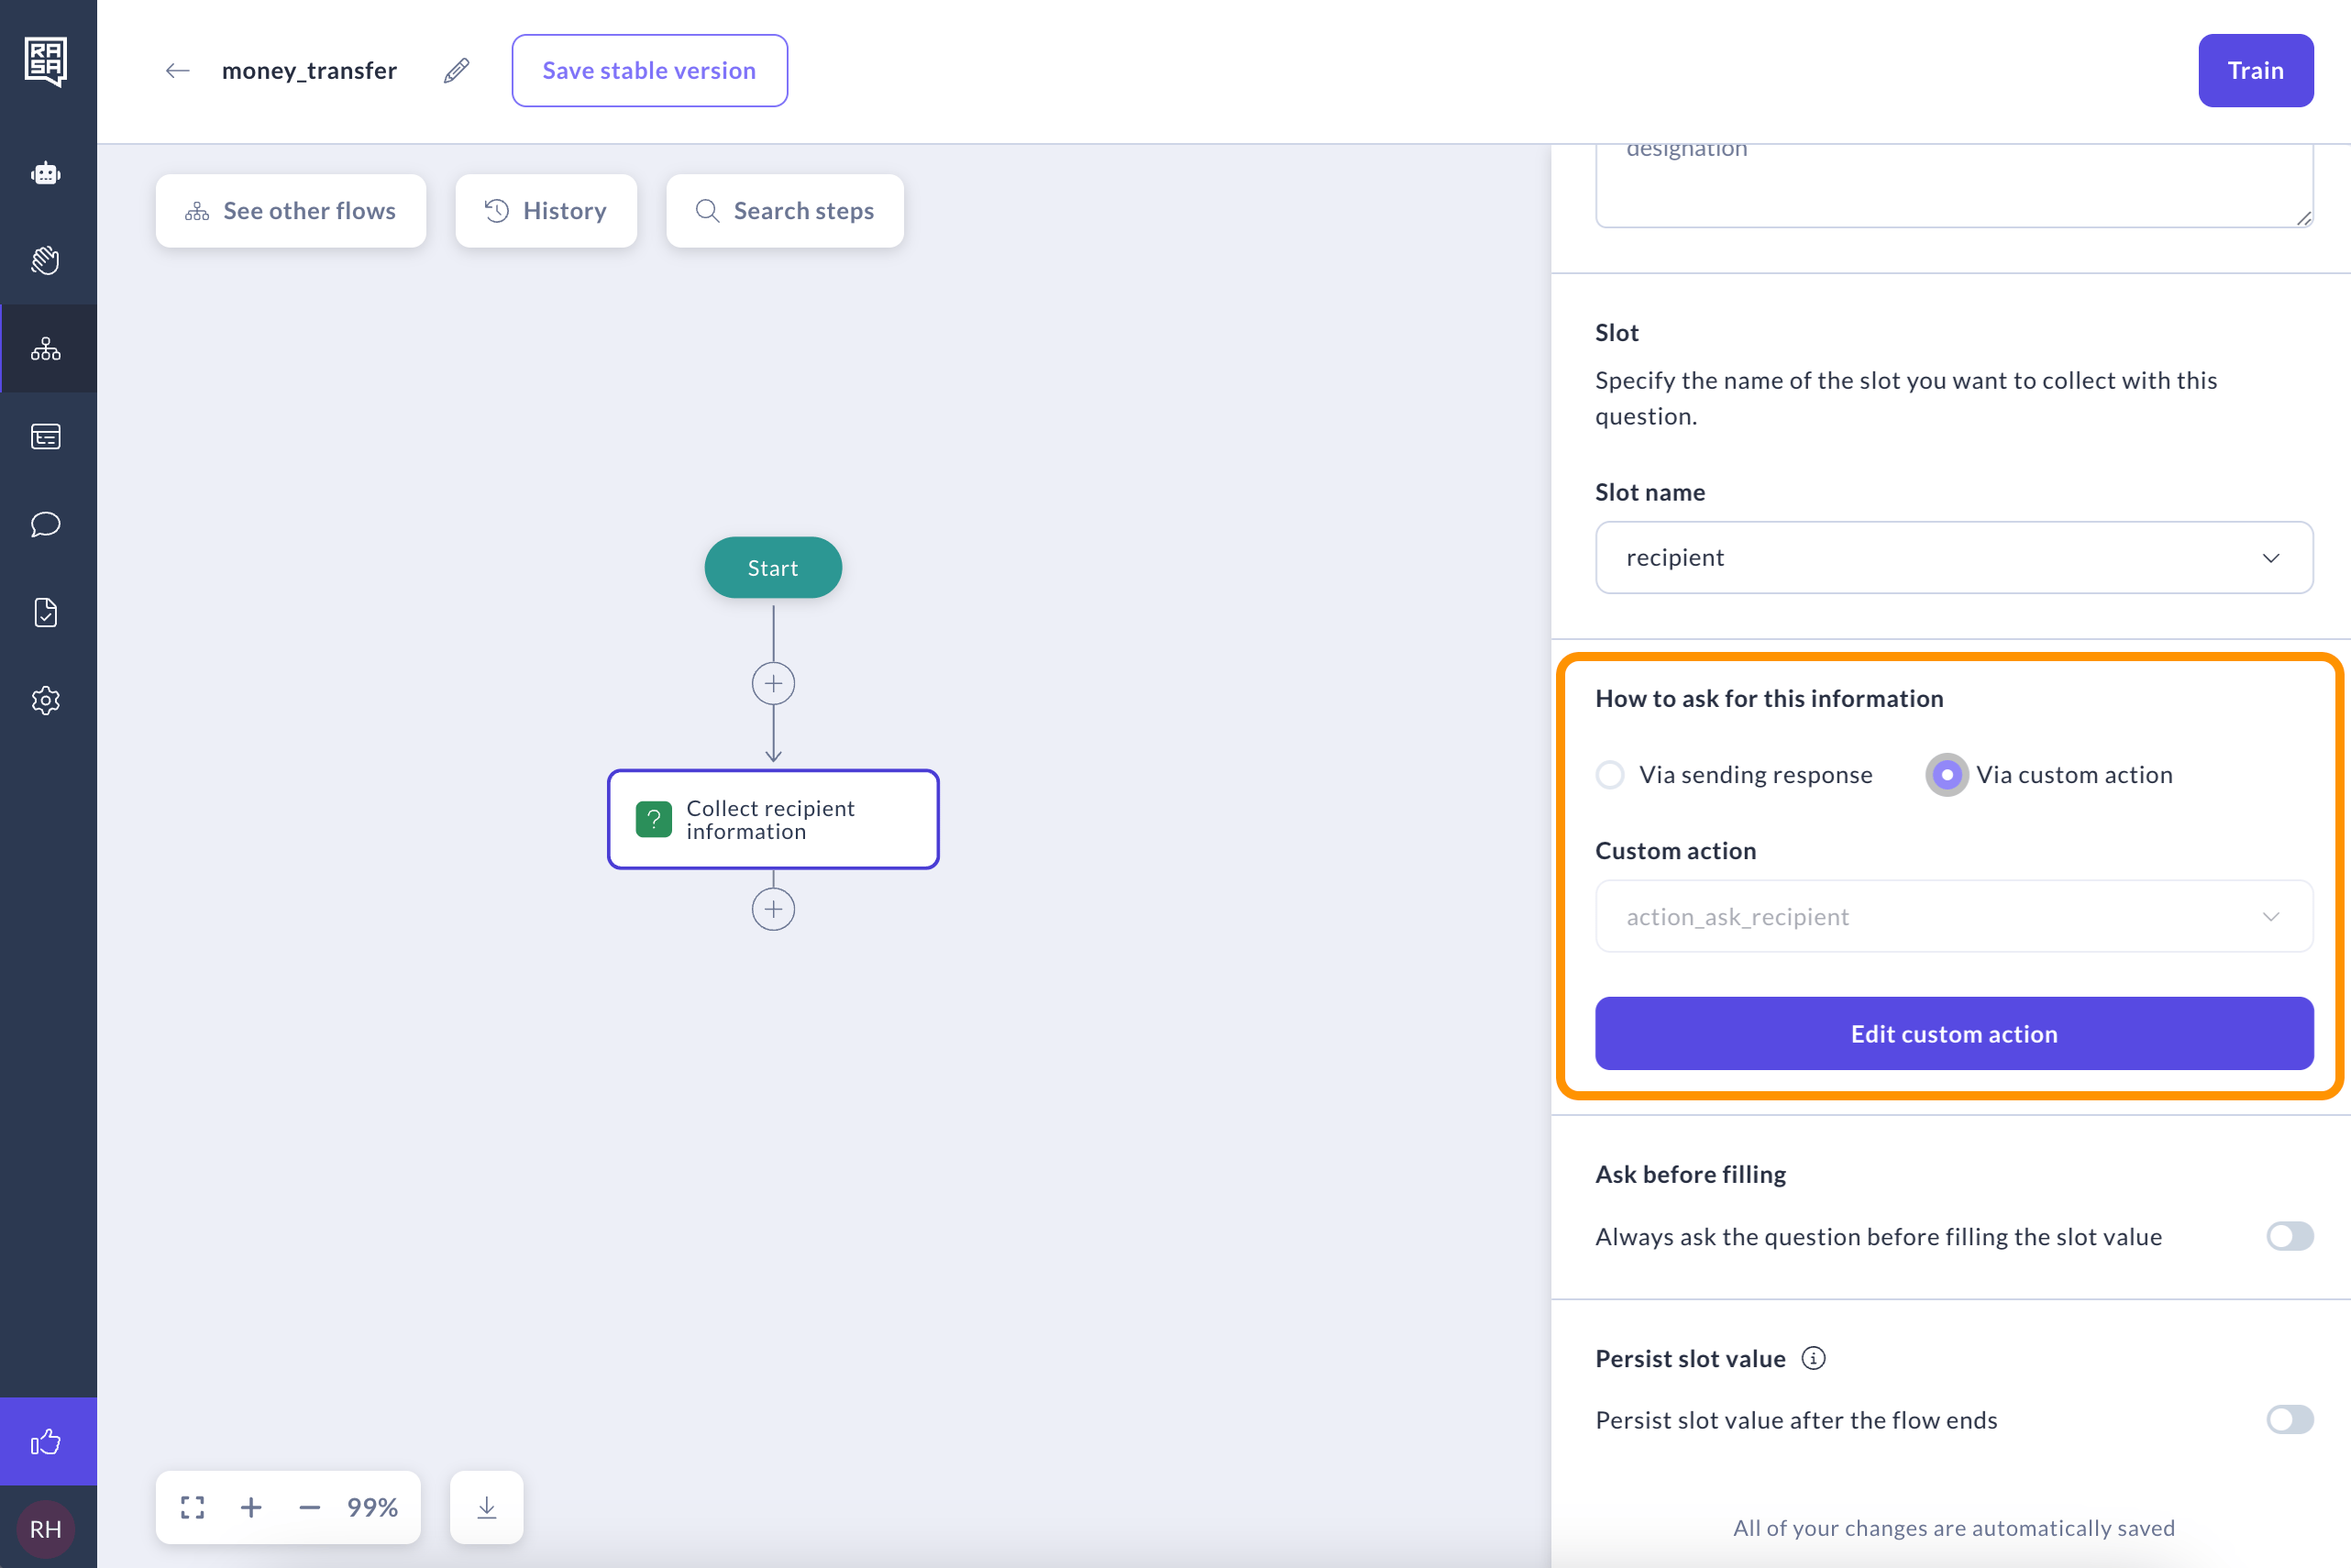
Instead of using a response for the Collect step, you can use a [custom action](/docs/studio/build/actions/create-a-custom-action#how-to-create-custom-action). This is useful if, for example, you want to display dynamic data to the user as options.
The custom action must follow a specific naming convention and be called `action_ask_{slot_name}`, which is why the name will be pre-filled. Make sure to add this custom action to your [domain file outside of Studio](/docs/studio/build/actions/create-a-custom-action).
### Option 2: Use a Custom Action
Instead of using a response for the Collect step, you can use a [custom action](/docs/studio/build/actions/create-a-custom-action#how-to-create-custom-action). This is useful if, for example, you want to display dynamic data to the user as options.
The custom action must follow a specific naming convention and be called `action_ask_{slot_name}`, which is why the name will be pre-filled. Make sure to add this custom action to your [domain file outside of Studio](/docs/studio/build/actions/create-a-custom-action).
 ## Configure Collection Rules
You can fine-tune how your assistant gathers information using the options below. These help ensure the right data is collected — and in the right way for your use case.
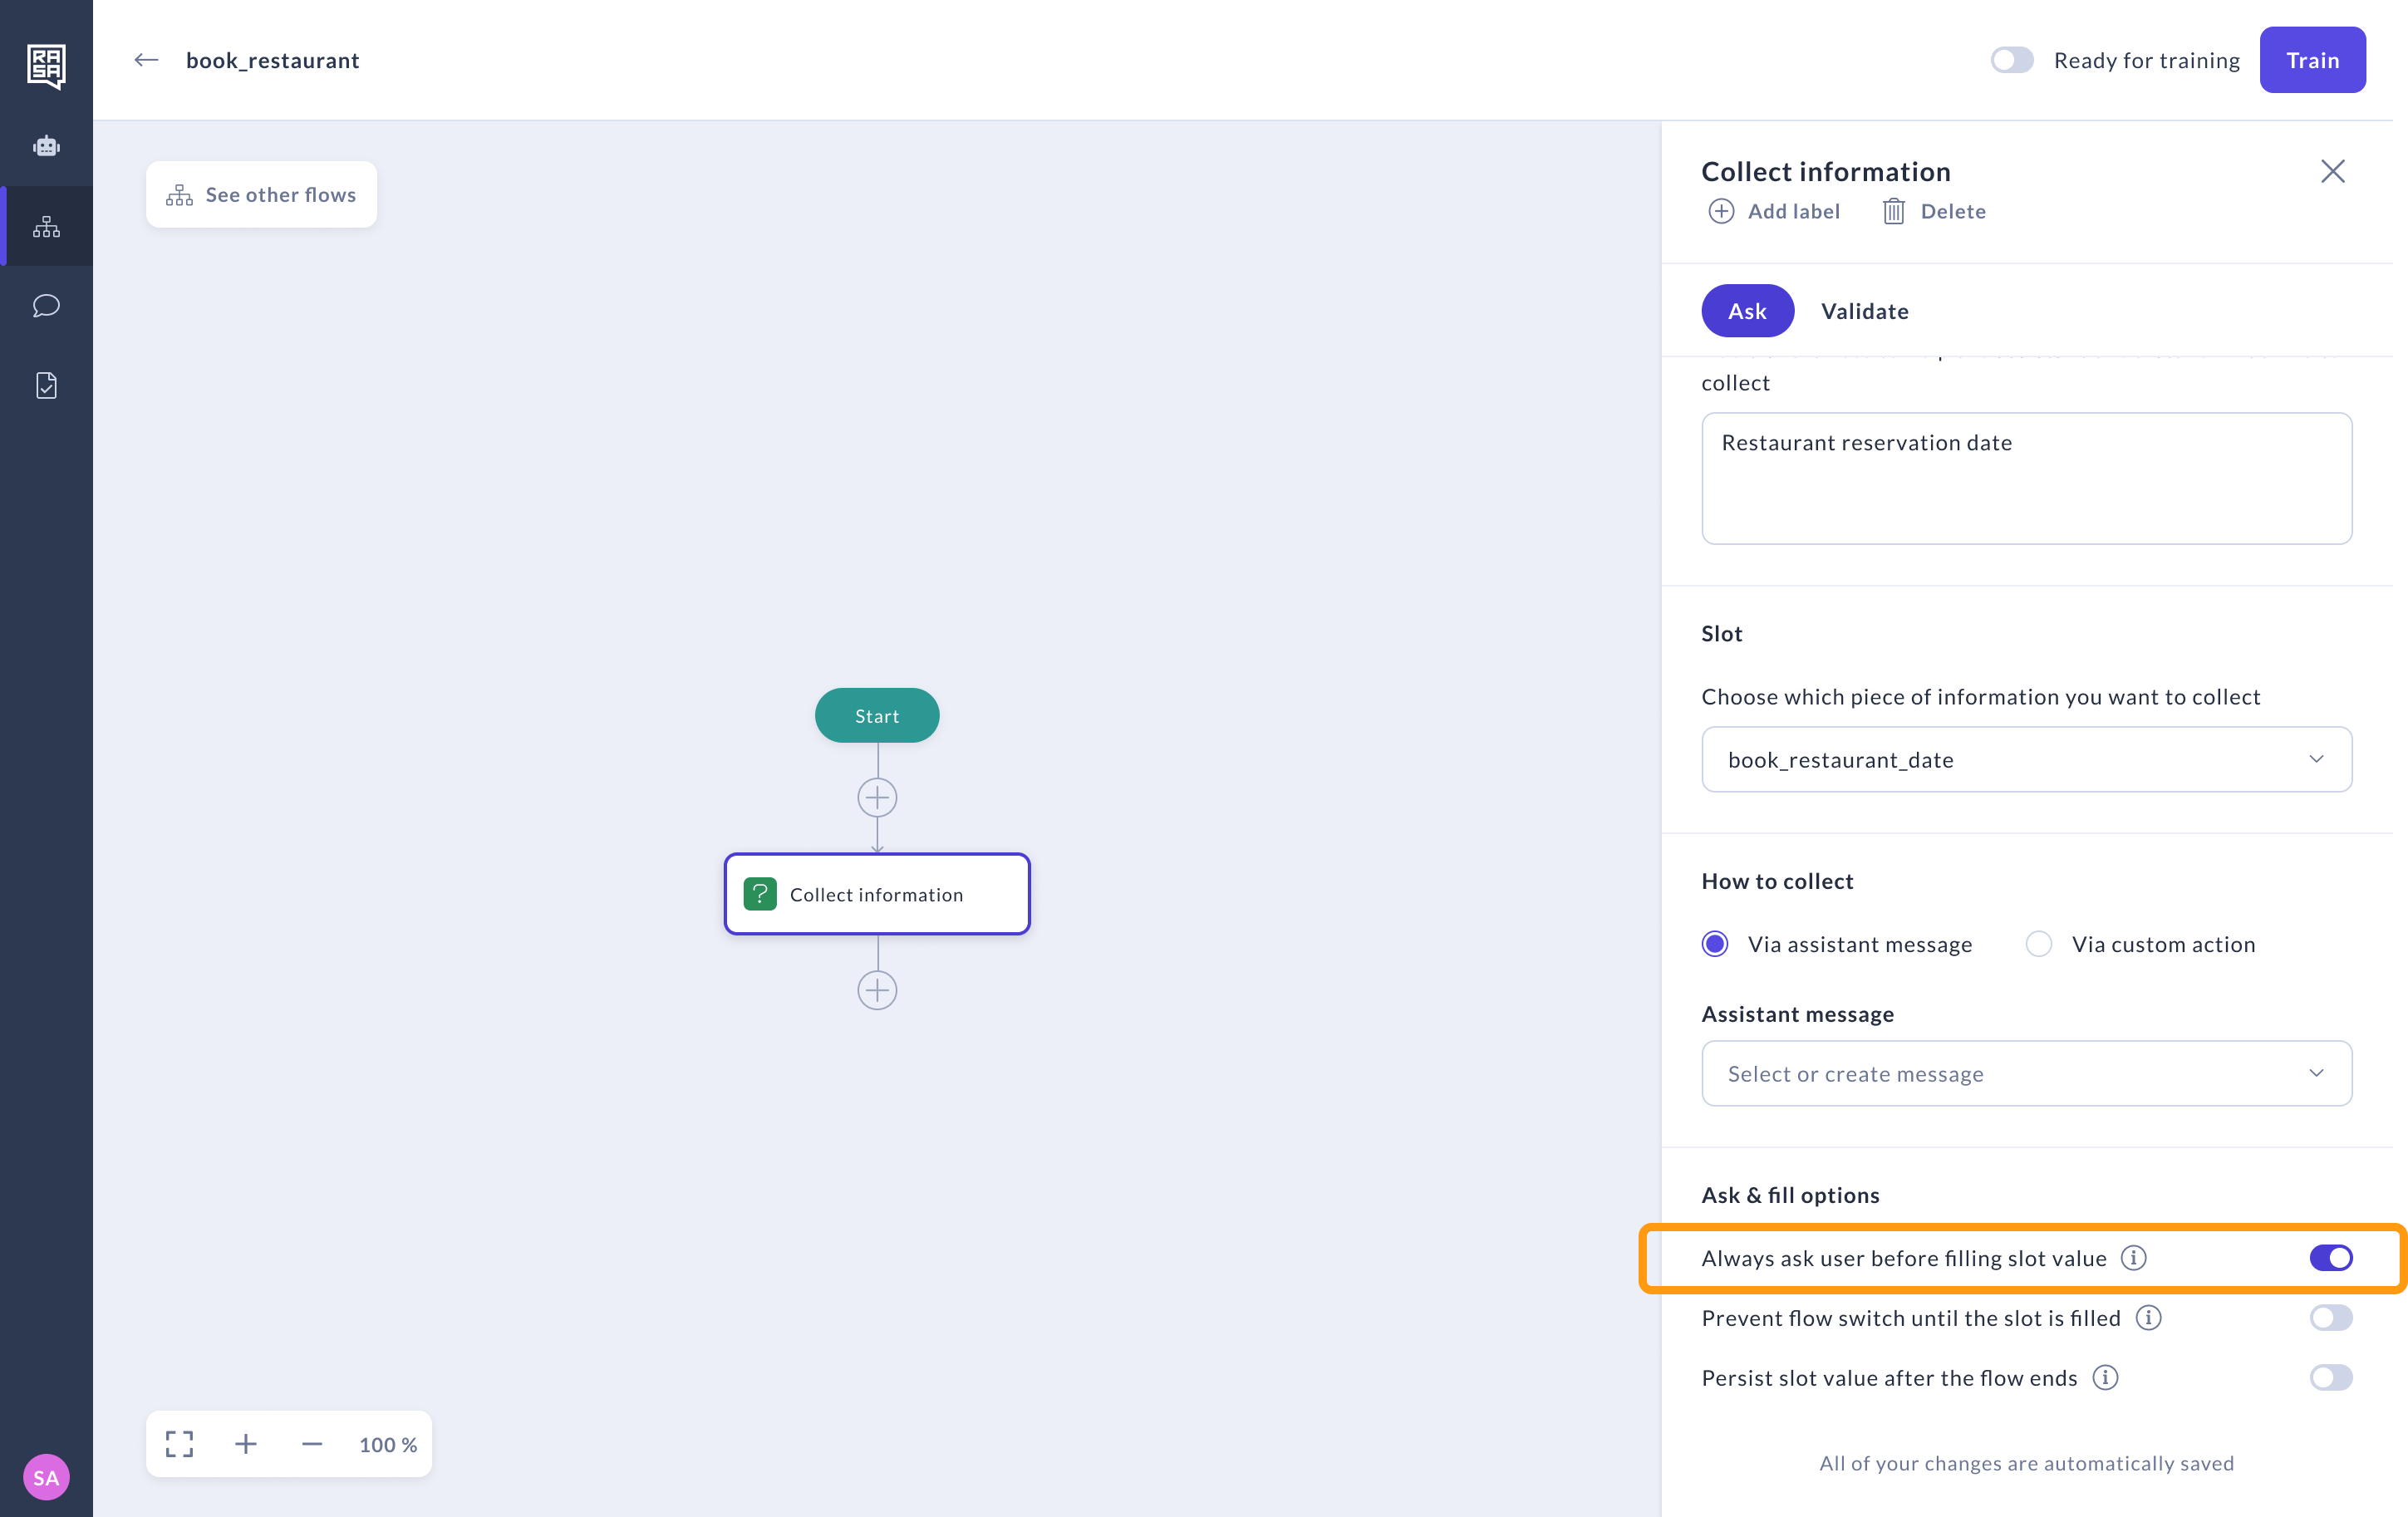
### Ask Before Filling
Normally, if a slot is already filled earlier in the conversation, the assistant won’t ask again.\
But if you want the assistant to *always* ask — even when it already has an answer — switch on **Ask before filling**.
**When to use it:**\
Useful when you want to confirm or re-collect something every time or when the value may need to be updated in the context of a flow, like a time slot for a booking.
## Configure Collection Rules
You can fine-tune how your assistant gathers information using the options below. These help ensure the right data is collected — and in the right way for your use case.
### Ask Before Filling
Normally, if a slot is already filled earlier in the conversation, the assistant won’t ask again.\
But if you want the assistant to *always* ask — even when it already has an answer — switch on **Ask before filling**.
**When to use it:**\
Useful when you want to confirm or re-collect something every time or when the value may need to be updated in the context of a flow, like a time slot for a booking.
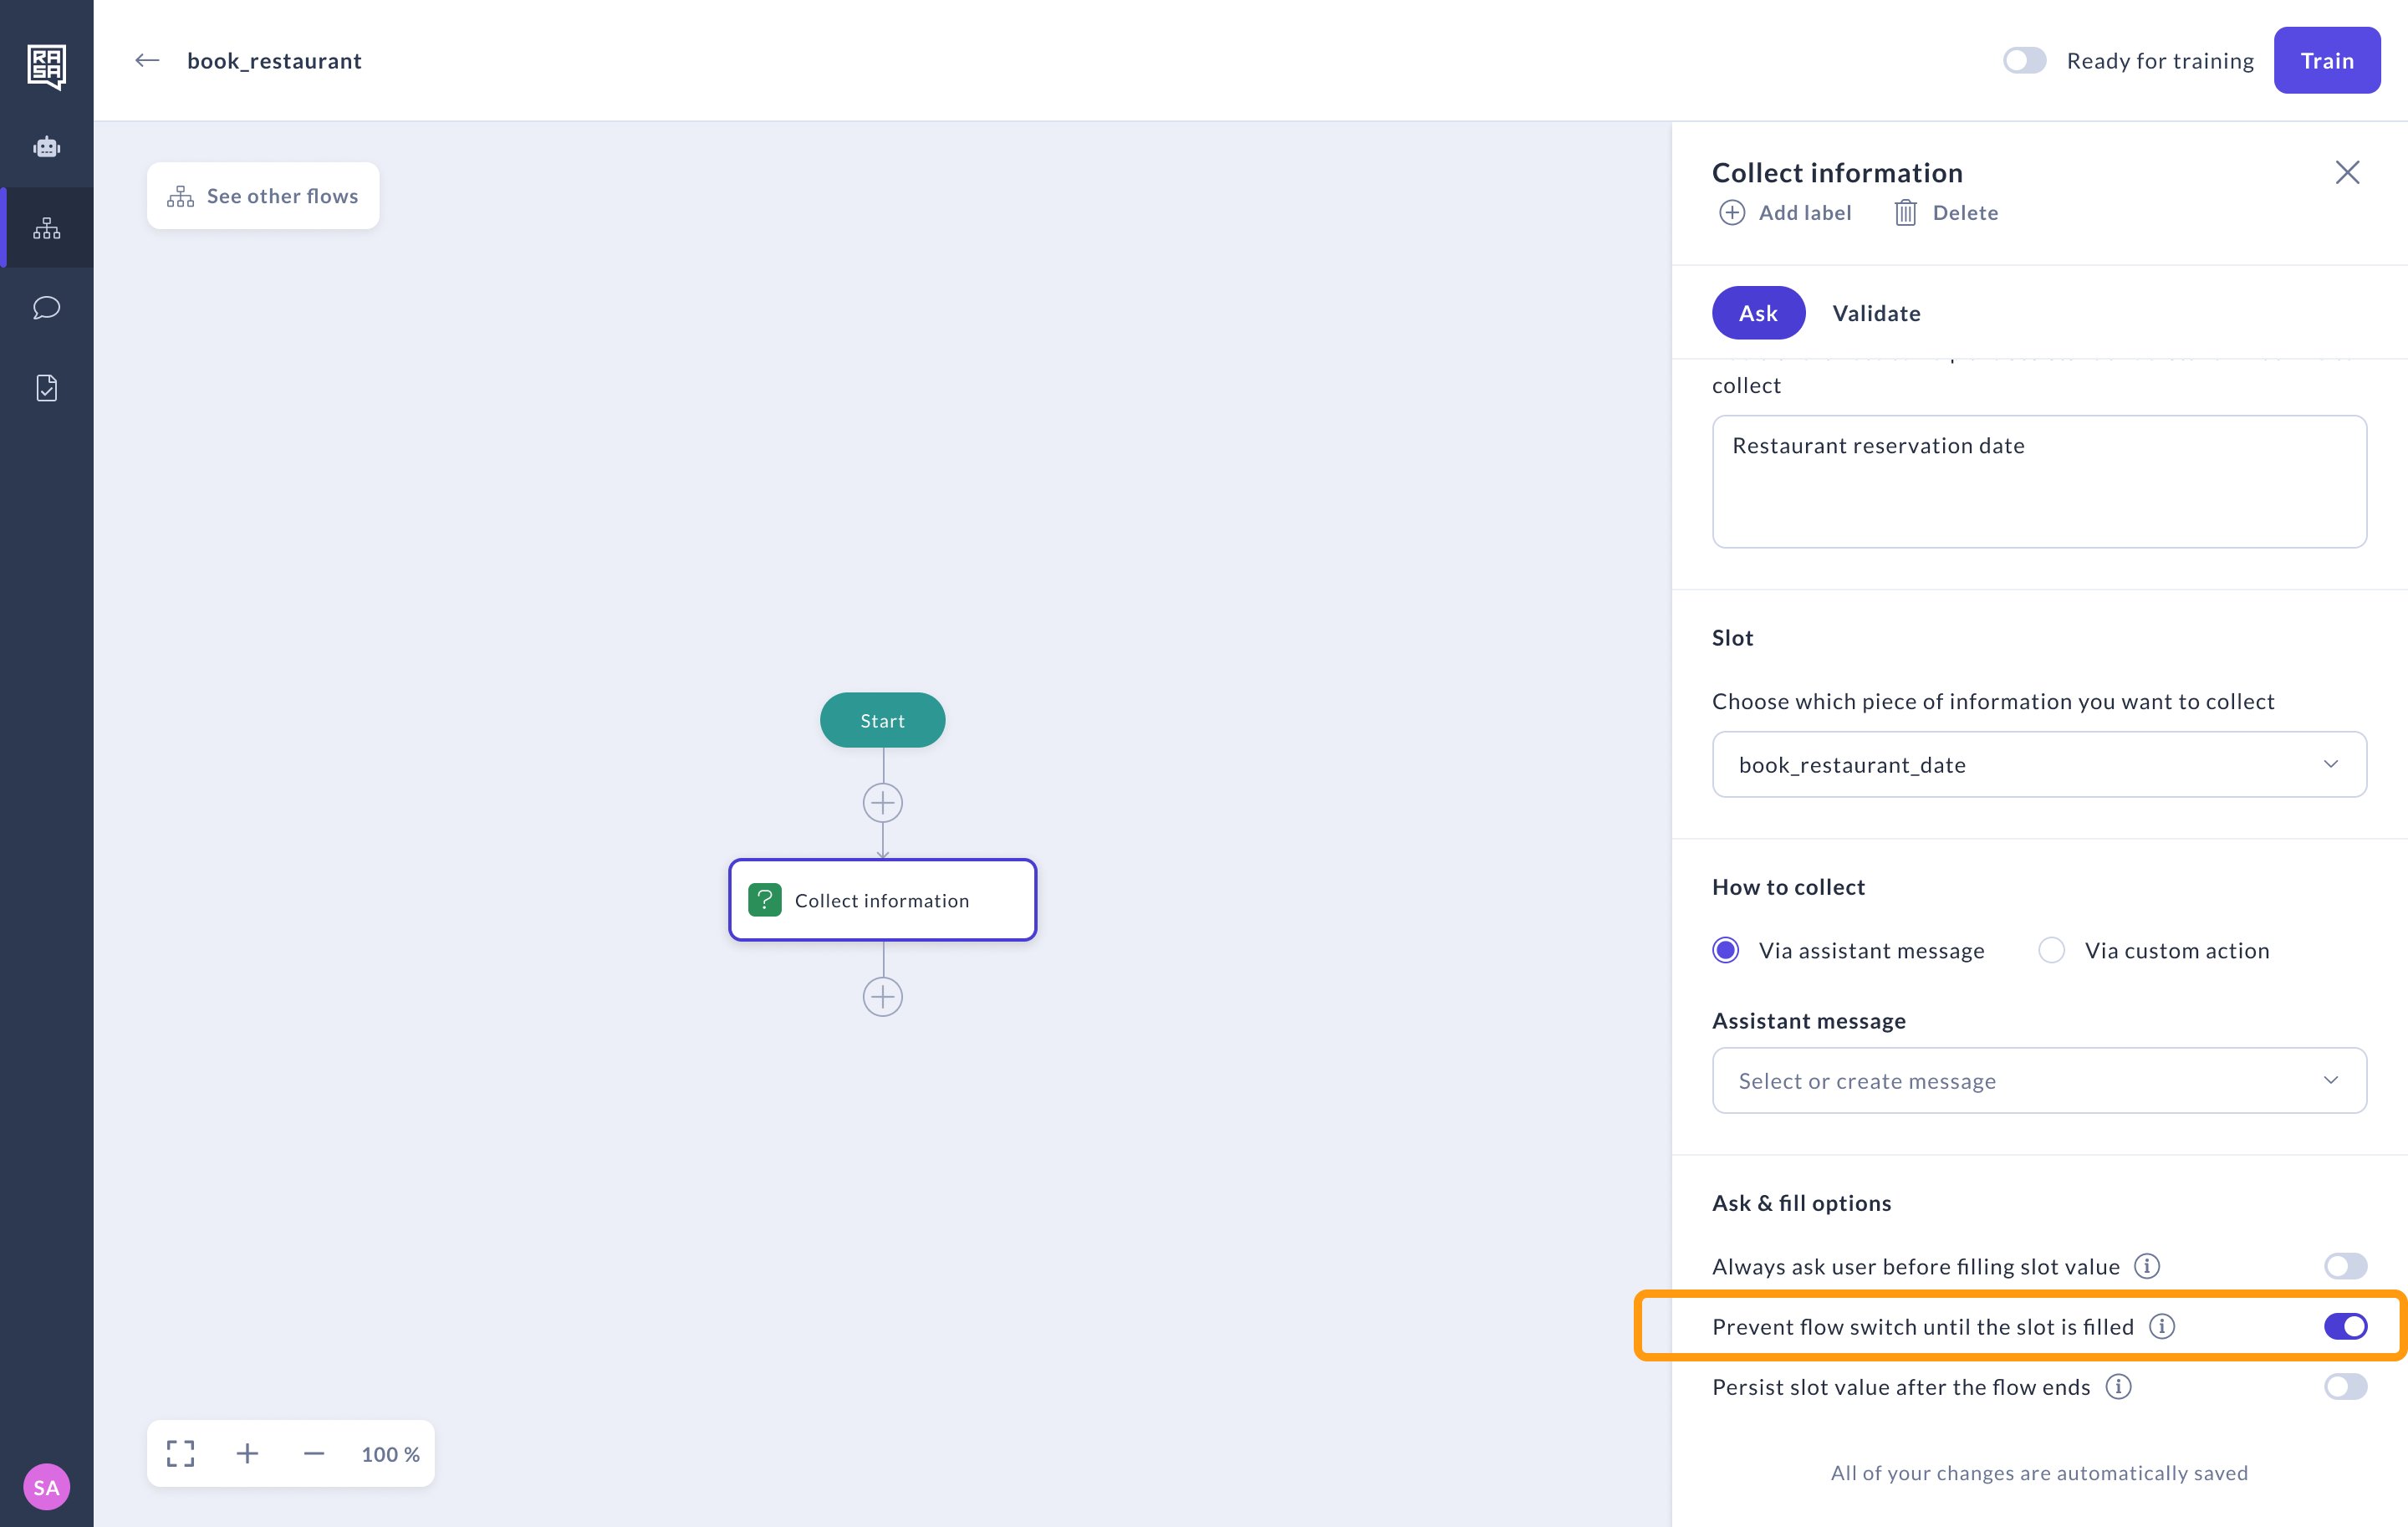
 ### Prevent Digressions
If you want to prevent users jumping topics before giving you a crucial detail, you can ensure that the assistant collects a the slot value before moving to a different flow with this feature.
**When to use it:**\
If you have some required data like an email that you need to be able to fill out a support ticket — you can use this feature to ensure your assistant doesn't digress to another topic without it.
### Prevent Digressions
If you want to prevent users jumping topics before giving you a crucial detail, you can ensure that the assistant collects a the slot value before moving to a different flow with this feature.
**When to use it:**\
If you have some required data like an email that you need to be able to fill out a support ticket — you can use this feature to ensure your assistant doesn't digress to another topic without it.
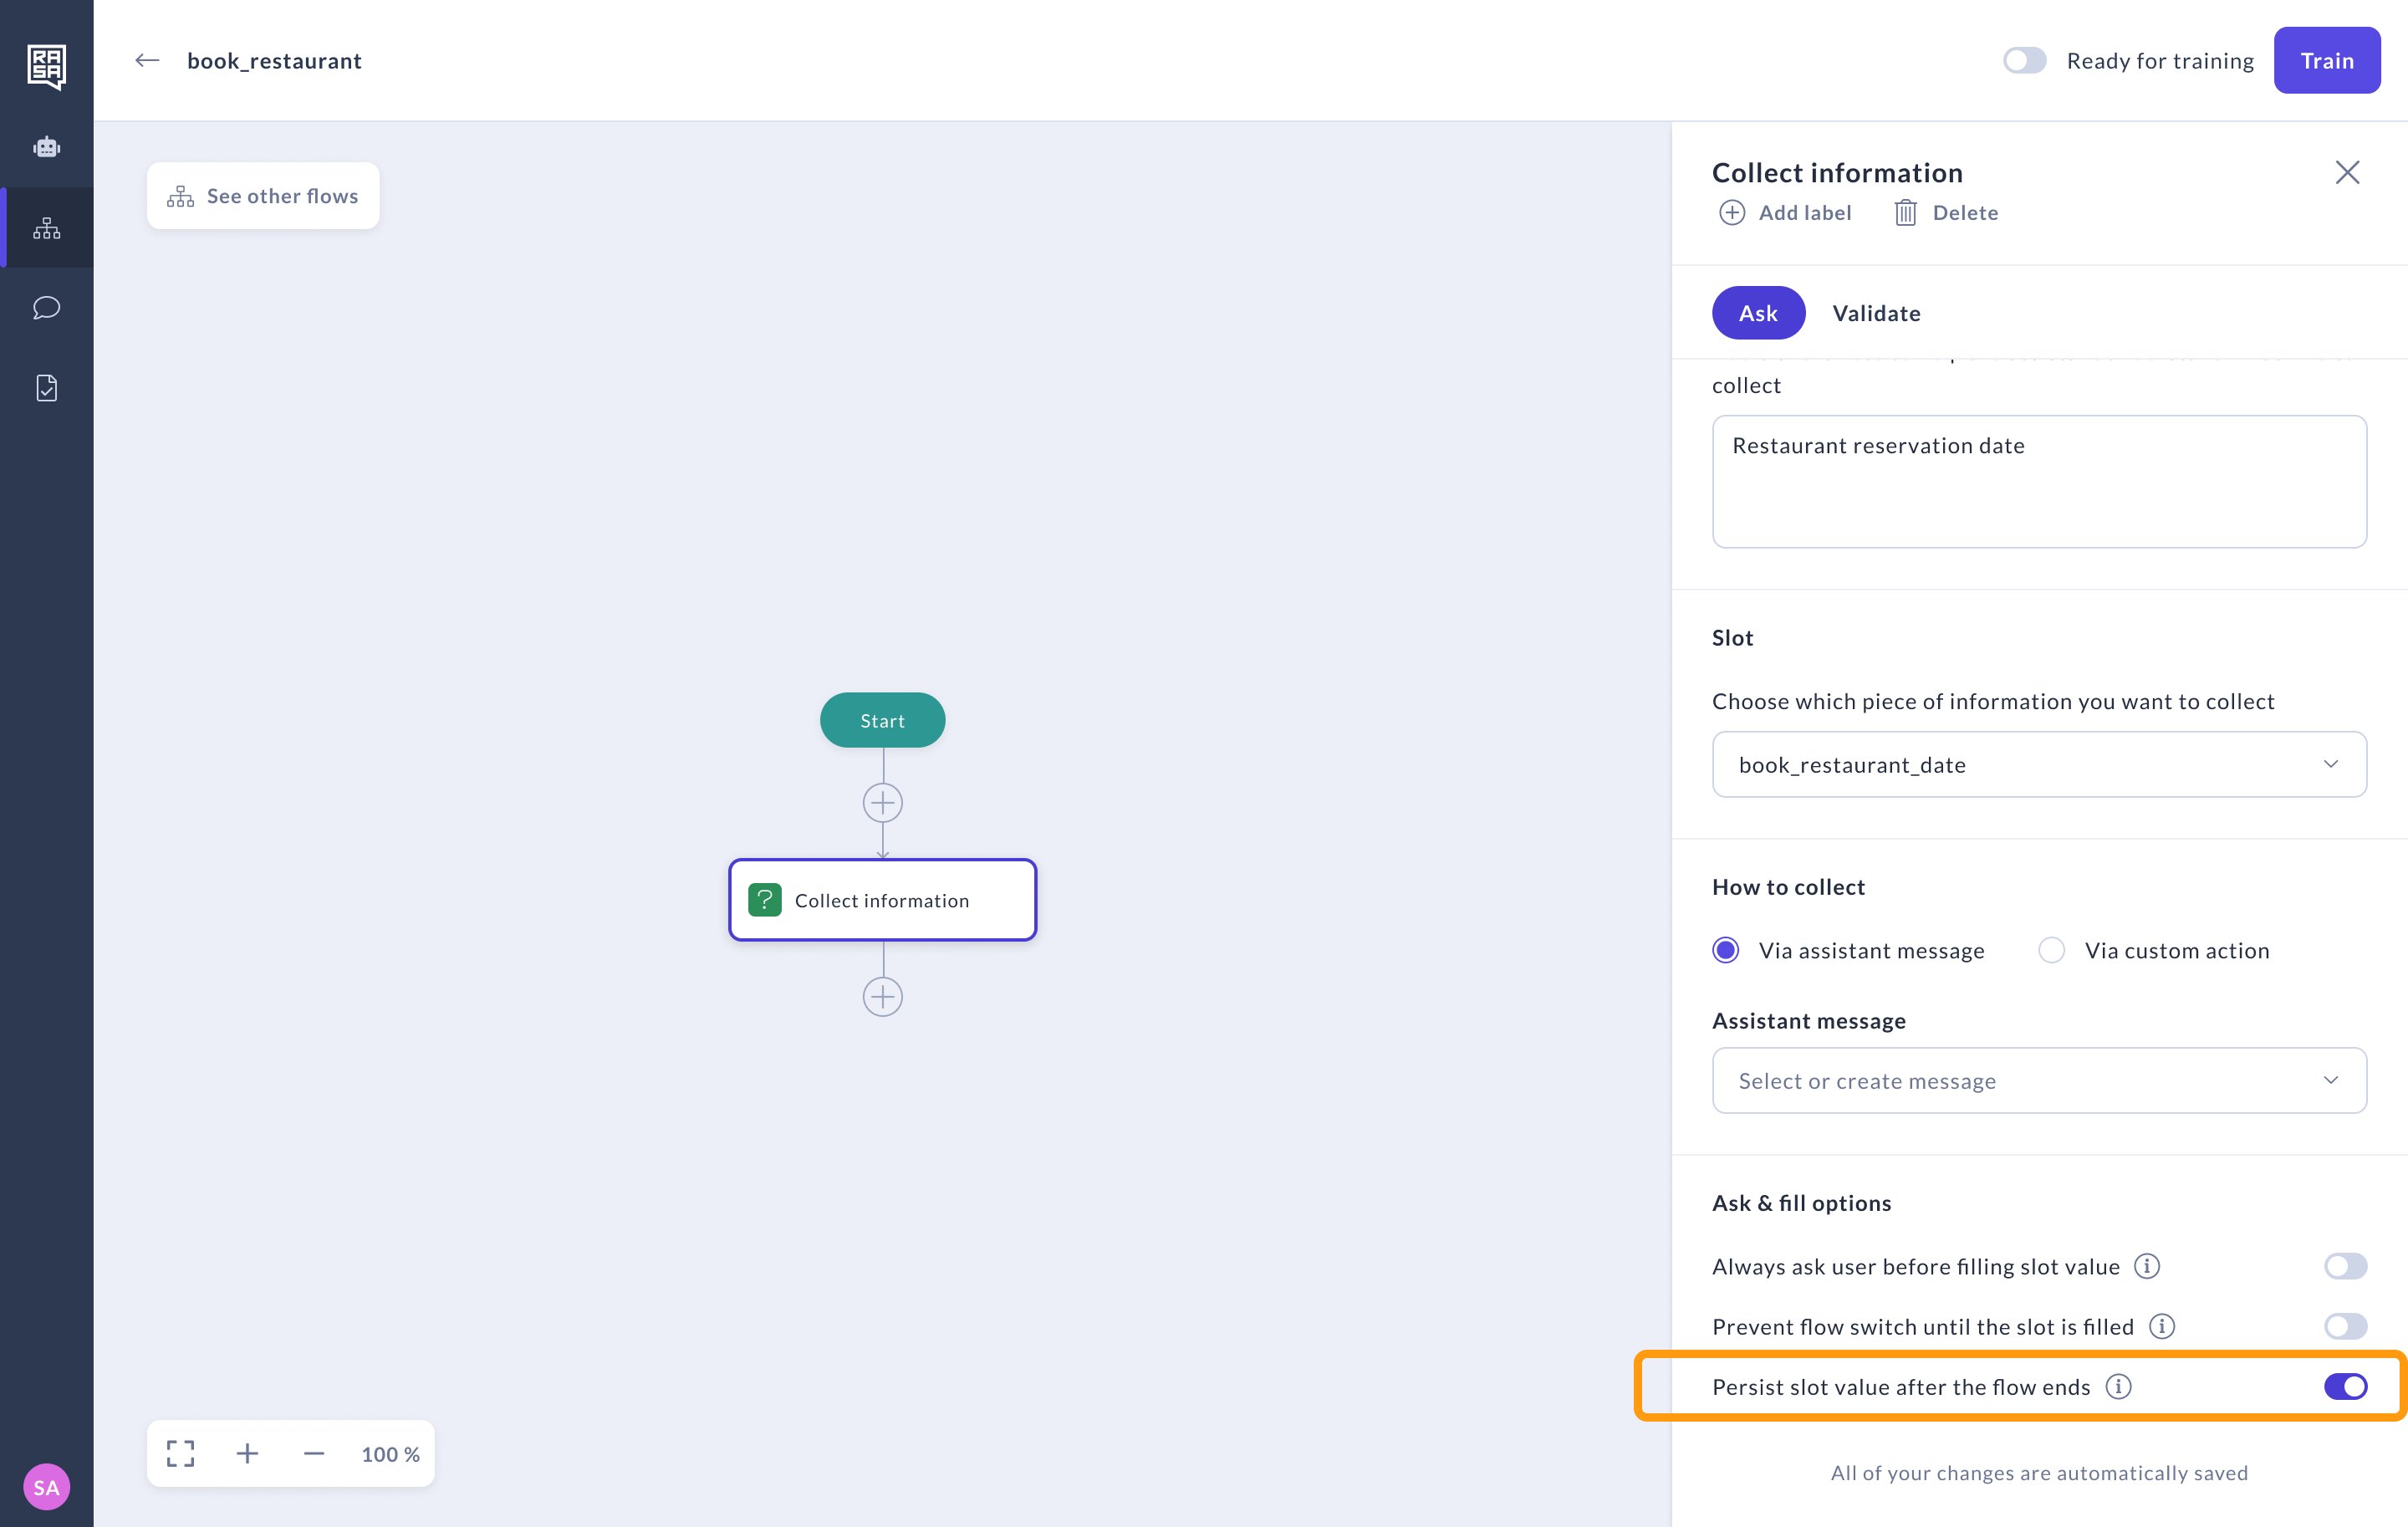
 ### Persist Slot Value
By default slots are stored in the assistant's memory during a given flow but are then reset when you change to a new topic.
Switch on **Persist slot value** to have your assistant remember the info for later use in a different flow context.
**When to use it:**\
Helpful for things like remembering a user's preferences across a full conversation.
### Persist Slot Value
By default slots are stored in the assistant's memory during a given flow but are then reset when you change to a new topic.
Switch on **Persist slot value** to have your assistant remember the info for later use in a different flow context.
**When to use it:**\
Helpful for things like remembering a user's preferences across a full conversation.
 ### Silcence handling
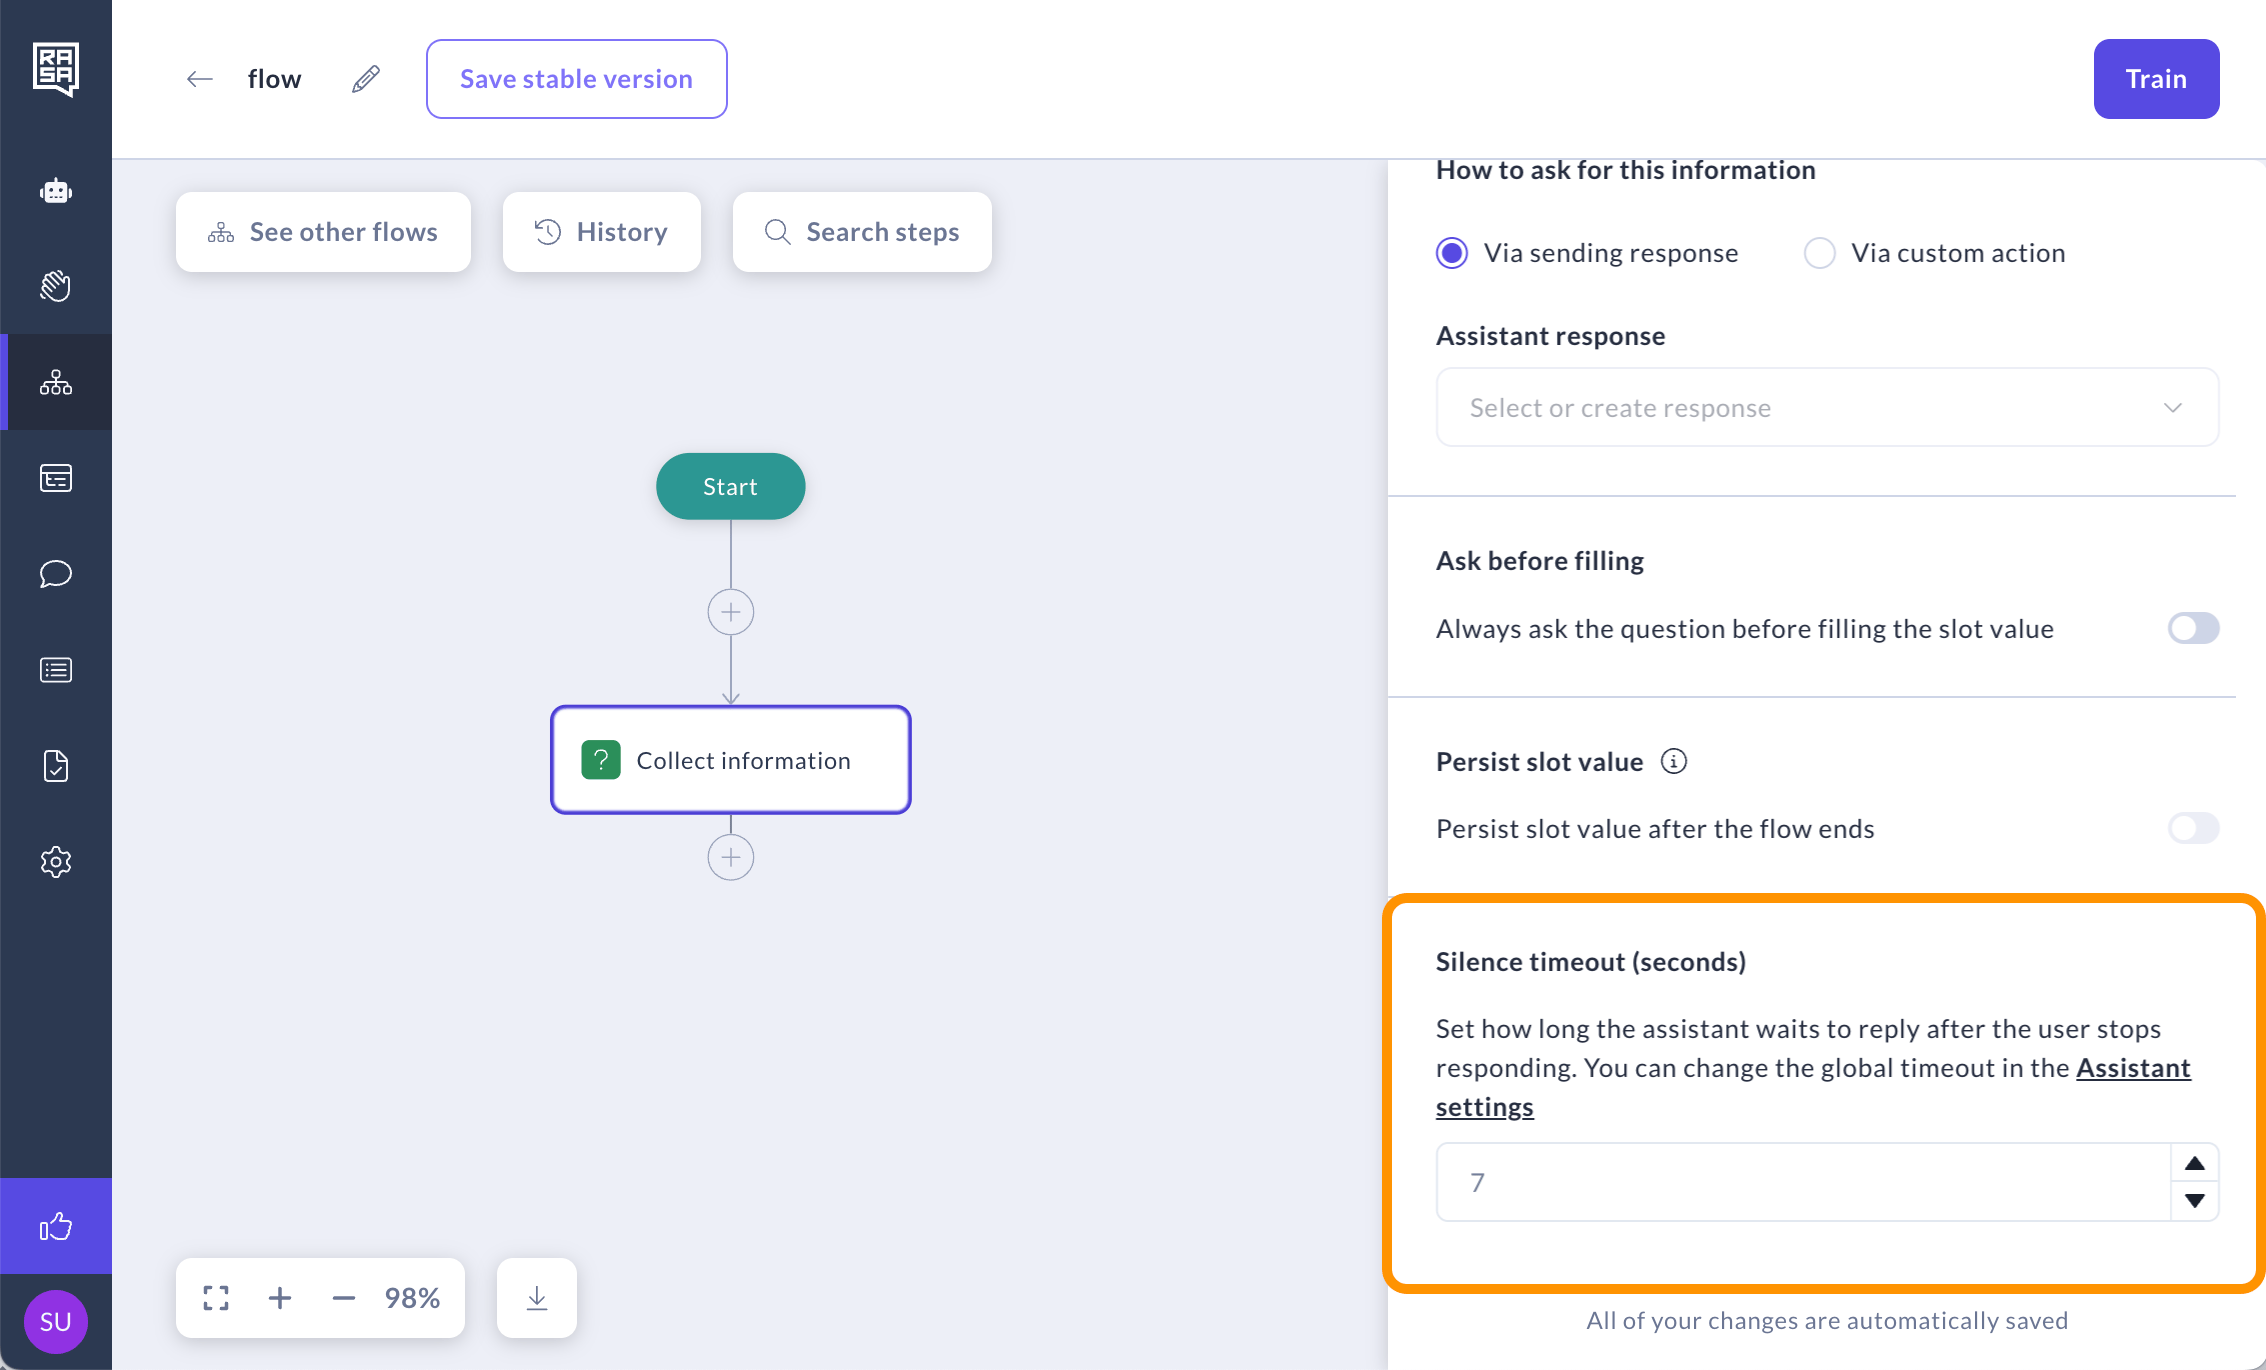
If your Rasa license includes voice, you’ll see the **Silence handling** option. It sets how long the assistant waits during voice interactions before repeating the question and checking if the user is still there. You can define a global timeout in Assistant settings or override it per Collect step for questions that may need more response time.
### Silcence handling
If your Rasa license includes voice, you’ll see the **Silence handling** option. It sets how long the assistant waits during voice interactions before repeating the question and checking if the user is still there. You can define a global timeout in Assistant settings or override it per Collect step for questions that may need more response time.
 ## Validate
Validation is optional but sometimes you may want to validate a slot to ensure the user has provided the correct information before proceeding to the next step in the dialogue.
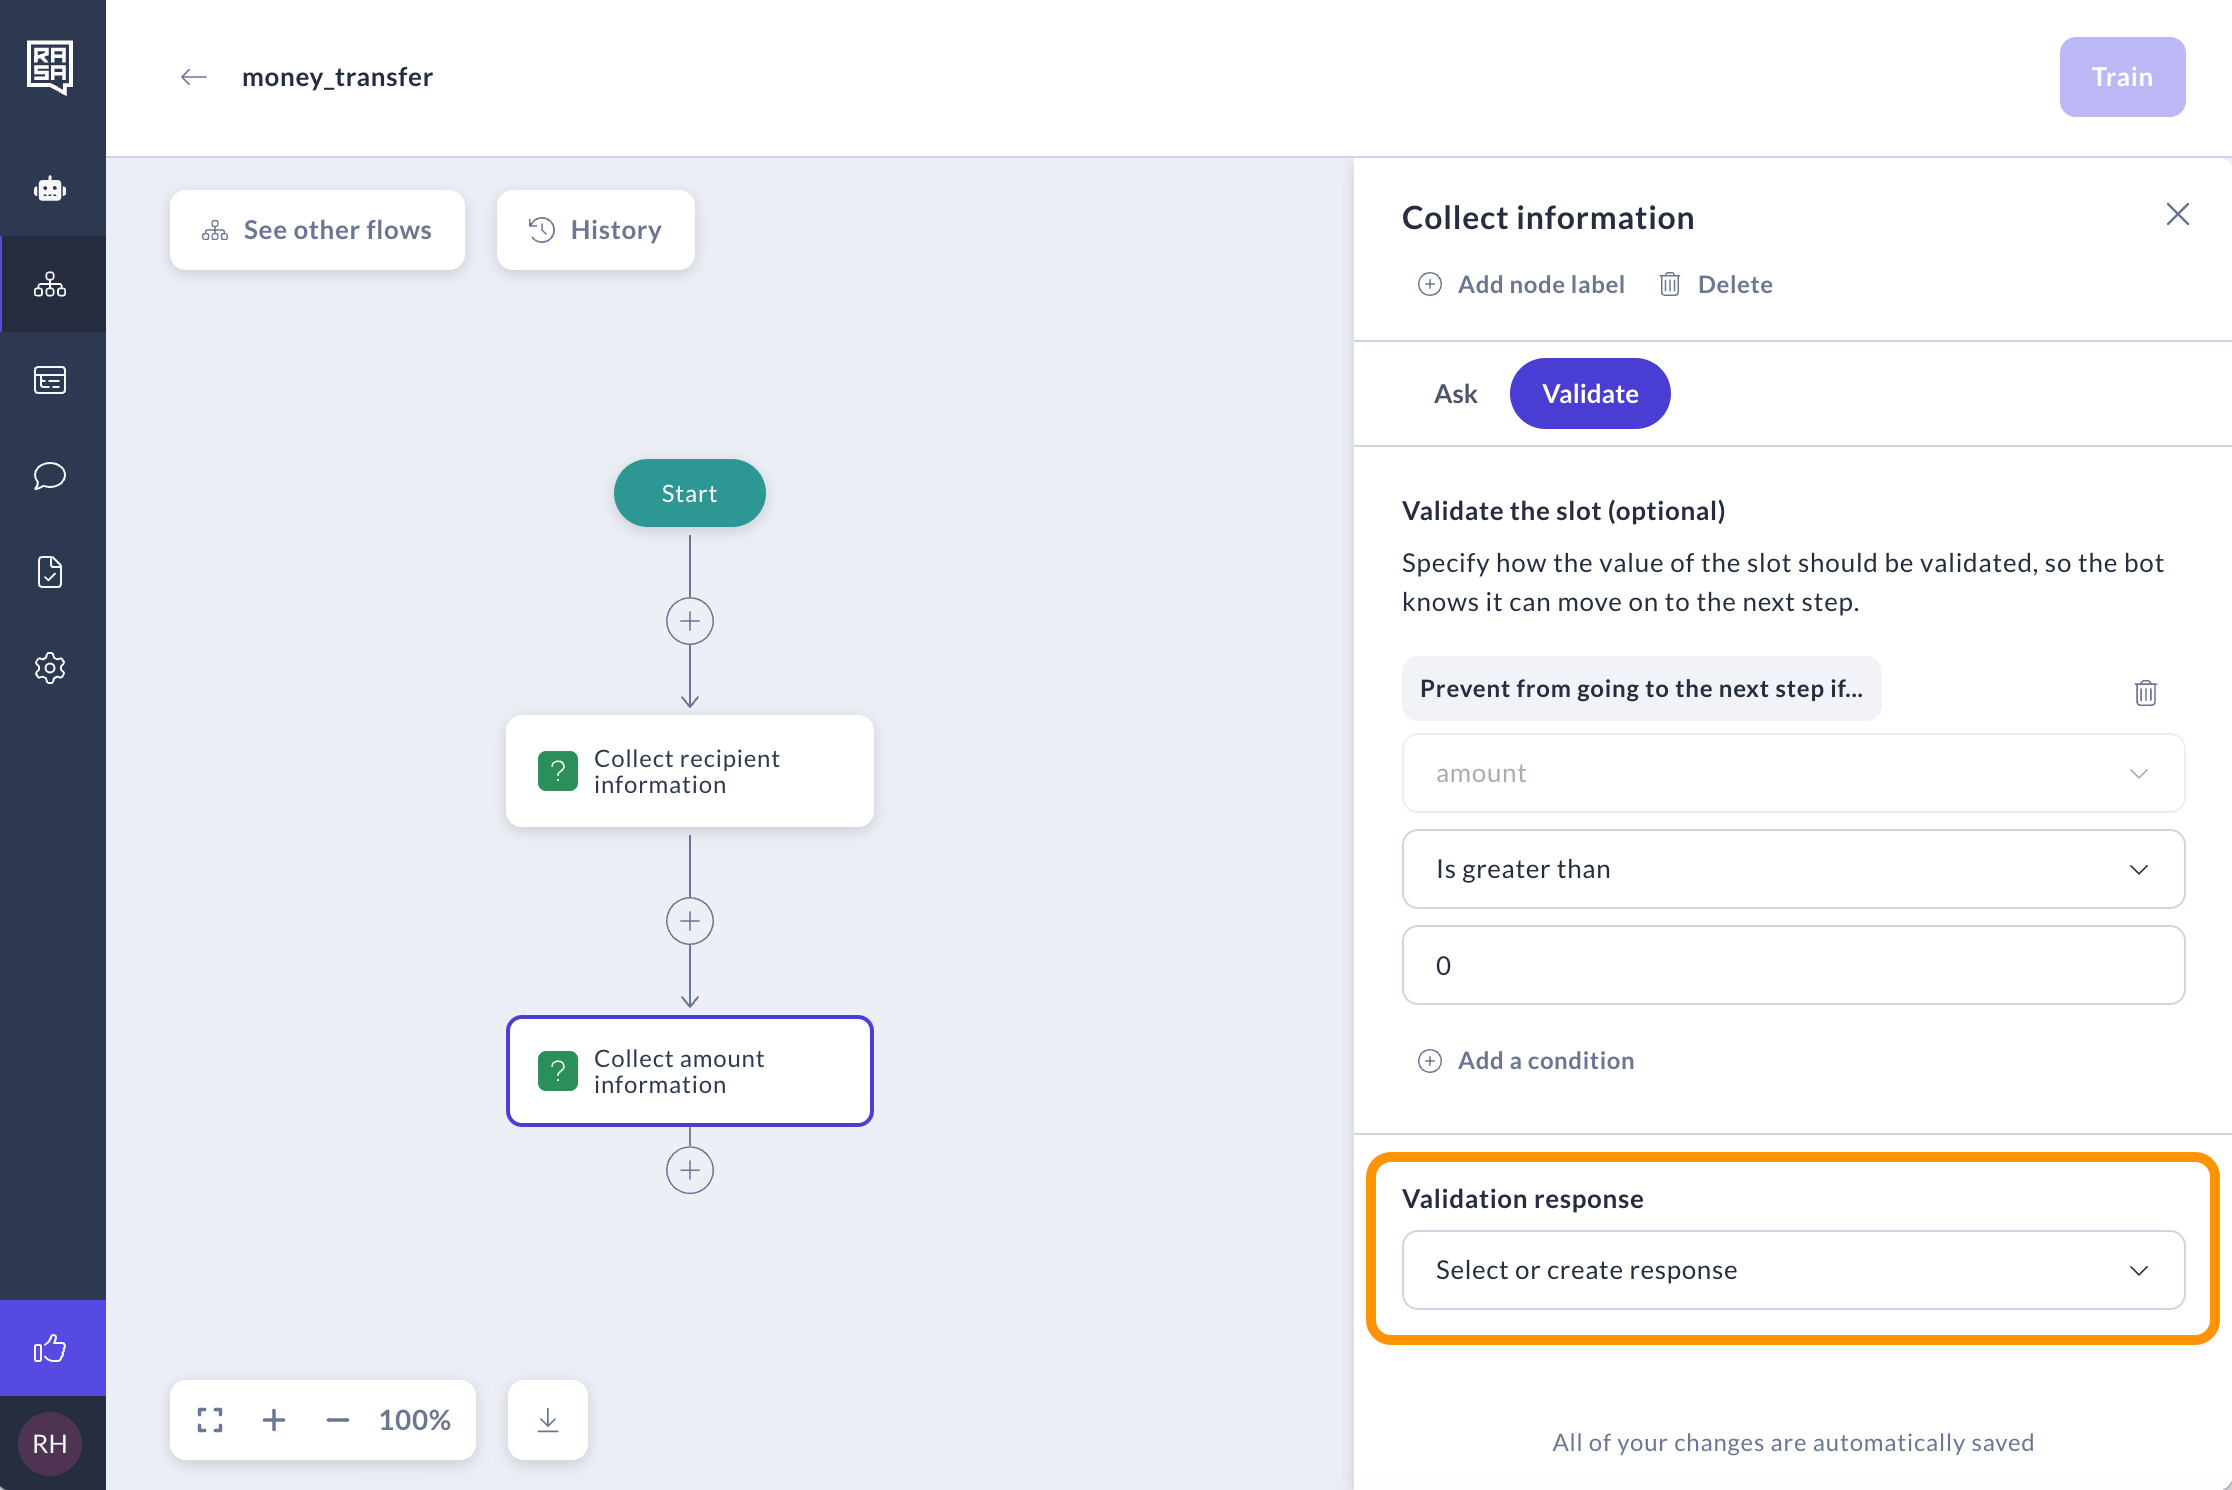
1. To do this, go to the **Validate** tab of **Collect information** step.
## Validate
Validation is optional but sometimes you may want to validate a slot to ensure the user has provided the correct information before proceeding to the next step in the dialogue.
1. To do this, go to the **Validate** tab of **Collect information** step.
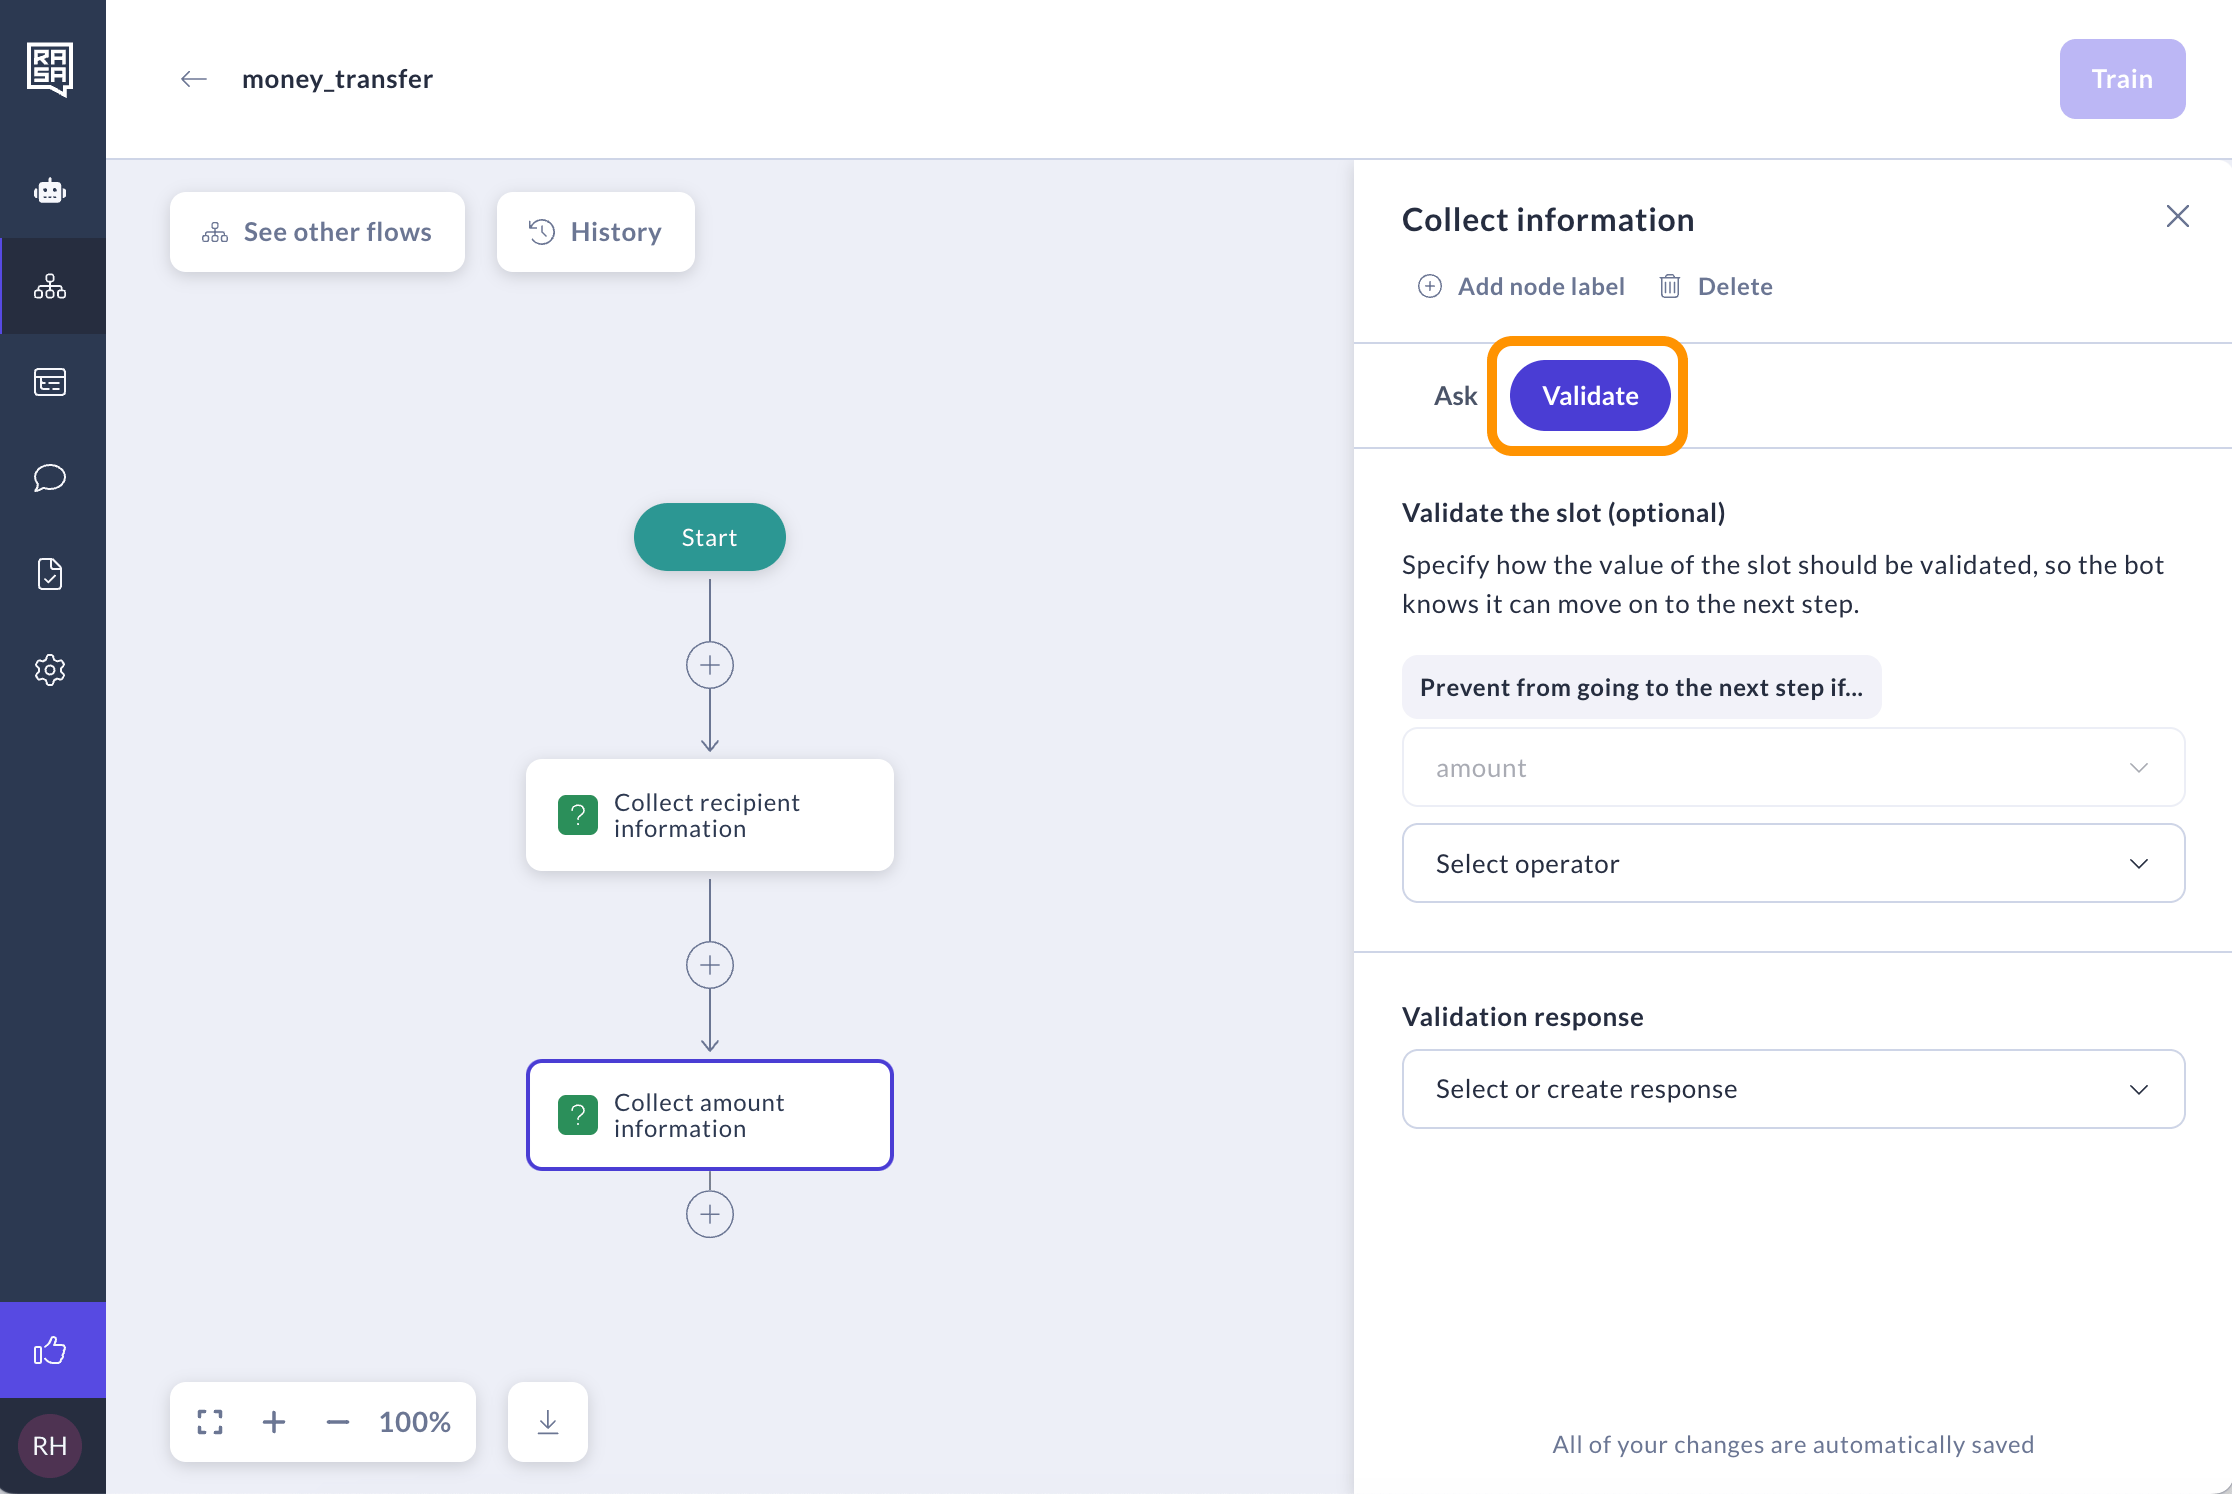 2. Prevent user from going to the next step if certain conditions are not met.
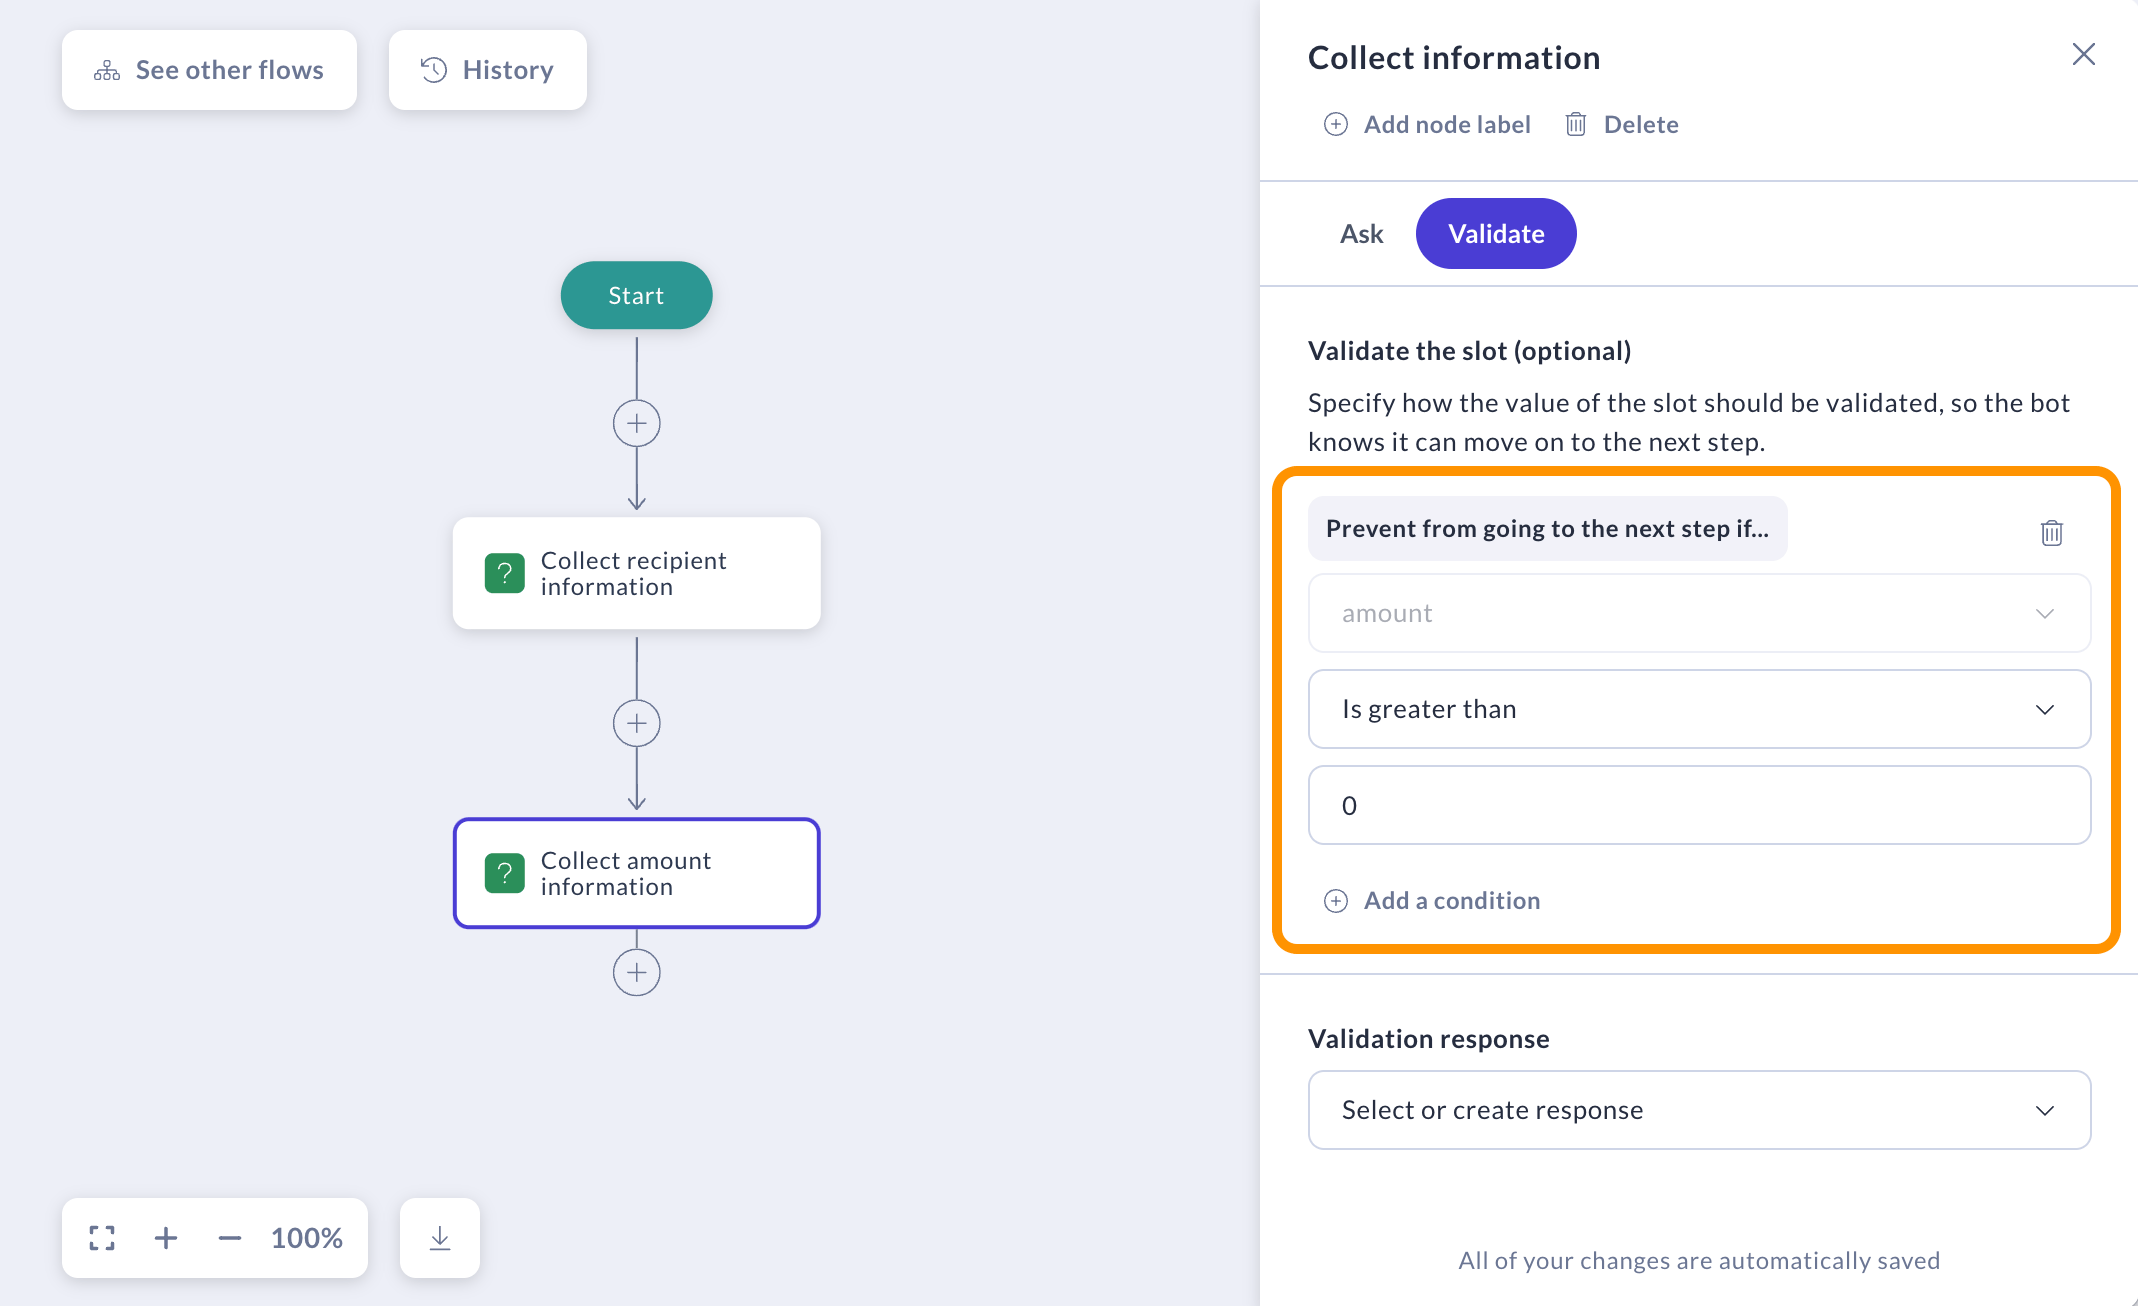 3. Click **Select or create response**. If the user's answer deviates from these values, a validation response will be displayed to them.
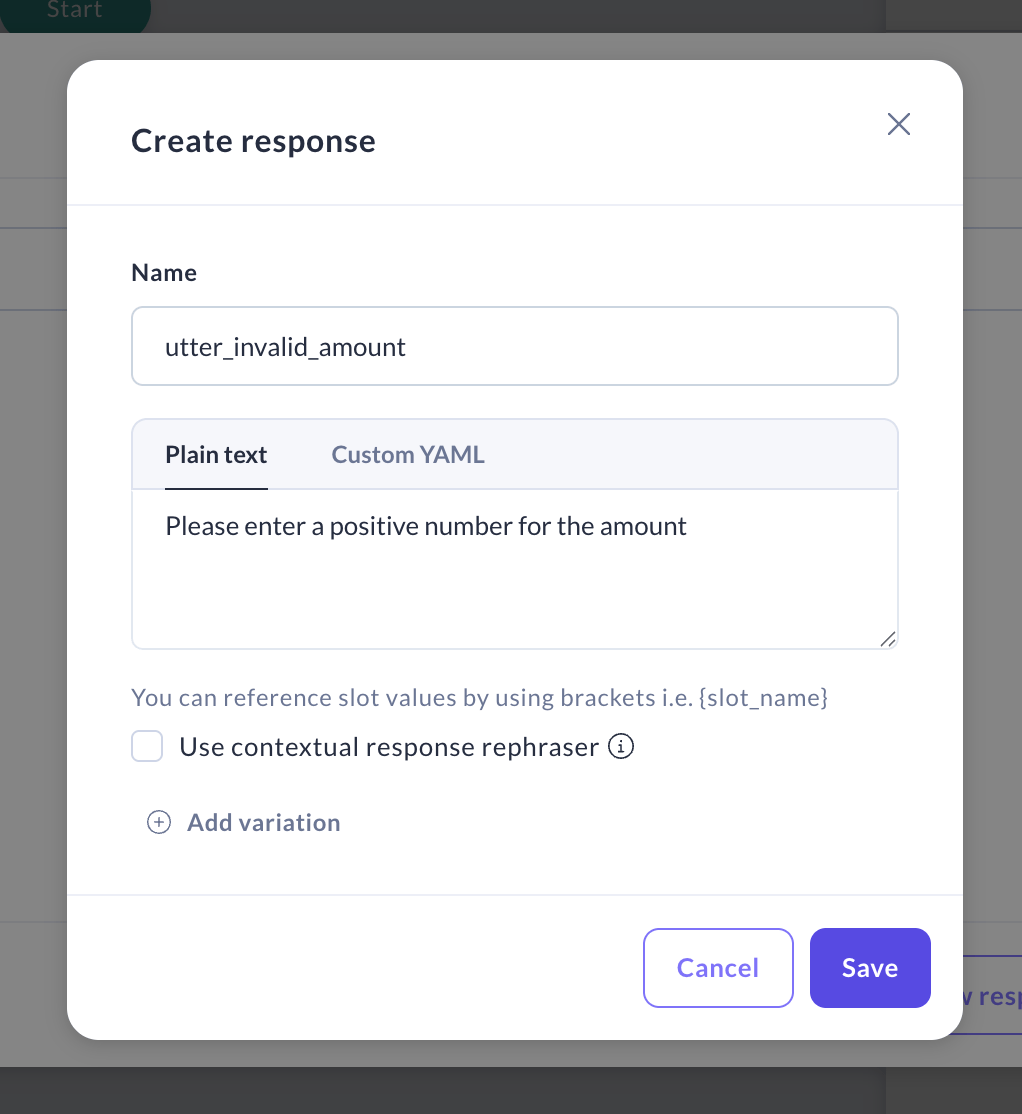
 4. Select **Create new response**.
5. In the modal that appears, specify the text for the response, and then click "Save."
4. Select **Create new response**.
5. In the modal that appears, specify the text for the response, and then click "Save."
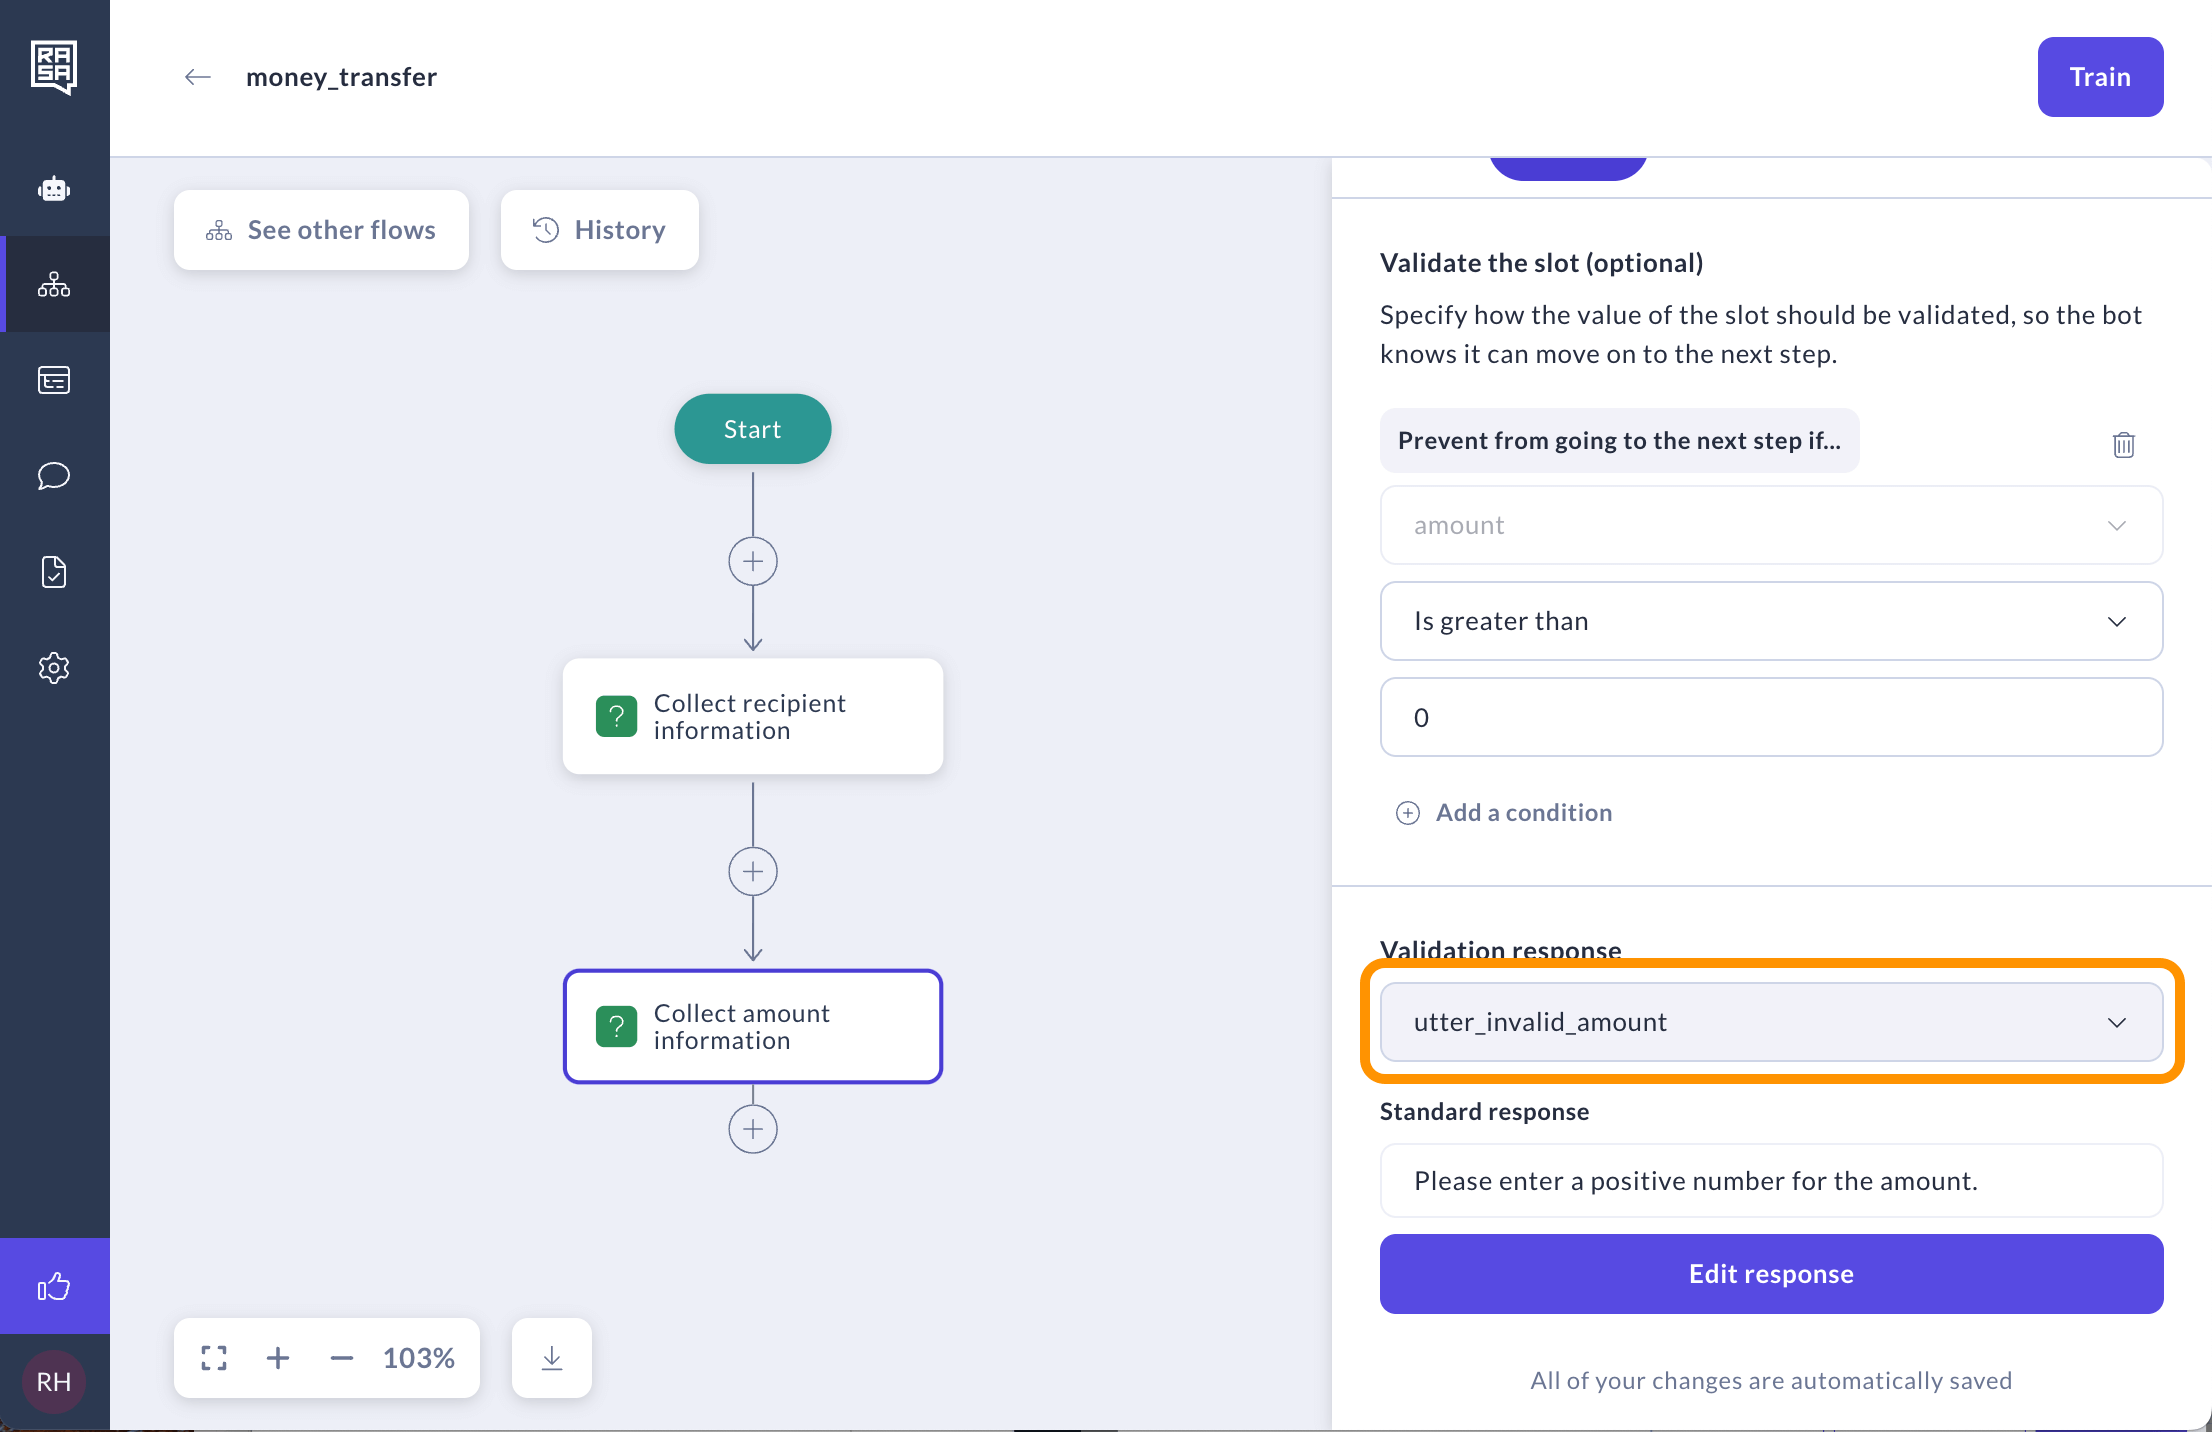
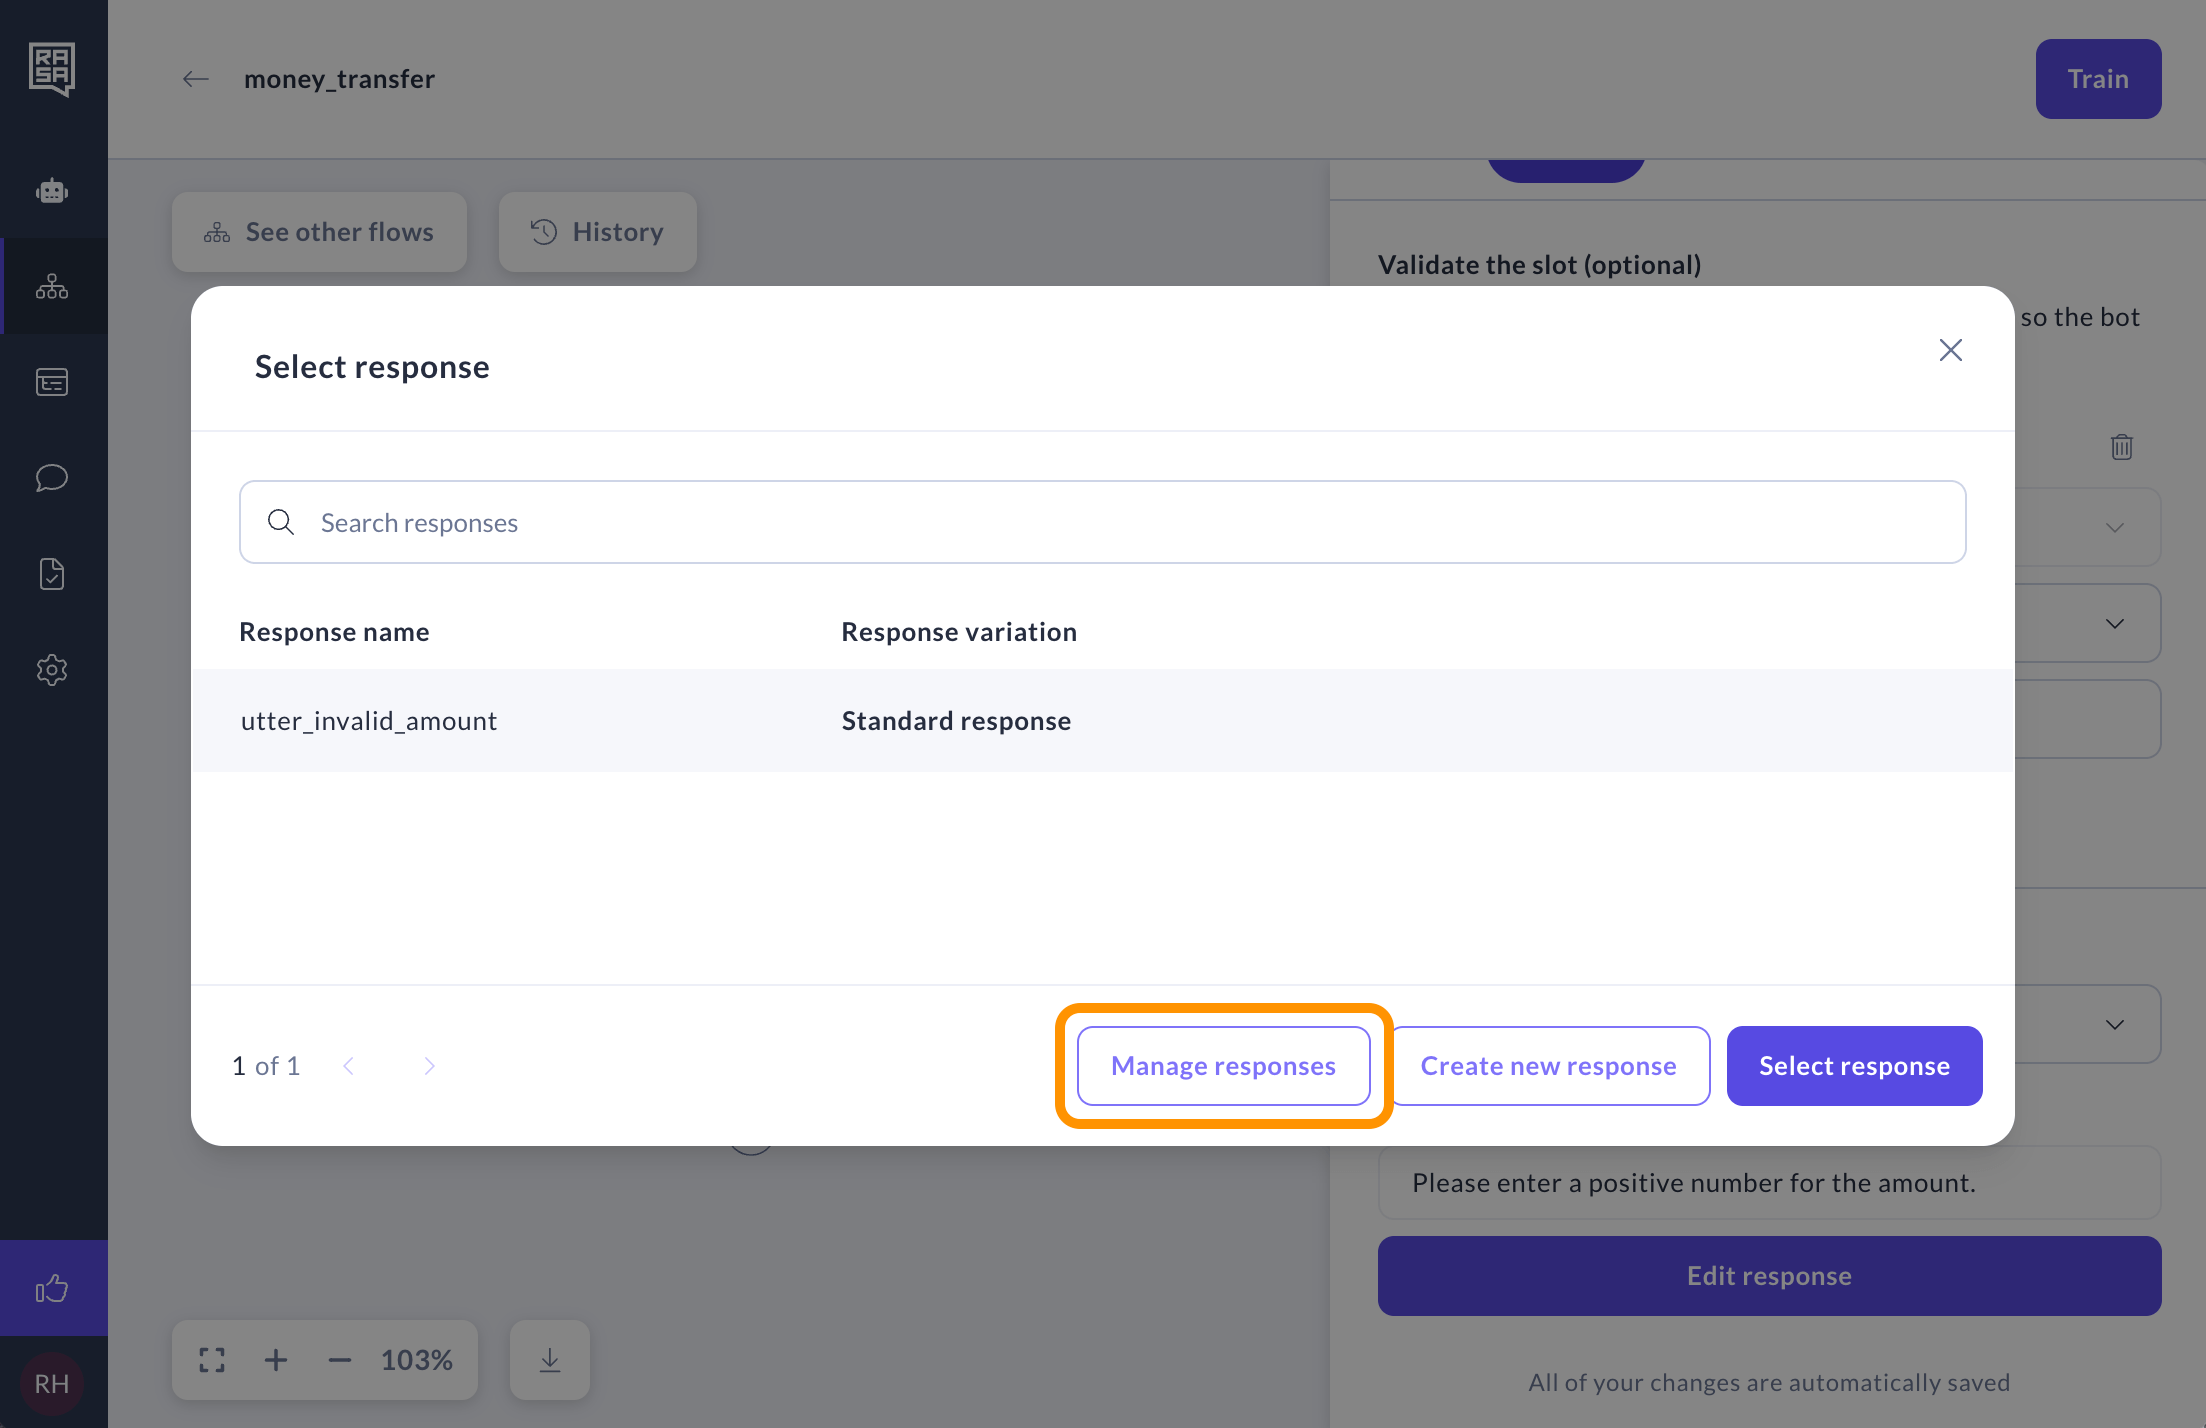
 6. You can edit or delete previously created validation responses by clicking on the drop-down menu and choosing the **Manage responses** option in the modal that opens.
 ## Slots
### What is a Slot?
Think of slots as your assistant’s memory. They store important pieces of information from the conversation, like a user’s name, date, or location, and can be referenced throughout the flow.
### Slot types
#### Text
A **text** slot is used to store textual information such as names of countries, cities, or personal names. It's designed to hold various types of alphanumeric characters, making it suitable for a wide range of textual data.
#### Boolean
A **boolean** slot is designed to store binary information, representing either a true or false value. It's commonly used for yes/no questions or scenarios where only two opposing options exist, like true/false statements.
#### Categorical
A **categorical** slot is used to store data that can take on one of a specific set of values. It's well-suited for scenarios where data can be classified into distinct categories, like labels such as low, medium, or high to describe levels of something.
#### Float
A **float** slot is employed for storing numerical values that can have decimal points. It's suitable for handling continuous numeric data, such as age, temperature, or monetary amounts involving fractions.
#### Any
An **any** slot is capable of storing a wide variety of data types without any specific constraints. It's a flexible option for cases where the data type might vary or is not well-defined in advance, allowing you to store arbitrary values with diverse characteristics.
## Buttons
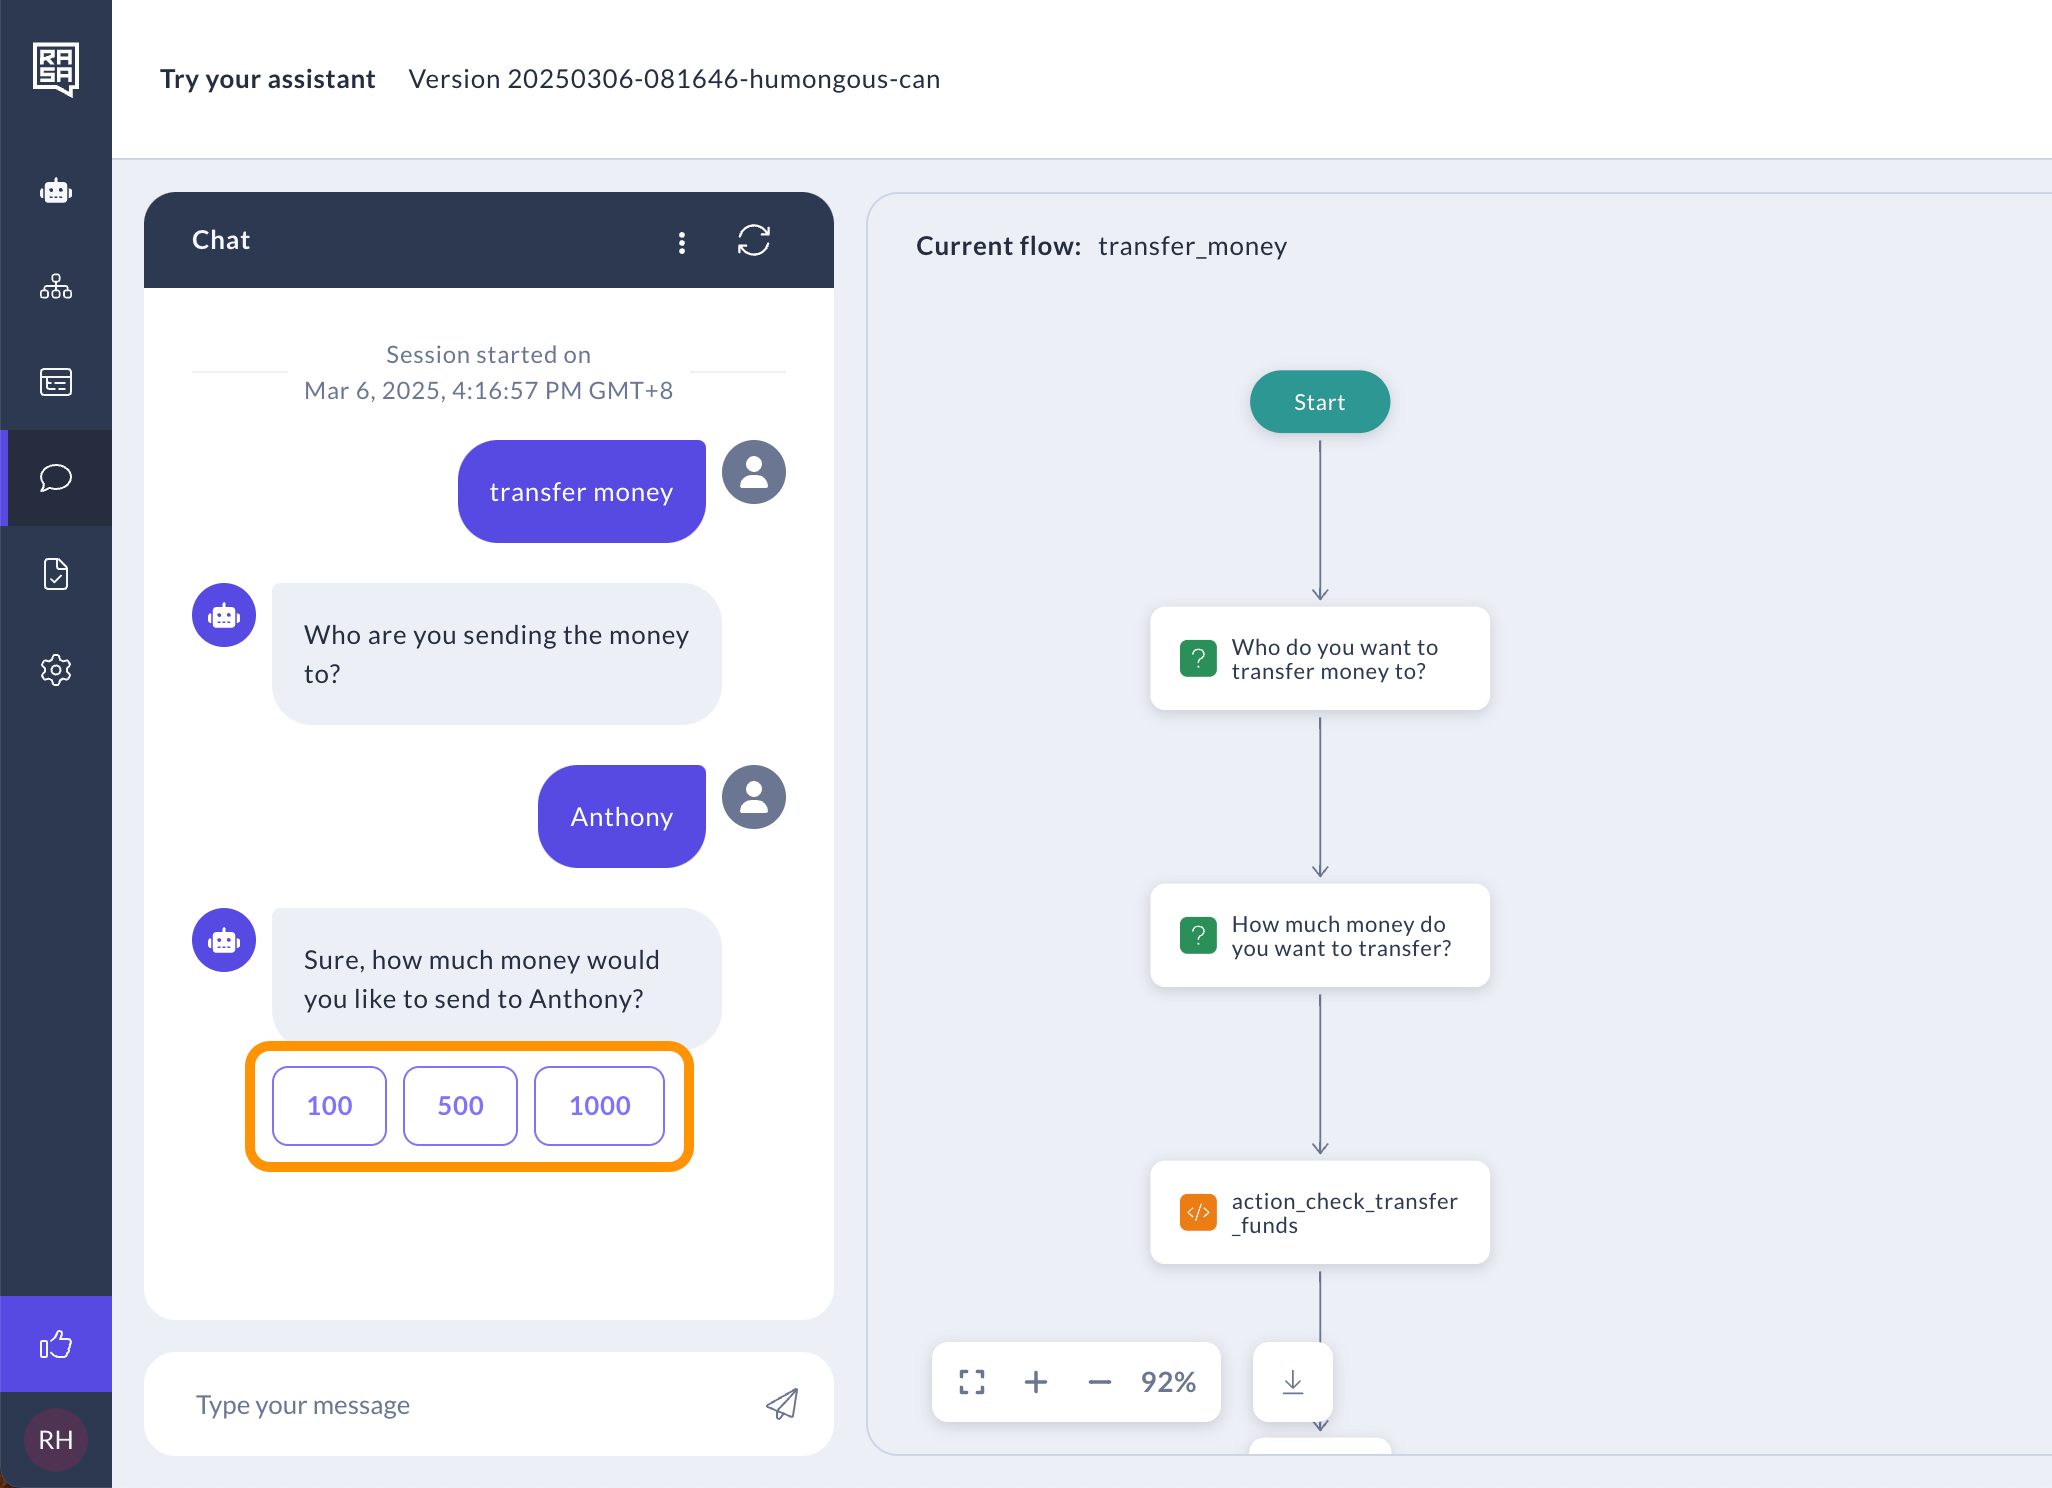
You can make your assistant even more interactive by adding buttons to the responses in the Collect Information step. Instead of making users type, they can simply click on buttons to give their answers.
## Slots
### What is a Slot?
Think of slots as your assistant’s memory. They store important pieces of information from the conversation, like a user’s name, date, or location, and can be referenced throughout the flow.
### Slot types
#### Text
A **text** slot is used to store textual information such as names of countries, cities, or personal names. It's designed to hold various types of alphanumeric characters, making it suitable for a wide range of textual data.
#### Boolean
A **boolean** slot is designed to store binary information, representing either a true or false value. It's commonly used for yes/no questions or scenarios where only two opposing options exist, like true/false statements.
#### Categorical
A **categorical** slot is used to store data that can take on one of a specific set of values. It's well-suited for scenarios where data can be classified into distinct categories, like labels such as low, medium, or high to describe levels of something.
#### Float
A **float** slot is employed for storing numerical values that can have decimal points. It's suitable for handling continuous numeric data, such as age, temperature, or monetary amounts involving fractions.
#### Any
An **any** slot is capable of storing a wide variety of data types without any specific constraints. It's a flexible option for cases where the data type might vary or is not well-defined in advance, allowing you to store arbitrary values with diverse characteristics.
## Buttons
You can make your assistant even more interactive by adding buttons to the responses in the Collect Information step. Instead of making users type, they can simply click on buttons to give their answers.
 ### Button properties
A button has two important parts:
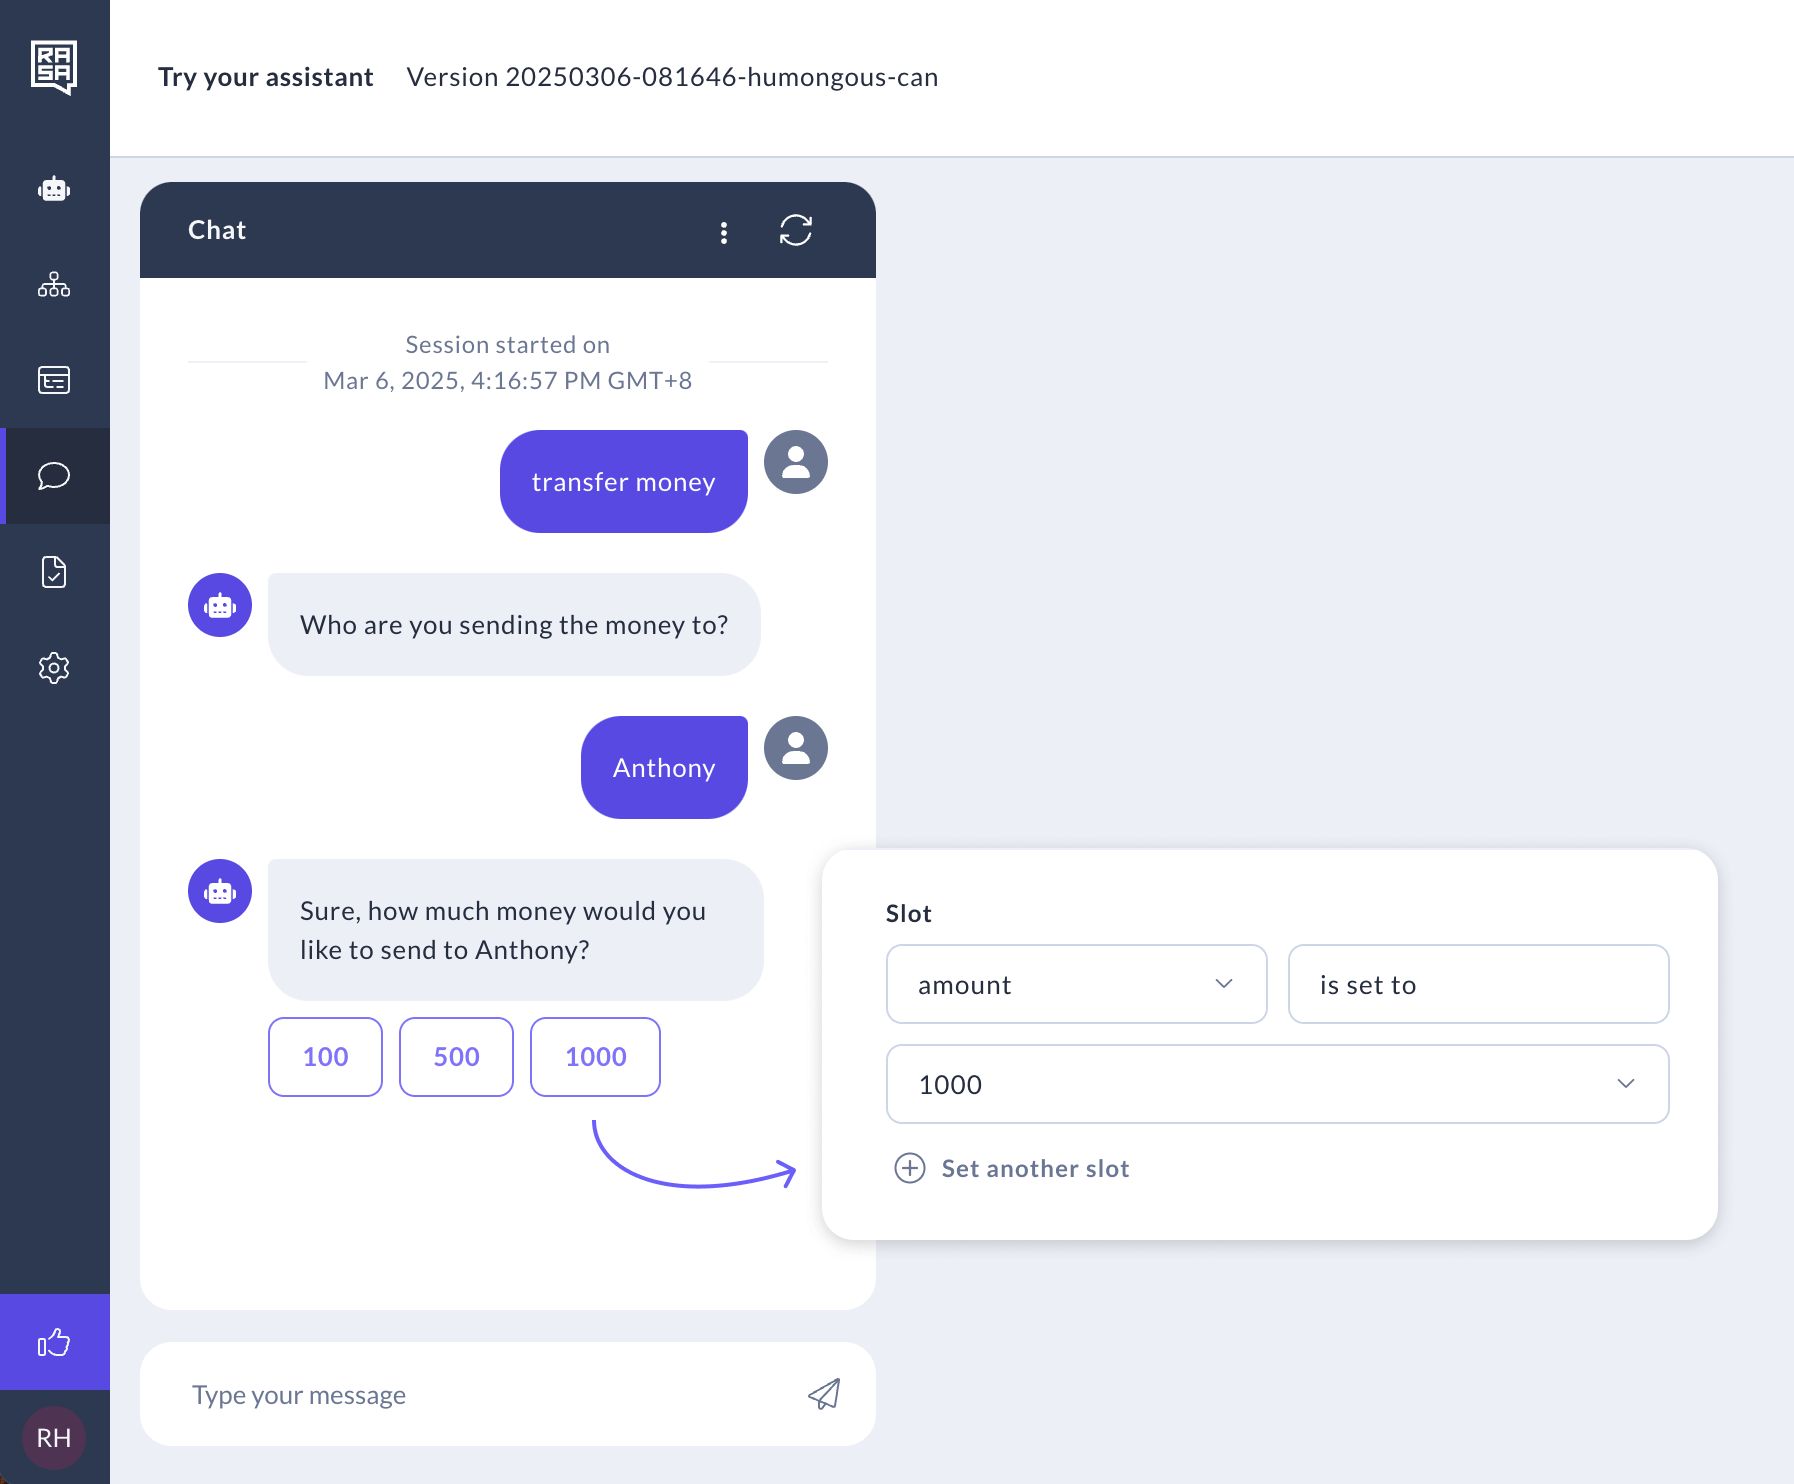
* **Title:** This is the text your users will see on the button.
* **Payload:** Think of this as a behind-the-scenes command the assistant uses when the button is clicked. You don’t have to fill it in unless you want to give your assistant extra instructions like skipping LLM calls and going straight to a specific command, intent, or entity.
### Button properties
A button has two important parts:
* **Title:** This is the text your users will see on the button.
* **Payload:** Think of this as a behind-the-scenes command the assistant uses when the button is clicked. You don’t have to fill it in unless you want to give your assistant extra instructions like skipping LLM calls and going straight to a specific command, intent, or entity.
 ### How to add buttons
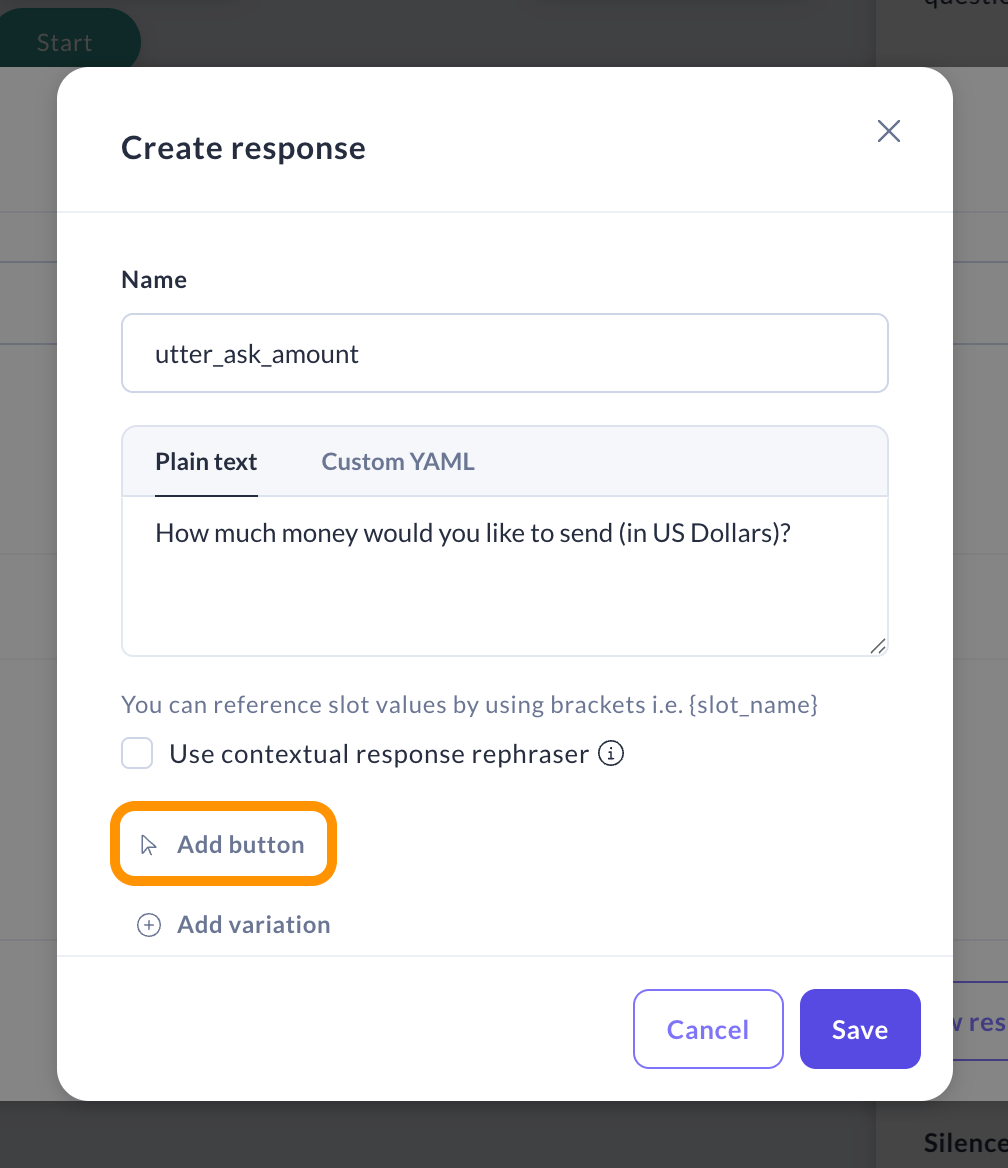
1. Click **Add button** in your Collect information response.
### How to add buttons
1. Click **Add button** in your Collect information response.
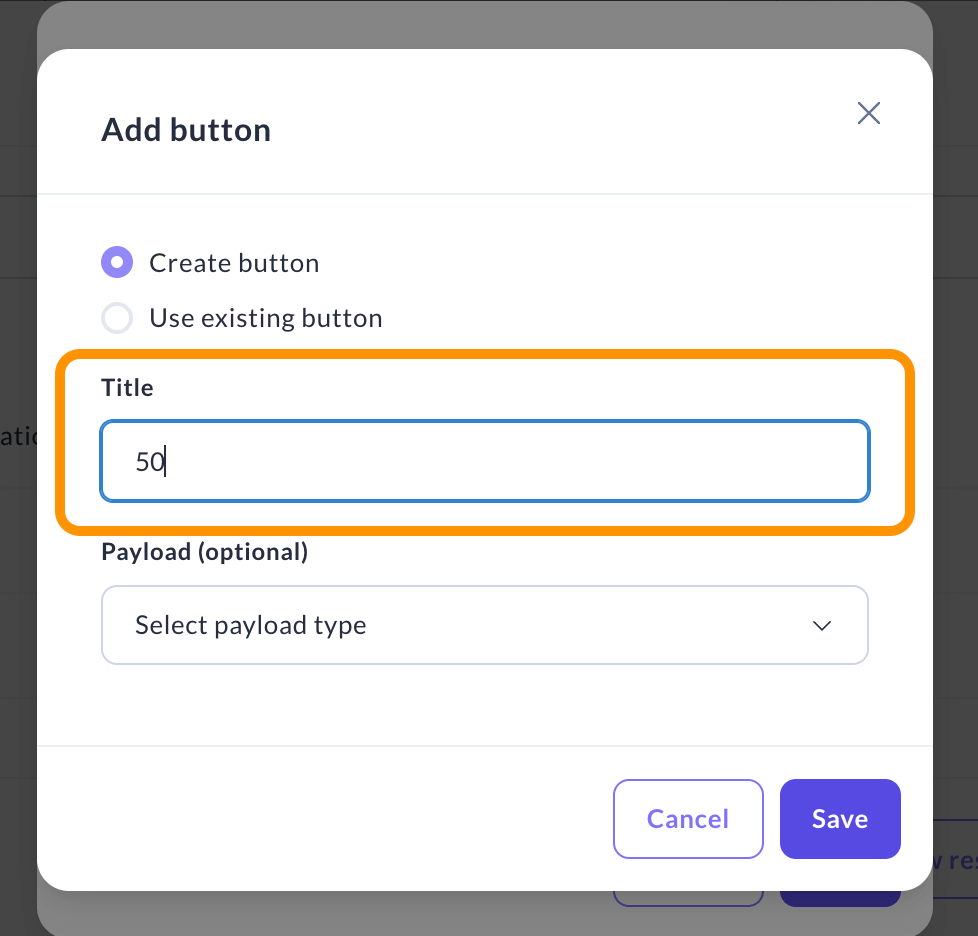
 2. Choose between reusing an existing button or creating a new one. If you create a new button, enter a title for it. This title will be the text displayed on the button for users to click.
 3. Optional: If you want the button to bypass the LLM, choose a payload. Here are the types of things you can set it to do:
* **Intent** — triggers an intent.
* **Intent and entity** — passes entities along with the intent.
* **Set slot** — sends commands to set or reset slot values.
* **Text** — sends a predefined free-form text to the assistant. This should only be used if none of the above options apply.
* If you leave the field empty, it will automatically be pre-filled with the same text as the title.
3. Optional: If you want the button to bypass the LLM, choose a payload. Here are the types of things you can set it to do:
* **Intent** — triggers an intent.
* **Intent and entity** — passes entities along with the intent.
* **Set slot** — sends commands to set or reset slot values.
* **Text** — sends a predefined free-form text to the assistant. This should only be used if none of the above options apply.
* If you leave the field empty, it will automatically be pre-filled with the same text as the title.
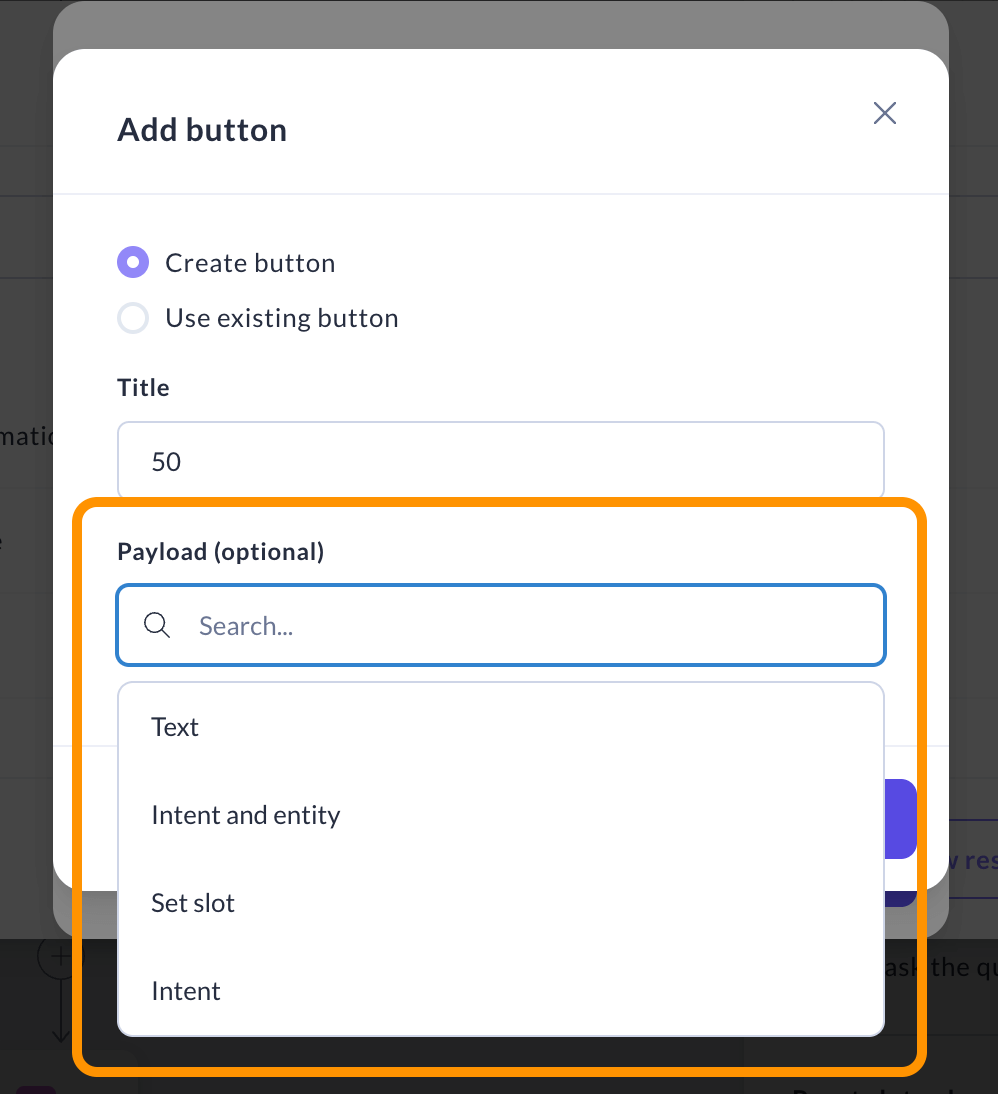 4. Keep clicking **Add button** and fill in the information for as many buttons as you need.
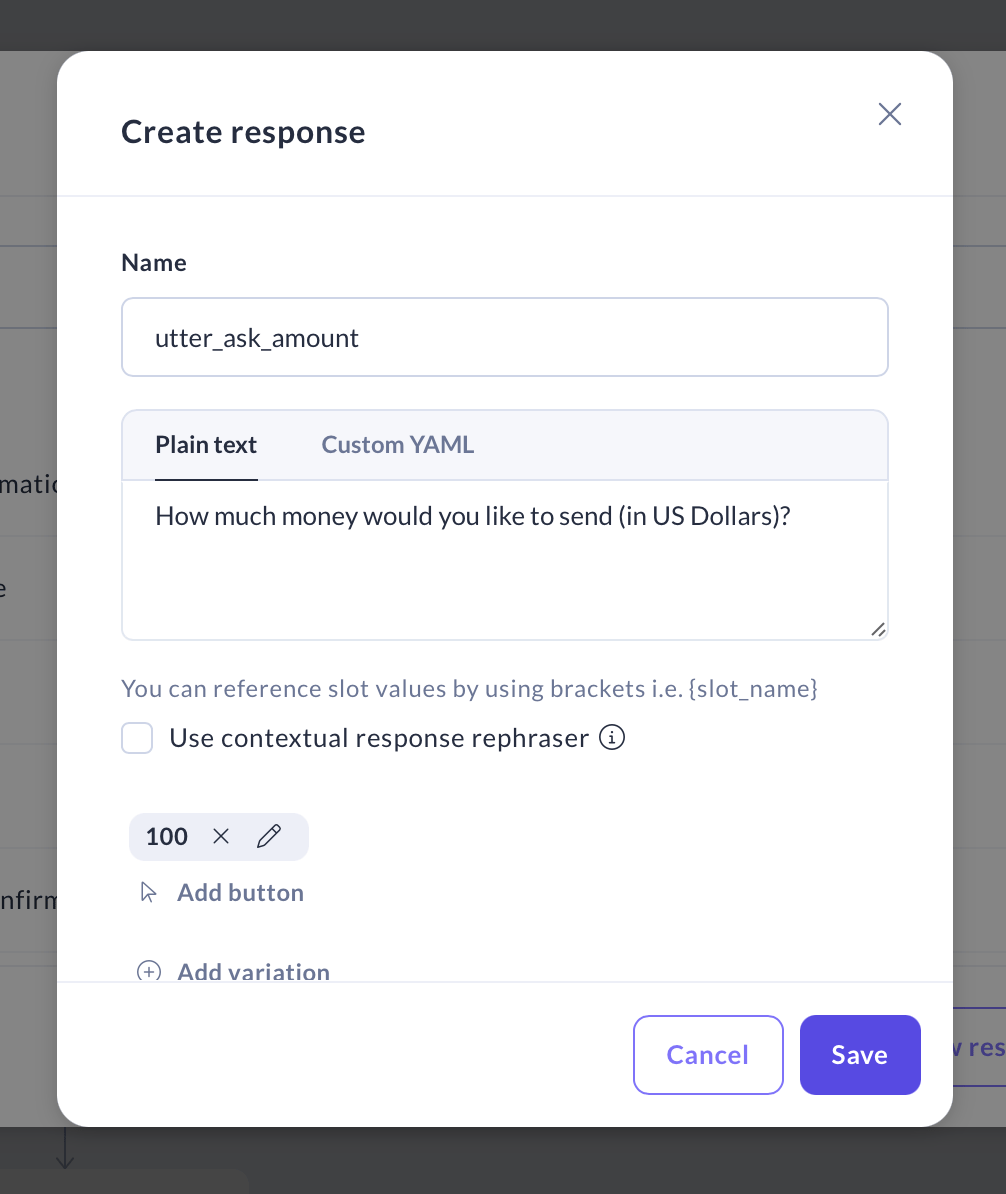 5. If you want to reuse an existing button, select **Use existing button** and choose the button you'd like to use from the dropdown menu.
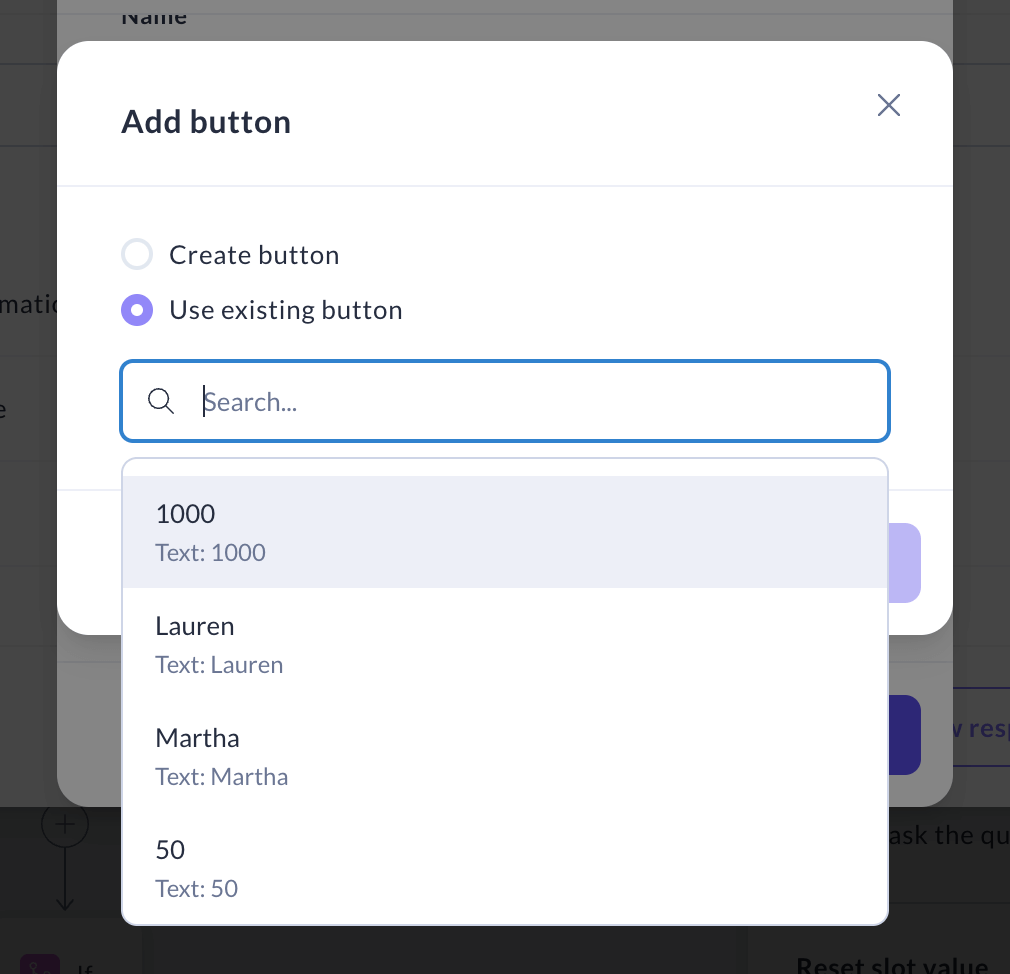 6. Use the icons next to the buttons to edit or delete them from the response.
 ### Reordering buttons
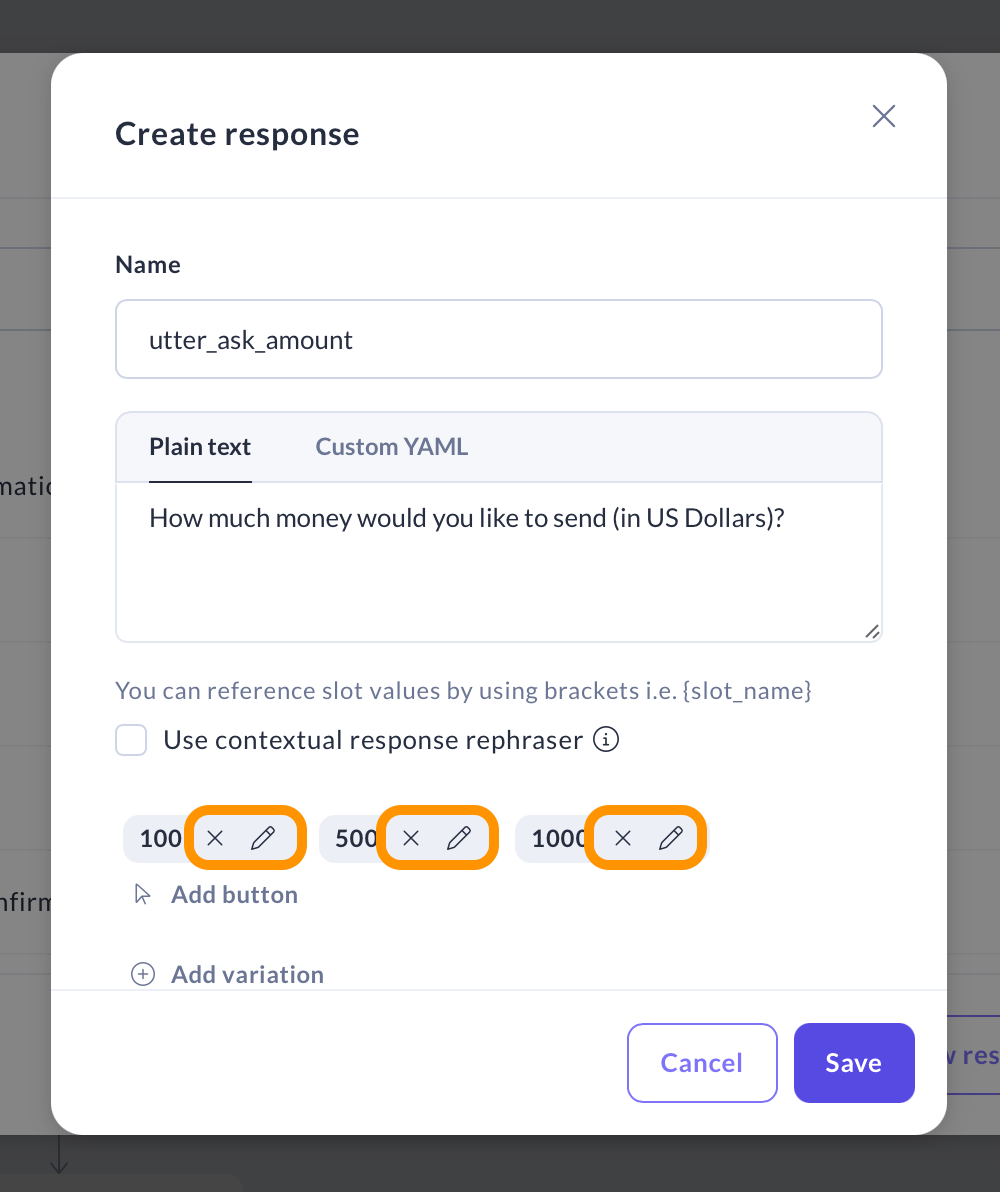
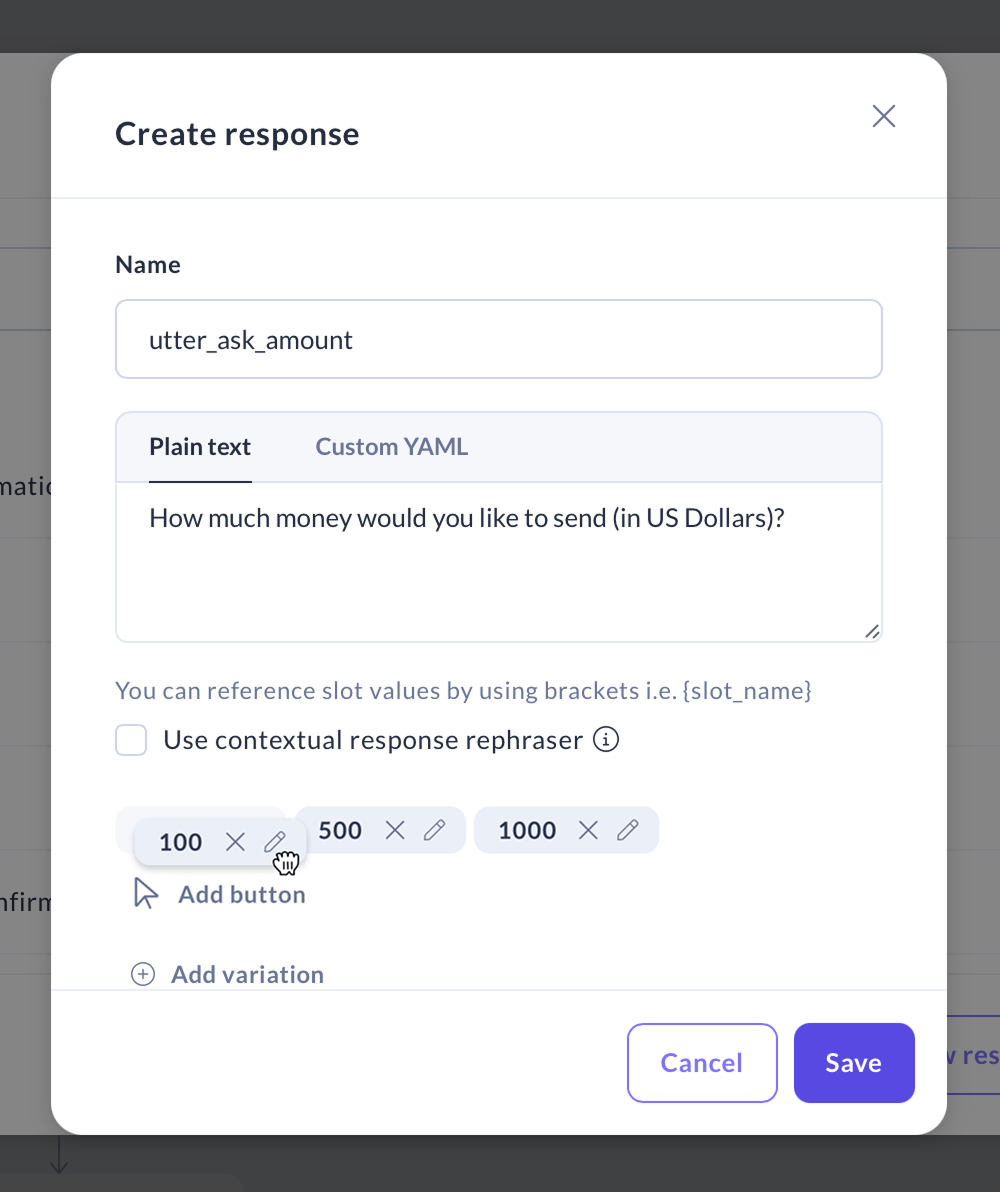
You can drag and drop buttons directly in the response editor — giving you full control over the order in which options are shown to users.
### Reordering buttons
You can drag and drop buttons directly in the response editor — giving you full control over the order in which options are shown to users.
 ## Slot Mappings (Advanced)
Use slot mappings to control how slot values are extracted.
### From LLM
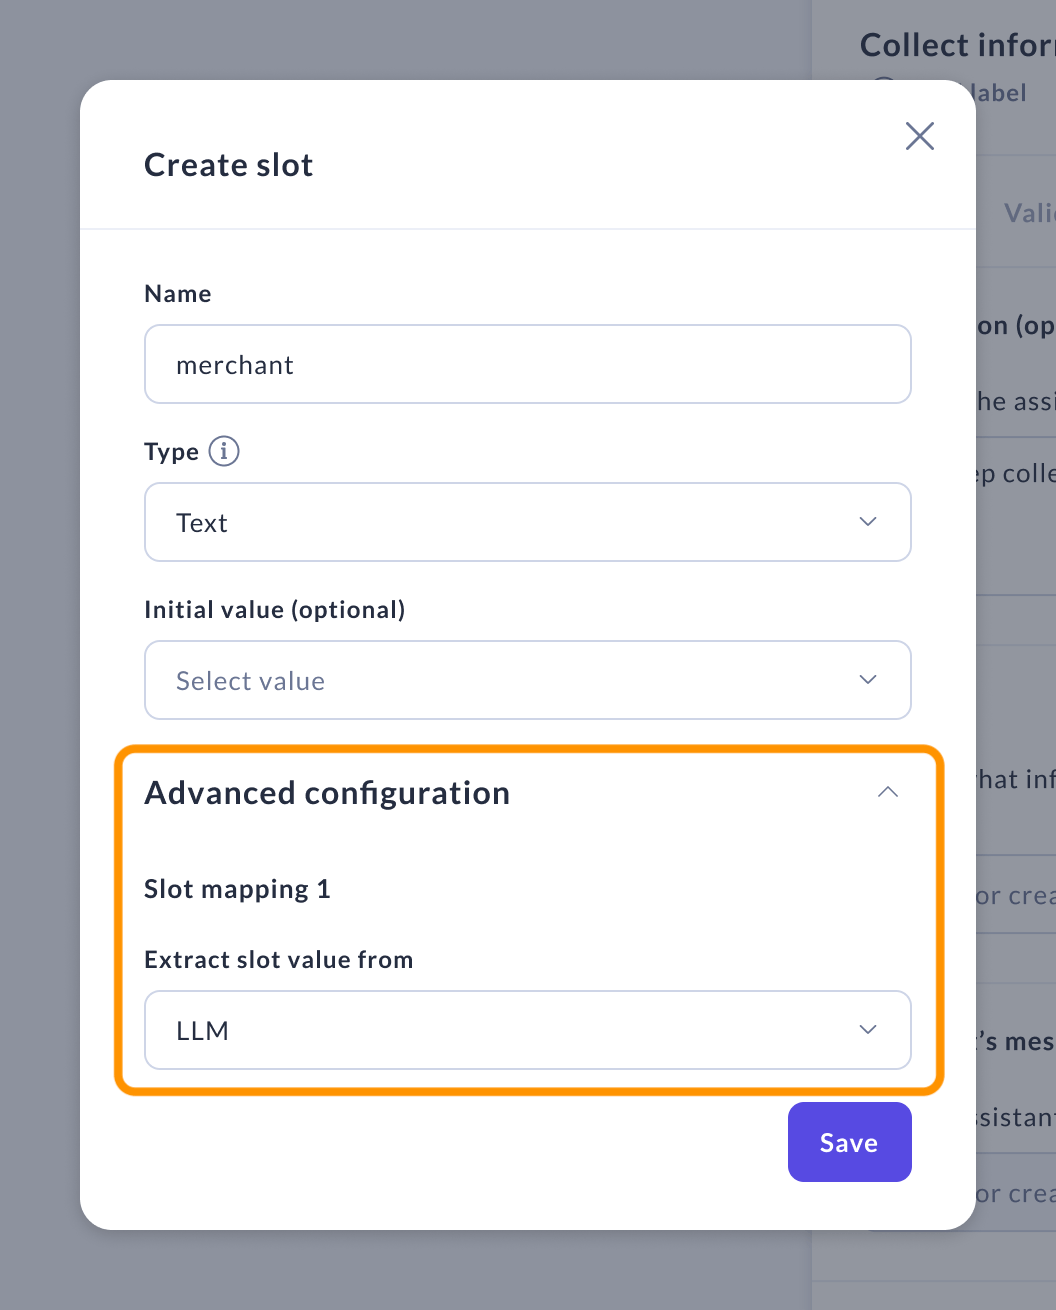
By default, the slot value is extracted from the user's message using an LLM, which interprets the message and fills the slot accordingly. The prompt includes descriptions and slot definitions from each flow as relevant information. However, if your assistant includes NLU components (intents and entities), you might consider using alternative extraction methods.
## Slot Mappings (Advanced)
Use slot mappings to control how slot values are extracted.
### From LLM
By default, the slot value is extracted from the user's message using an LLM, which interprets the message and fills the slot accordingly. The prompt includes descriptions and slot definitions from each flow as relevant information. However, if your assistant includes NLU components (intents and entities), you might consider using alternative extraction methods.
 ### From text
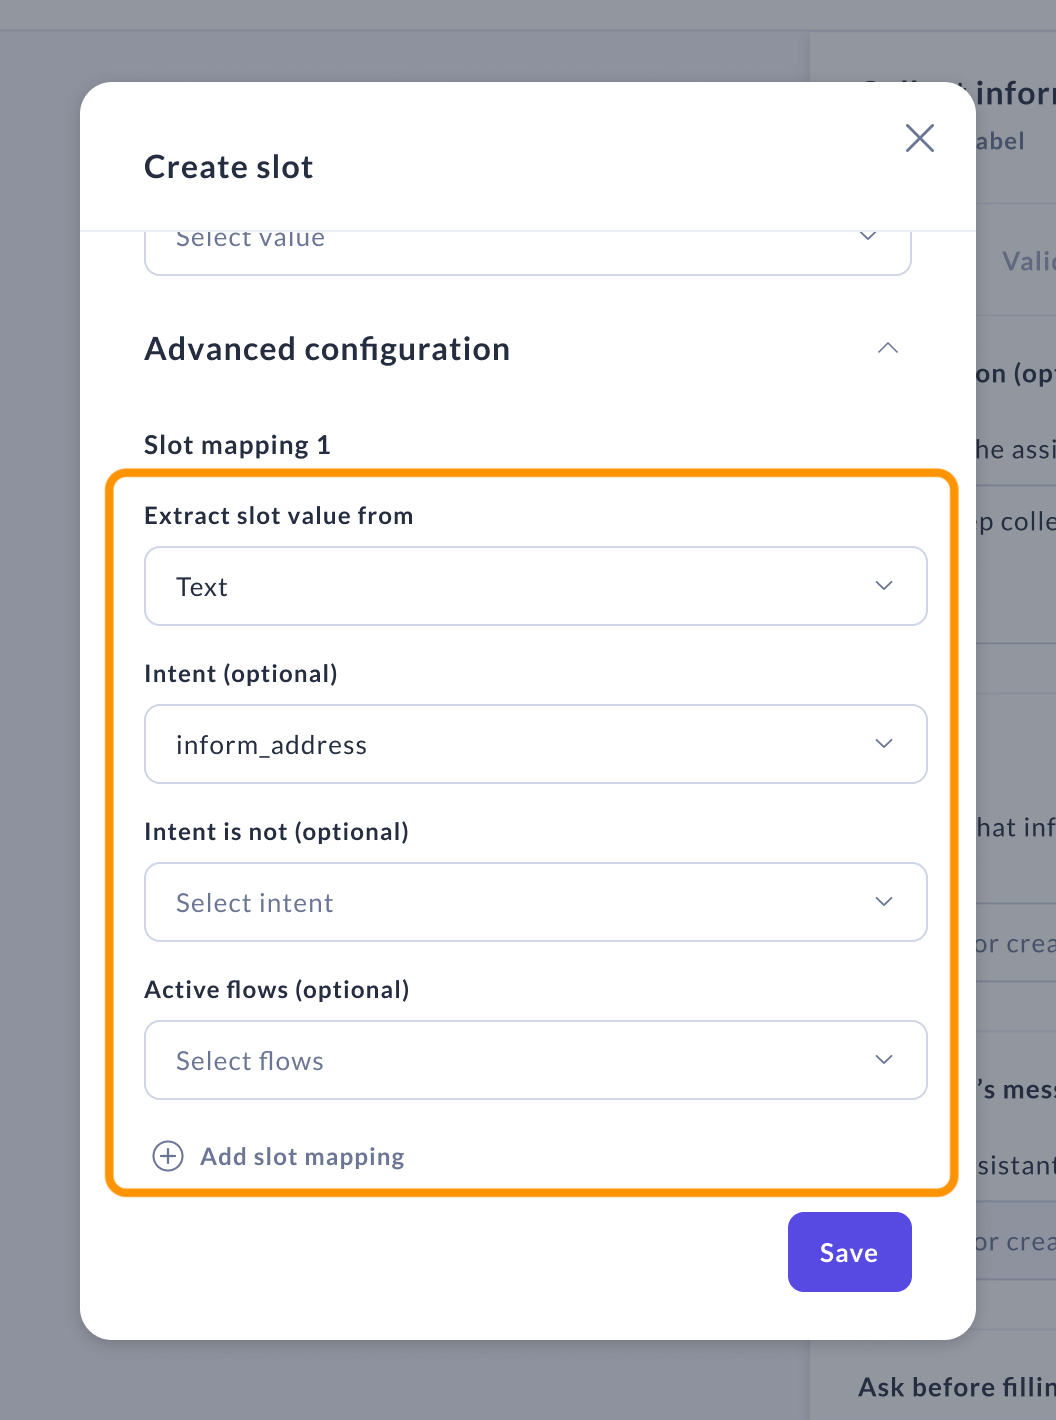
This mapping type uses the text of the last user message to fill the slot. Optionally it can be configured with the following parameters:
* **Intent** — Only applies the mapping when this intent is predicted.
* **Intent is not** — Excludes the mapping when this intent is predicted.
* **Active flows** — Restricts the mapping to certain flows, selectable in this field.
### From text
This mapping type uses the text of the last user message to fill the slot. Optionally it can be configured with the following parameters:
* **Intent** — Only applies the mapping when this intent is predicted.
* **Intent is not** — Excludes the mapping when this intent is predicted.
* **Active flows** — Restricts the mapping to certain flows, selectable in this field.
 ### From entity
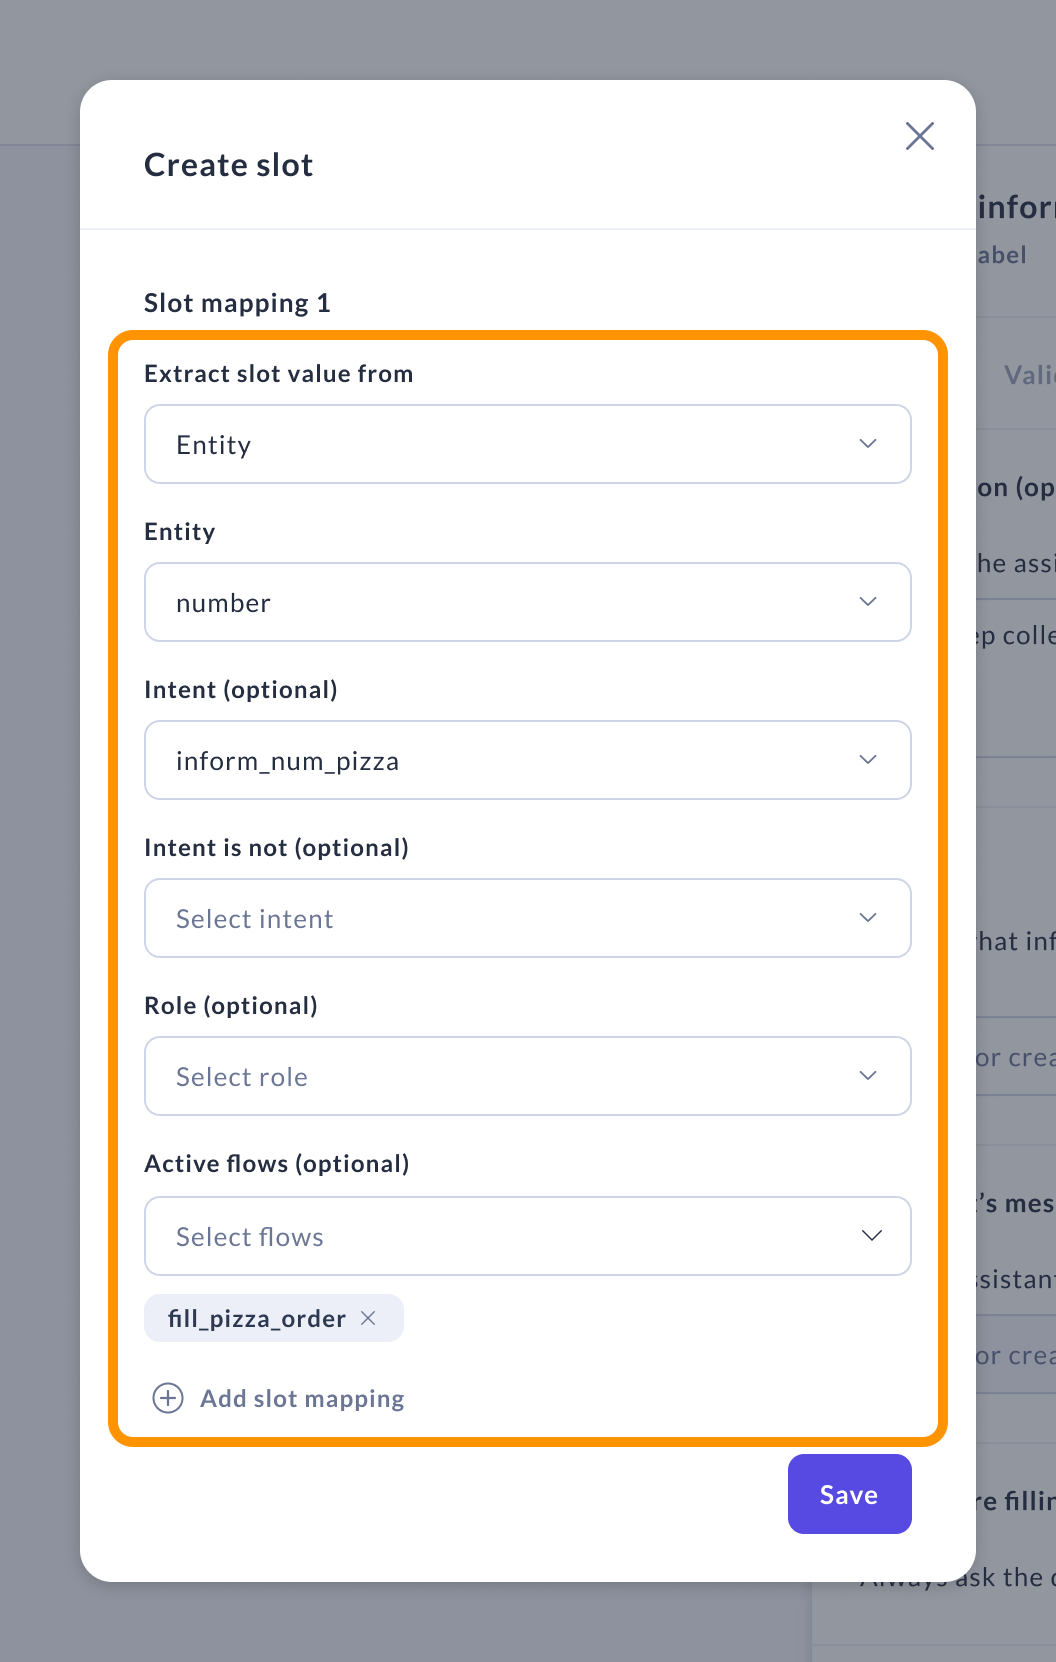
This mapping type fills slots based on extracted entities. The following parameters are required:
* **Entity** — The entity used to fill the slot.
Optional parameters to specify the application of the mapping include:
* **Intent** — Applies only when this intent is predicted.
* **Intent is not** — Excludes the mapping when this intent is predicted.
* **Role** — Applies only if the extracted entity has this specified role.
* **Active flows** — Restricts the mapping to certain flows, selectable in this field.
### From entity
This mapping type fills slots based on extracted entities. The following parameters are required:
* **Entity** — The entity used to fill the slot.
Optional parameters to specify the application of the mapping include:
* **Intent** — Applies only when this intent is predicted.
* **Intent is not** — Excludes the mapping when this intent is predicted.
* **Role** — Applies only if the extracted entity has this specified role.
* **Active flows** — Restricts the mapping to certain flows, selectable in this field.
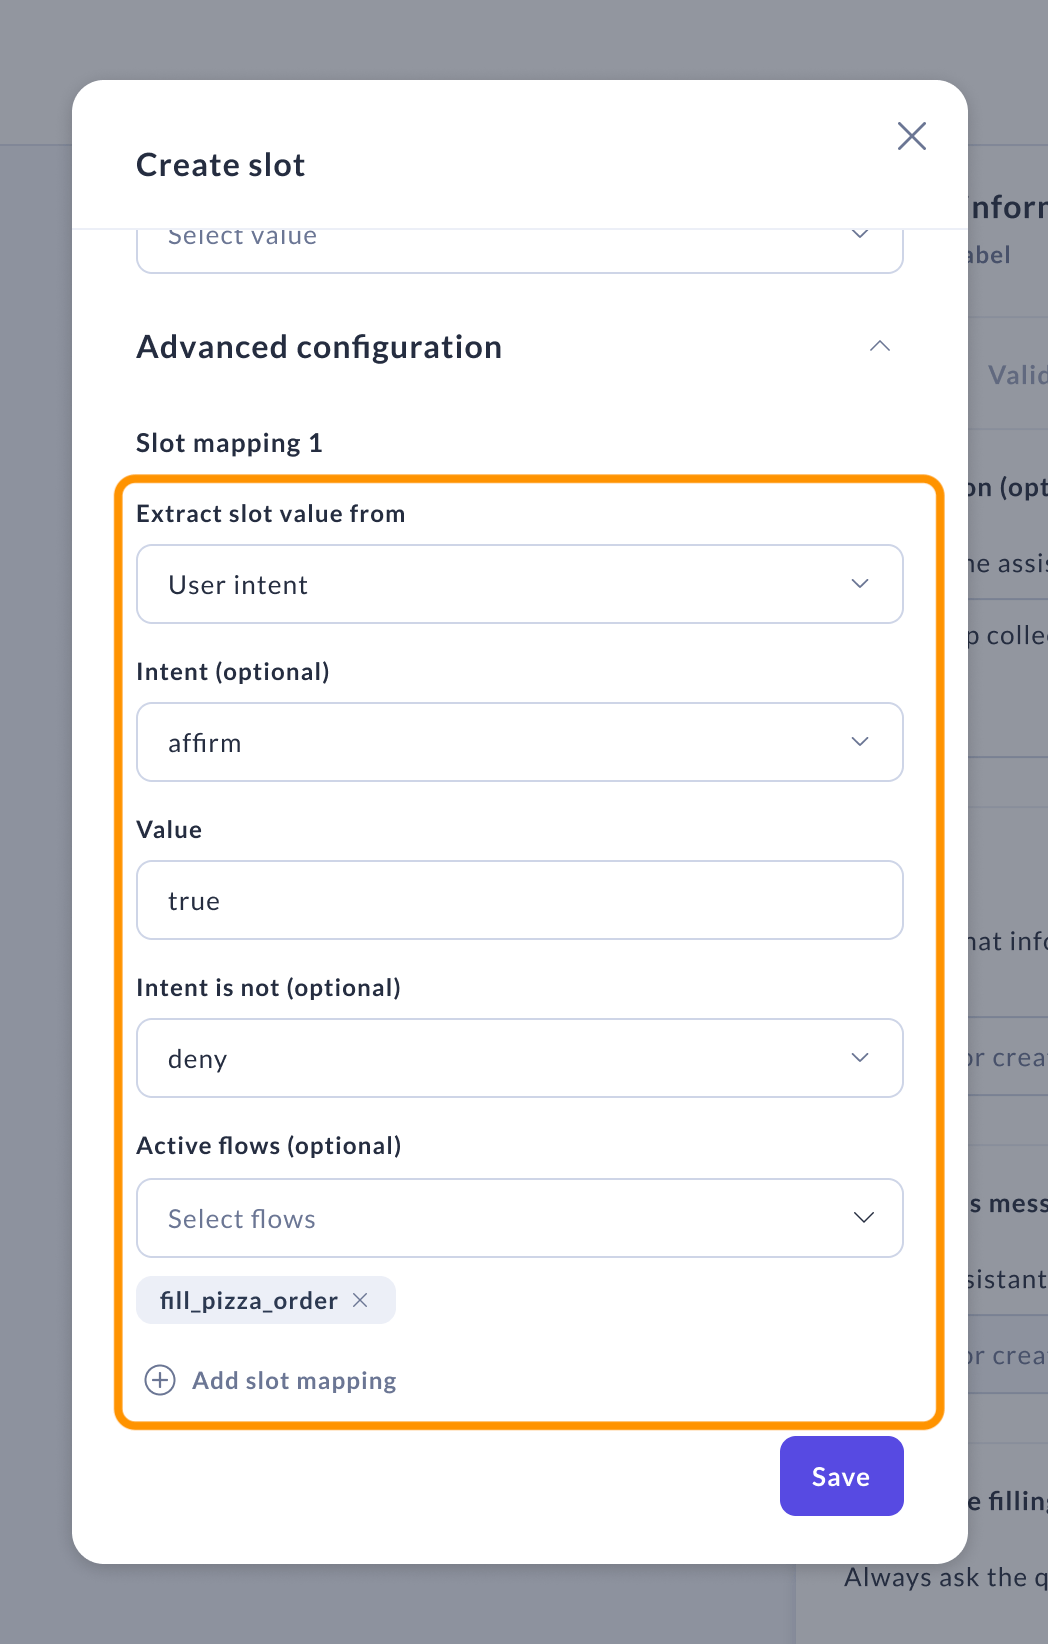
 ### From intent
This mapping fills a slot with a specified value if the user's intent matches. If no intent is specified, the slot fills regardless, unless the intent matches those listed under "Intent is not."
Required parameter:
* **Value** — The value to fill the slot.
Optional parameters include:
* **Intent** — Applies the mapping only when this intent is predicted.
* **Intent is not** — Excludes the mapping when this intent is predicted.
* **Active flows** — Restricts the mapping to certain flows, selectable in this field.
### From intent
This mapping fills a slot with a specified value if the user's intent matches. If no intent is specified, the slot fills regardless, unless the intent matches those listed under "Intent is not."
Required parameter:
* **Value** — The value to fill the slot.
Optional parameters include:
* **Intent** — Applies the mapping only when this intent is predicted.
* **Intent is not** — Excludes the mapping when this intent is predicted.
* **Active flows** — Restricts the mapping to certain flows, selectable in this field.
 ### From custom action
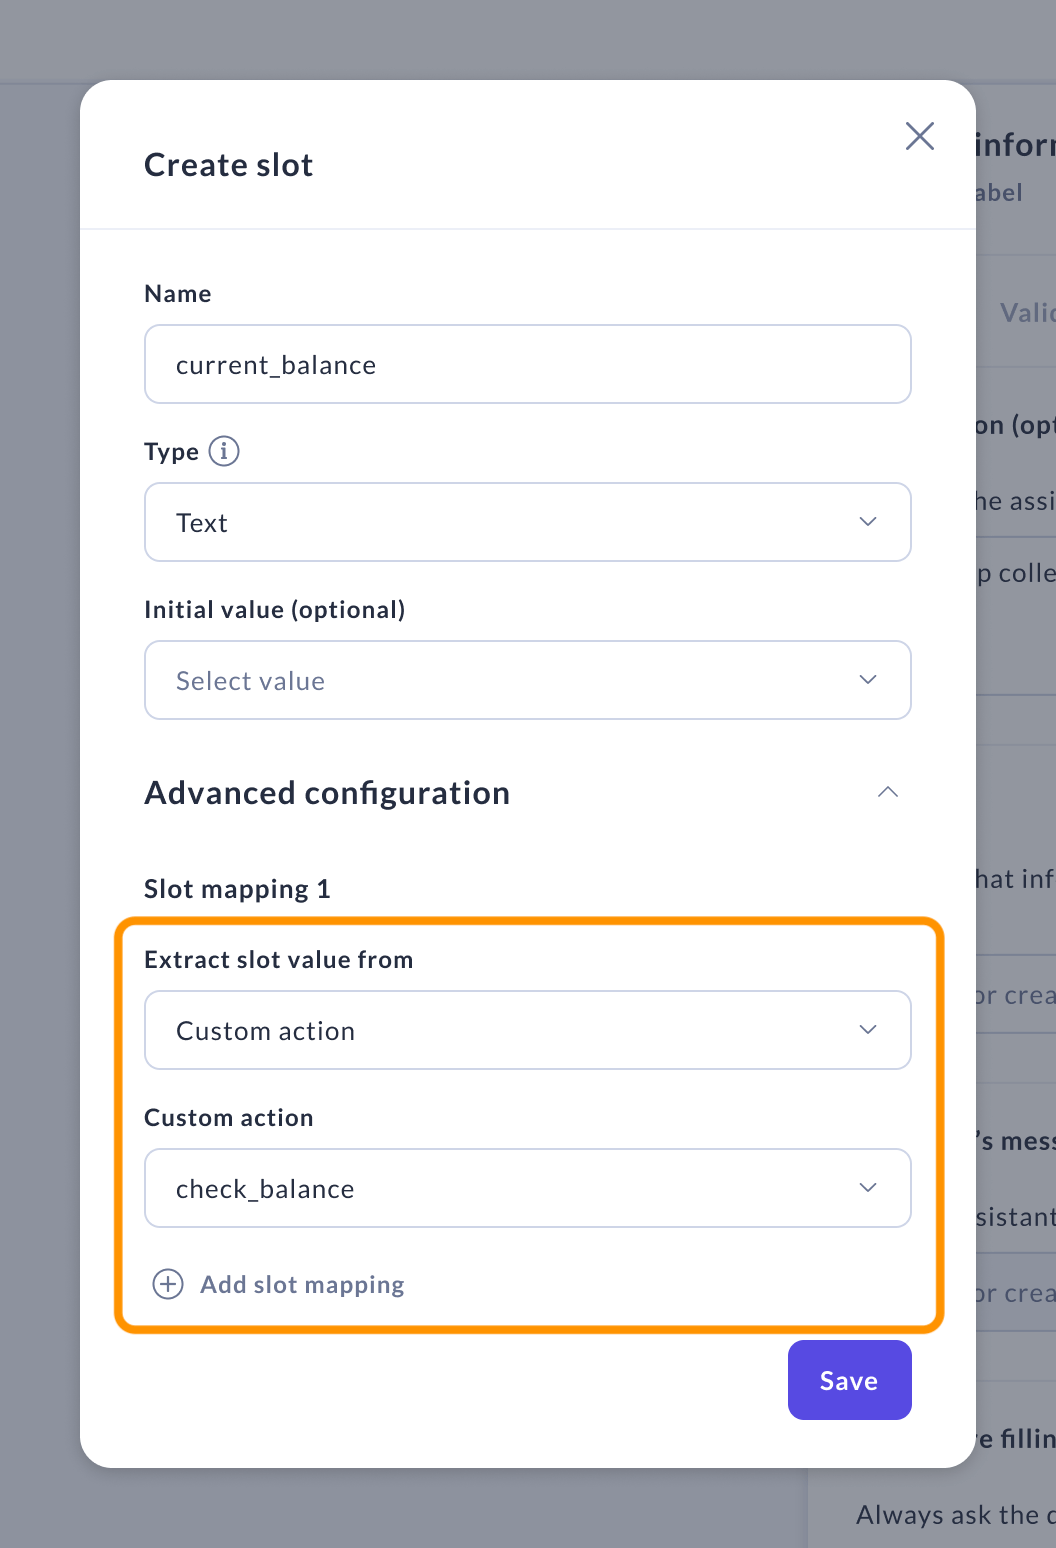
Use the "From custom action" mapping type for slots that need to be filled by a specified [custom action](/docs/studio/build/actions/create-a-custom-action). This action must be detailed in the "Custom action" field of the slot mapping.
### From custom action
Use the "From custom action" mapping type for slots that need to be filled by a specified [custom action](/docs/studio/build/actions/create-a-custom-action). This action must be detailed in the "Custom action" field of the slot mapping.
 In case you use multiple mappings for one slot, they will be prioritized in the order they are listed. The first slot mapping found to apply will be used to fill the slot.
**Recommendation on combining slot mapping types**
A slot cannot have both "From LLM" and NLU-based predefined mappings or mappings from custom actions simultaneously. If you set a slot to use the "From LLM" mapping, you must not define any other types of mappings for that slot.
[Learn more about slot mappings](/docs/reference/config/domain#slots)
In case you use multiple mappings for one slot, they will be prioritized in the order they are listed. The first slot mapping found to apply will be used to fill the slot.
**Recommendation on combining slot mapping types**
A slot cannot have both "From LLM" and NLU-based predefined mappings or mappings from custom actions simultaneously. If you set a slot to use the "From LLM" mapping, you must not define any other types of mappings for that slot.
[Learn more about slot mappings](/docs/reference/config/domain#slots)