> ## Documentation Index
> Fetch the complete documentation index at: https://rasa.com/docs/llms.txt
> Use this file to discover all available pages before exploring further.
# Your First Assistant
> Rasa Studio Tutorials for CALM assistants
In this guide, you’ll create a simple assistant that greets users, introduces itself, and helps with money transfers.
Don't worry if you're new to Rasa or building assistants, this guide will walk you through each step.
By the end of this tutorial you will have built a [CALM](/docs/learn/concepts/calm)-based assistant that greets users, introduces itself, and assists with money transfers.
## Step 1: Create a new assistant
1. **Log In:** Start by logging into Studio with either the `superuser` or `developer` role. [Learn more about the default roles and their permissions](/docs/studio/installation/setup-guides/authorization-guide).
2. **Create Your Assistant:**
* On the Welcome page, click **Create new project**.
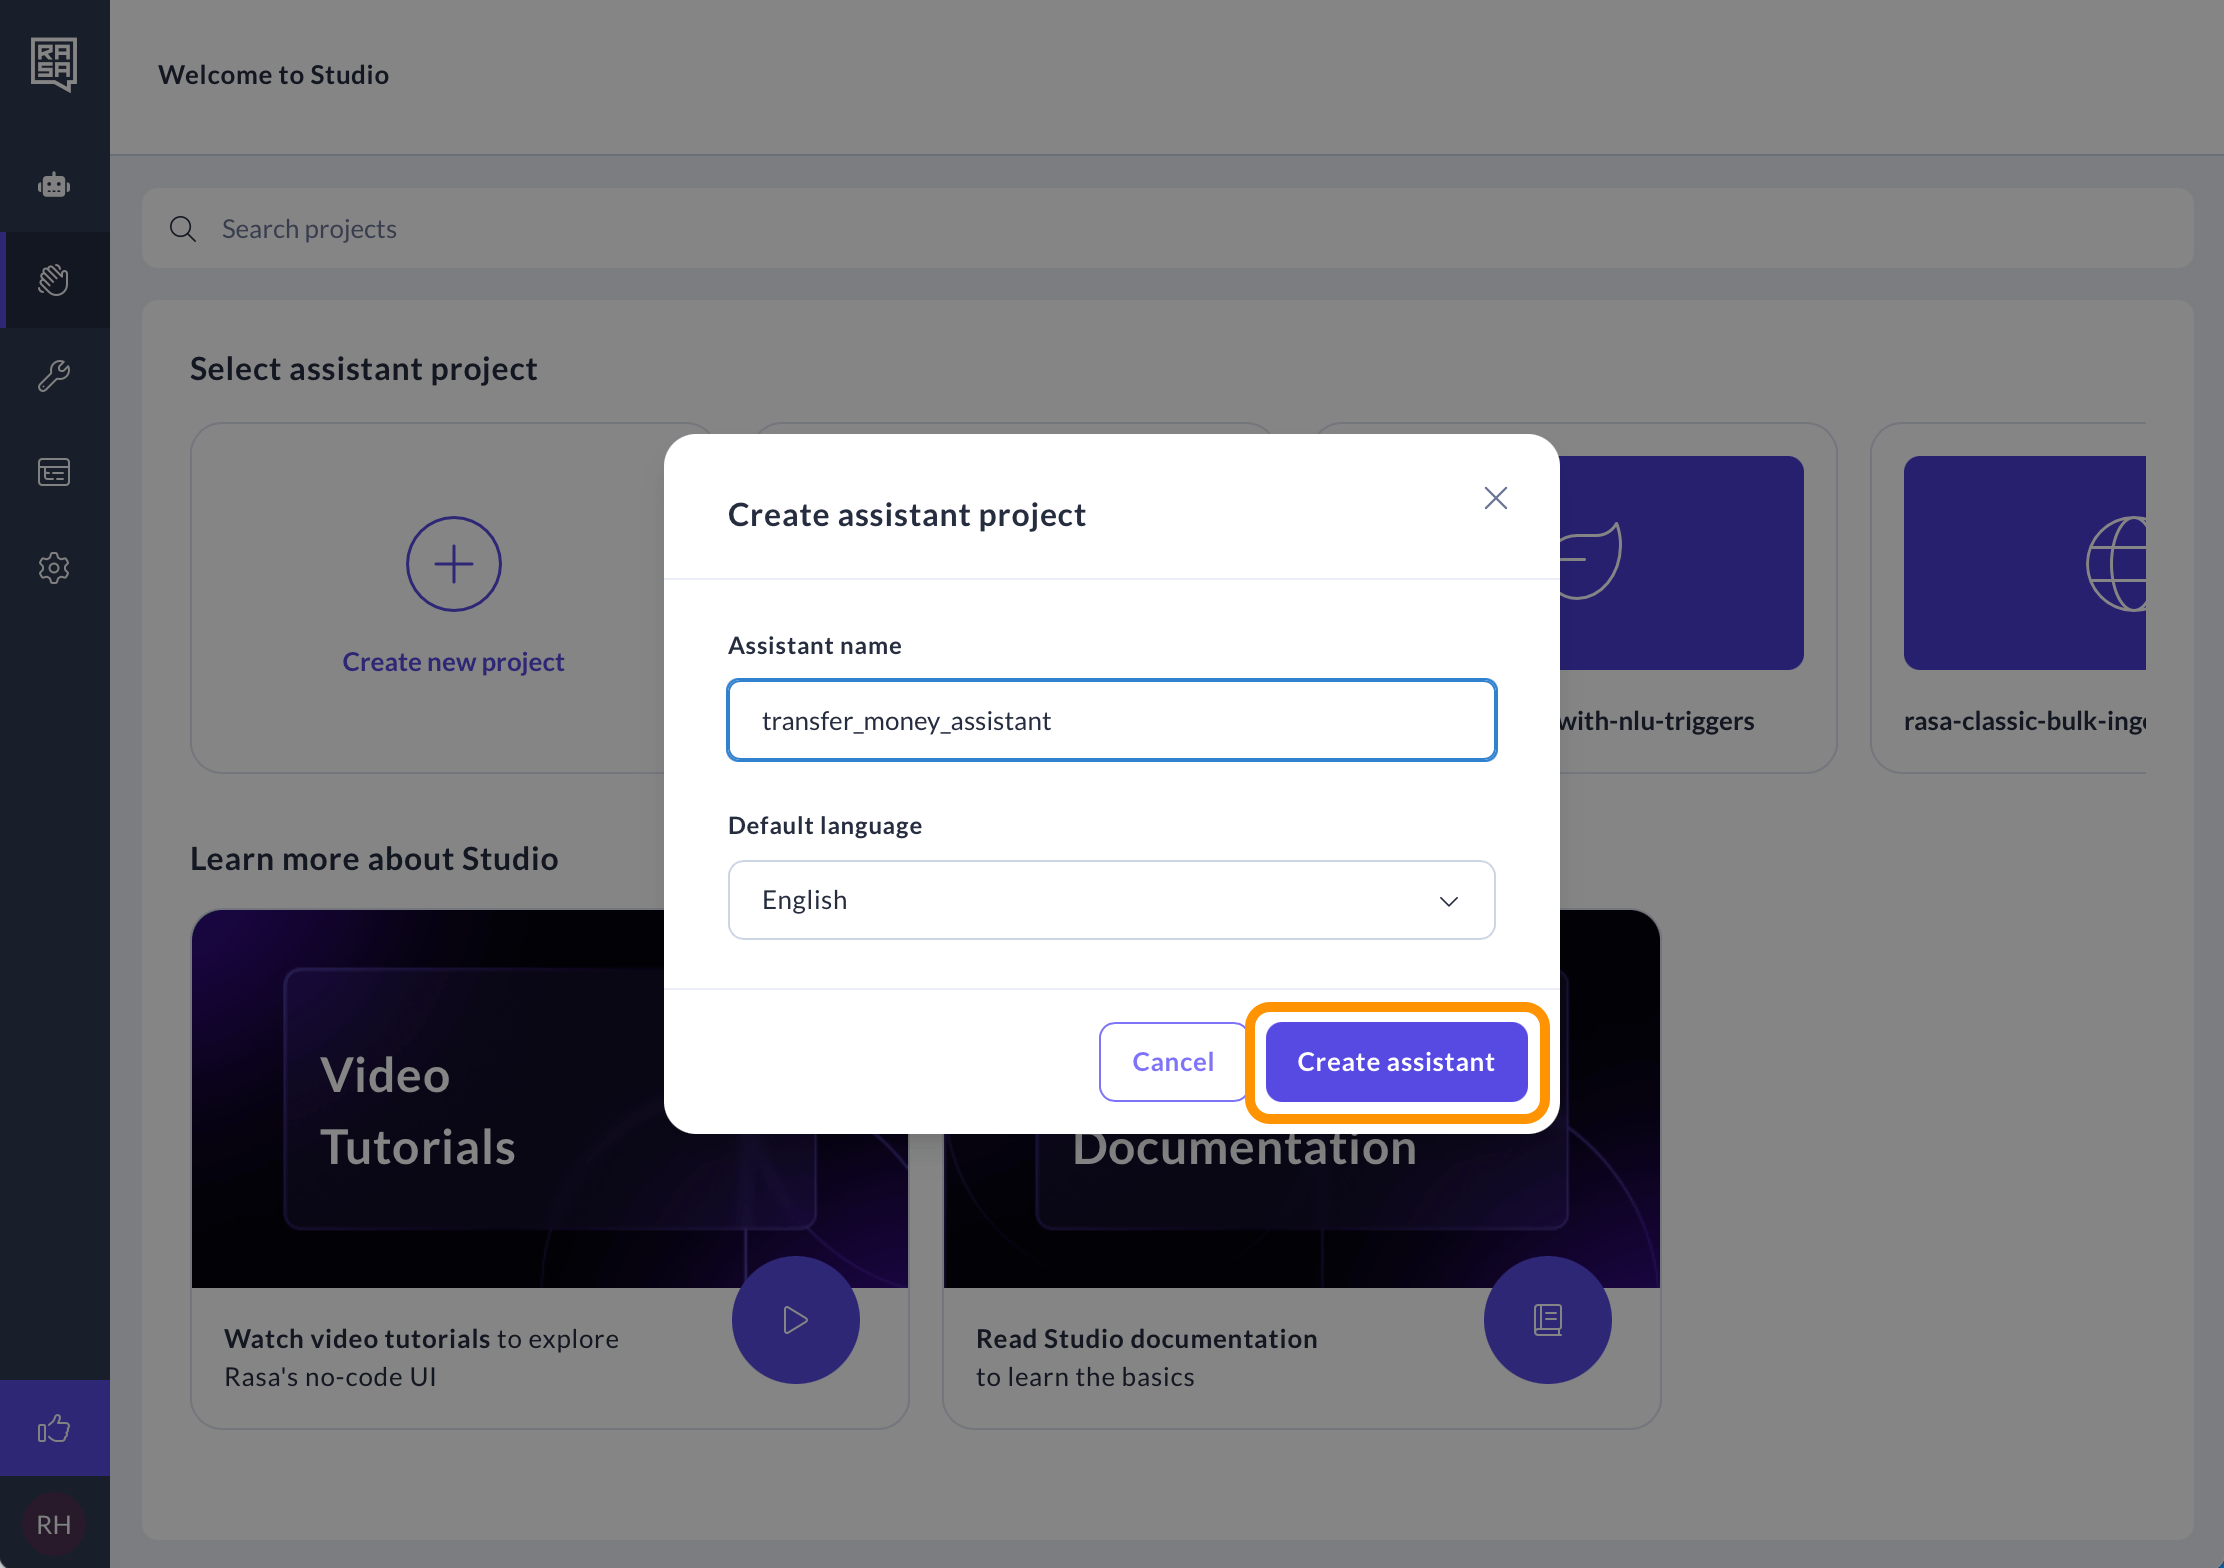
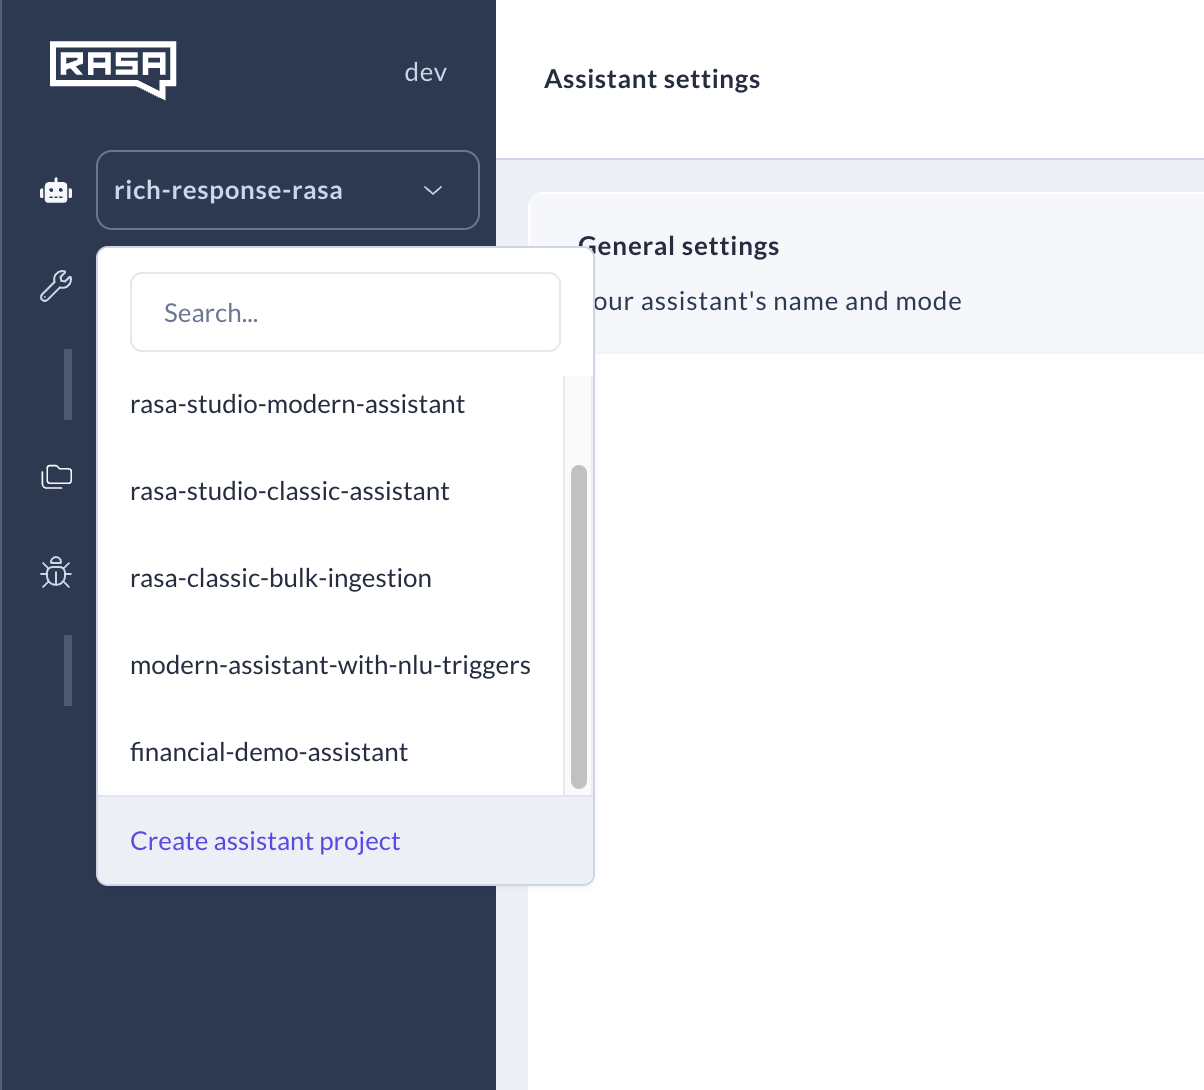 * Give your assistant a name that describes what it will do. Since we're building a bot that transfers money let's name it: `transfer_money_assistant`.
* Keep the **English** selected as a default language, then click **Create assistant**.
* Give your assistant a name that describes what it will do. Since we're building a bot that transfers money let's name it: `transfer_money_assistant`.
* Keep the **English** selected as a default language, then click **Create assistant**.
 ## Step 2: Create your First Conversation
One of the key concepts in Rasa's [CALM](/docs/learn/concepts/calm) (Conversational AI with Language Models) is a flow.
A flow represents a series of steps that guide the user through a conversation.
Think of it as a conversation tree, where each step helps the assistant figure out what to say or do next based on what the user says.
Now, let's create your first flow:
1. **Checkout the Flow Builder**: Navigate to the **Flows** page through the tab in the menu.
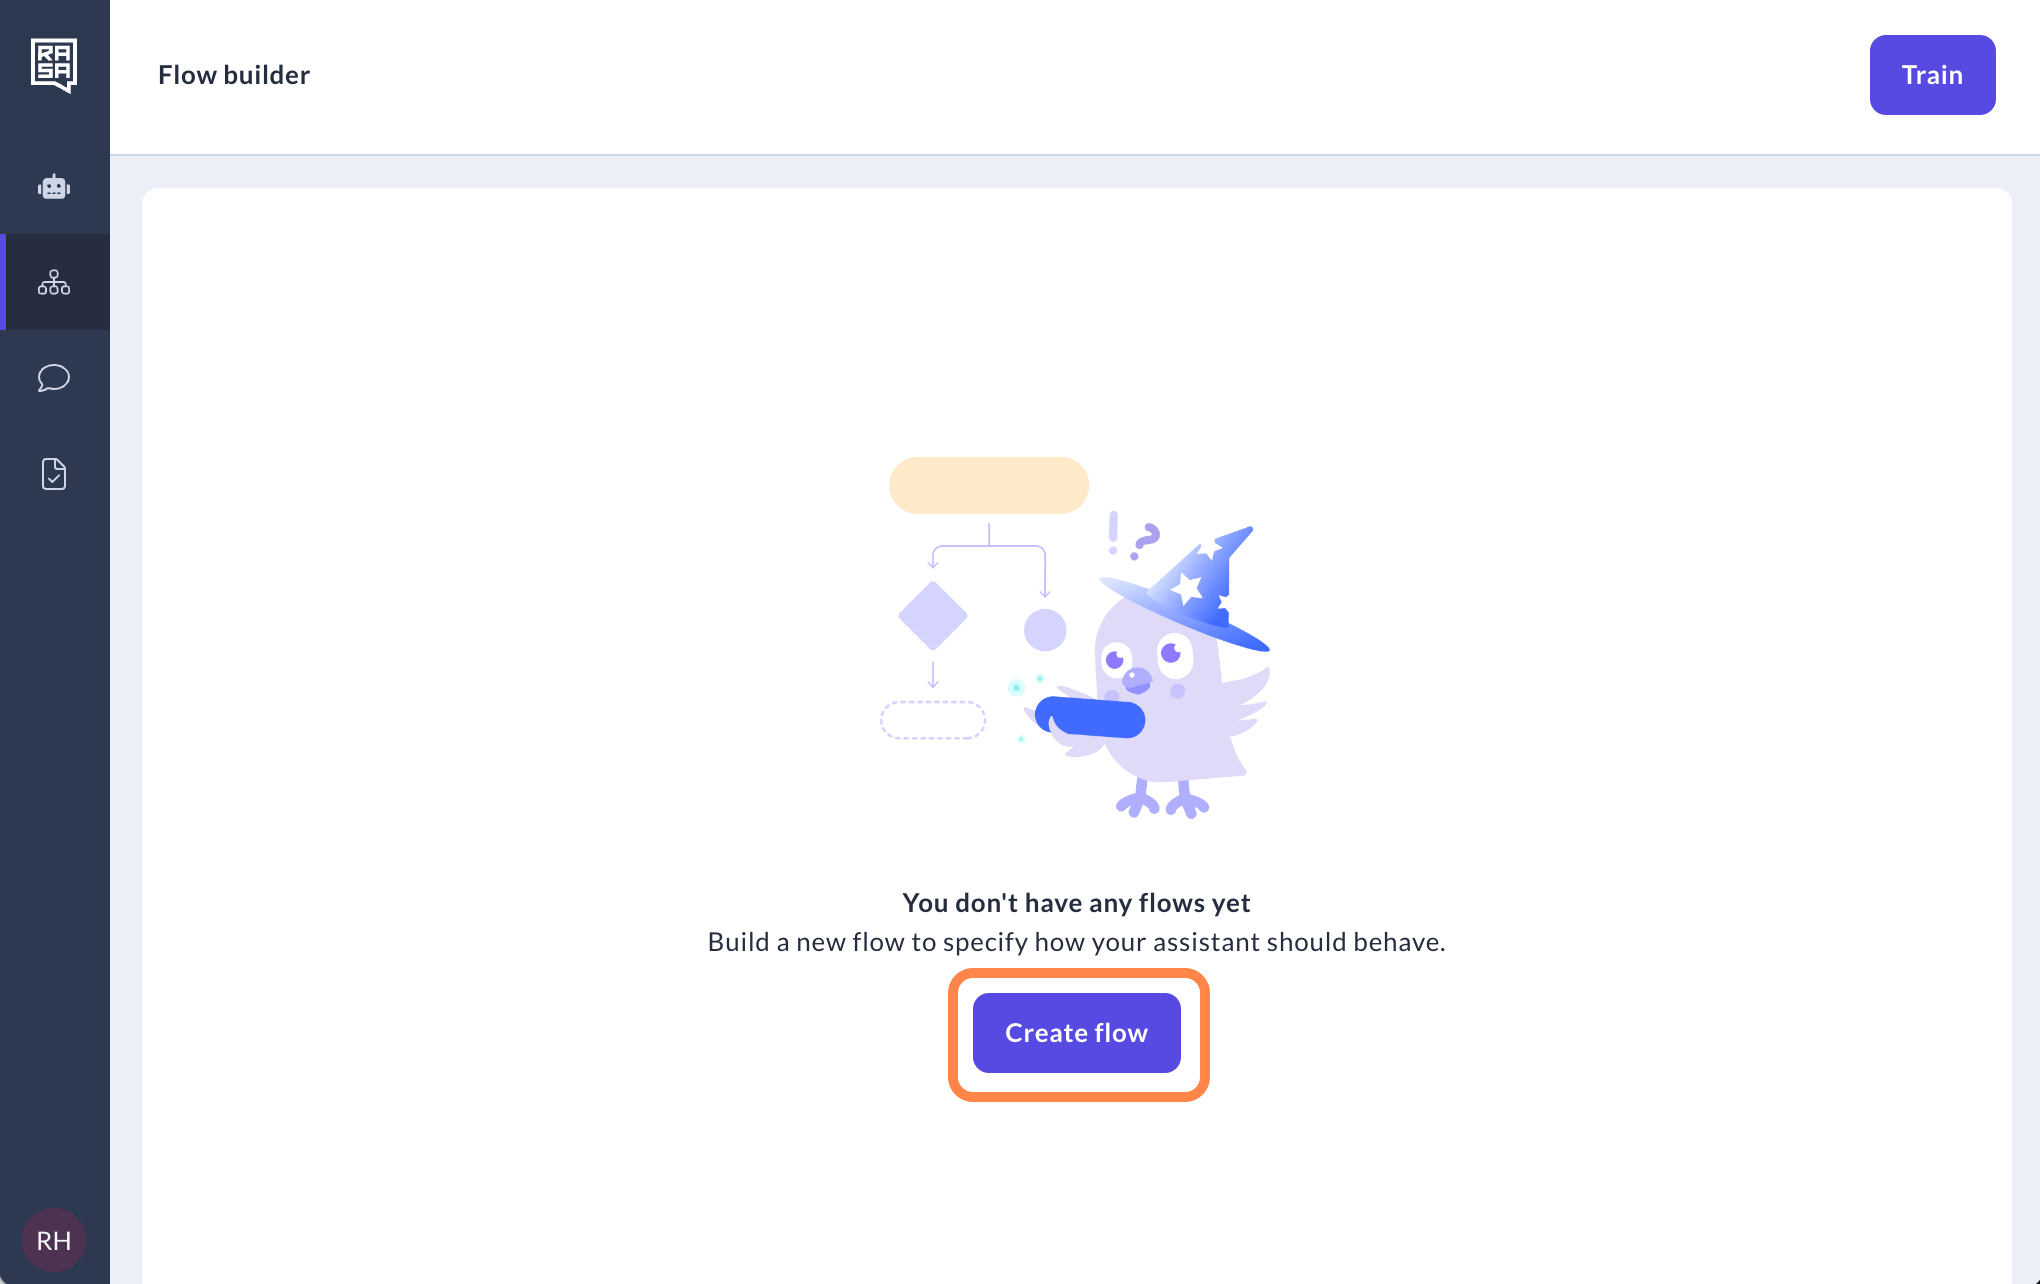
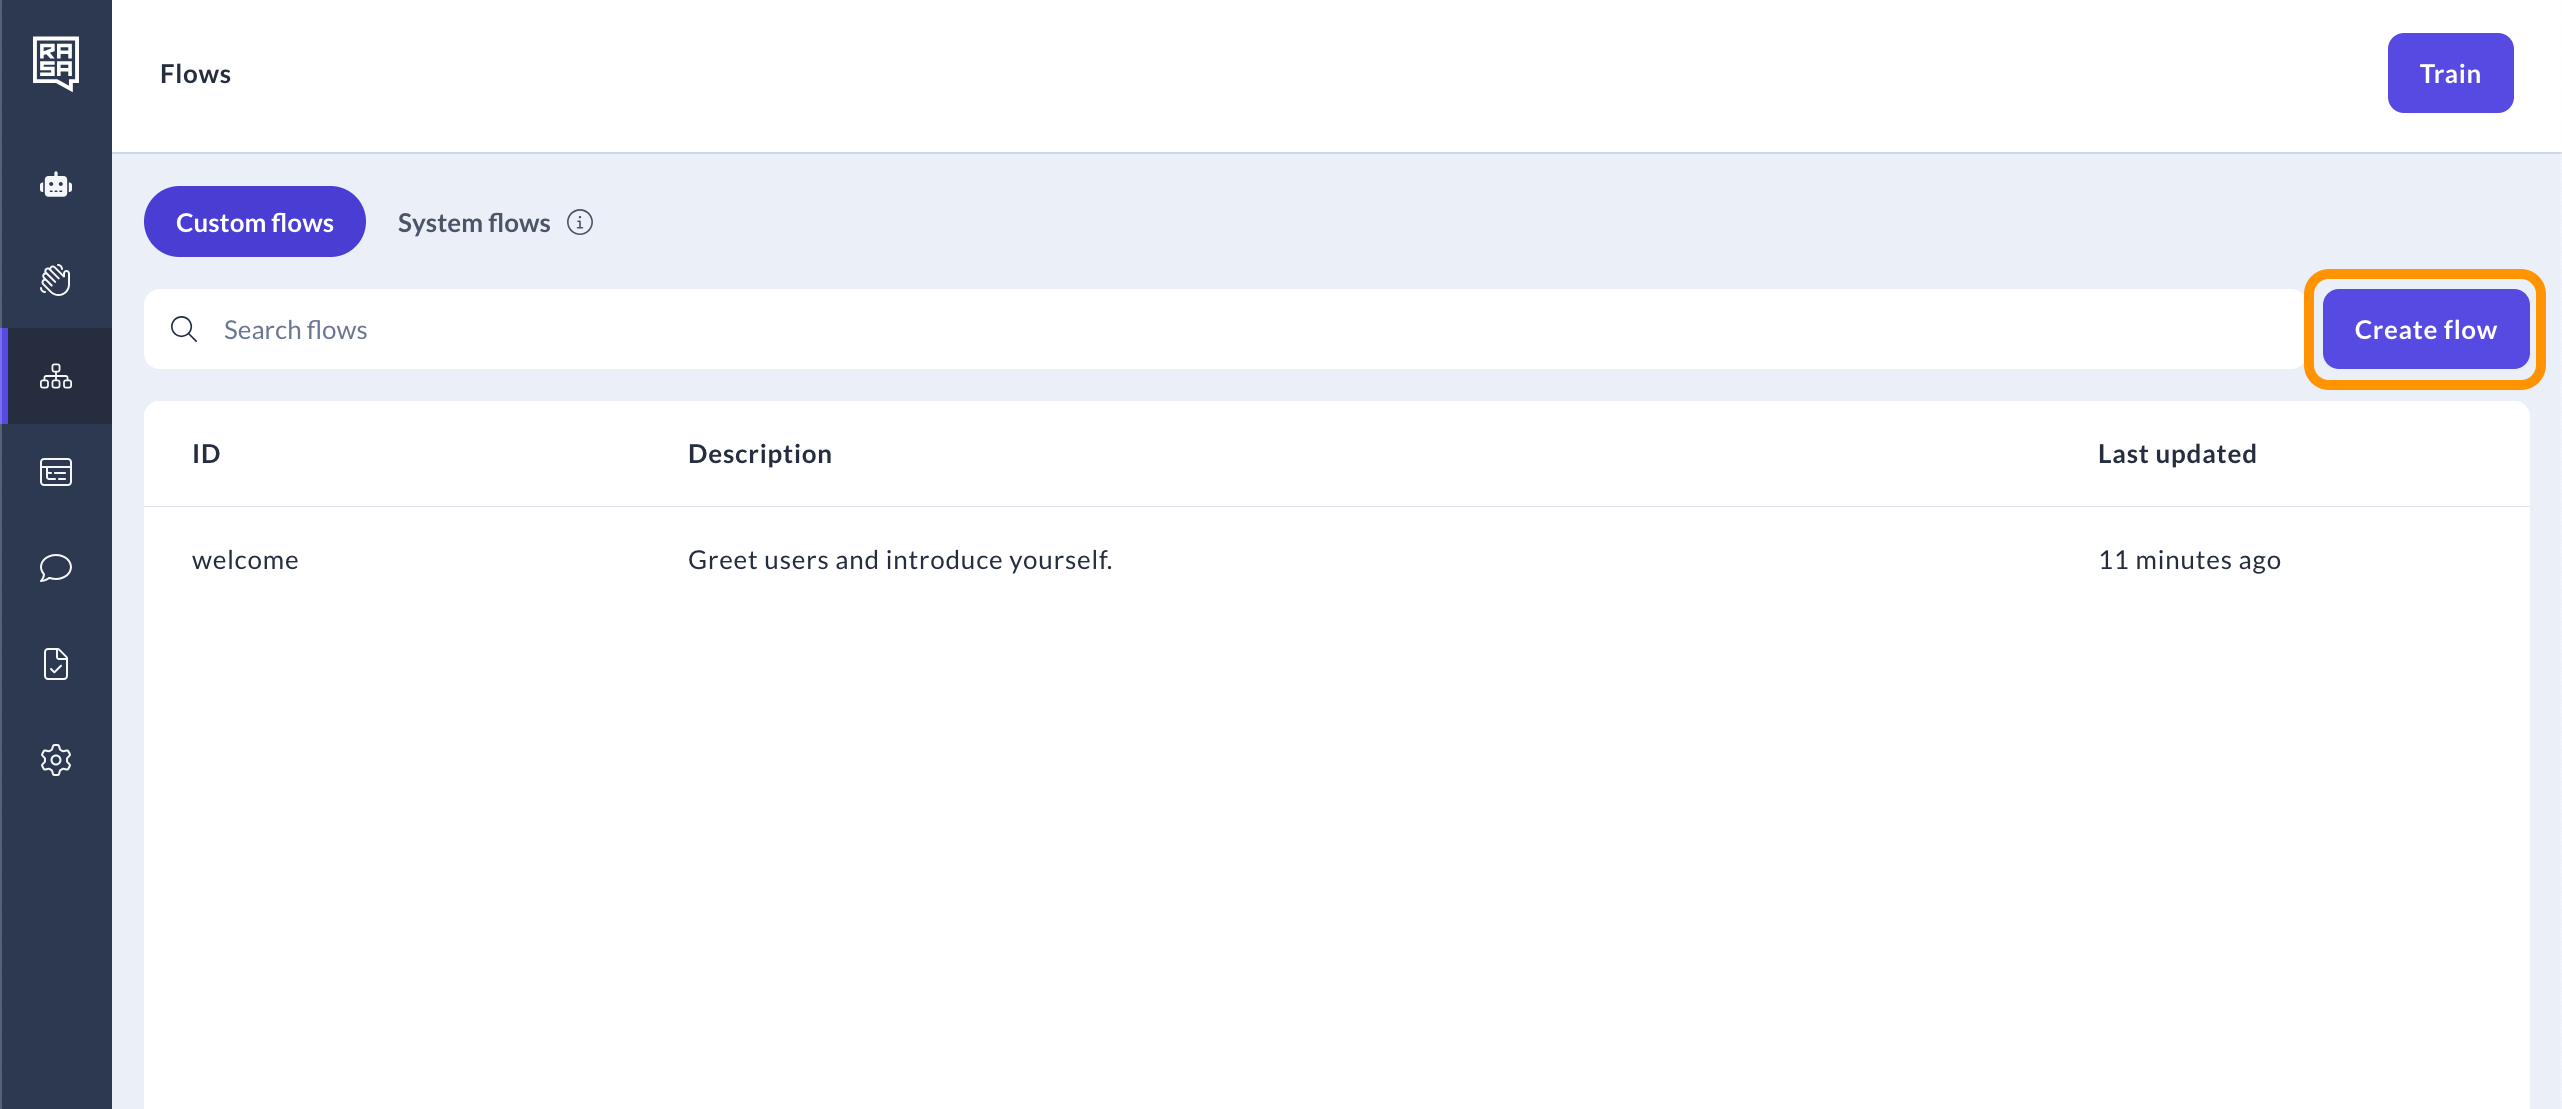
2. **Create your first flow**: Click **Create flow** to begin crafting your welcome flow.
## Step 2: Create your First Conversation
One of the key concepts in Rasa's [CALM](/docs/learn/concepts/calm) (Conversational AI with Language Models) is a flow.
A flow represents a series of steps that guide the user through a conversation.
Think of it as a conversation tree, where each step helps the assistant figure out what to say or do next based on what the user says.
Now, let's create your first flow:
1. **Checkout the Flow Builder**: Navigate to the **Flows** page through the tab in the menu.
2. **Create your first flow**: Click **Create flow** to begin crafting your welcome flow.
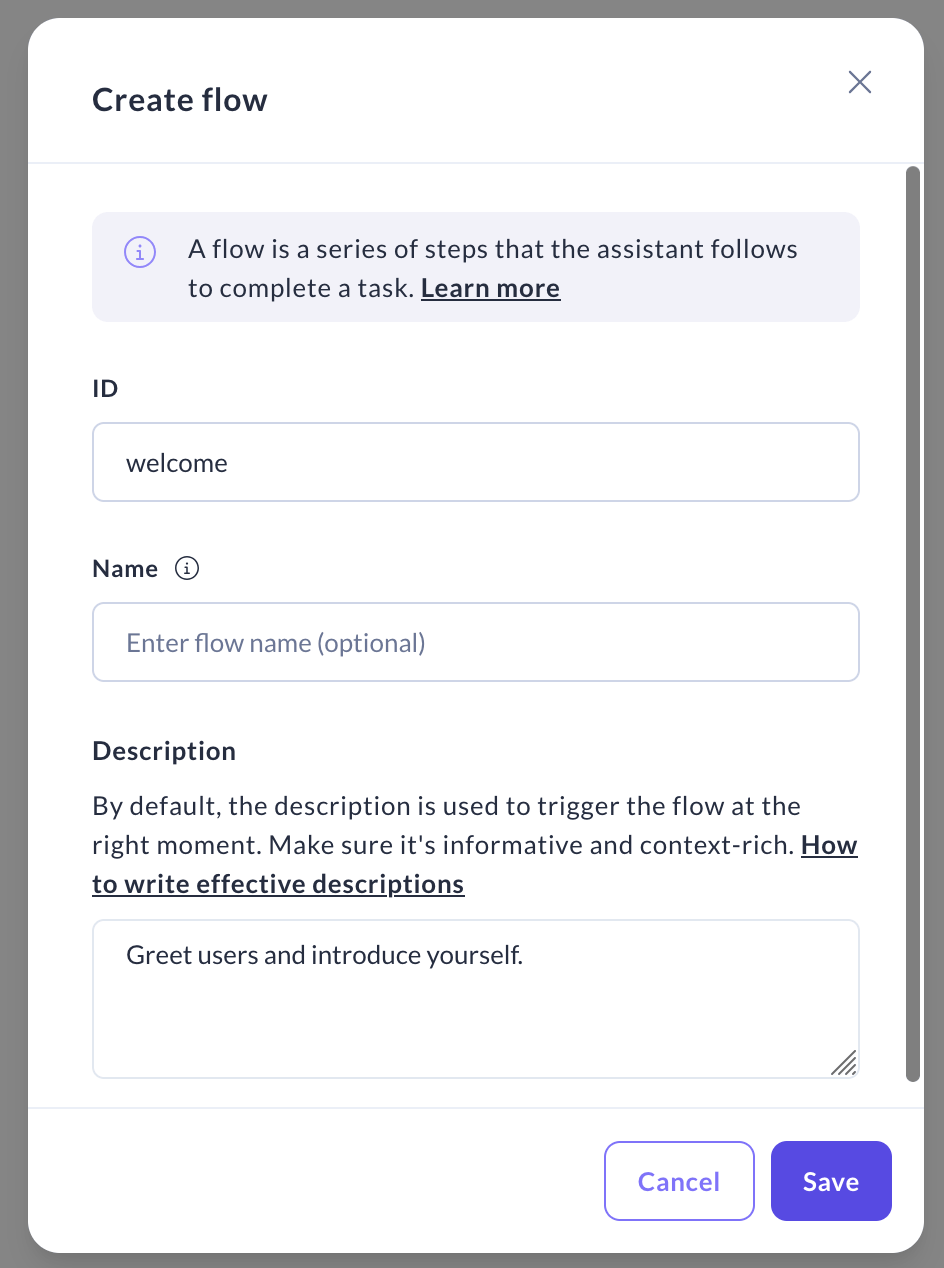
 3. **Create an ID for your Flow**: Since this flow is going to welcome the user, at the beginning of our conversation let's name it **welcome**.\
You can optionally add a flow name, but it’s fine to leave it blank for now.
4. **Write your Flow Description:** Let's describe the flow so your assistant knows when it should be triggered.
Ensure you provide specific and unique instructions, in this case: `Greet the user and introduce yourself` is appropriate. Click "Save" to create and open your flow.
Flow descriptions are incredibly important for your assistant's ability to know where to take a conversation. Rasa assistants use the flow description to determine when it is appropriate to trigger a specific flow.\
[Read more about flows here](/docs/reference/primitives/flows).
3. **Create an ID for your Flow**: Since this flow is going to welcome the user, at the beginning of our conversation let's name it **welcome**.\
You can optionally add a flow name, but it’s fine to leave it blank for now.
4. **Write your Flow Description:** Let's describe the flow so your assistant knows when it should be triggered.
Ensure you provide specific and unique instructions, in this case: `Greet the user and introduce yourself` is appropriate. Click "Save" to create and open your flow.
Flow descriptions are incredibly important for your assistant's ability to know where to take a conversation. Rasa assistants use the flow description to determine when it is appropriate to trigger a specific flow.\
[Read more about flows here](/docs/reference/primitives/flows).
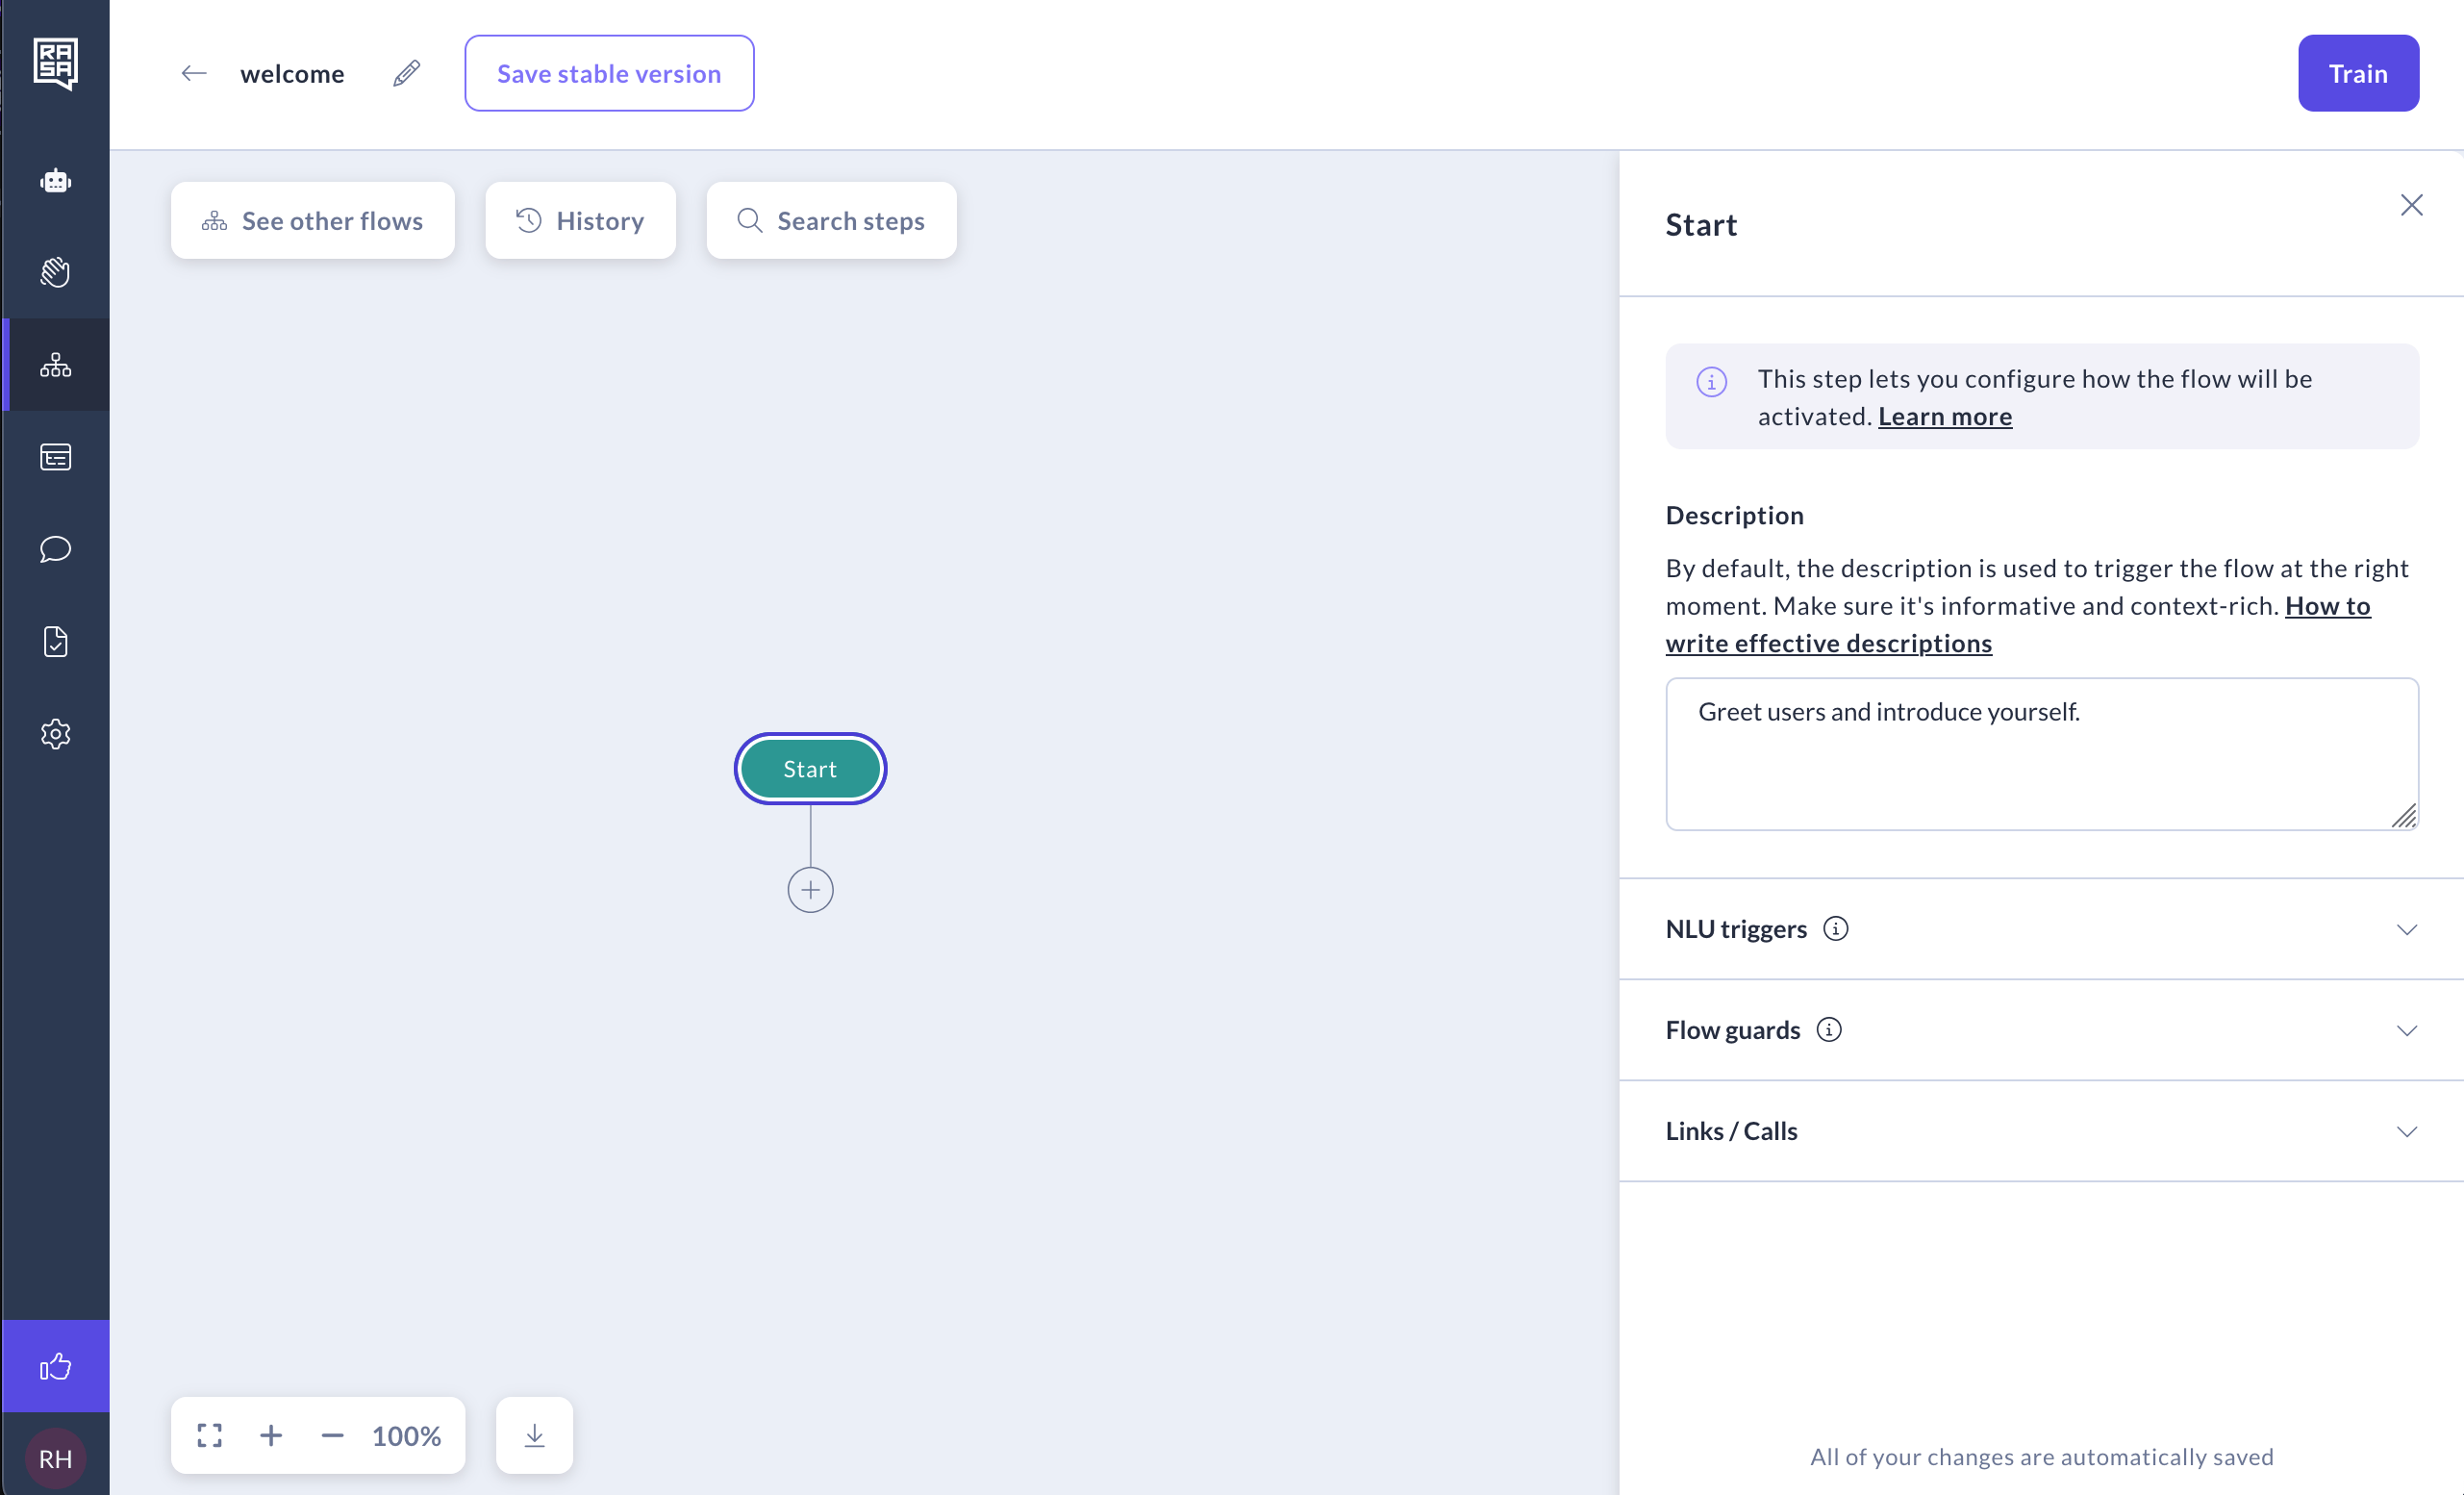
 5. Flows start with the "Start" step, which is where you configure how the flow gets triggered. By default, it will be triggered by CALM based on the description you provided. This works for us, so you can leave it as is for now.
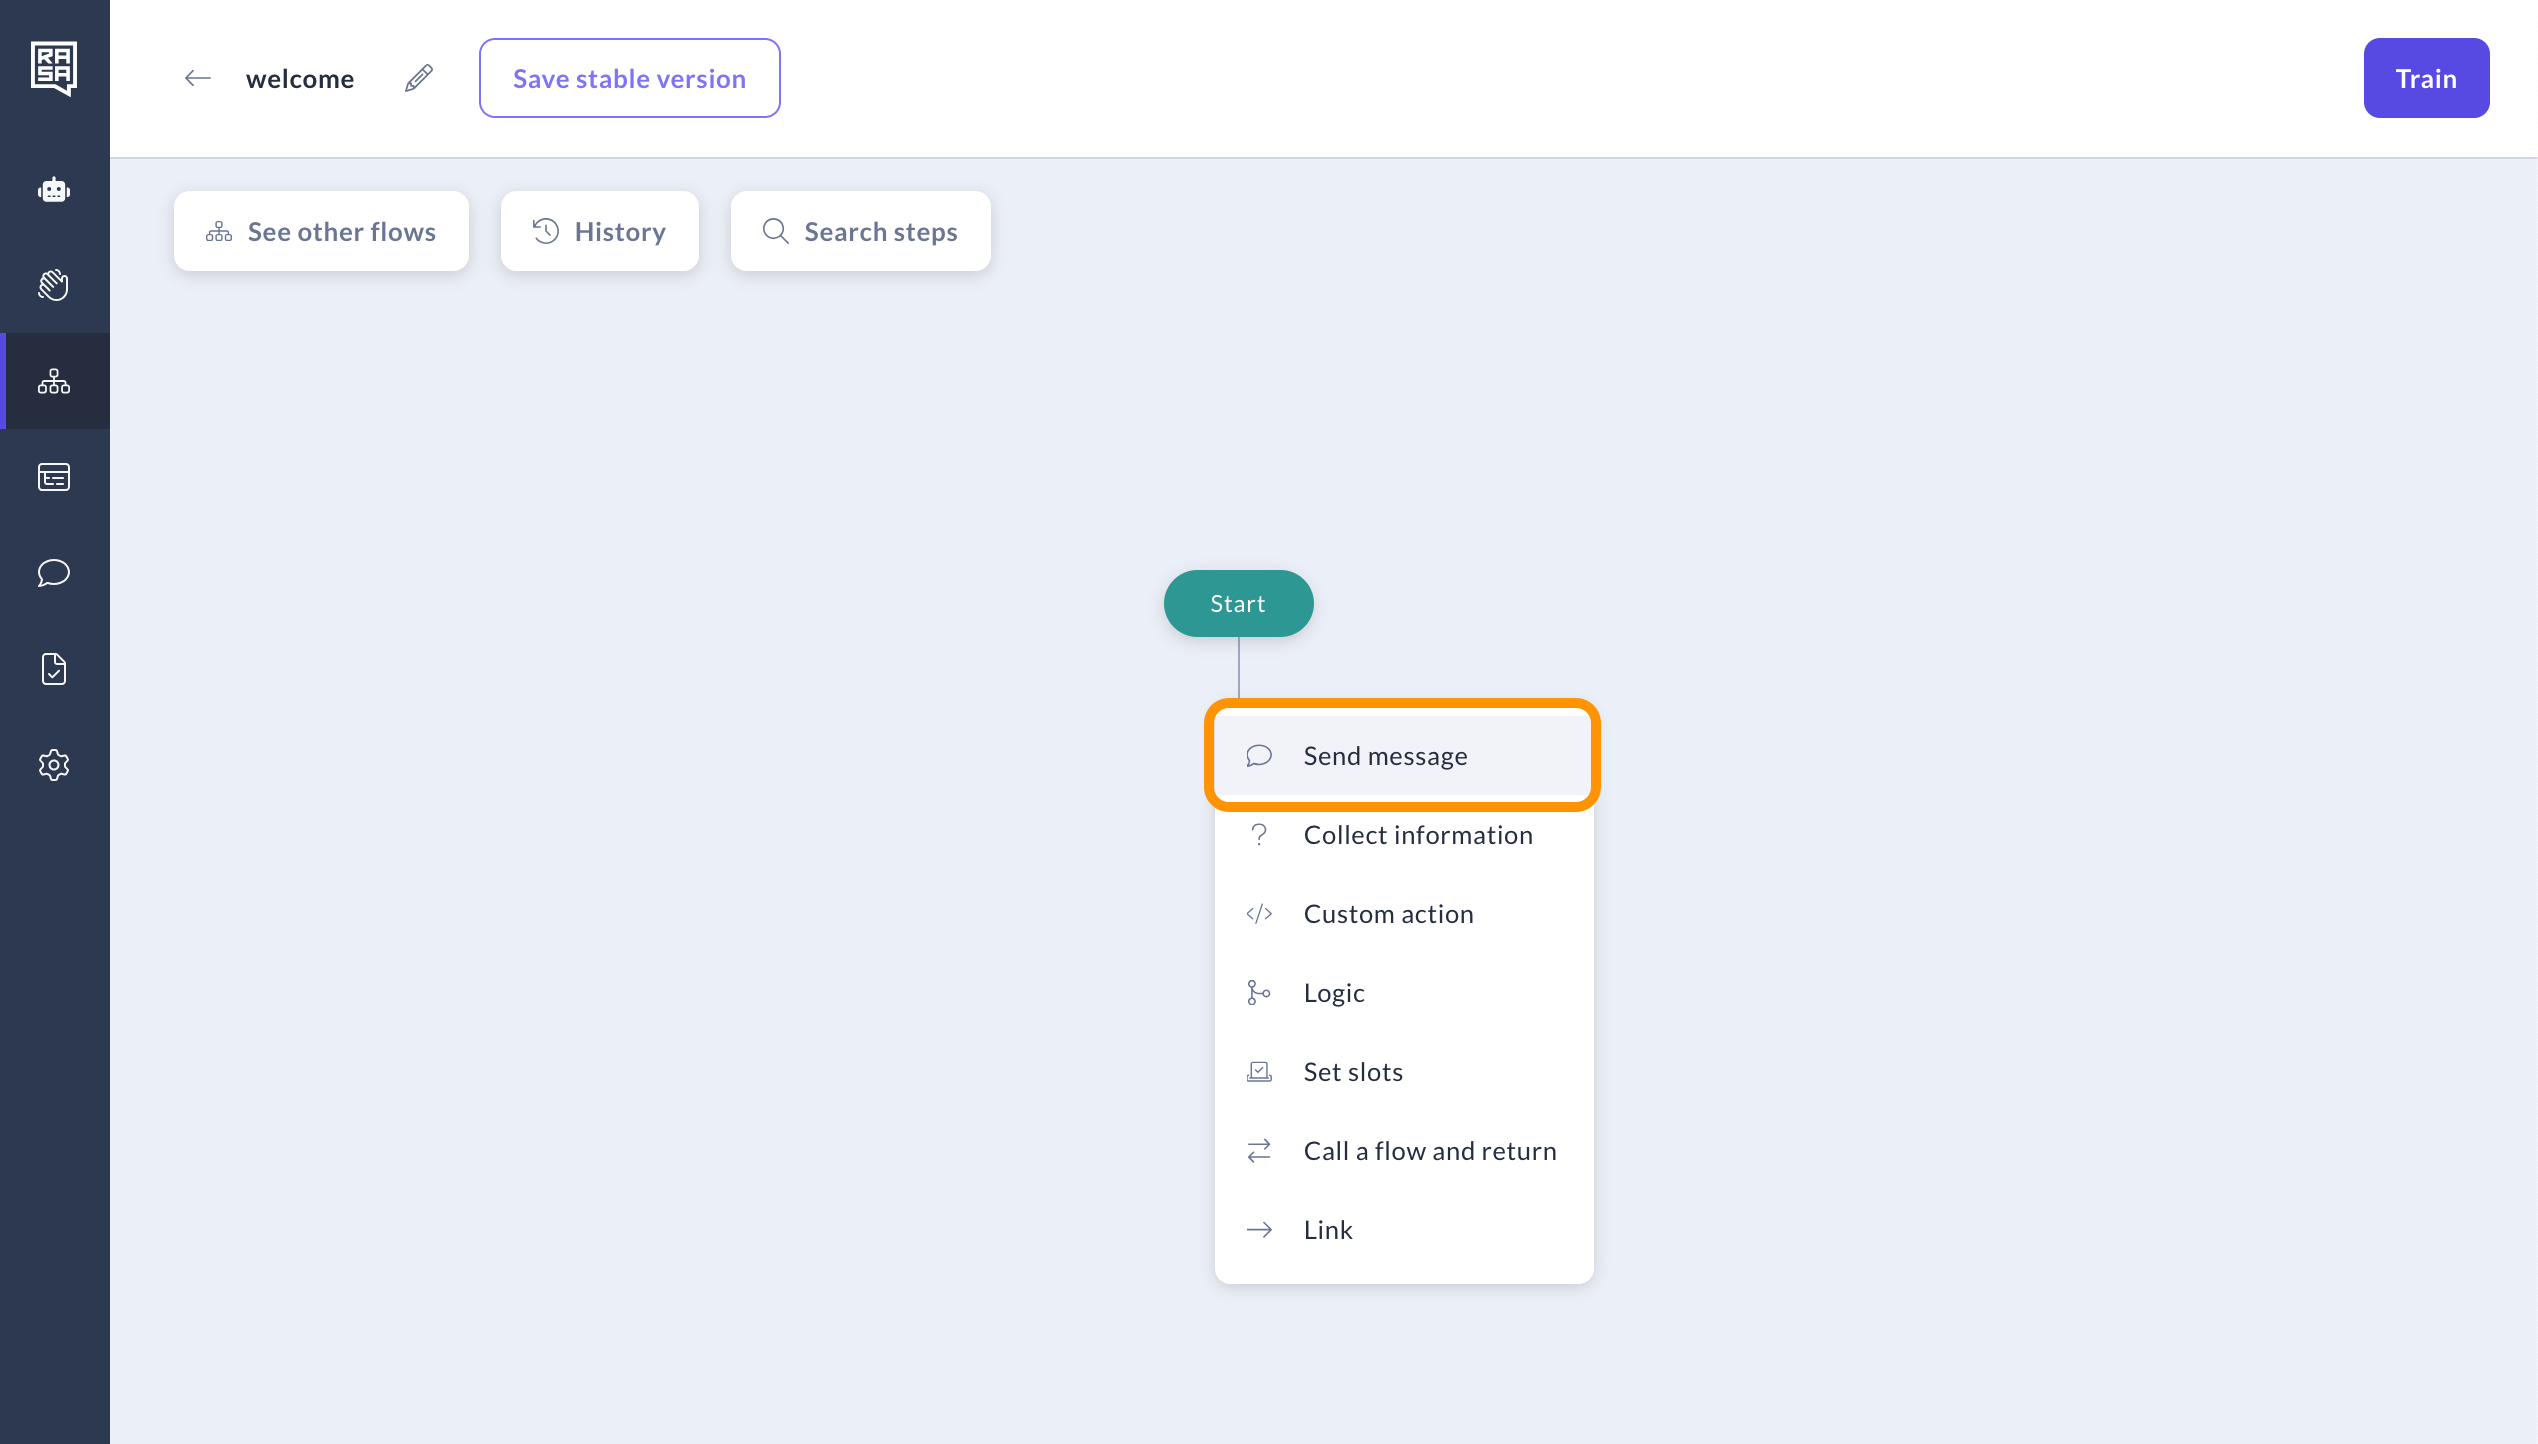
 6. Click the "Plus" icon to add a step. From the dropdown menu, select "Send message" to have your assistant send a text message to the user.
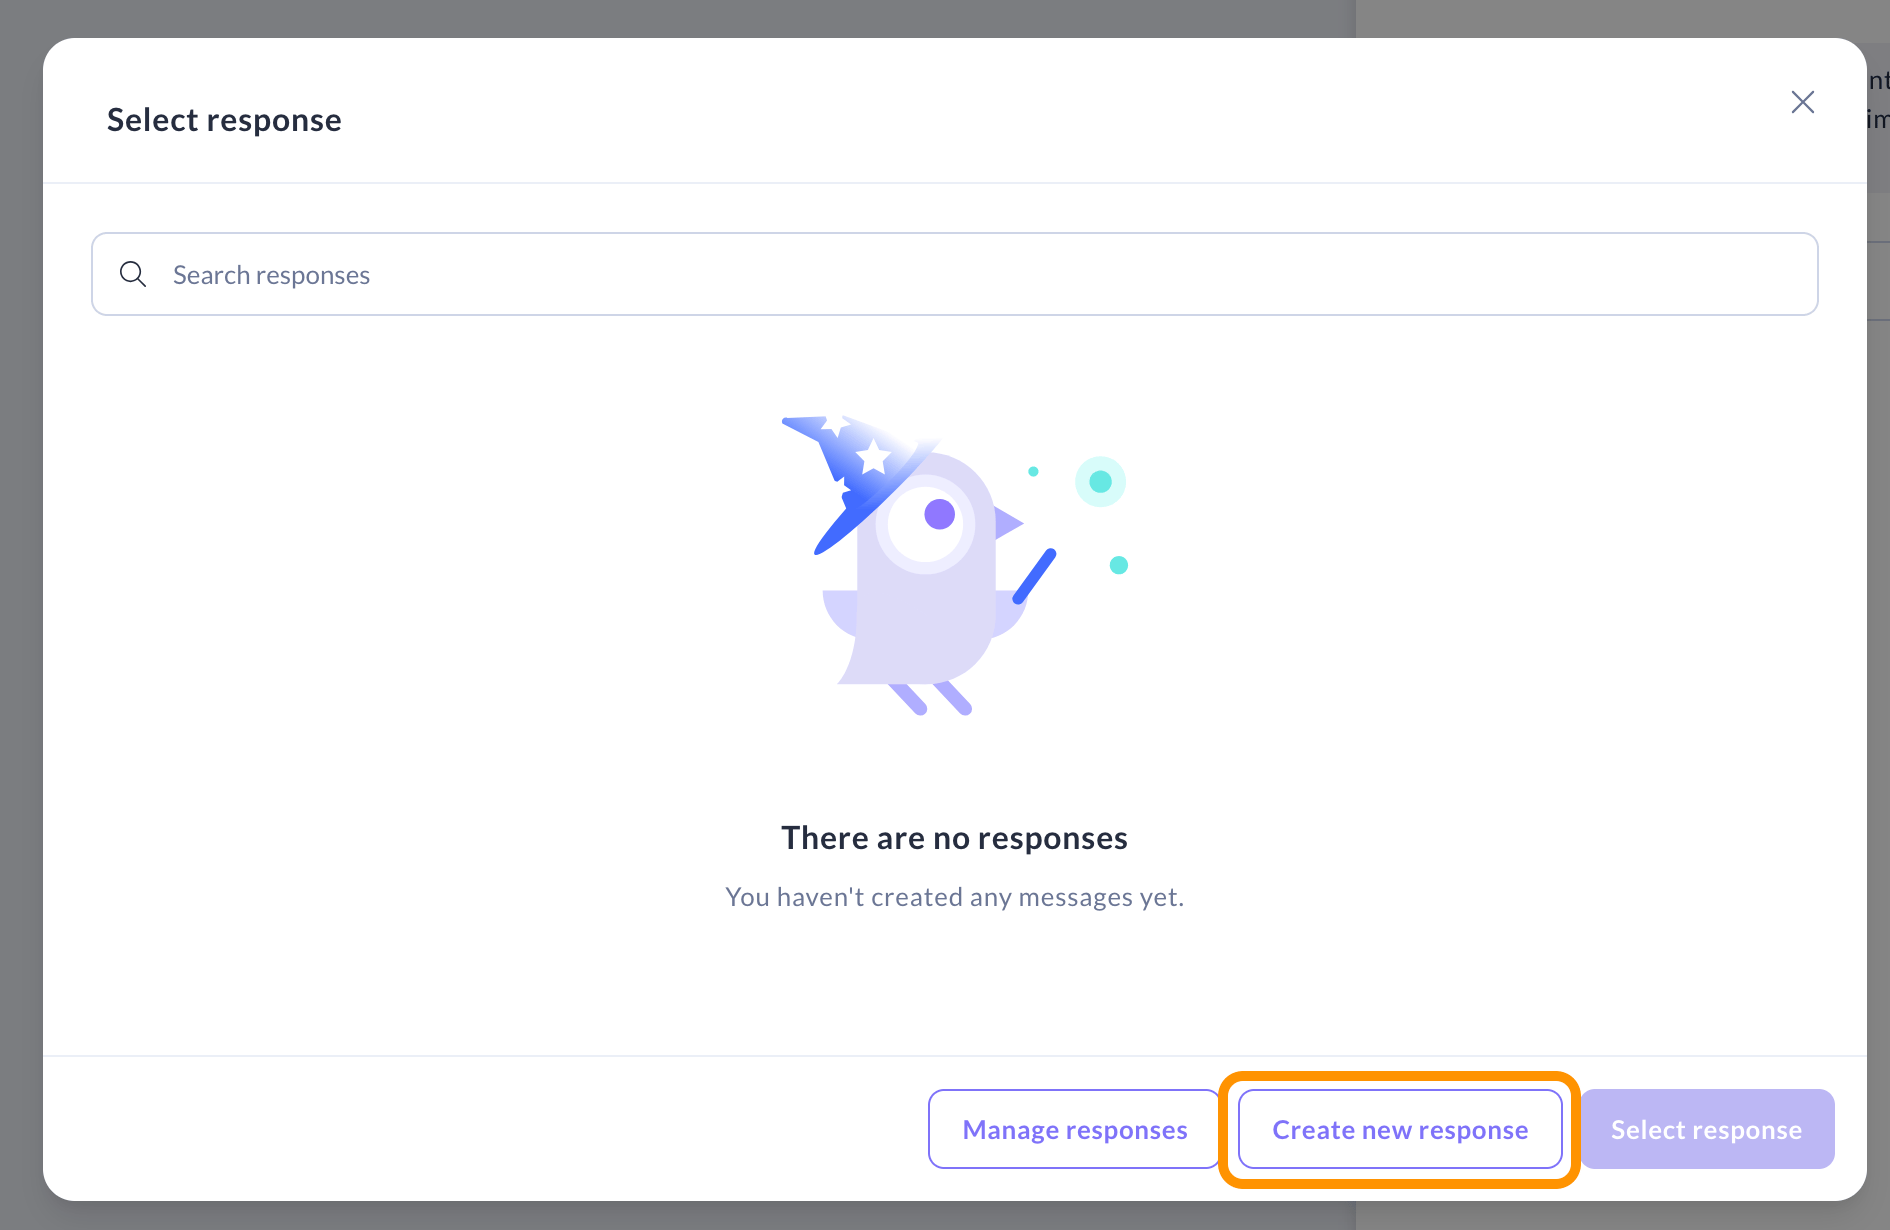
 7. Click on "Select or create response" on the side panel. When the pop-up appears, click the "Create new response" button.
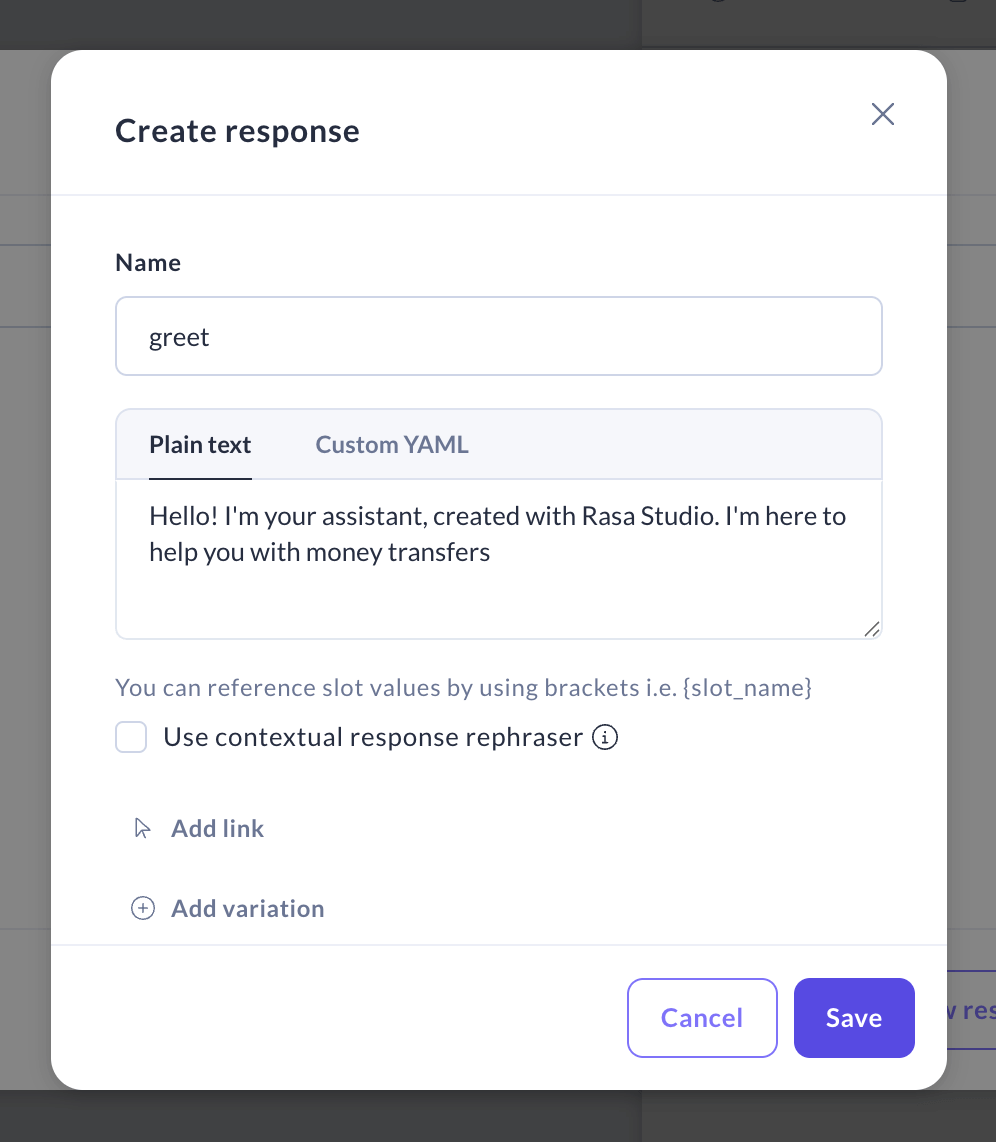
 8. Fill in the details:
1. Enter the name, e.g `greet`.
2. Enter the response e.g "Hello! I’m your assistant, created with Rasa Studio. I’m here to help you with money transfers".
3. Select "Use contextual response rephraser" to have the response automatically rephrased based on the conversation’s context.
4. Once you're set, click "Save".
8. Fill in the details:
1. Enter the name, e.g `greet`.
2. Enter the response e.g "Hello! I’m your assistant, created with Rasa Studio. I’m here to help you with money transfers".
3. Select "Use contextual response rephraser" to have the response automatically rephrased based on the conversation’s context.
4. Once you're set, click "Save".
 ## Step 3: Creating Money Transfer flow
Let’s now build another flow to help users in conducting money transfers, allowing CALM to activate this process when users inquire about sending money. To do it:
1. Return to the flow list and click "Create flow".
## Step 3: Creating Money Transfer flow
Let’s now build another flow to help users in conducting money transfers, allowing CALM to activate this process when users inquire about sending money. To do it:
1. Return to the flow list and click "Create flow".
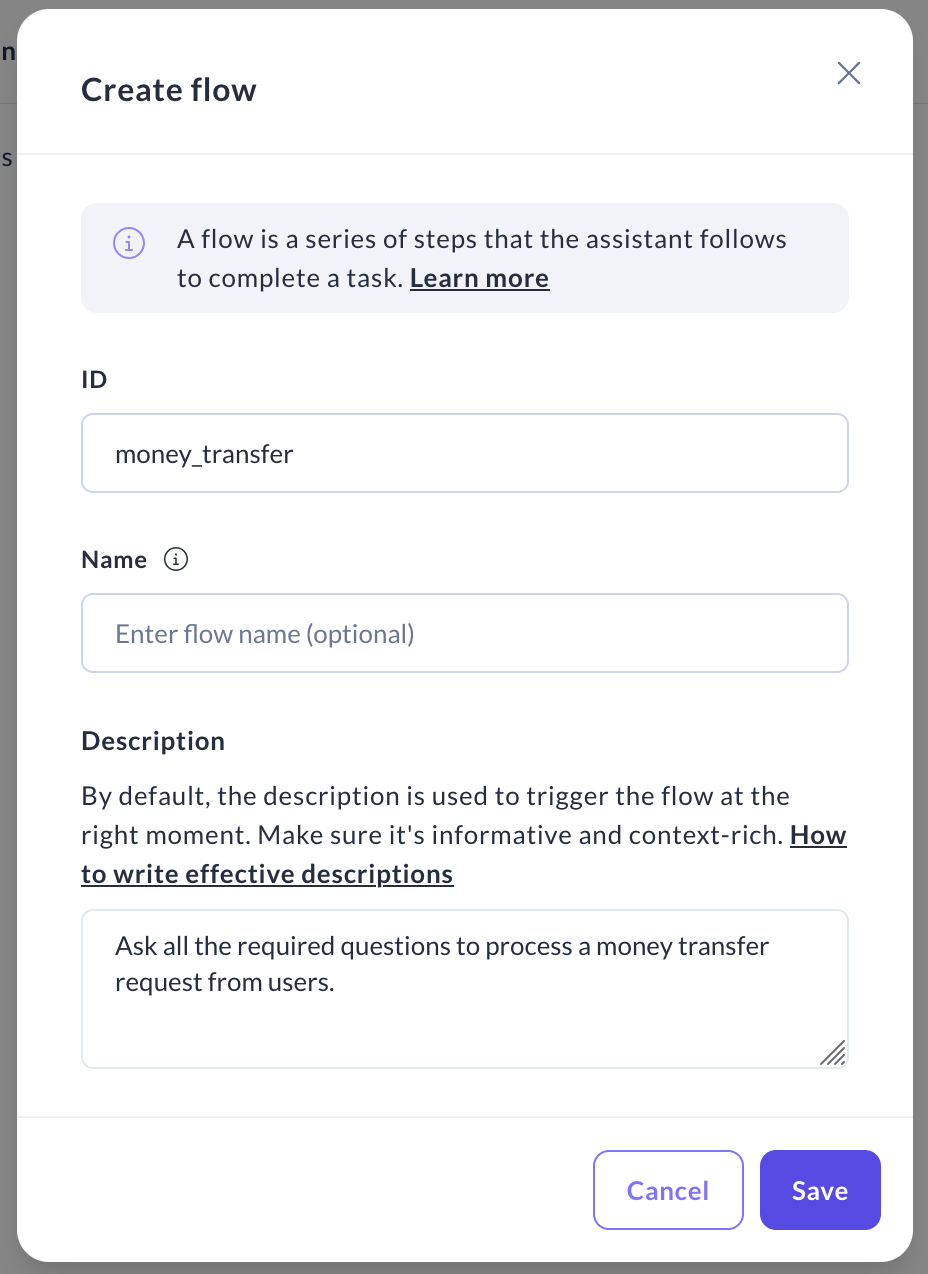
 2. Name your flow `money_transfer` and add the description: "Ask all the required questions to process a money transfer request from users." Click "Save".
 ### Collecting information about the recipient
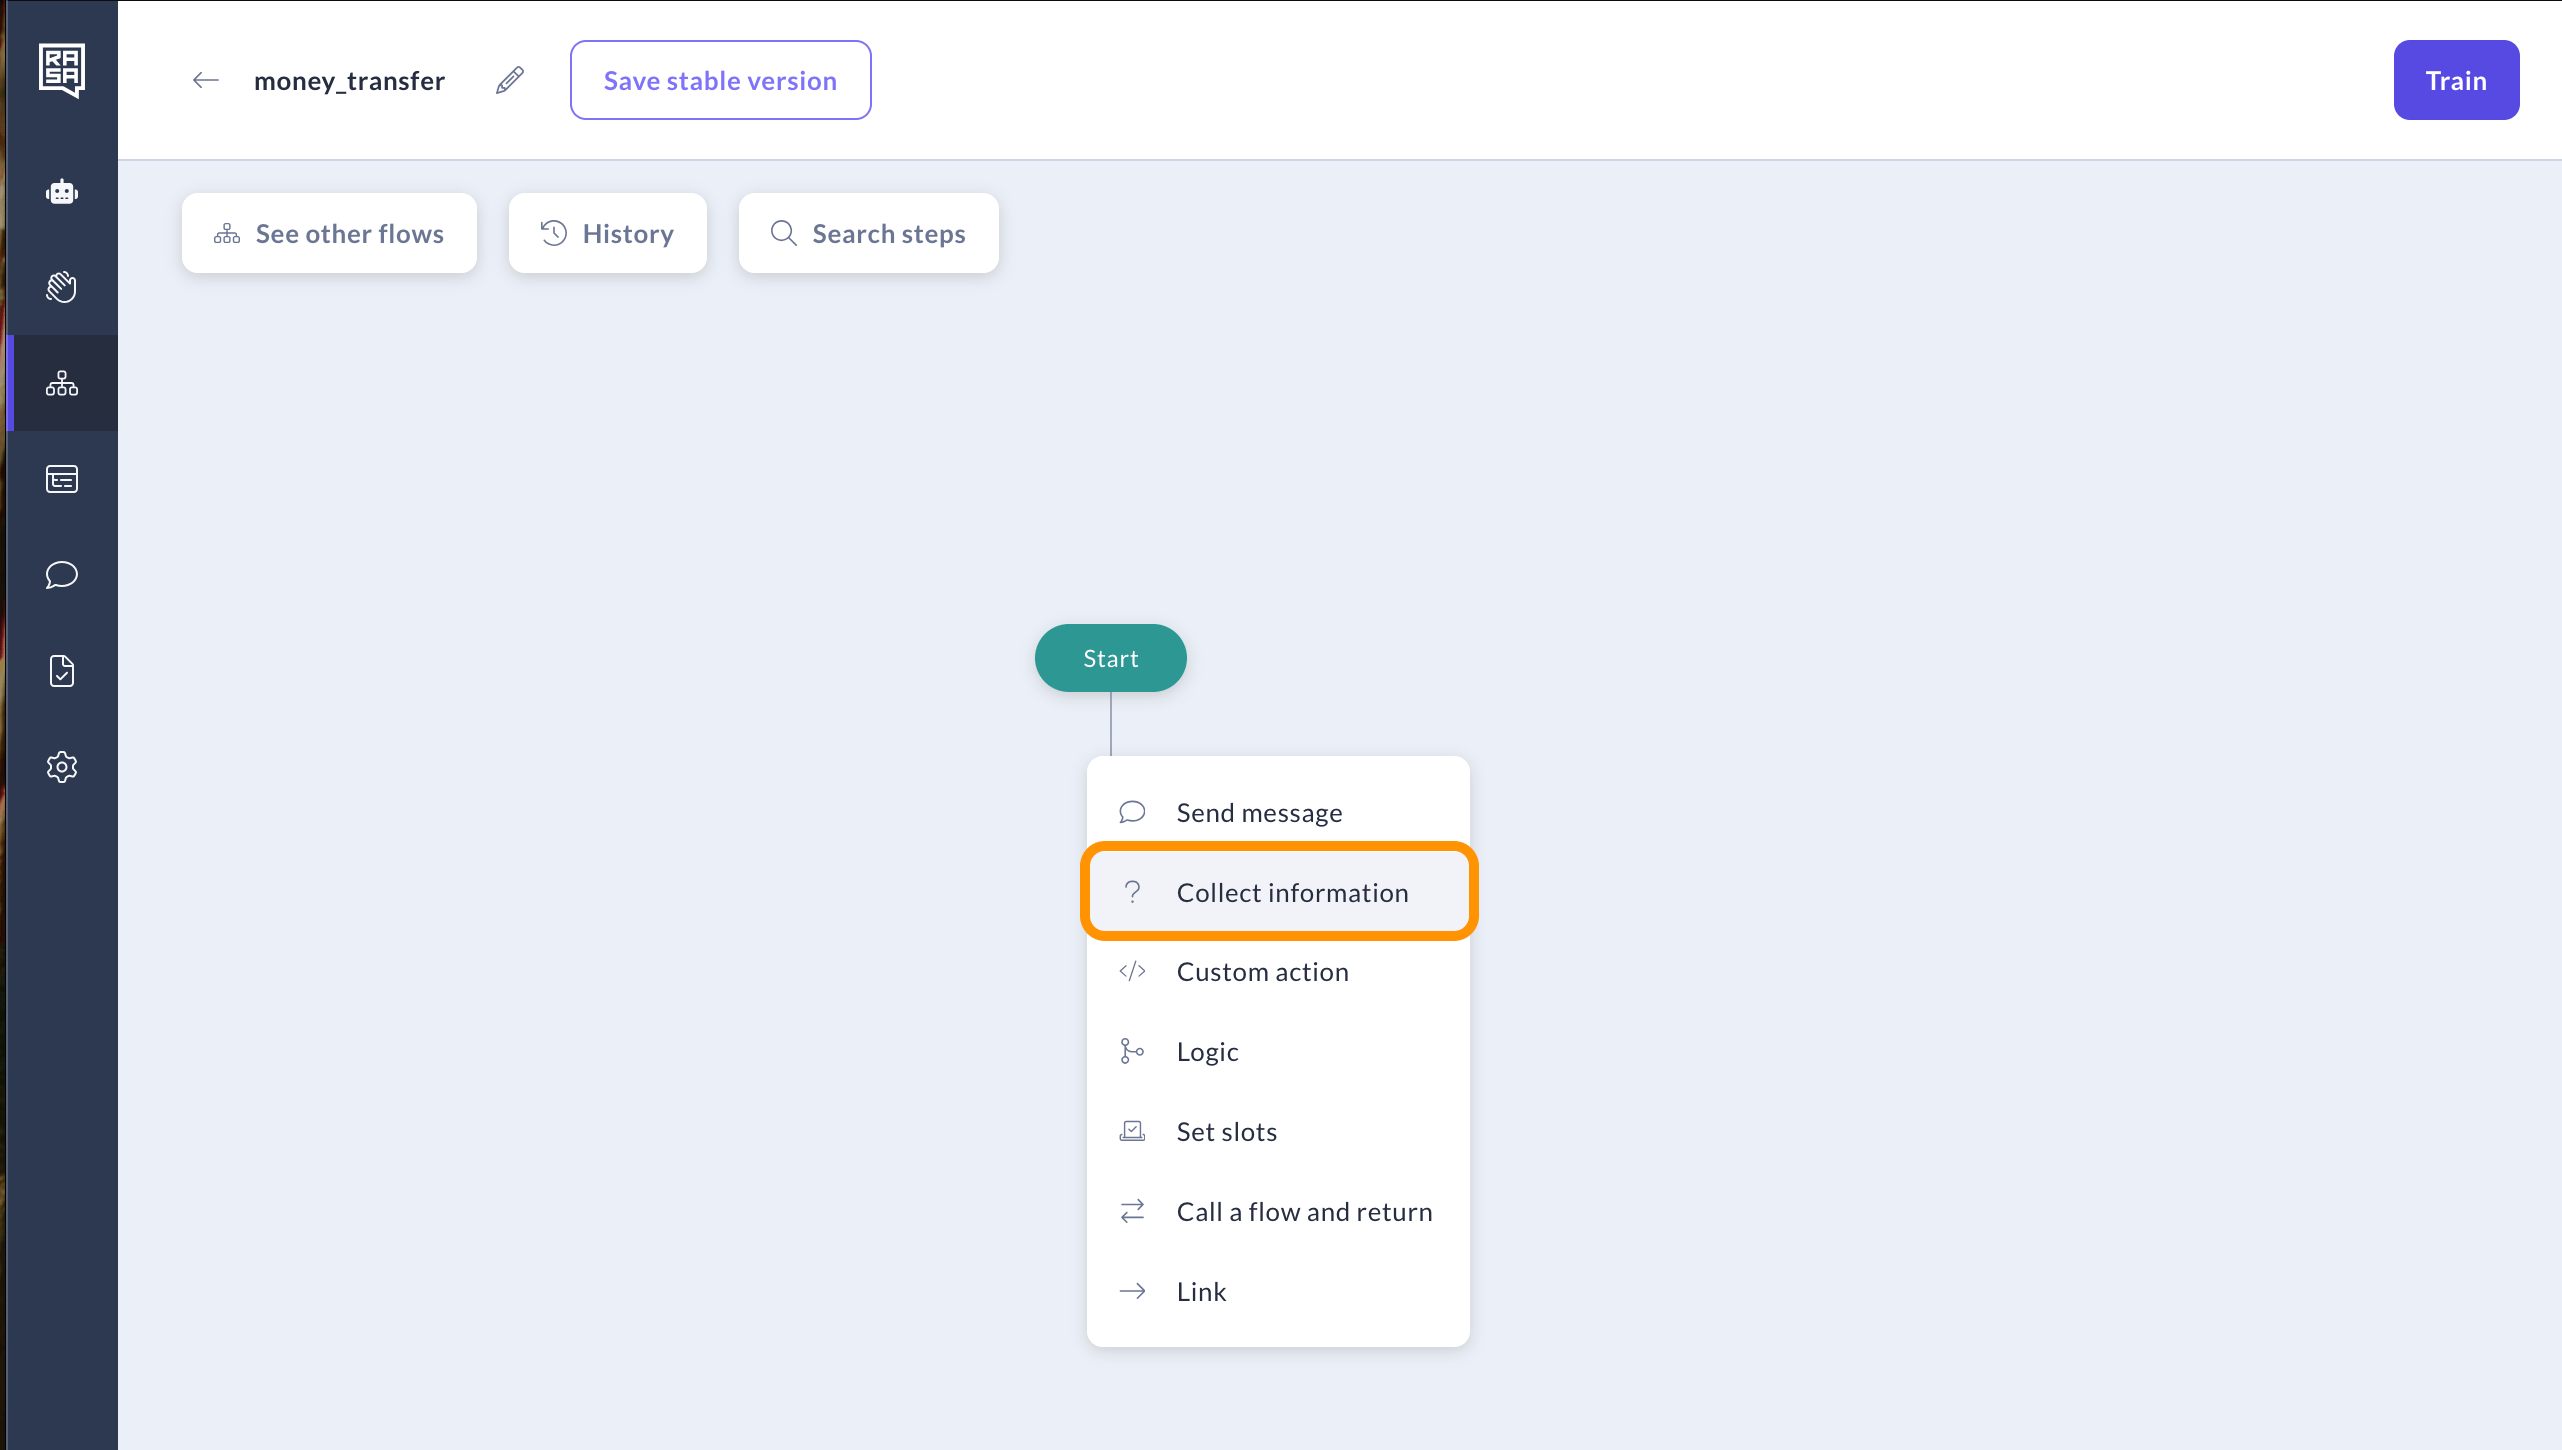
1. In the newly created flow, add the "Collect Information" step to ask the user who the recipient of the transfer will be.
### Collecting information about the recipient
1. In the newly created flow, add the "Collect Information" step to ask the user who the recipient of the transfer will be.
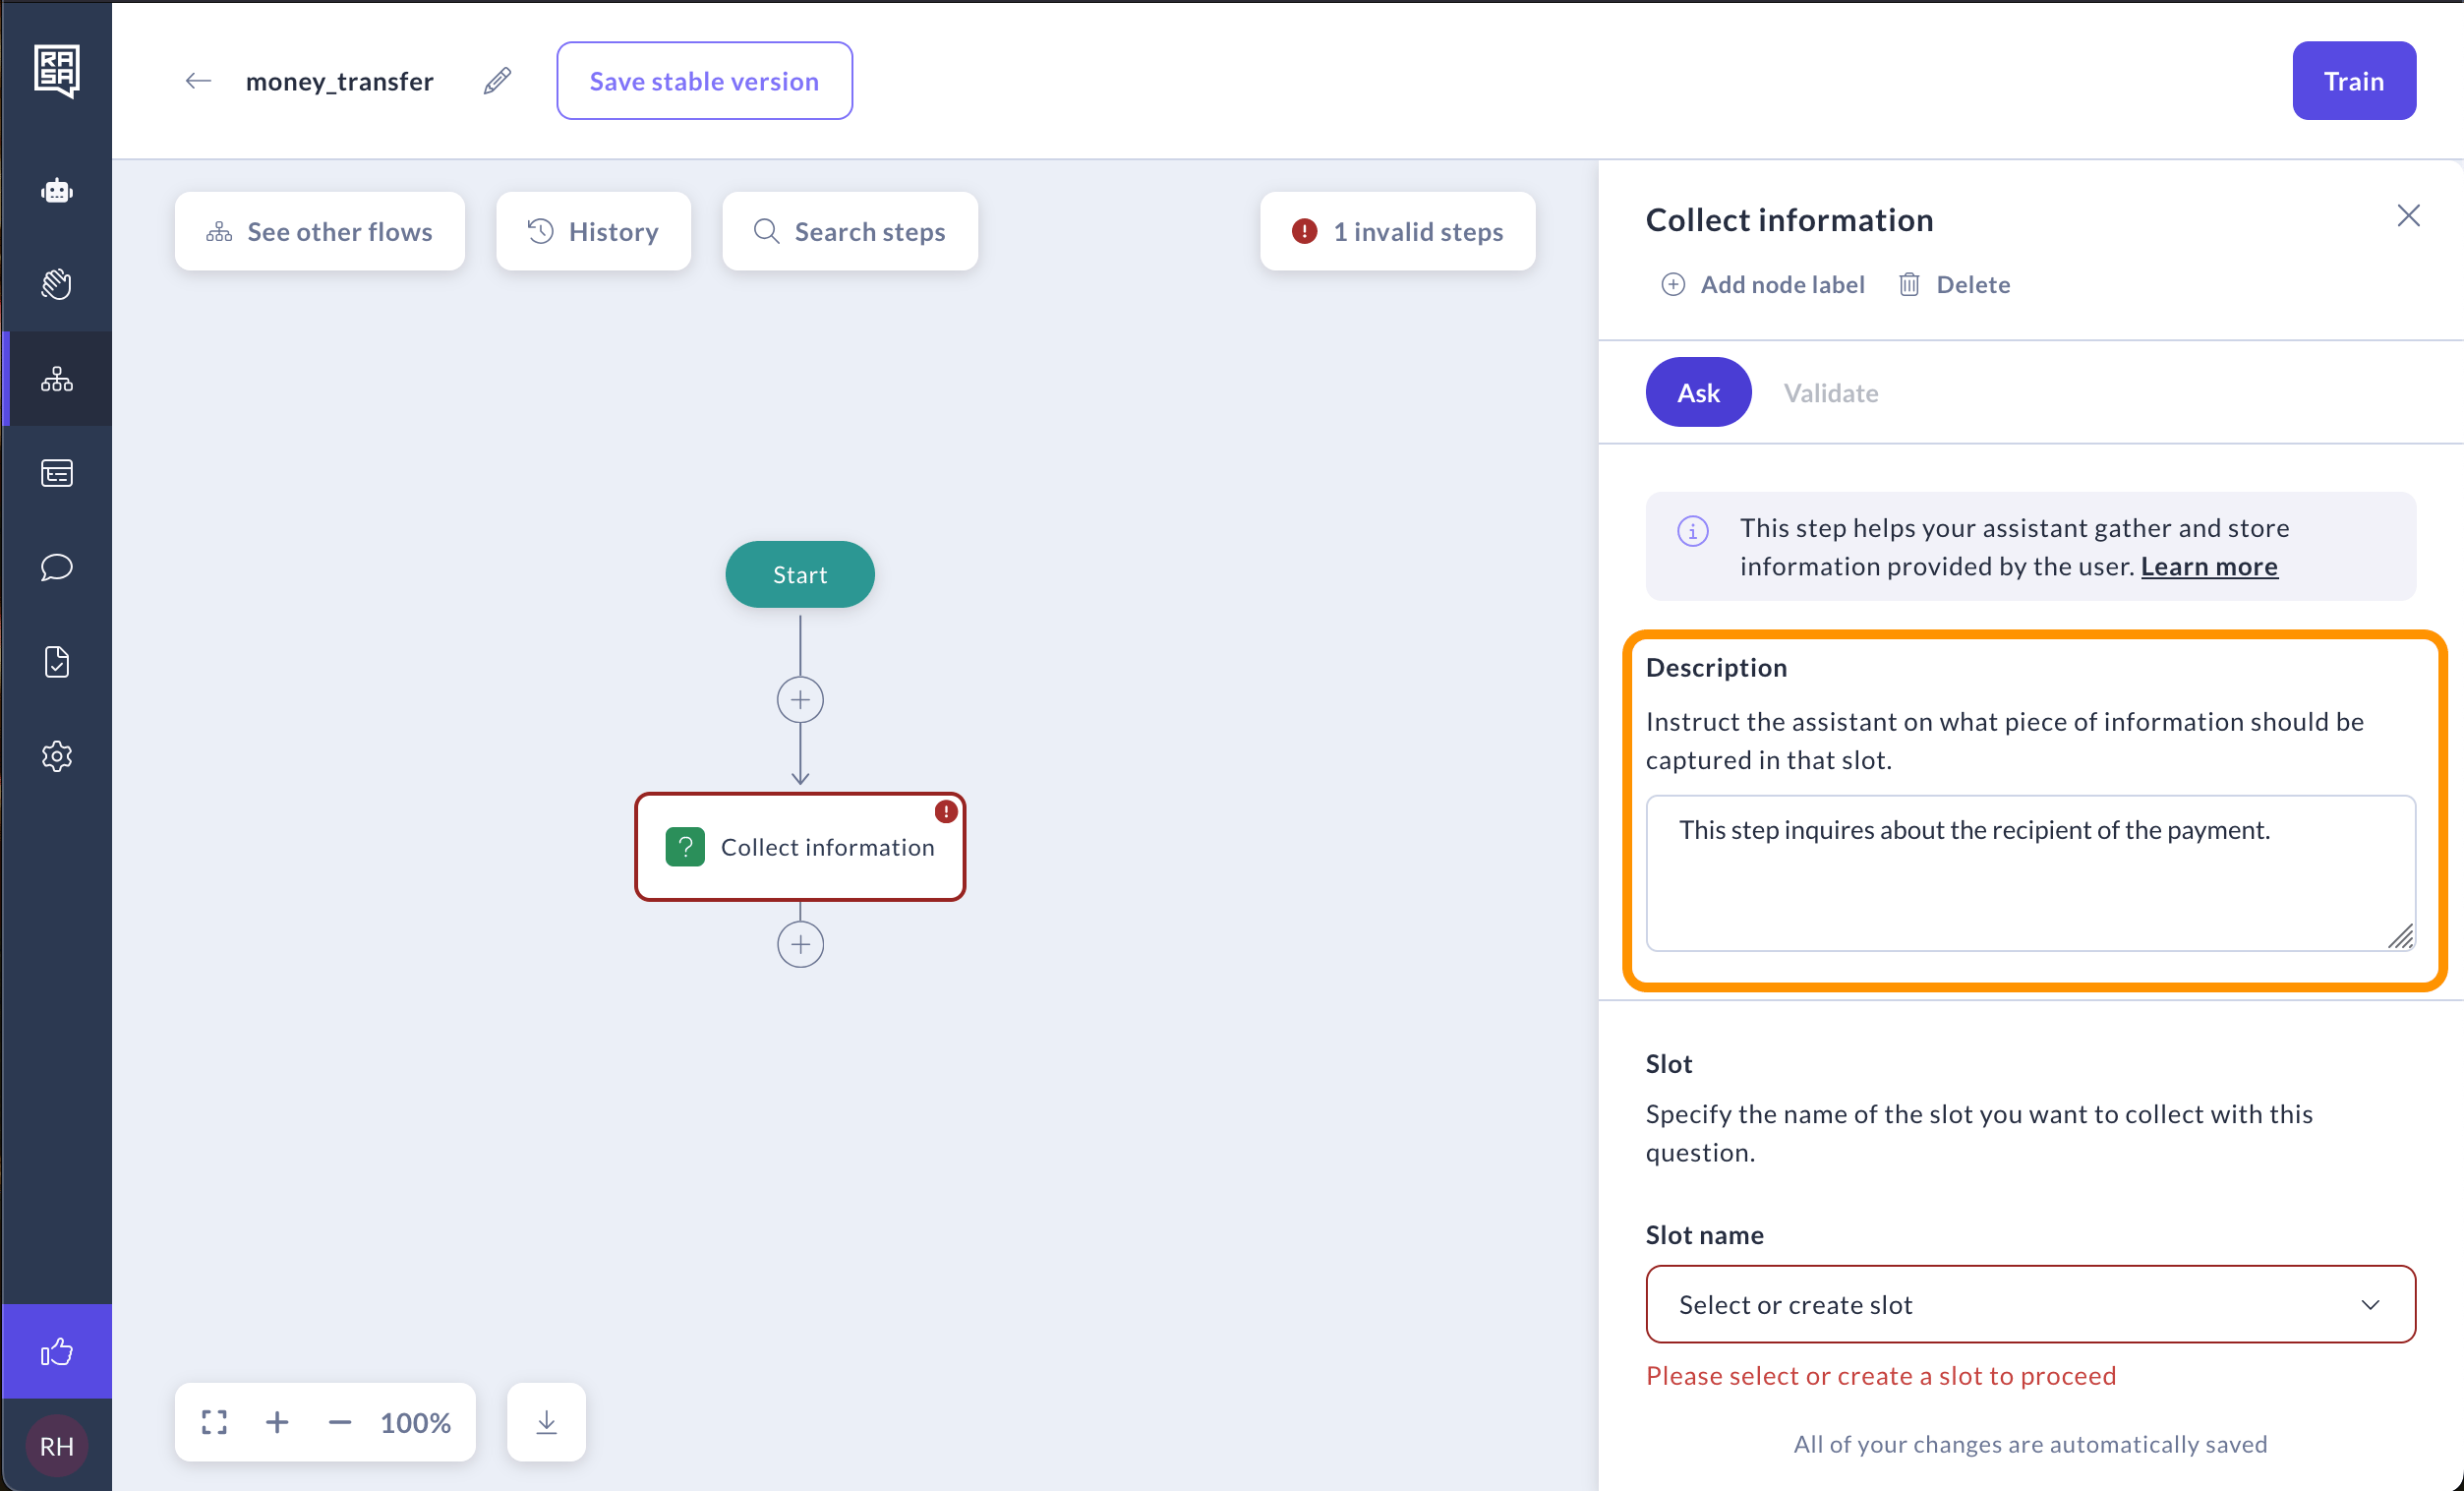
 2. Instruct the assistant on what information to collect in this step by filling out the "Description" field. For example, "This step inquires about the recipient of the payment."
 3. To define the specific information the assistant should collect from the user's reply, you'll need to create a [slot](/docs/reference/primitives/slots). Slots function as your bot's memory, it will hold the data that the user provides .
To create a slot, click on the "Select or create slot" field and choose "Create slot."
3. To define the specific information the assistant should collect from the user's reply, you'll need to create a [slot](/docs/reference/primitives/slots). Slots function as your bot's memory, it will hold the data that the user provides .
To create a slot, click on the "Select or create slot" field and choose "Create slot."
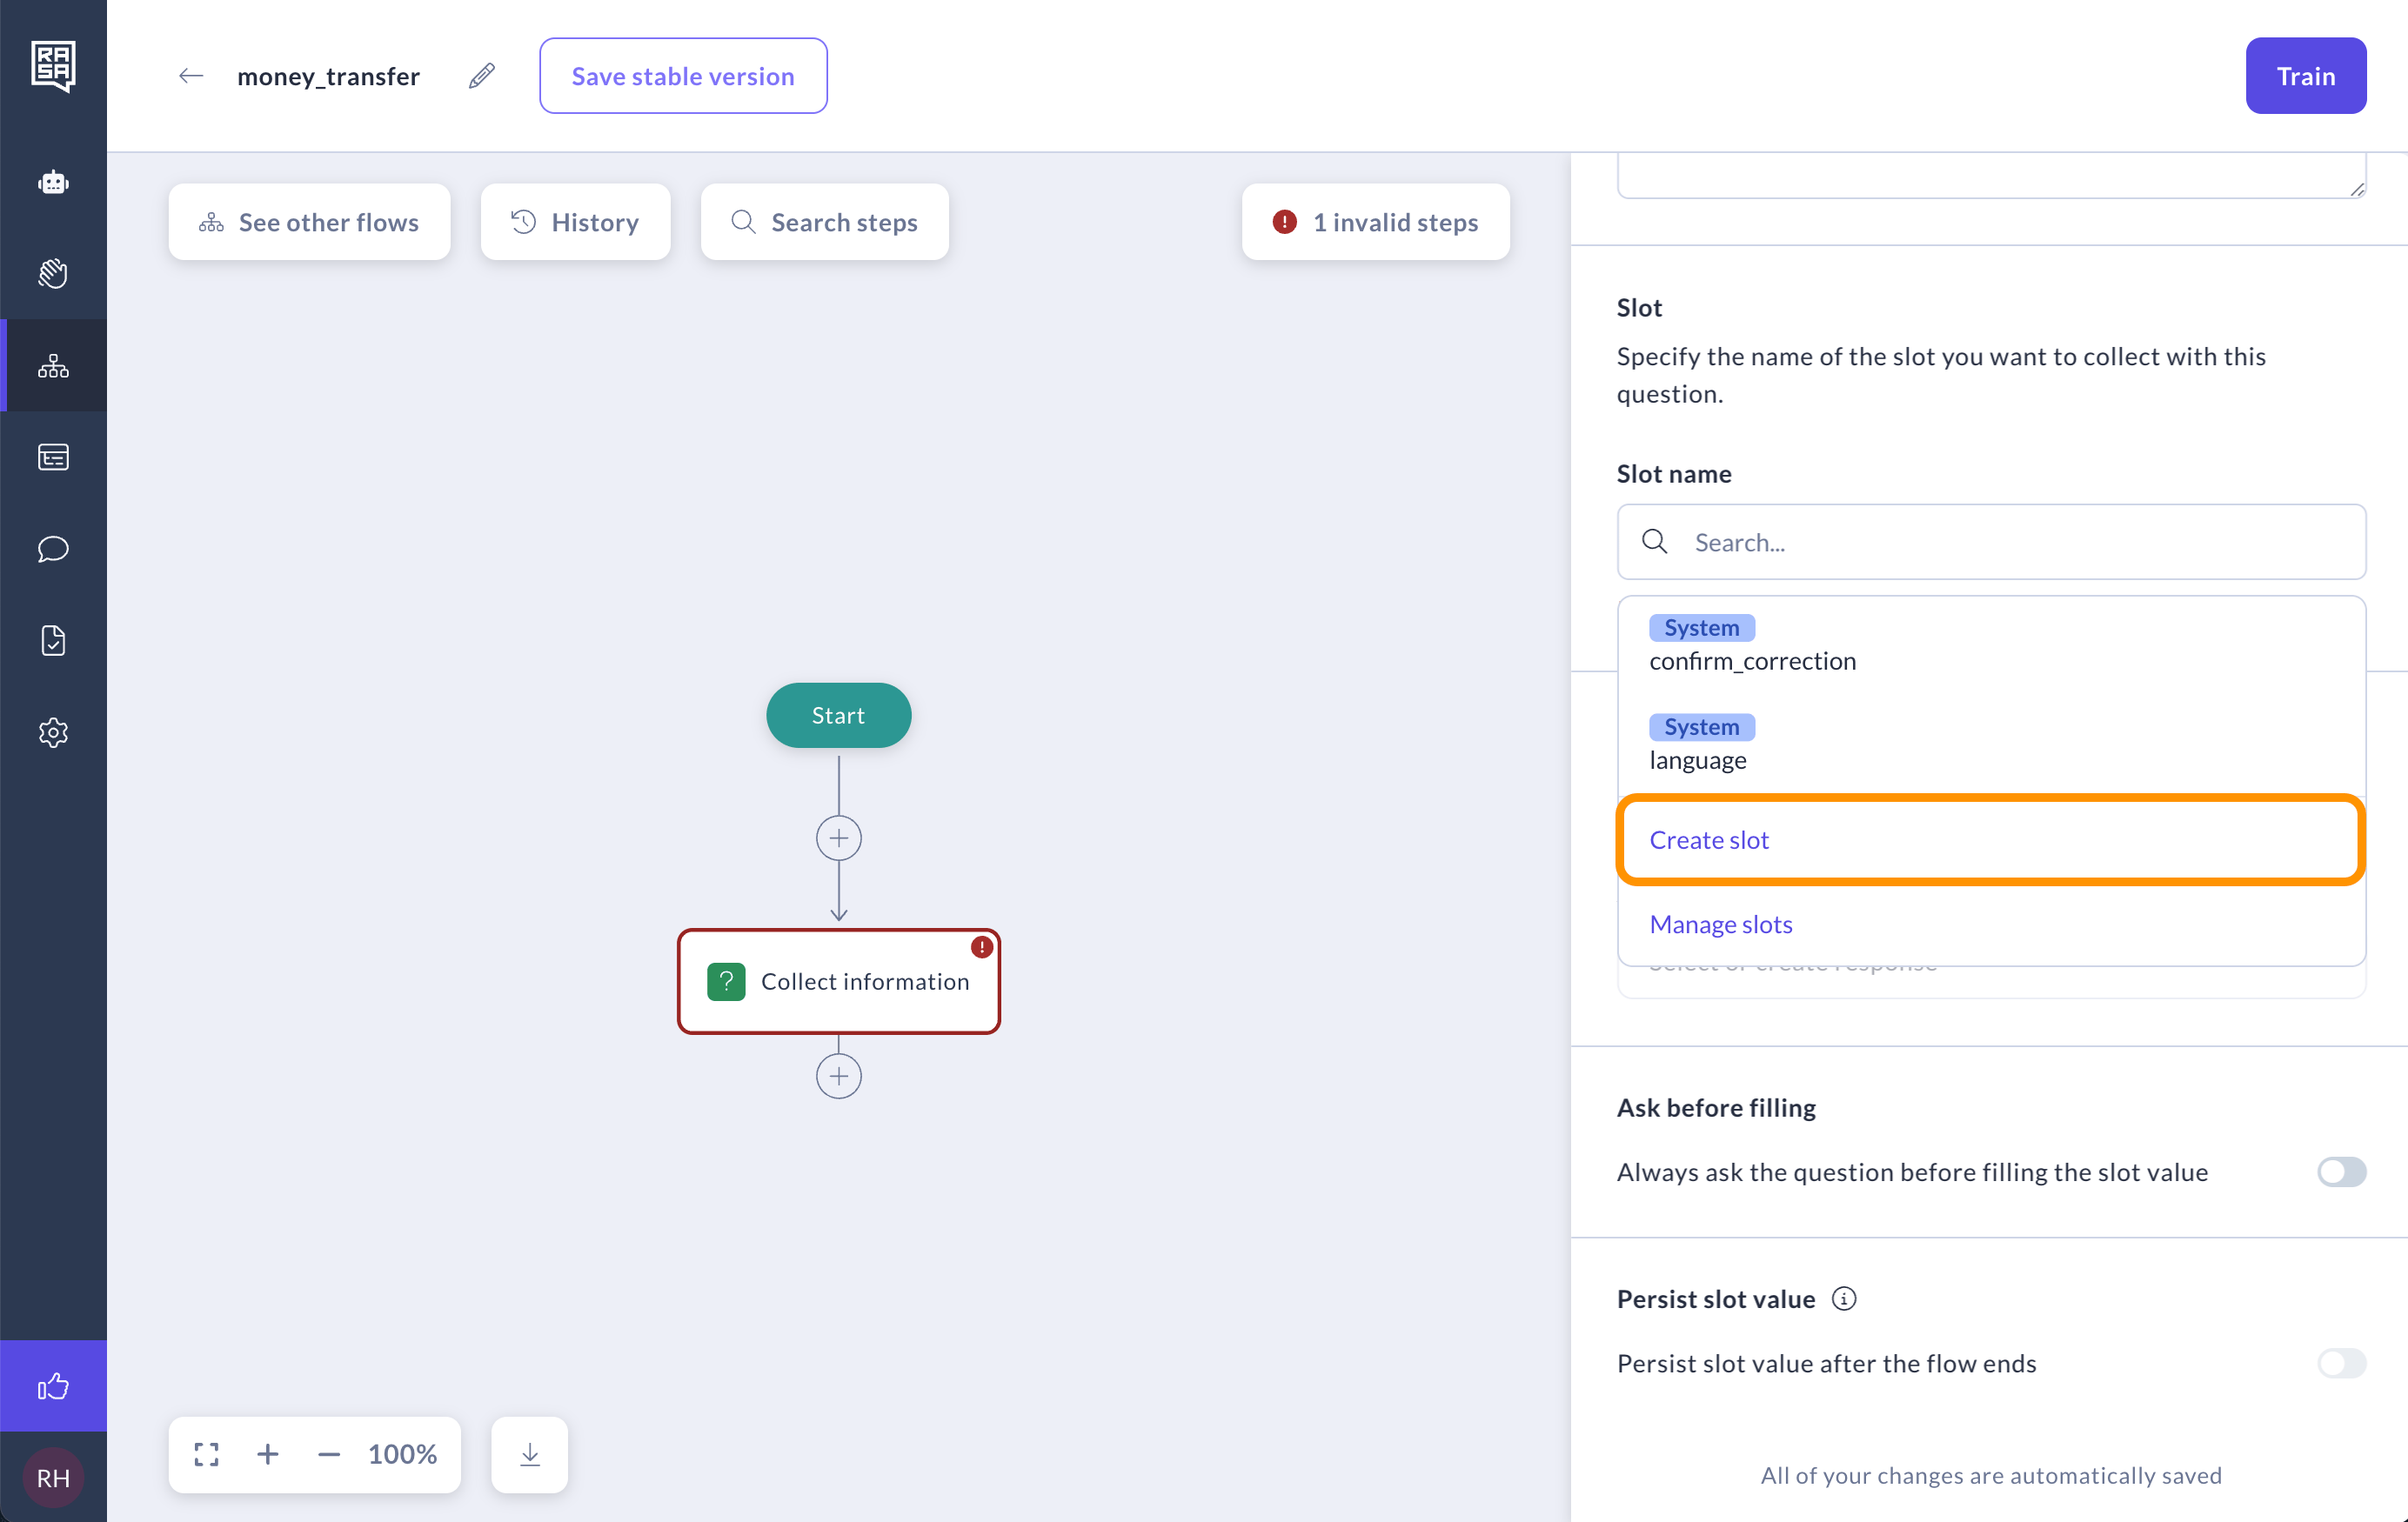 4. Input `recipient` as a slot name. Then select `Text` as type—a text slot stores information like personal names, countries, cities, etc. While you can provide an initial value for any slot, it's not applicable in this scenario. [Learn more about slot types](/docs/studio/build/flow-building/collect#slot-types).
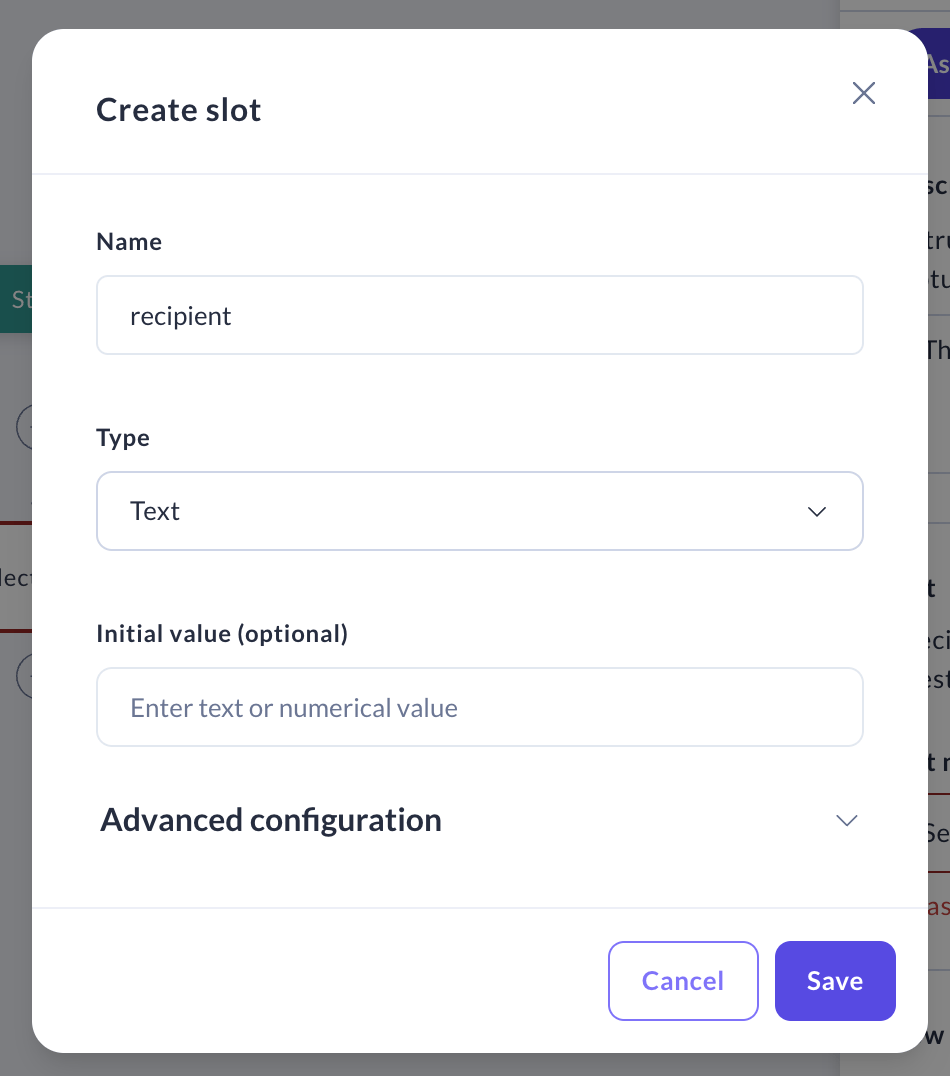 5. Finally, generate a response that the assistant will use to collect this information from the user. To do this, click "Select or create response".
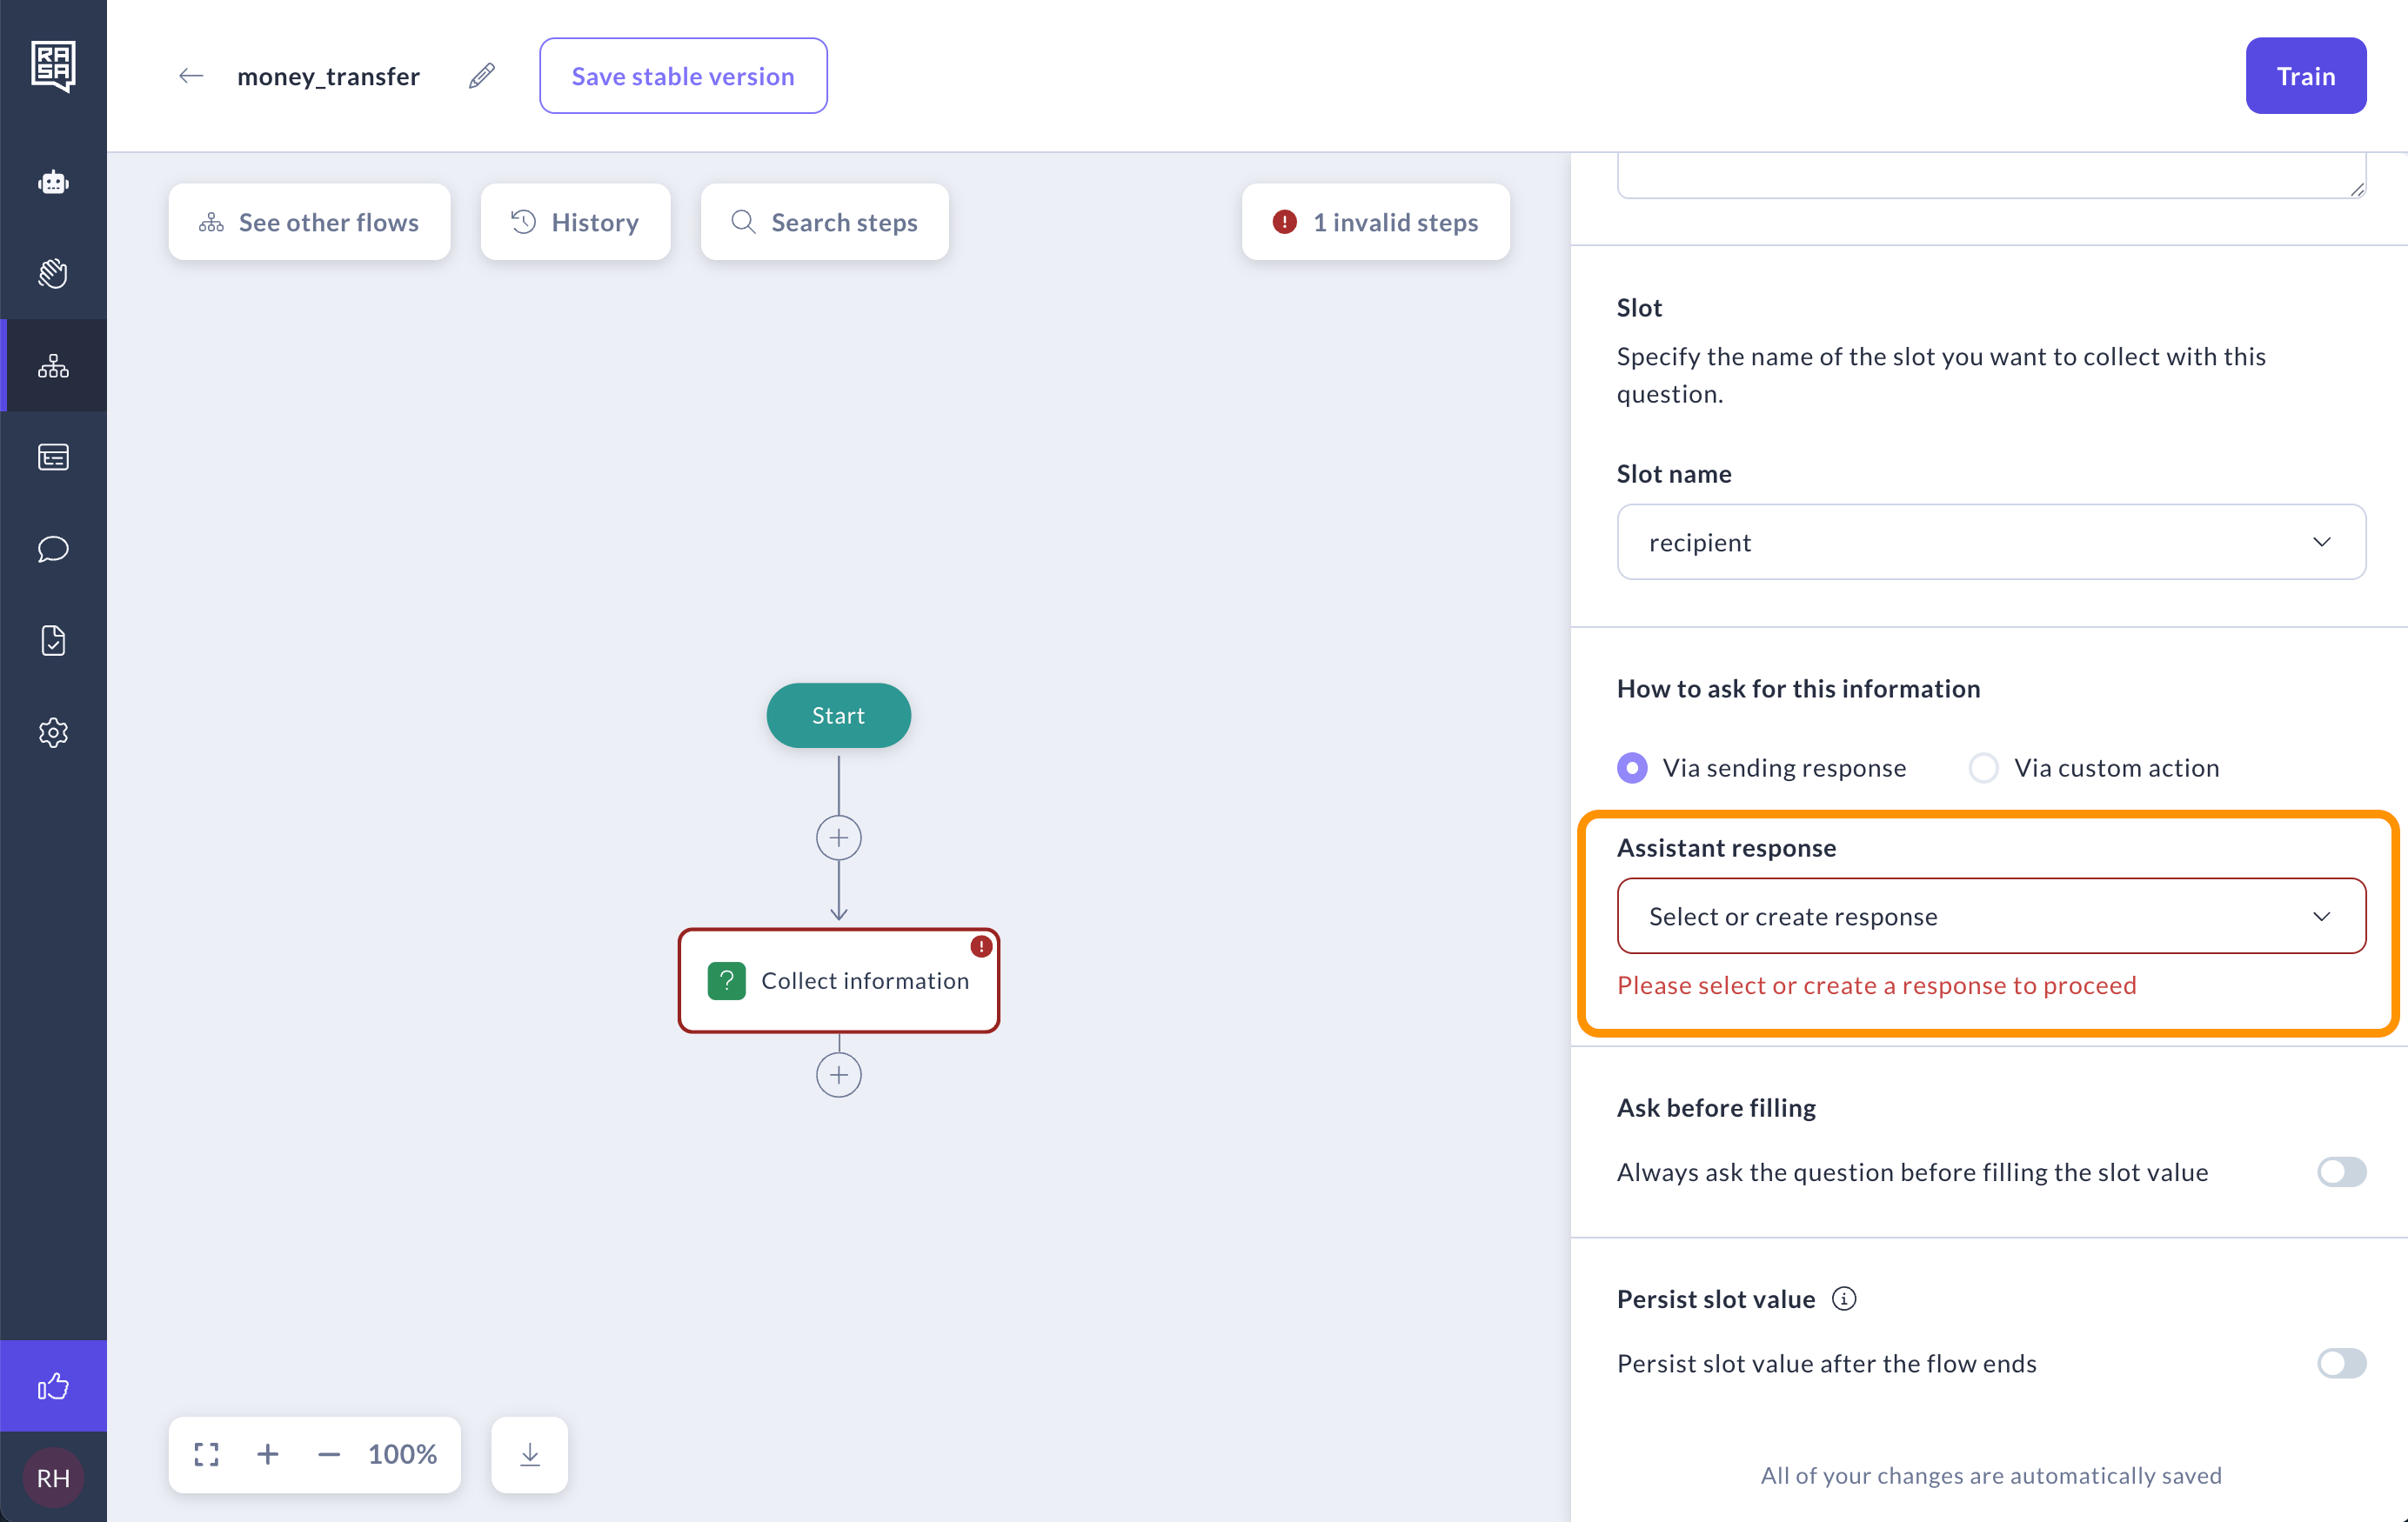 6. The system will automatically fill in the response name by combining the slot name with the prefix `utter_ask`, resulting in `utter_ask_recipient`. Enter the text as "Who would you like to send money to?"
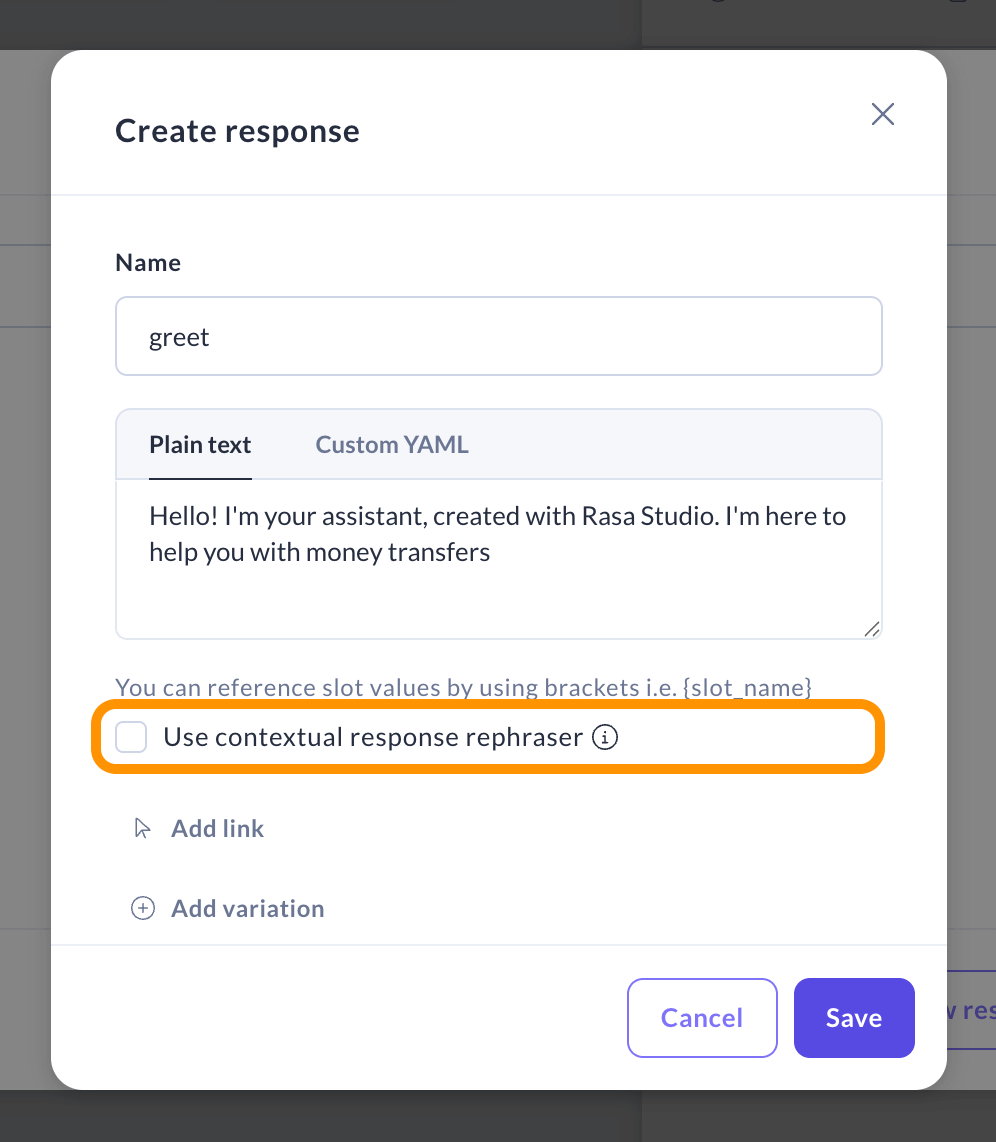
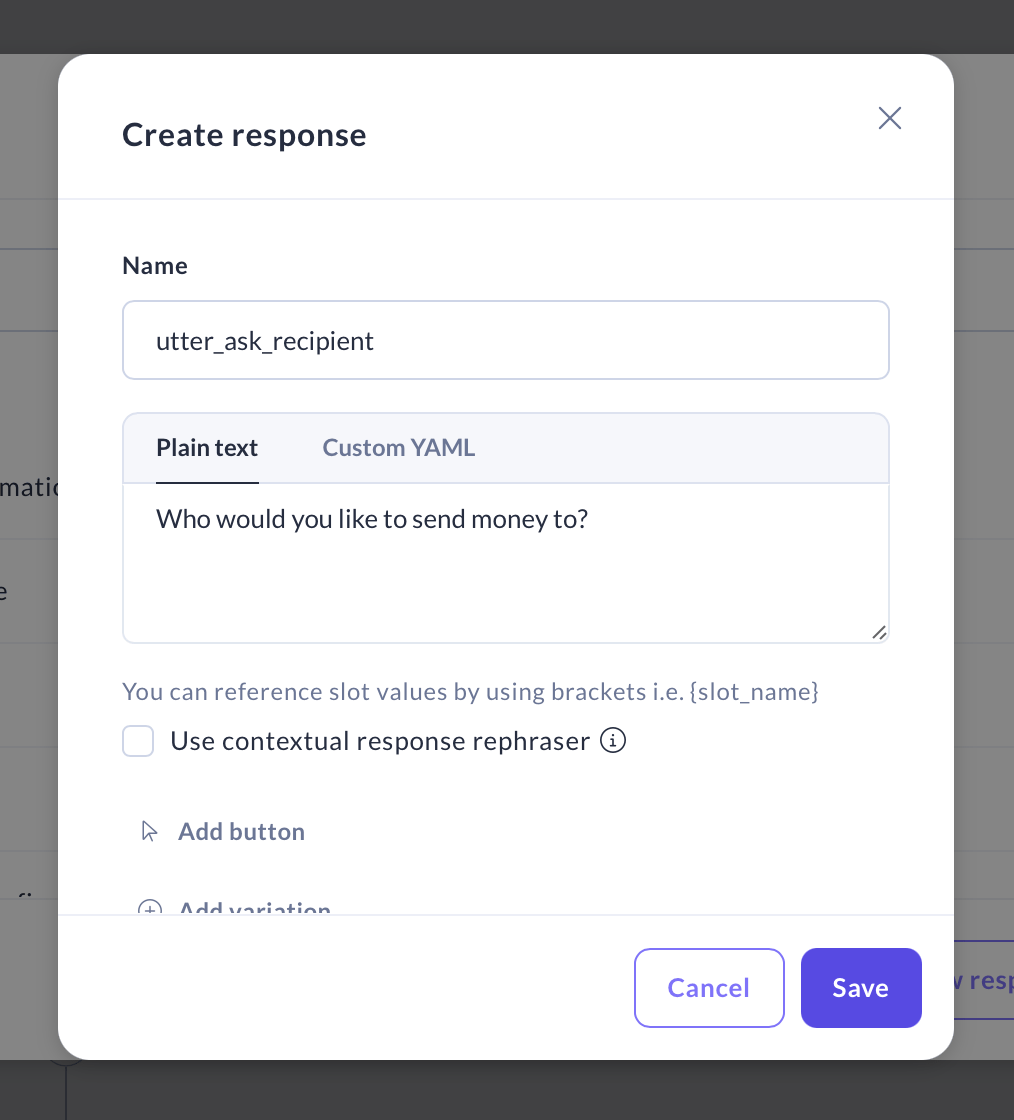 7. Decide whether to check the "Use contextual response rephraser" box. If you leave it unchecked, the assistant will always use the exact same wording. If you check it, the message will vary slightly each time, depending on the conversation context, making it sound more natural. [Learn more](/docs/reference/primitives/contextual-response-rephraser).
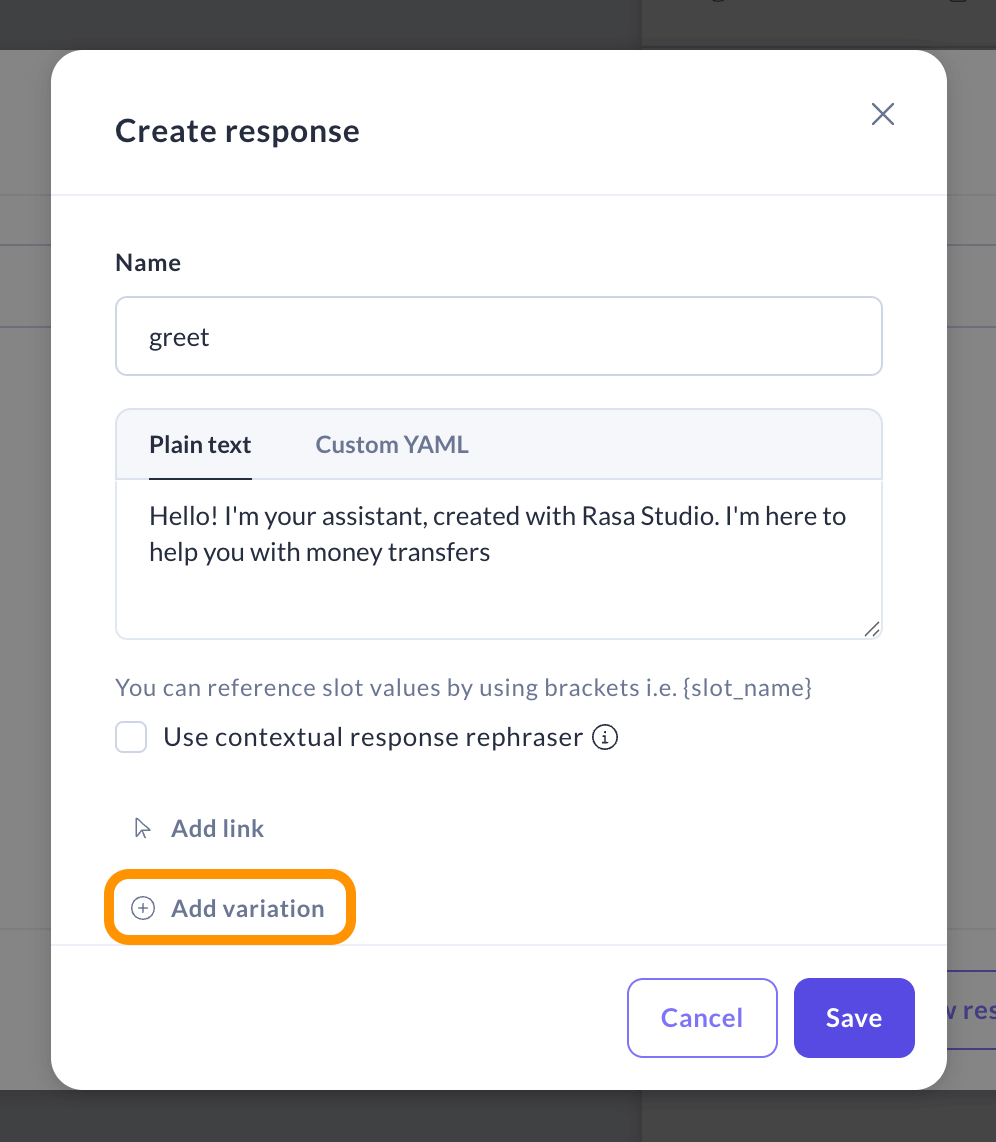
 8. If you prefer full control over responses or don’t want to use an LLM, you can manually create response variations by clicking the "Add variation" button. Add as many variations as you'd like. During the conversation, Rasa will randomly pick one of them.
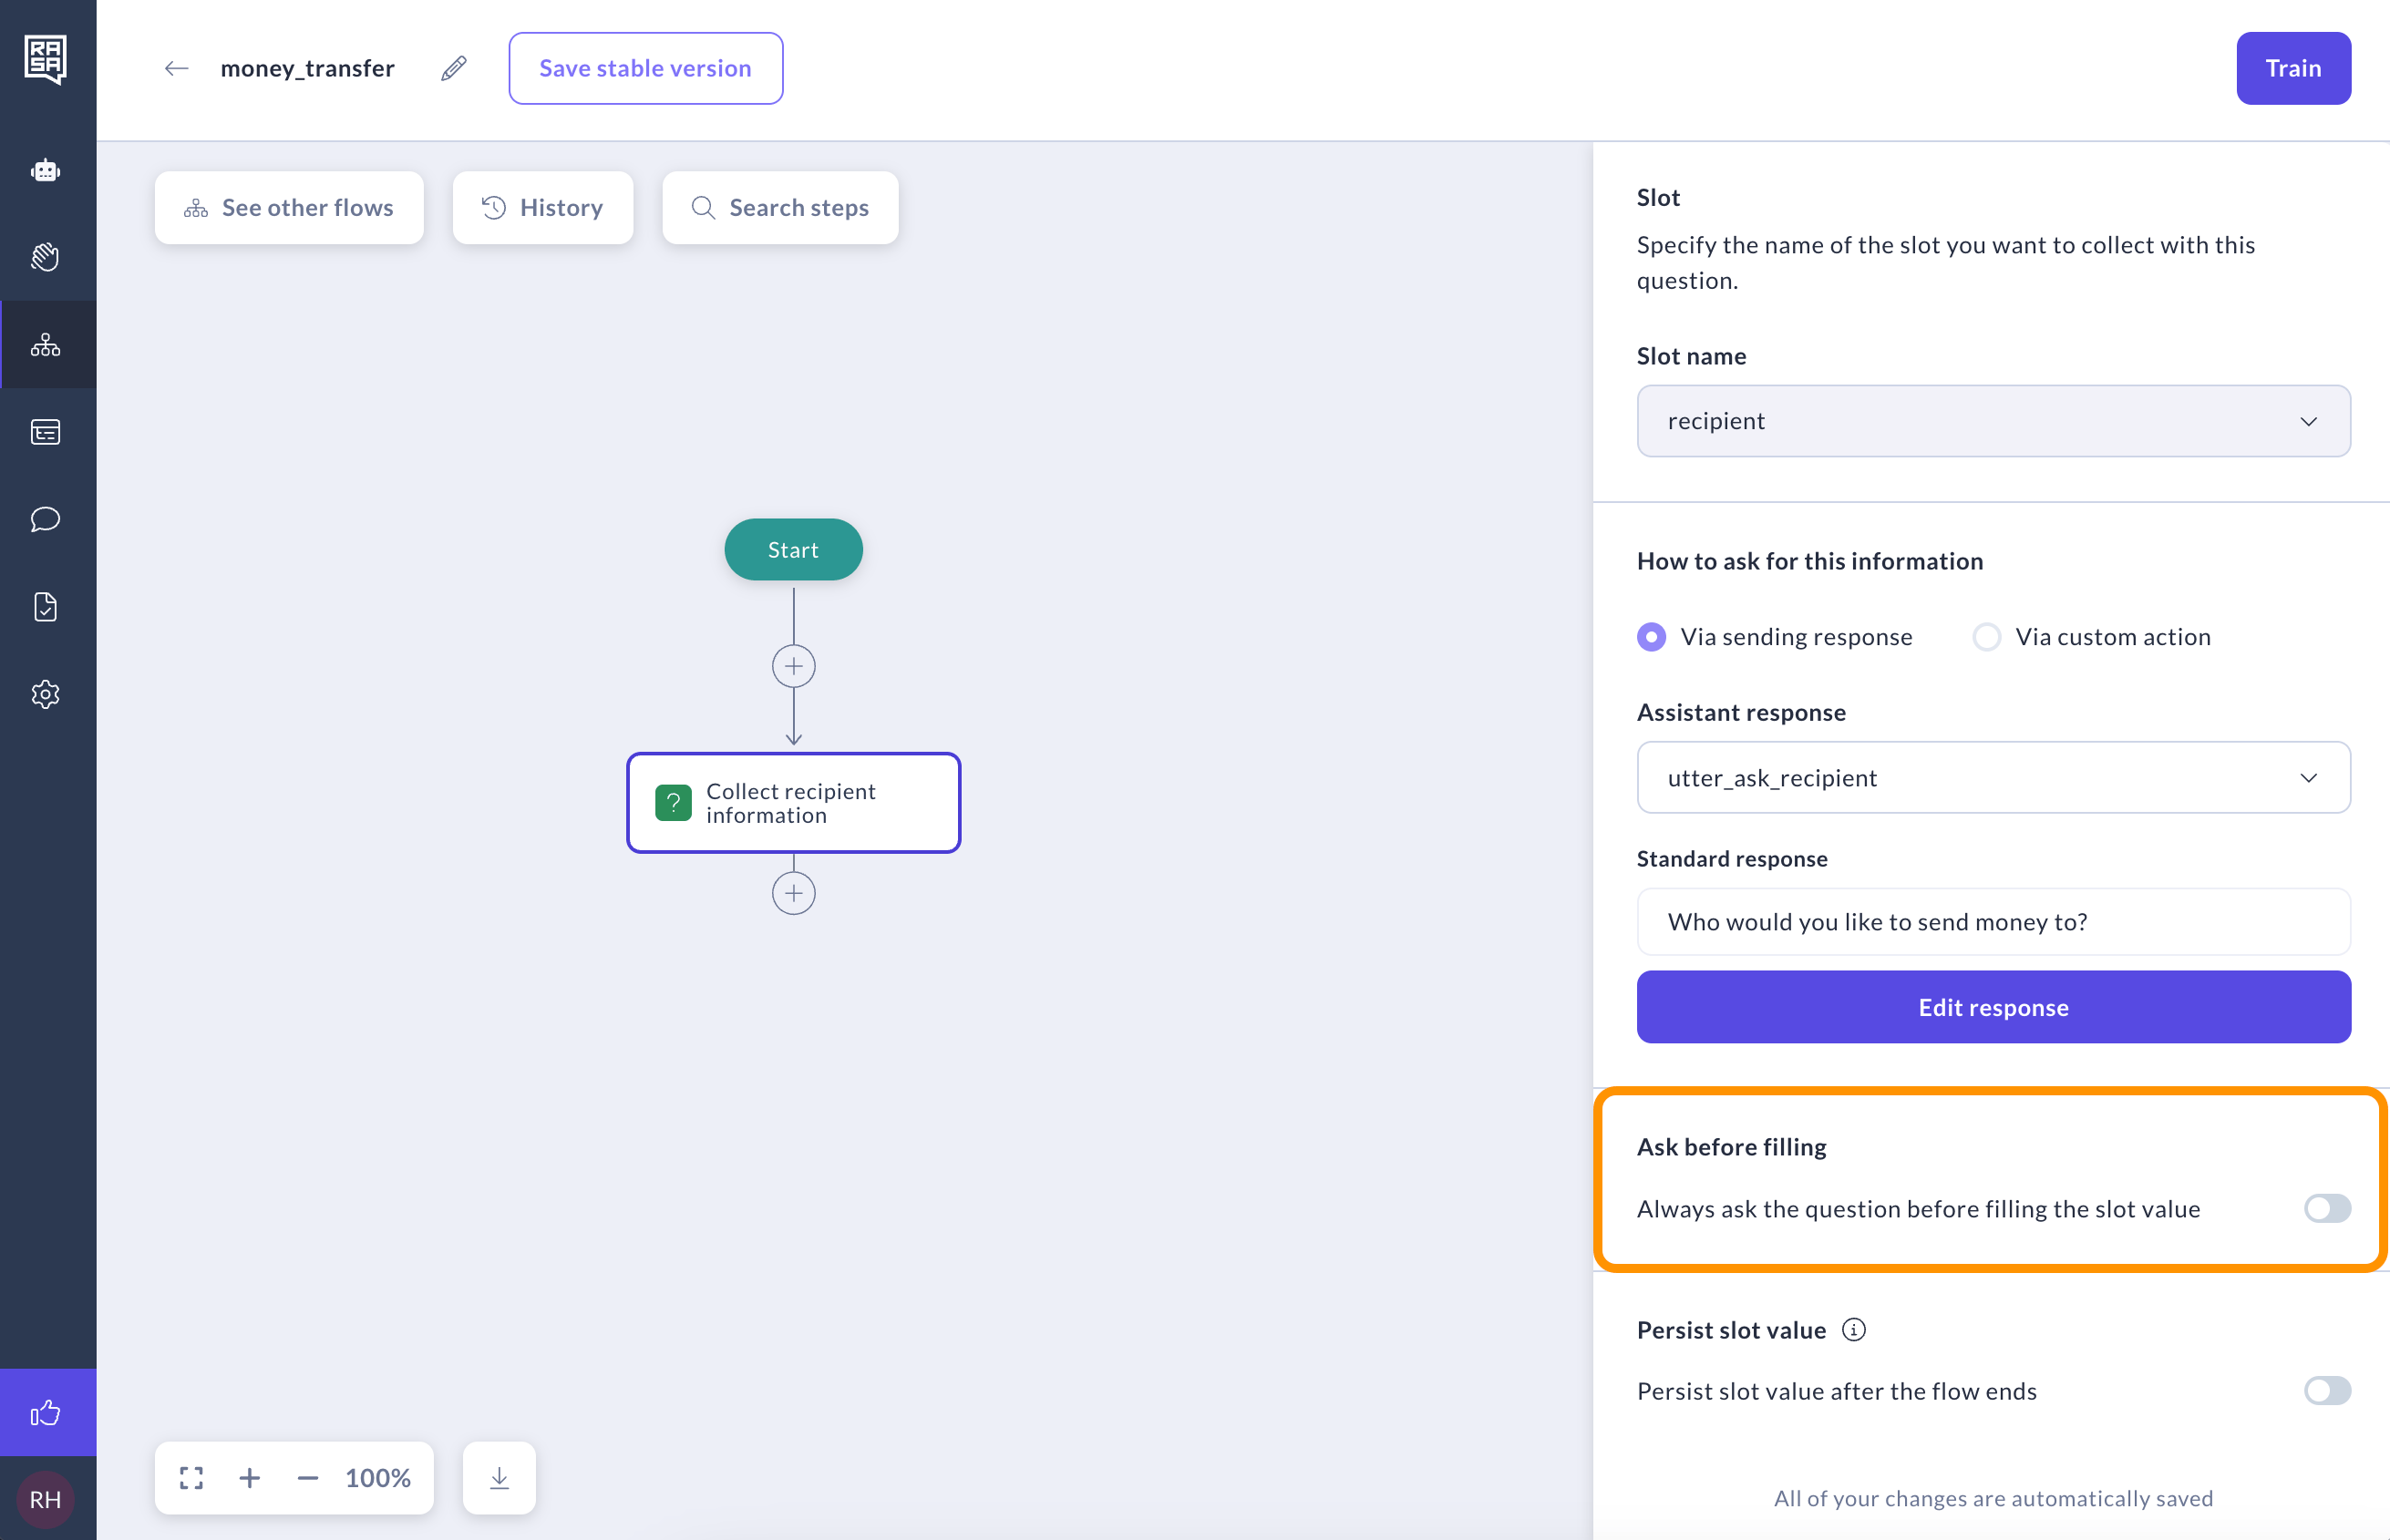
 9. By default, a "Collect Information" step can be skipped if the slot is already filled. For example, if a user says, "I want to transfer money to John" at the beginning of the conversation, the assistant will recognize John as the recipient and won't ask for the name again. If you want the assistant to always ask the question, even if the slot is already filled, enable the "Ask before filling" option. In this particular case, we recommend to leave it disabled.
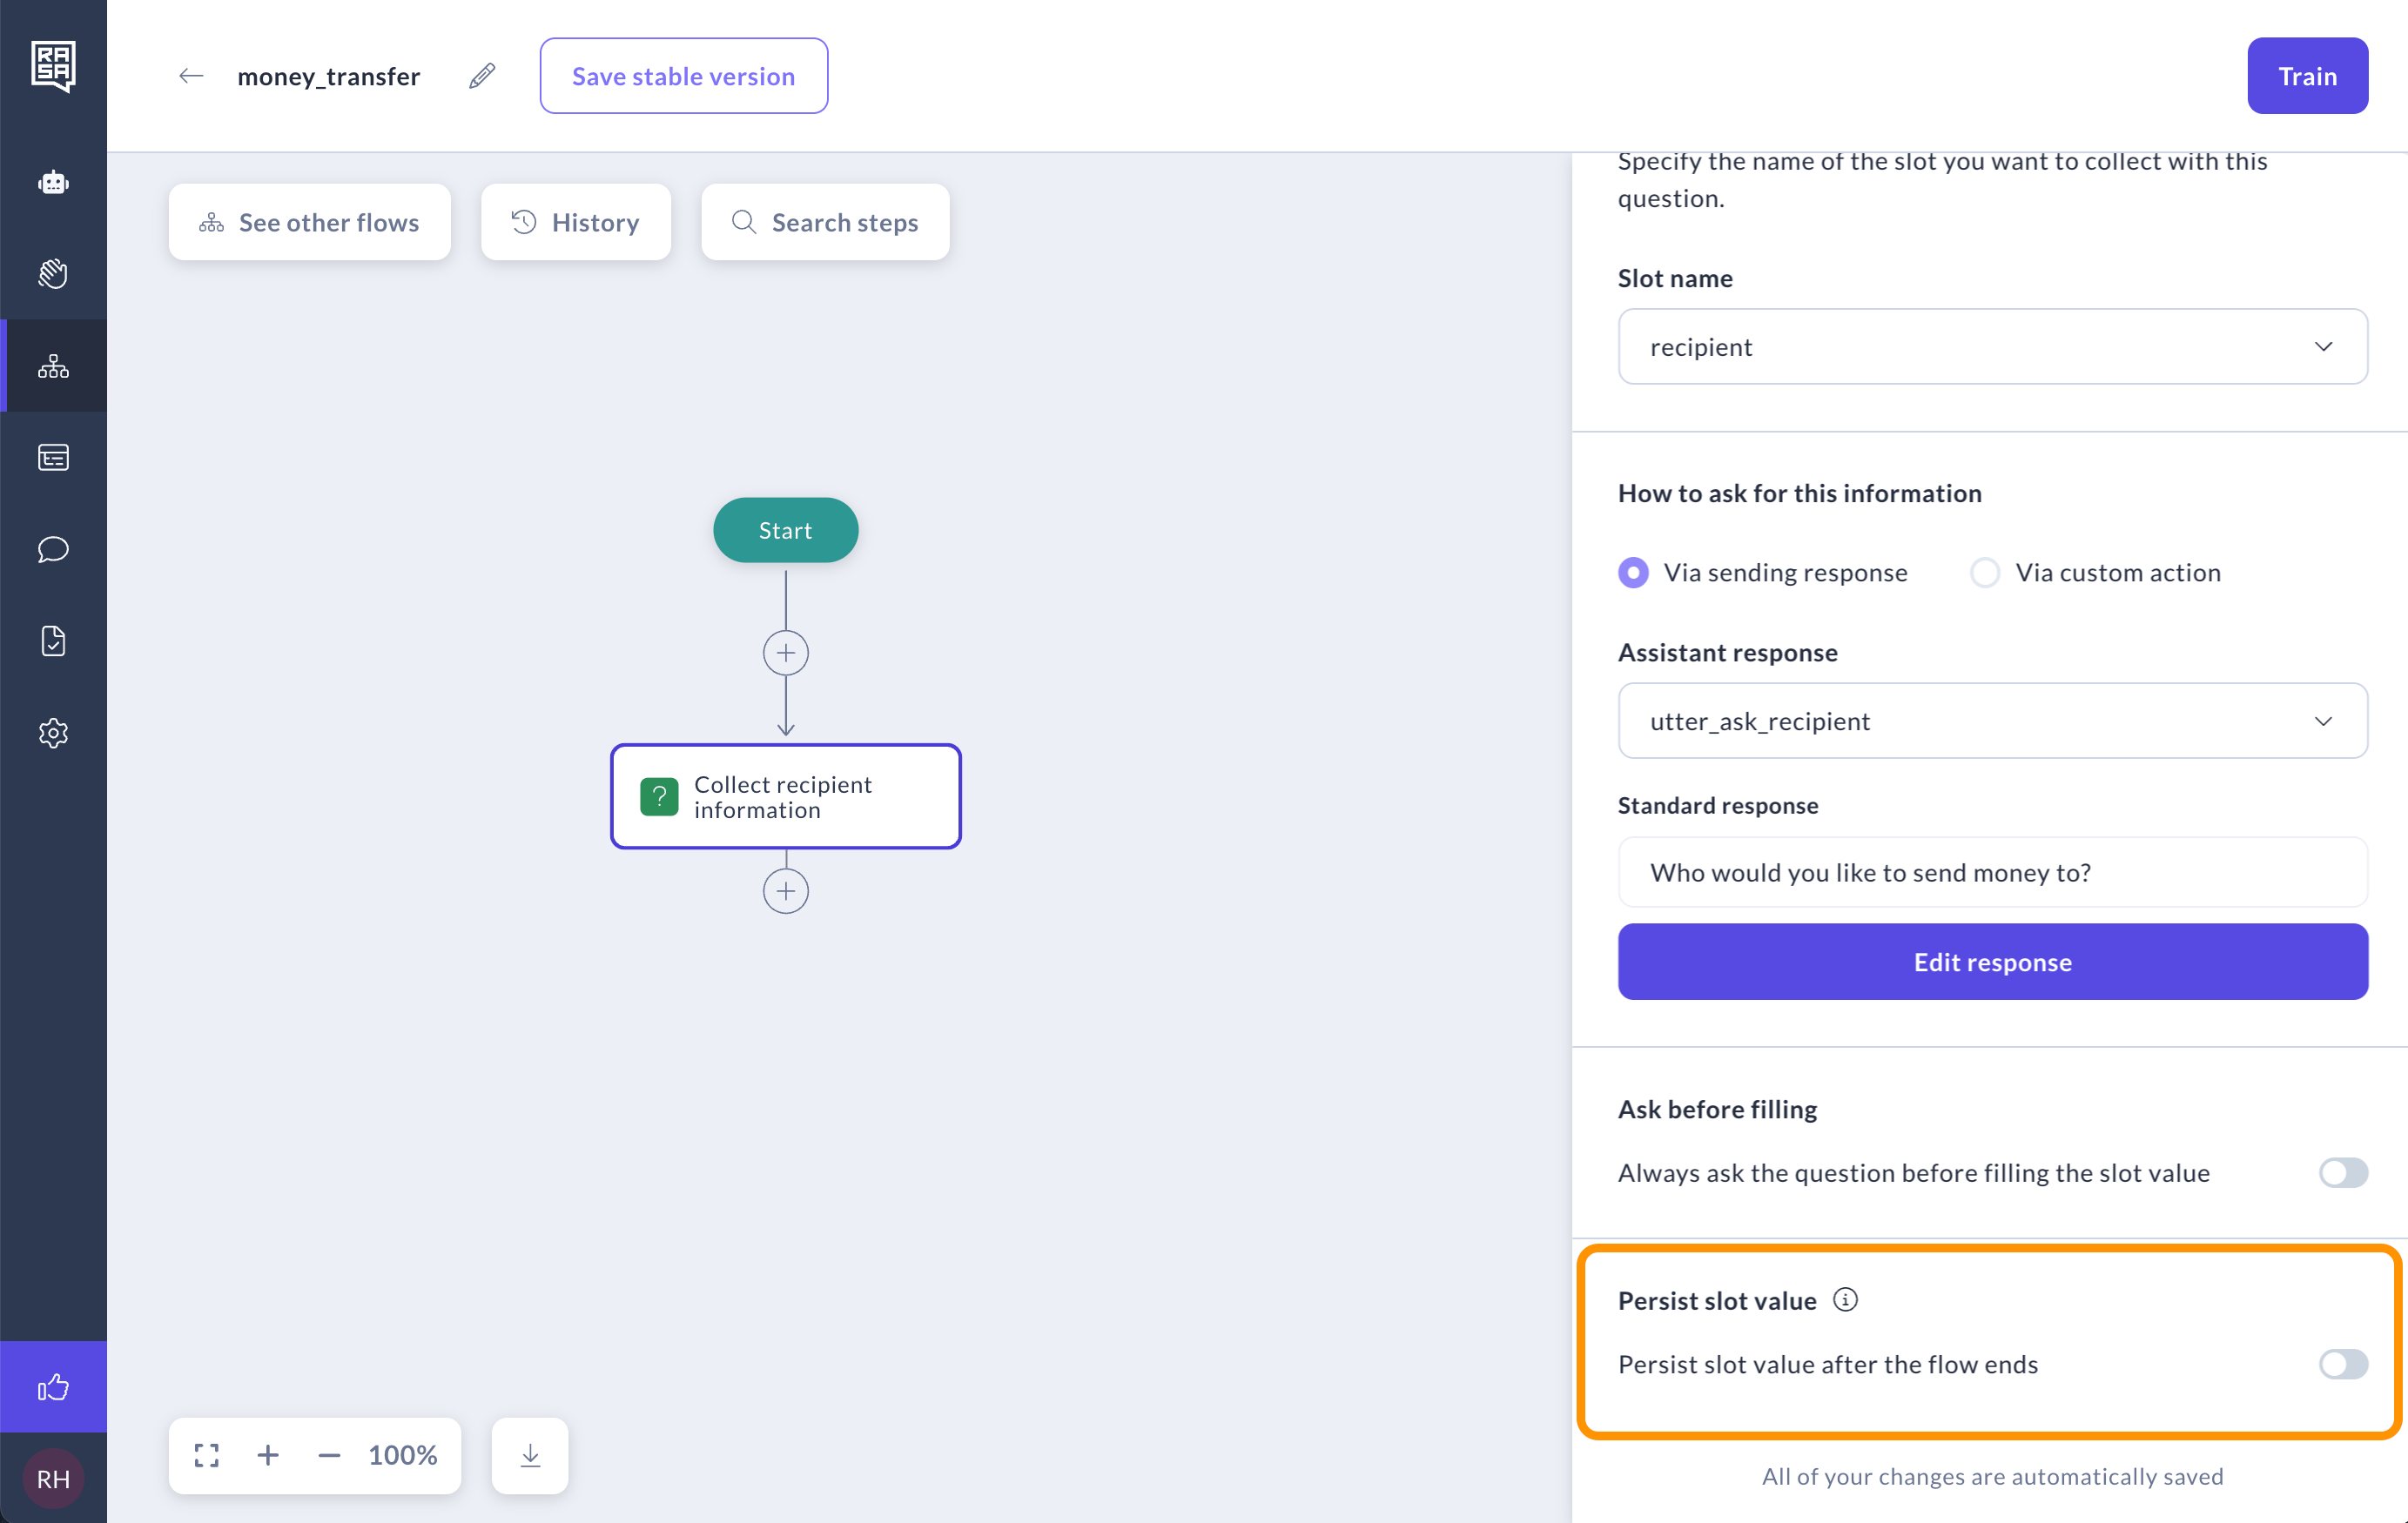
 10. When the "Persist slot value" option is disabled, the system will clear the slot after the flow's final steps, prompting the question again in future sessions. This is useful for slots like `transfer_amount` or `recipient_name`, which can change each session. In this particular case, we recommend leaving the "Persist slot value" option disabled.
 ### Collecting information about the amount
1. Add one more "Collect information" step to ask the user about the amount of transfer.
### Collecting information about the amount
1. Add one more "Collect information" step to ask the user about the amount of transfer.
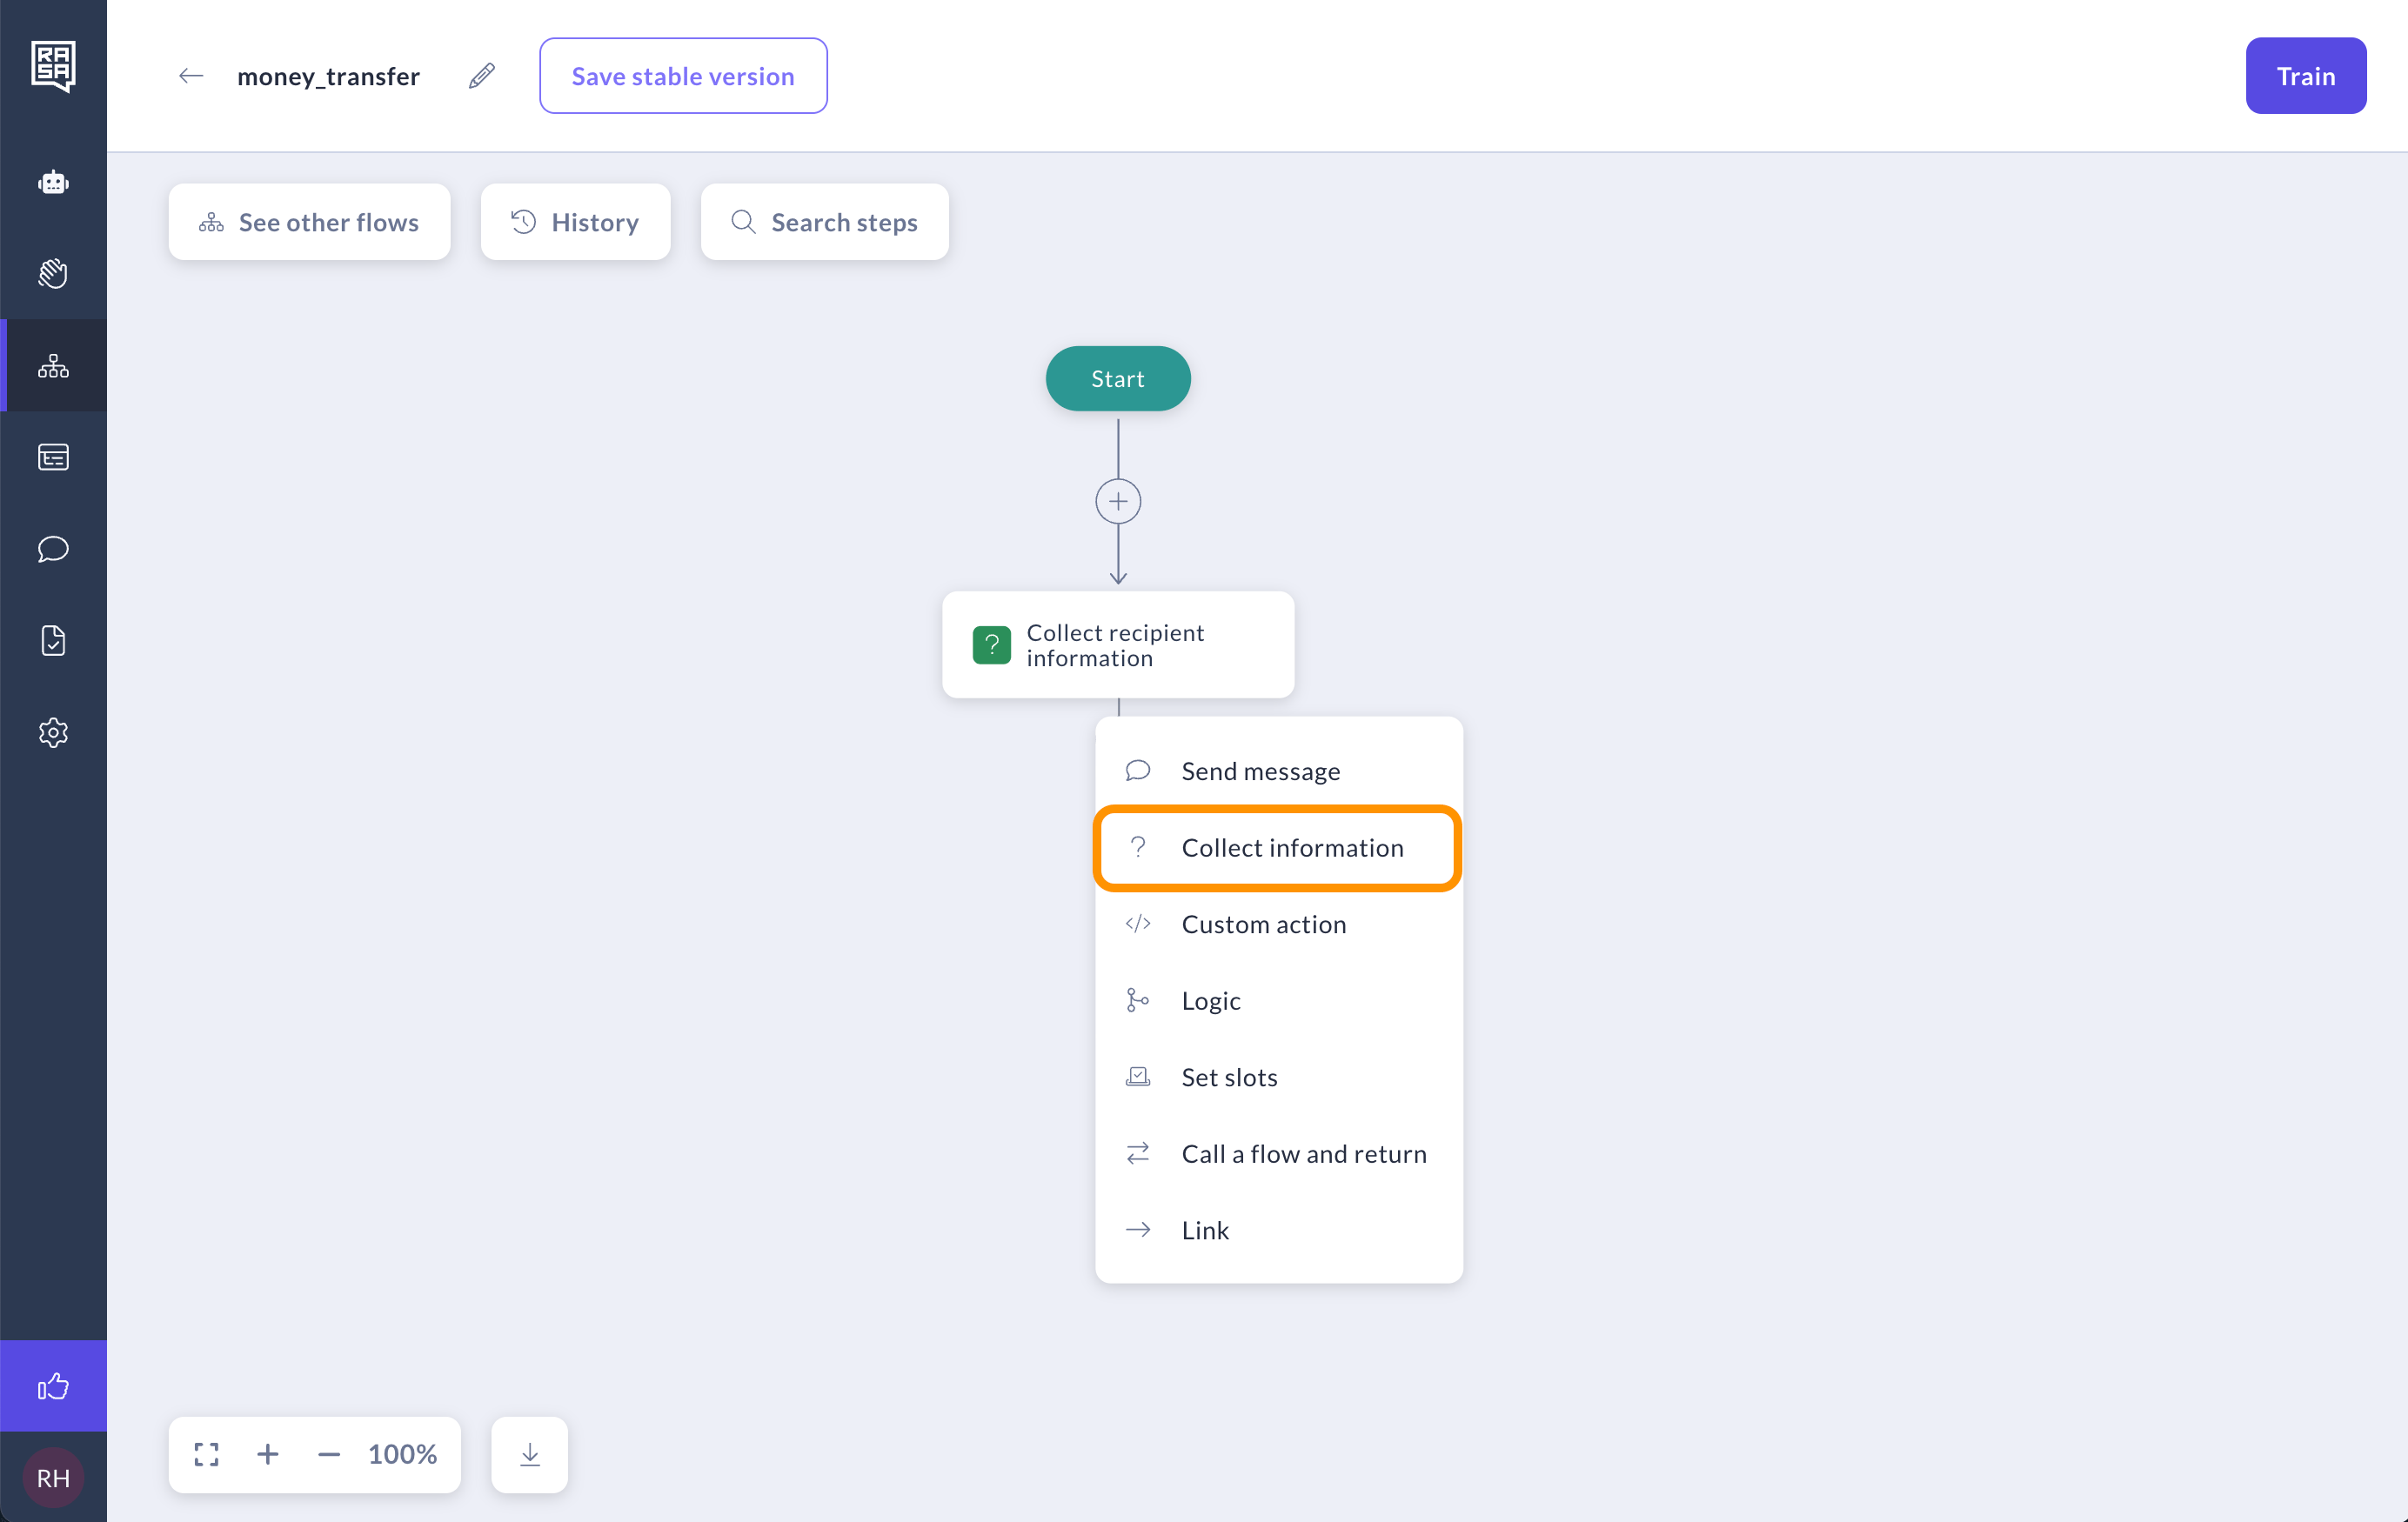 2. Enter the description: "This step inquires about the amount of the payment, in US Dollars."
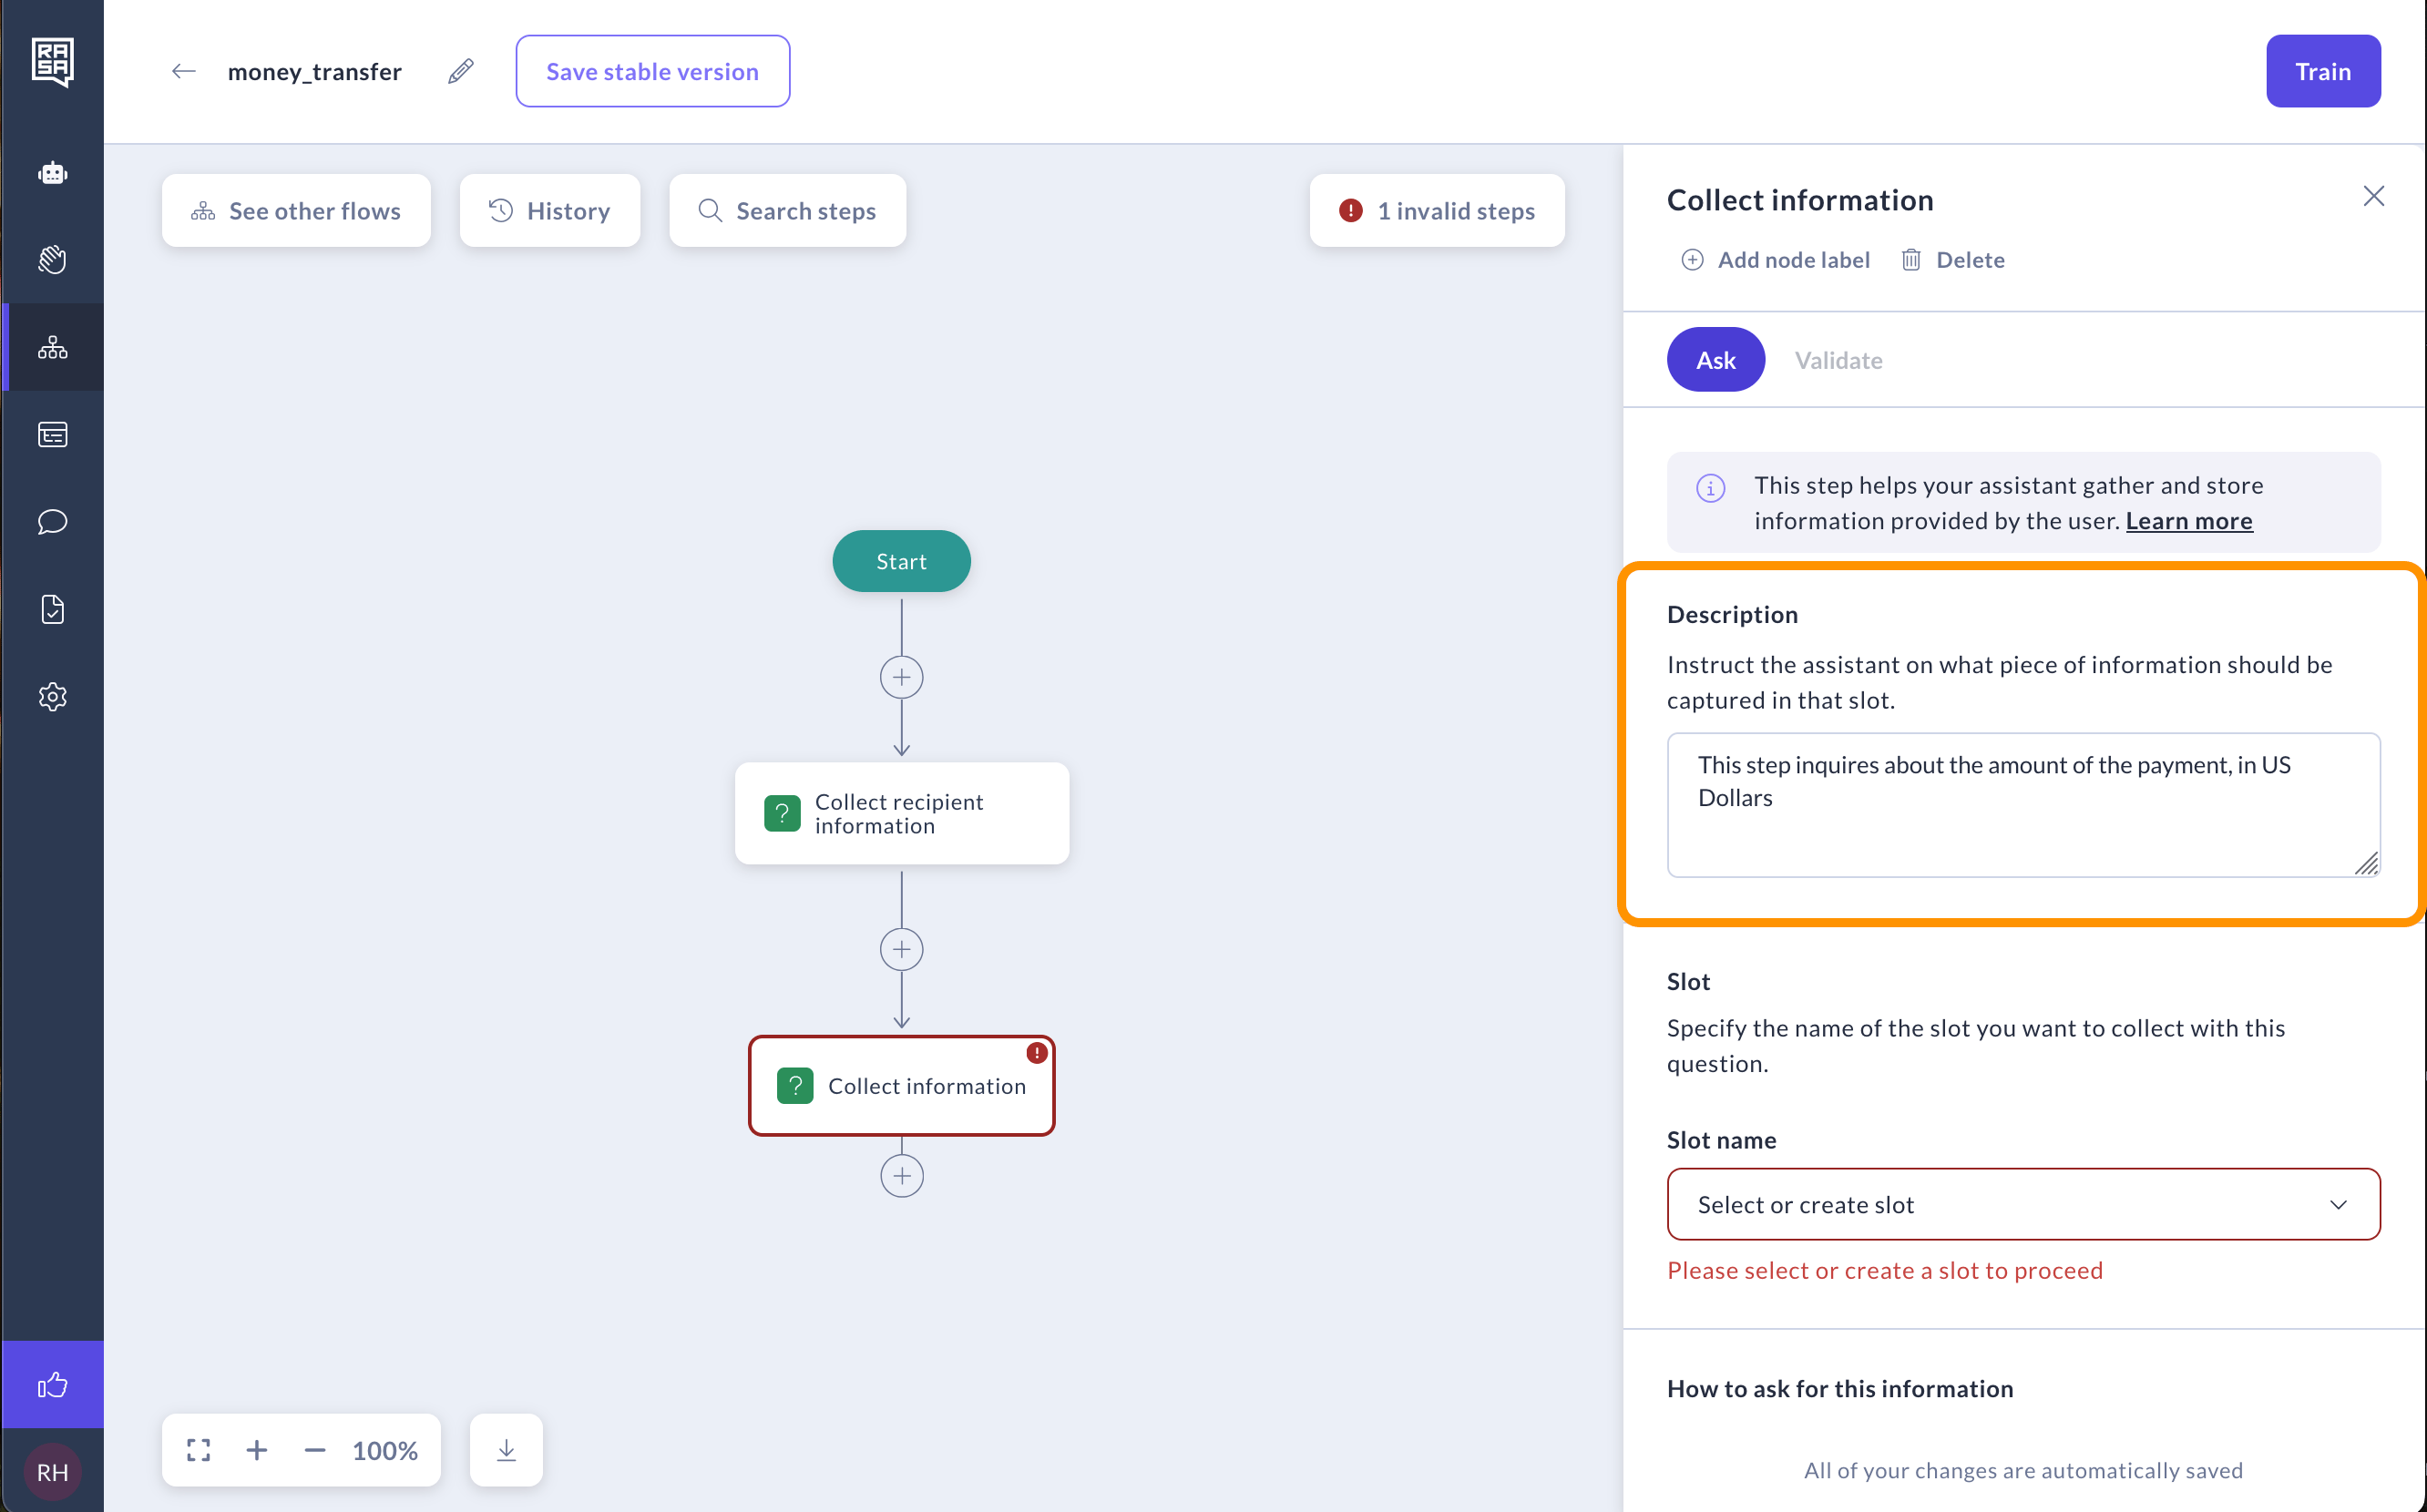 3. Create a new slot.
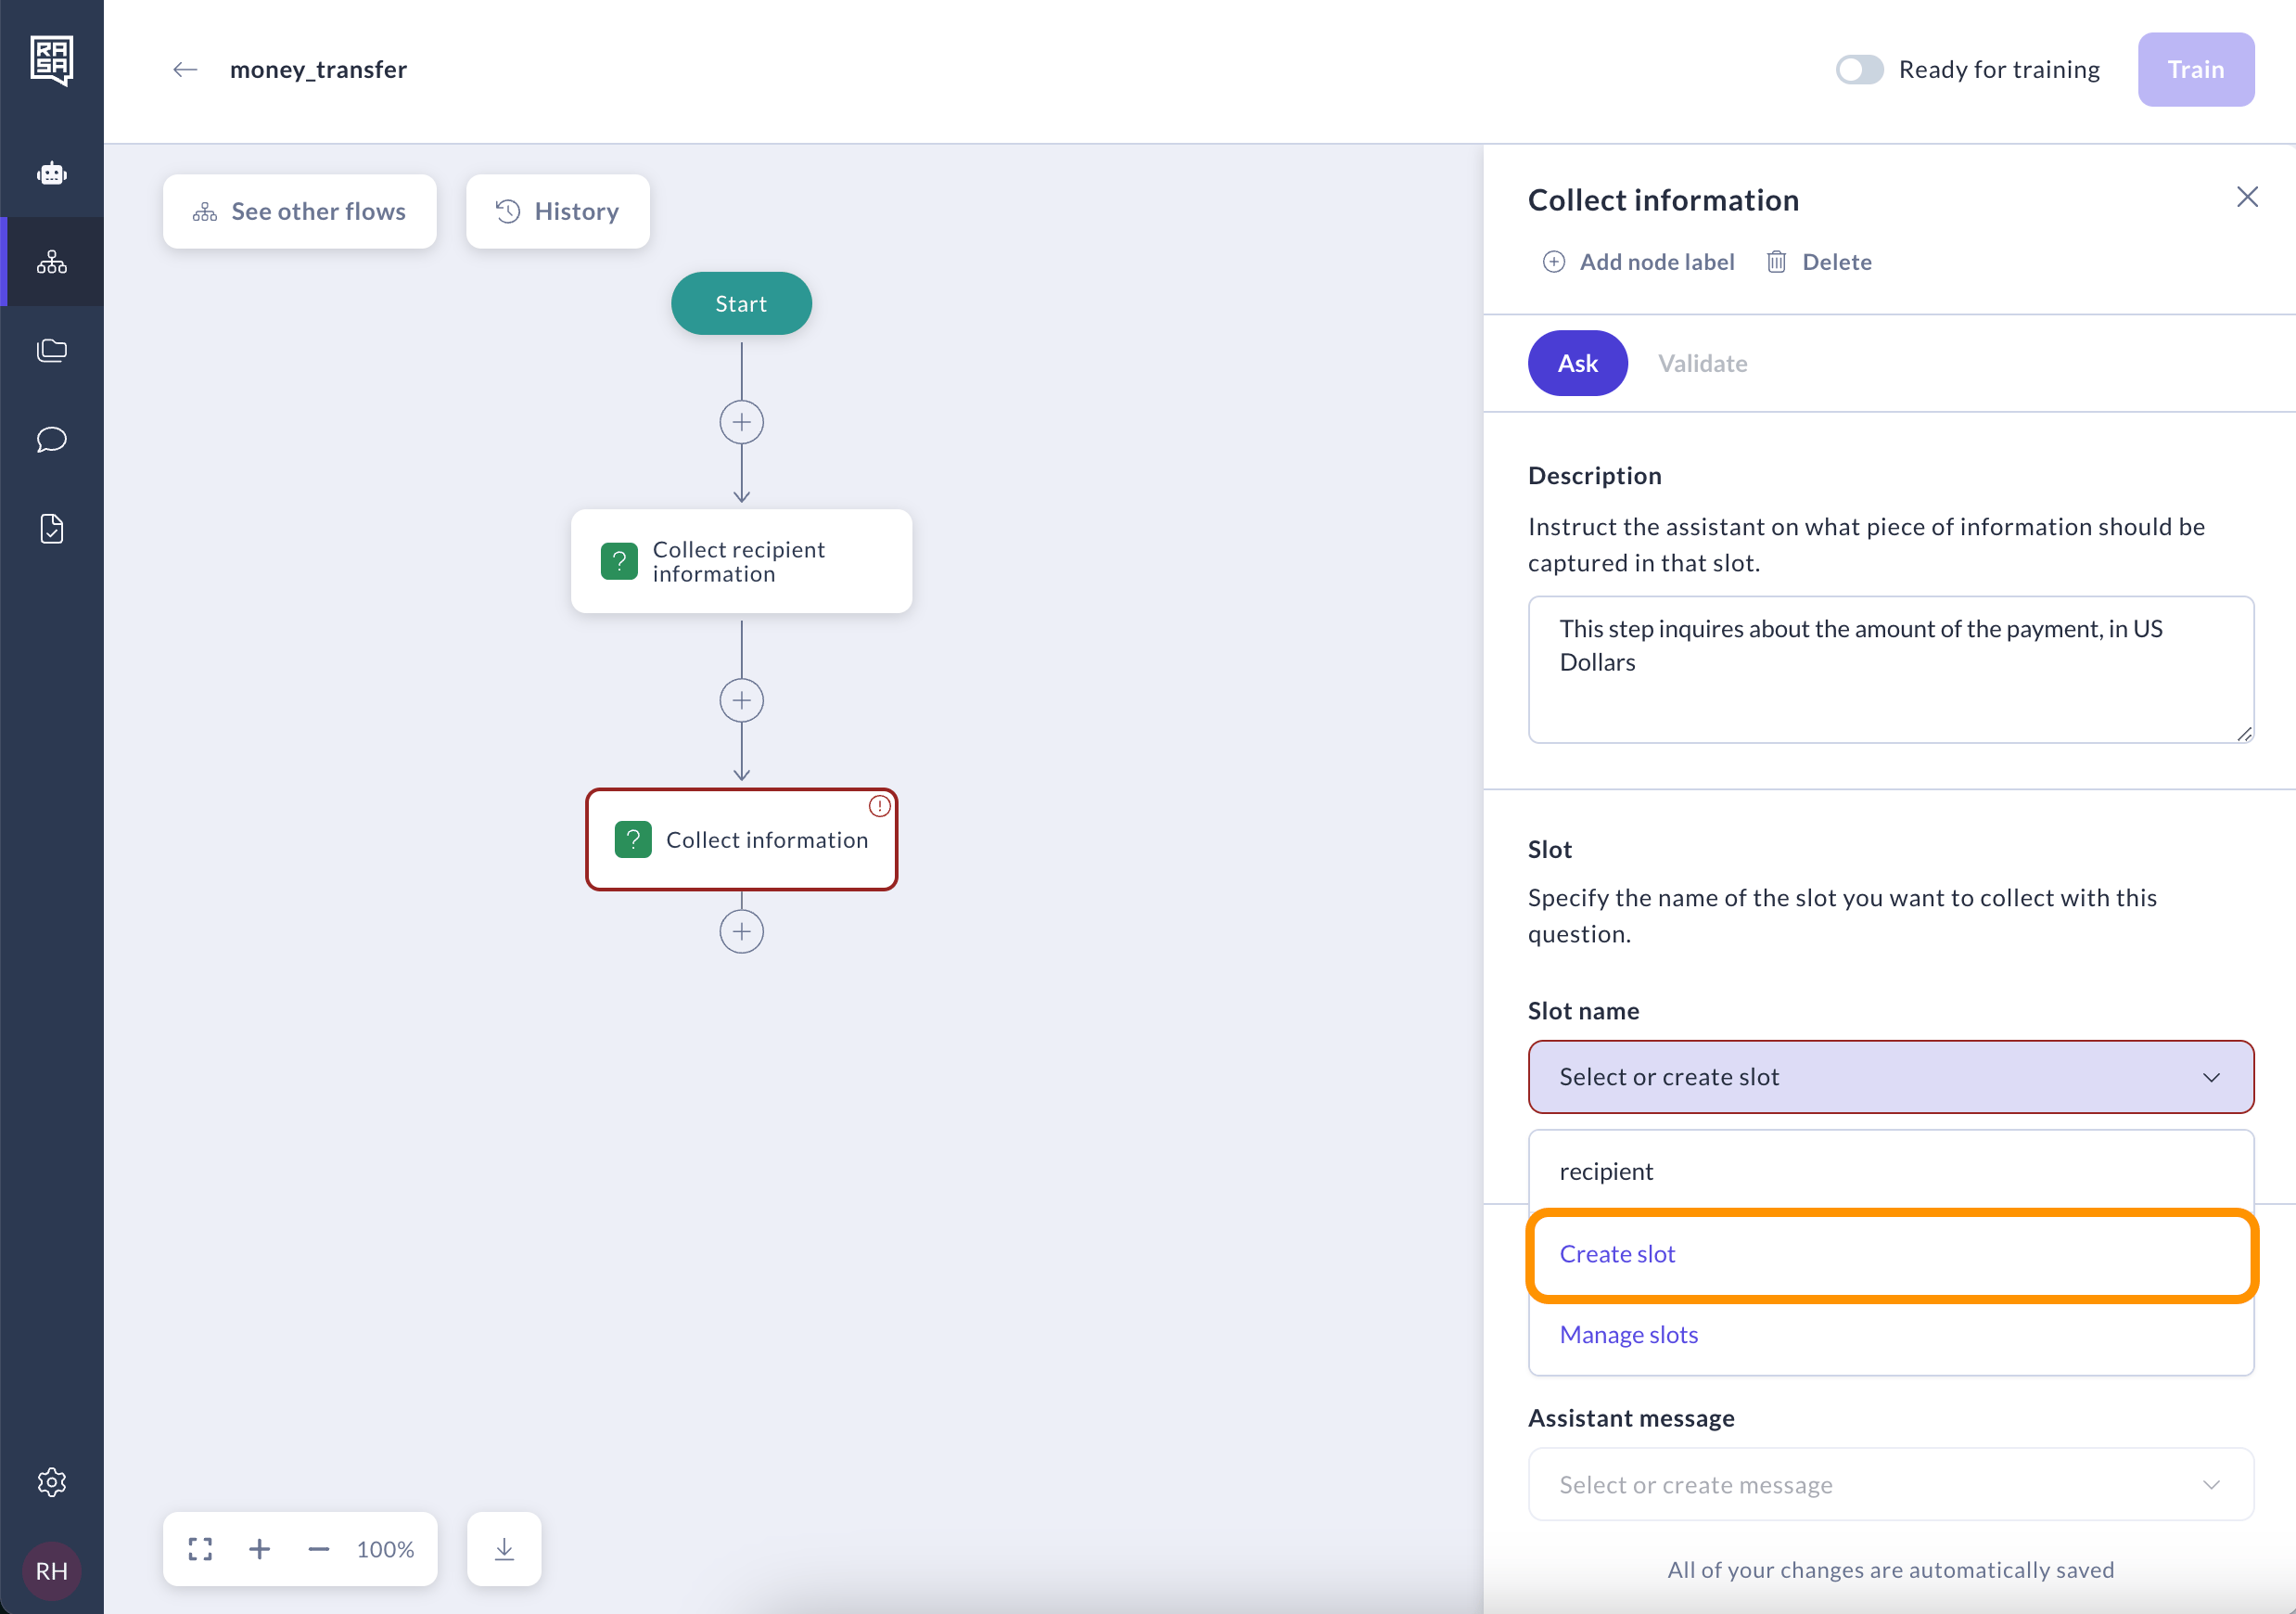 4. Input `amount` as the slot name. Then select `Float` as type — it is employed for storing numerical values that can have decimal points. Click "Save".
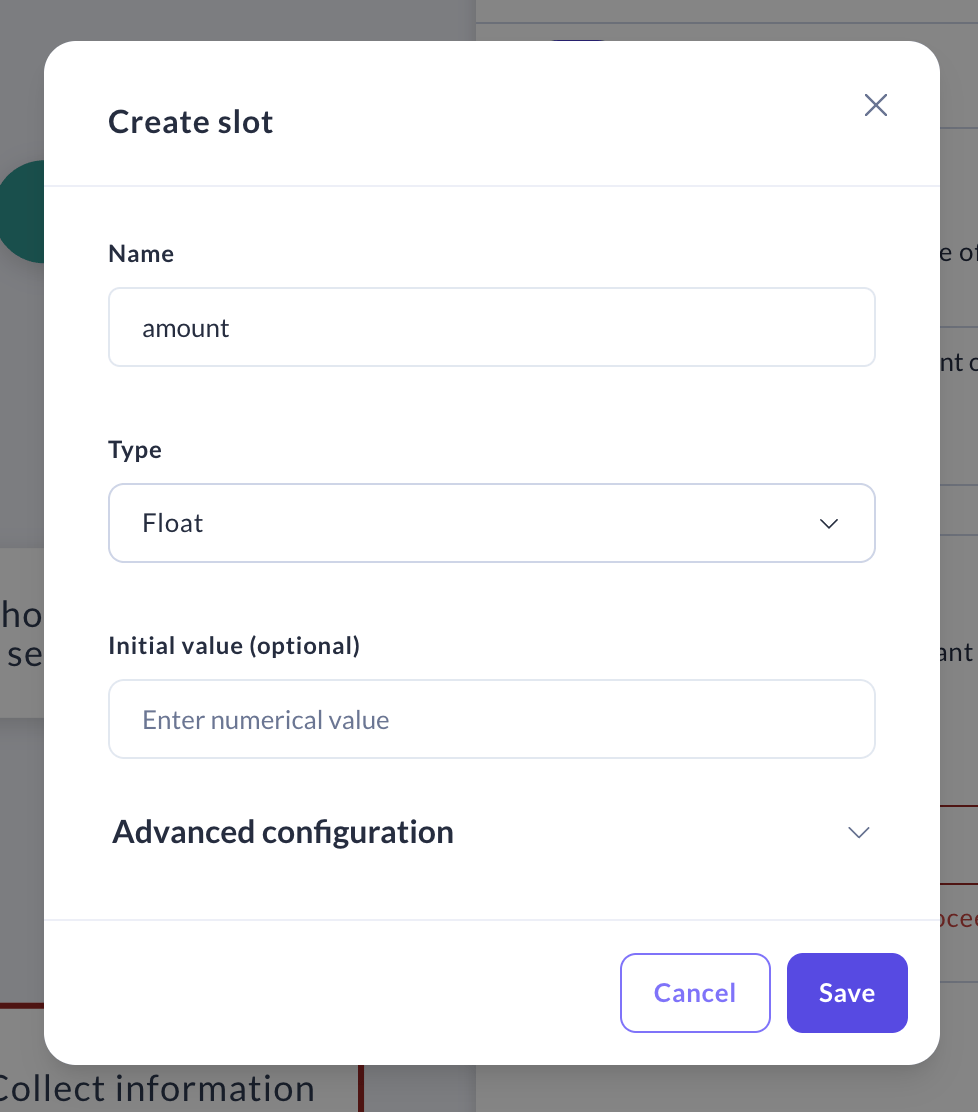 5. Finally, generate a response that the assistant will use to collect this information from the user. To do this, click "Select or create response".
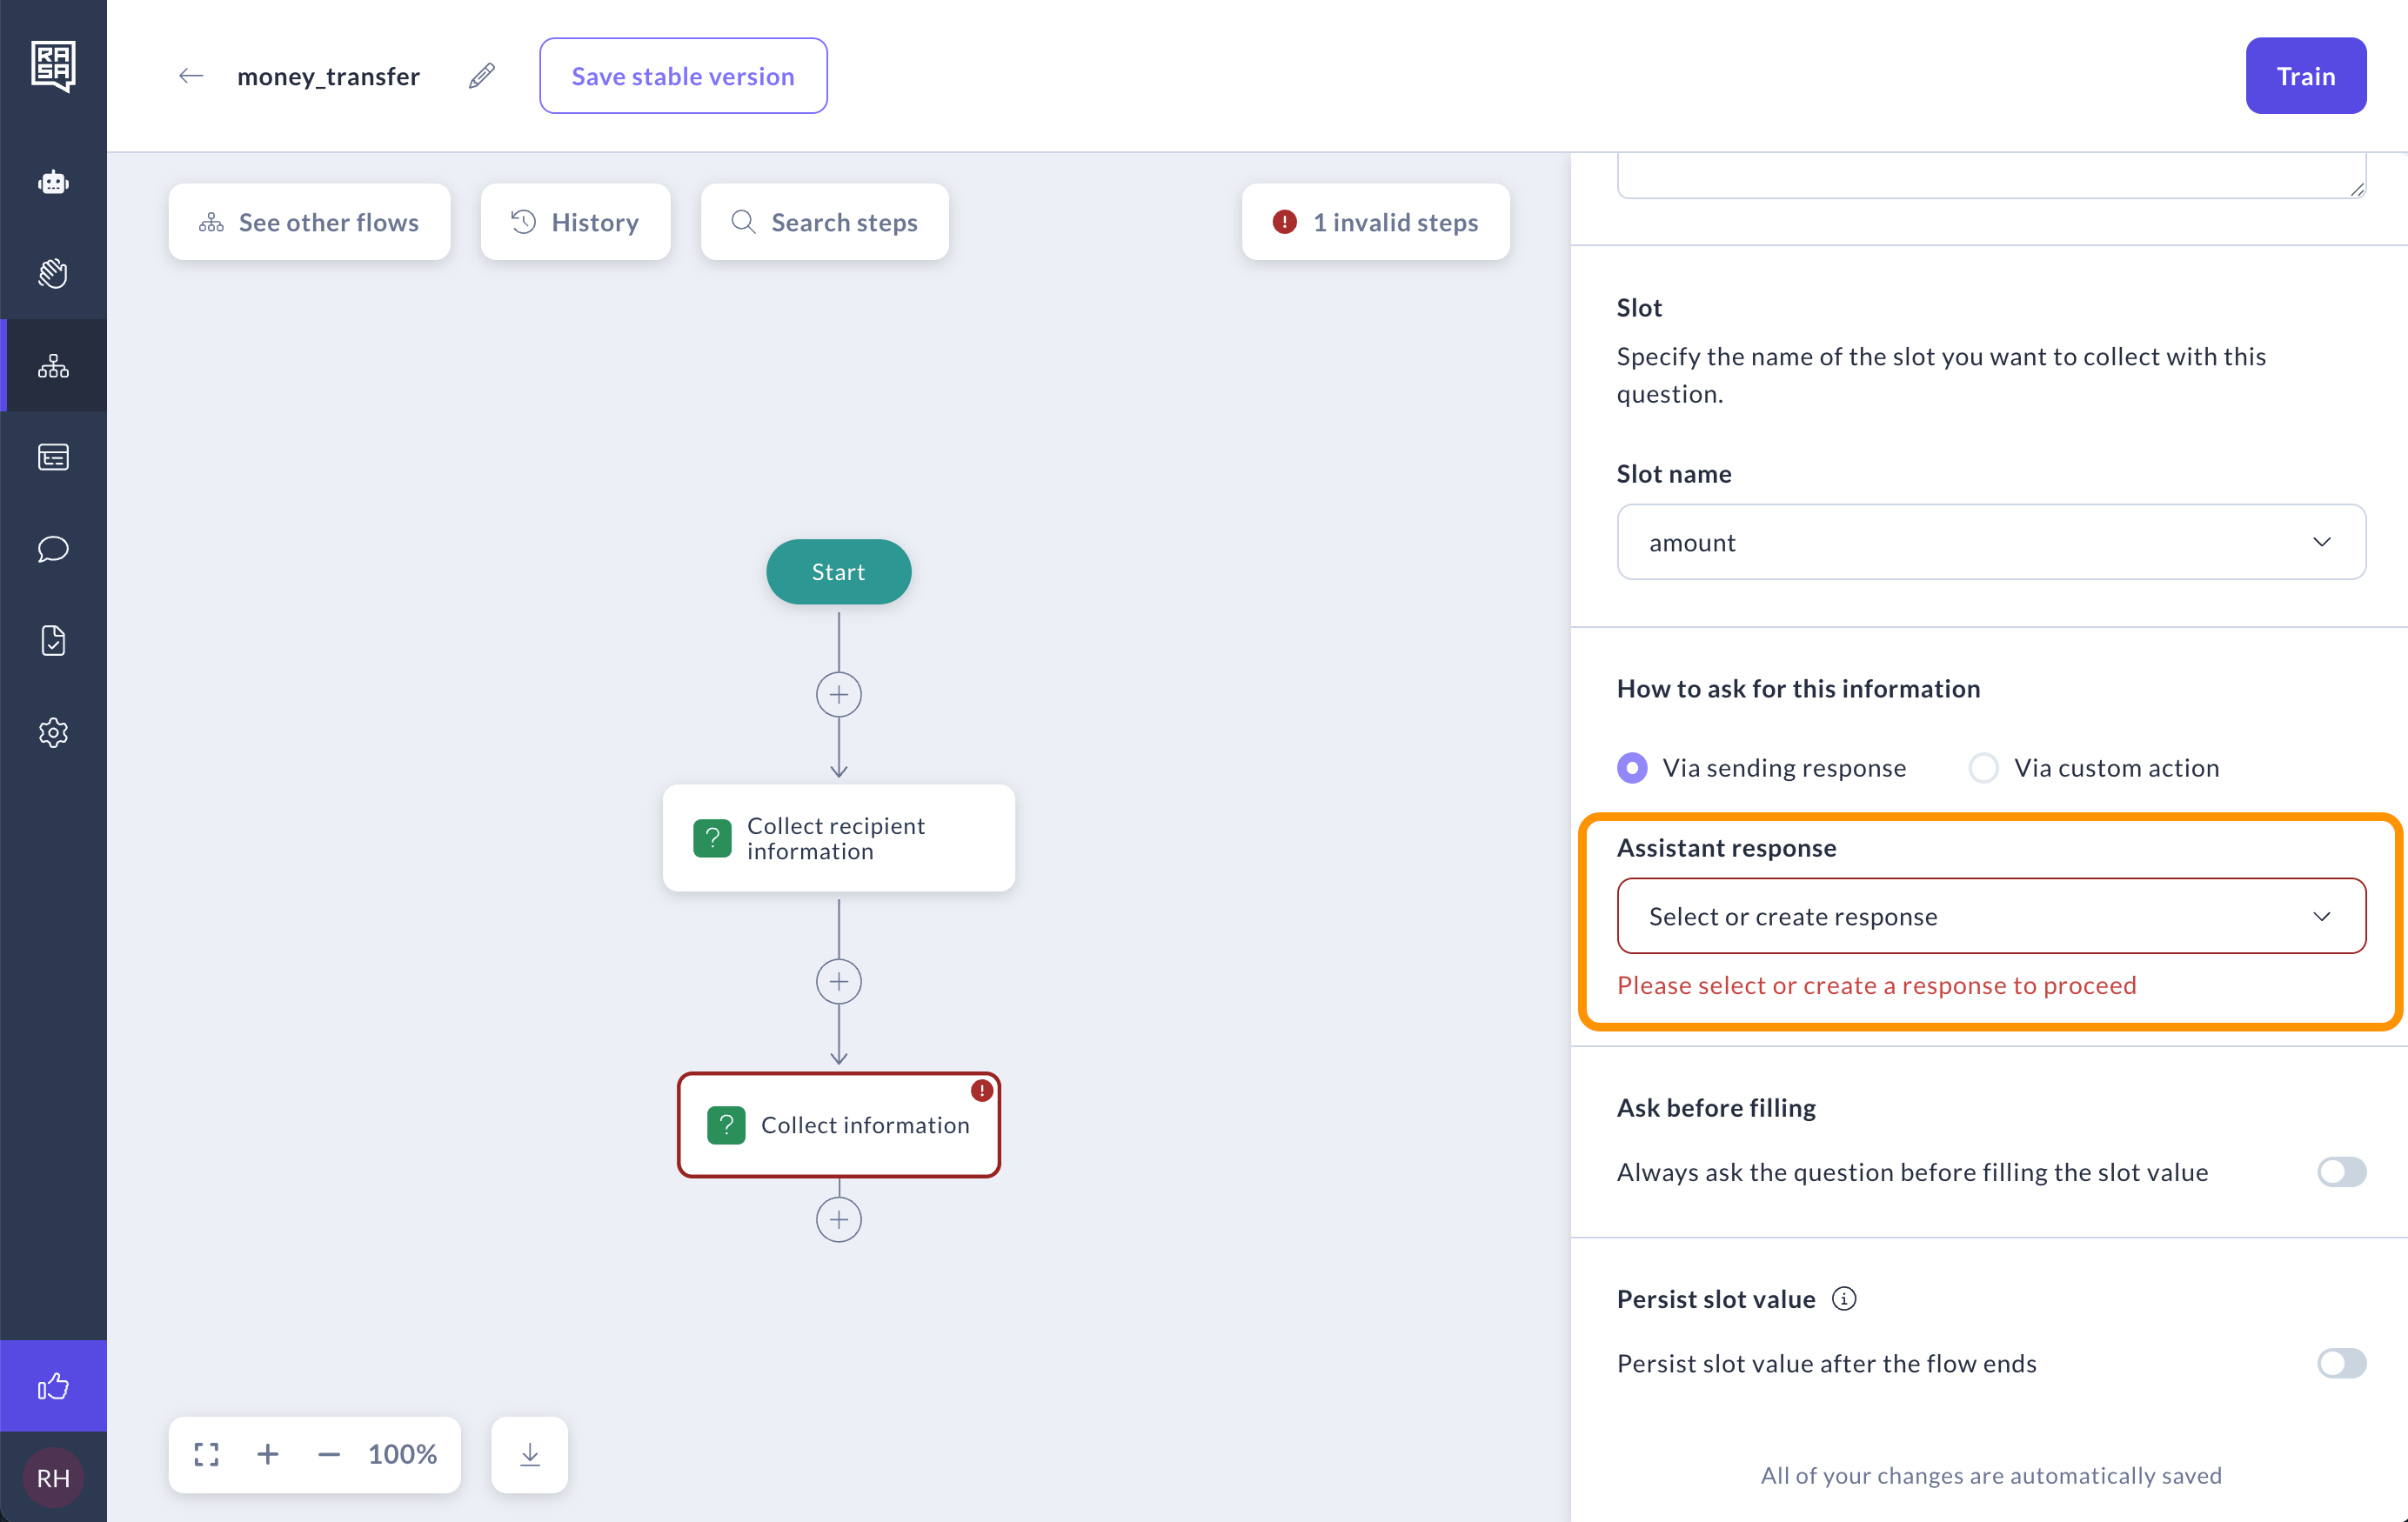 6. Modal to select or create new response will open. Click on "Create new response".
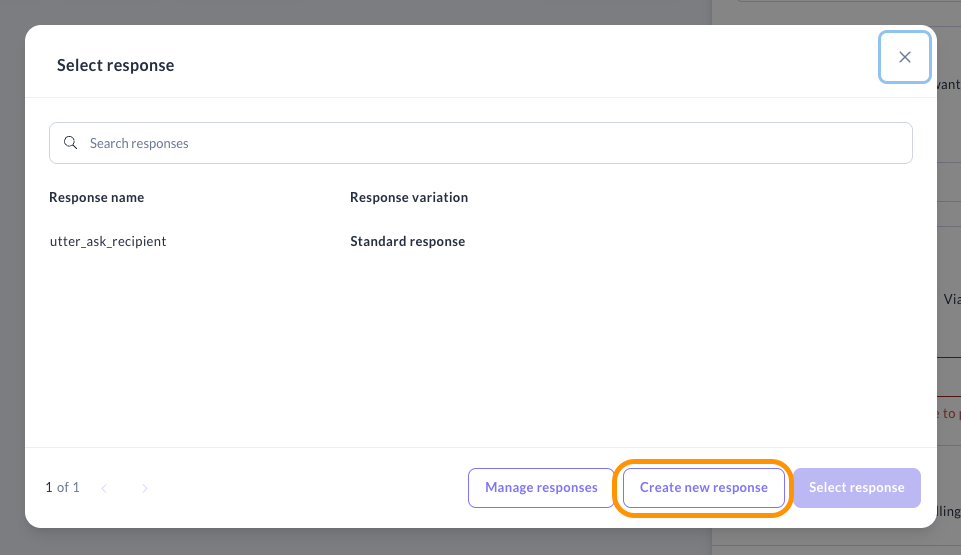 7. The system will automatically fill in the response name with `utter_ask_amount`. For the response content, you might use "How much money would you like to send (in US Dollars)?"
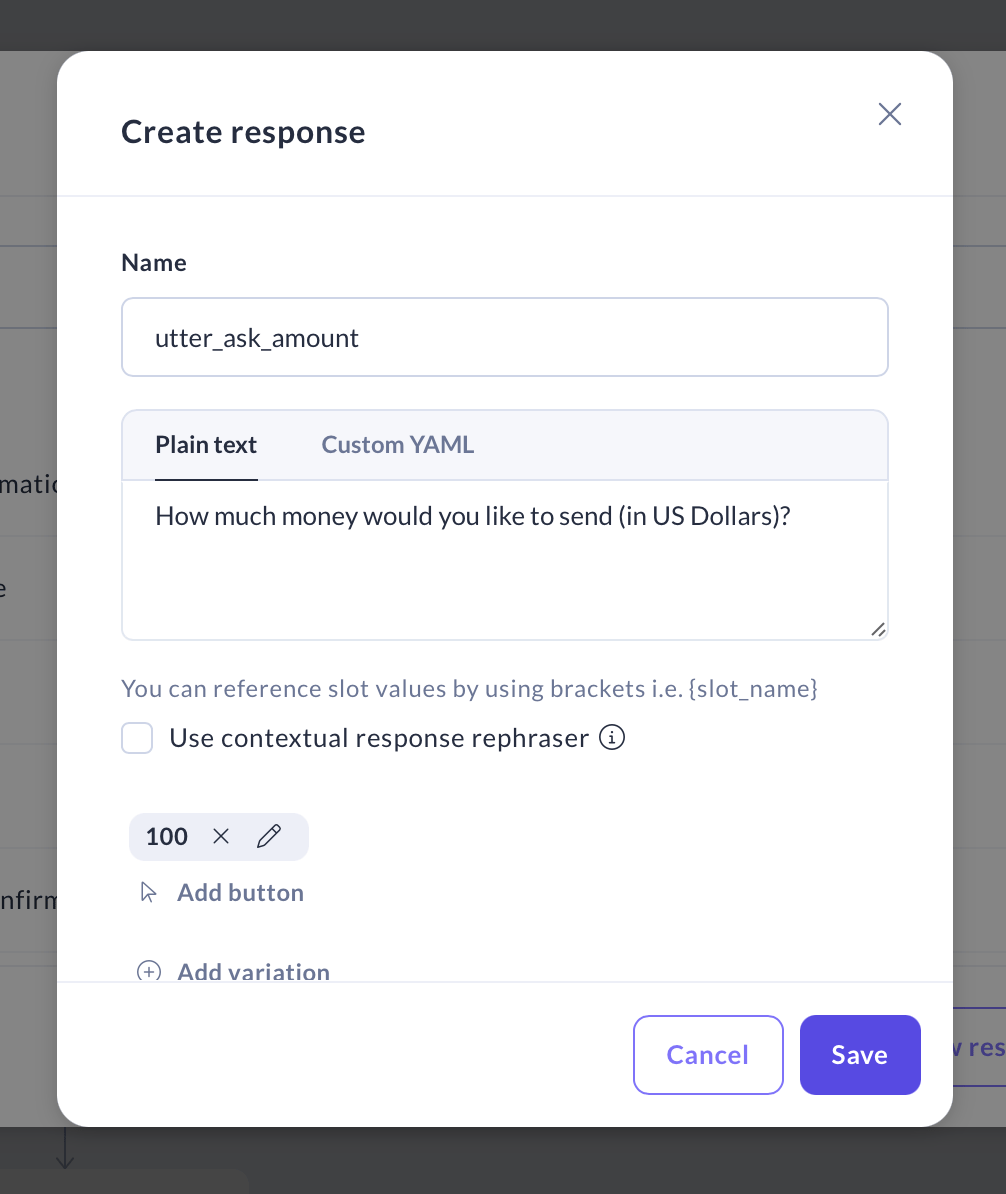
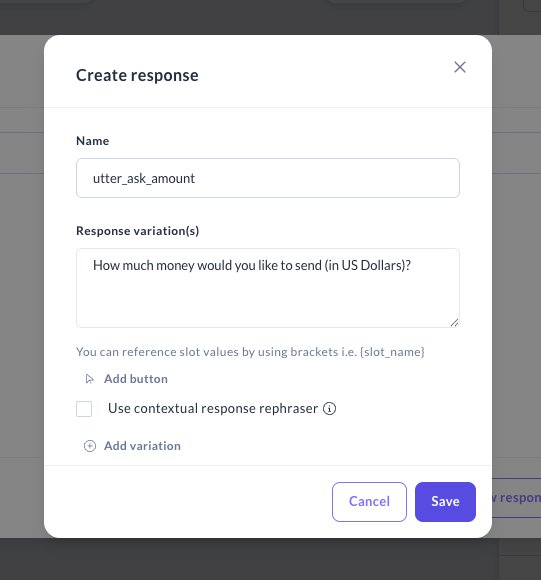 8. You can optionally add buttons to give users structured choices, making it easier for them to quickly select an answer. To do this, click "Add button".
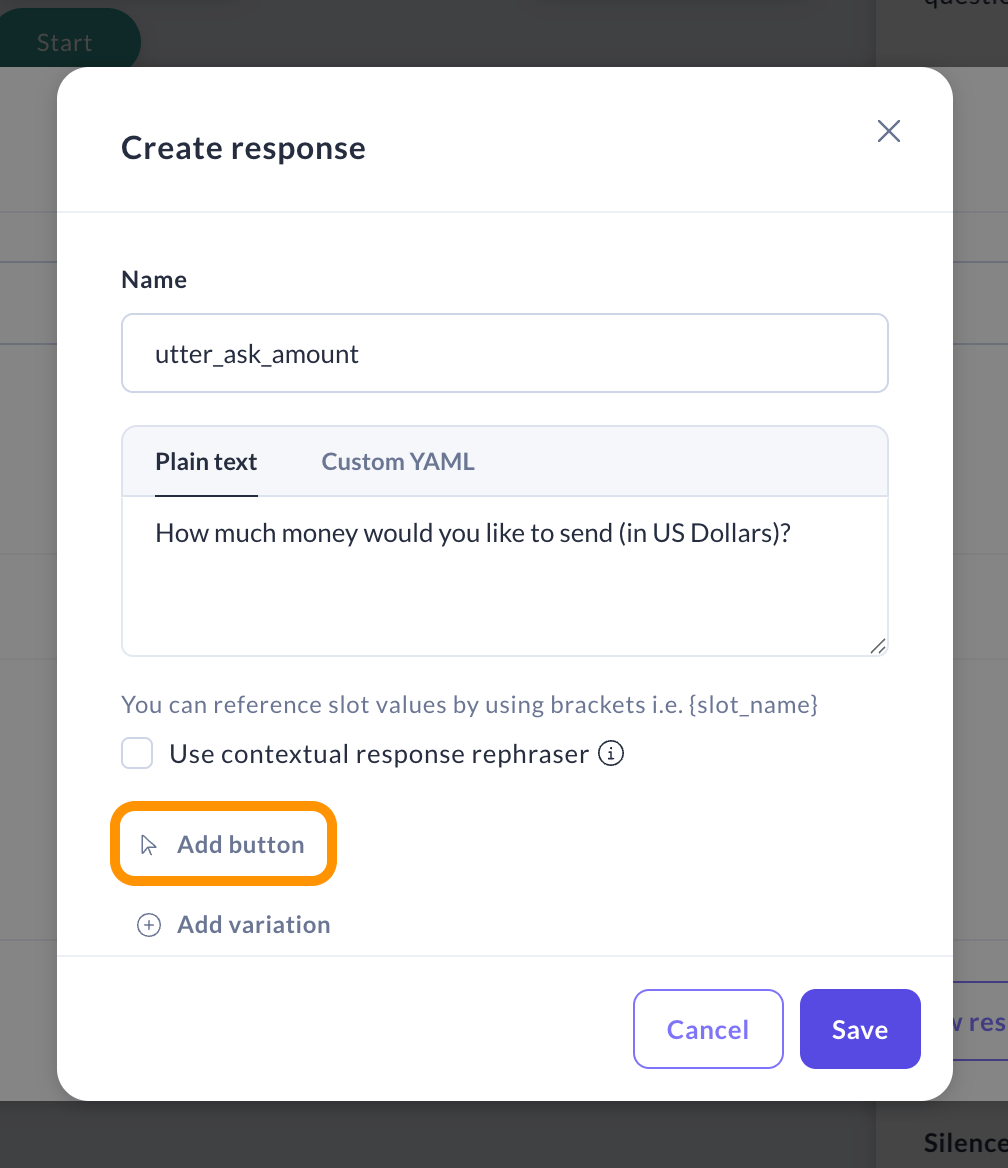 9. In the modal that opens, enter a button title, e.g., "50". You can leave the Payload field empty.
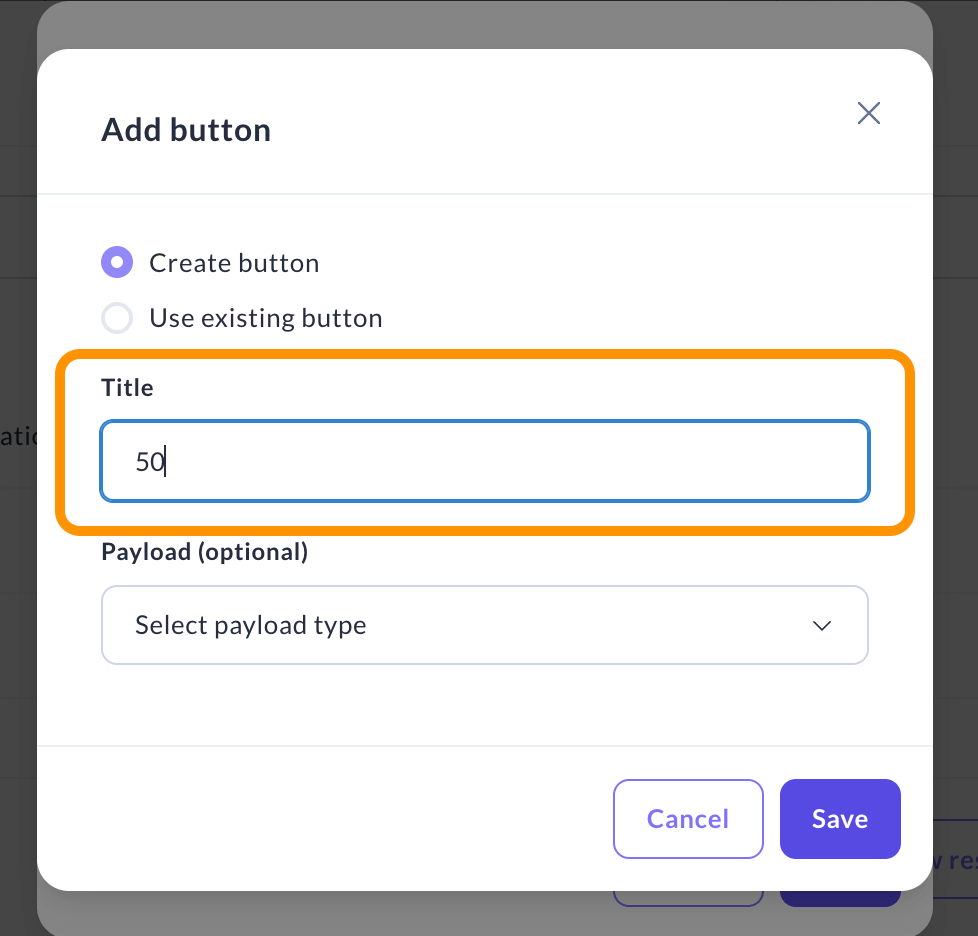 10. Click "Add another button" to add more options, such as `500`, `1000`, `1500`, etc. Don’t forget to save your buttons and the response when you're done.
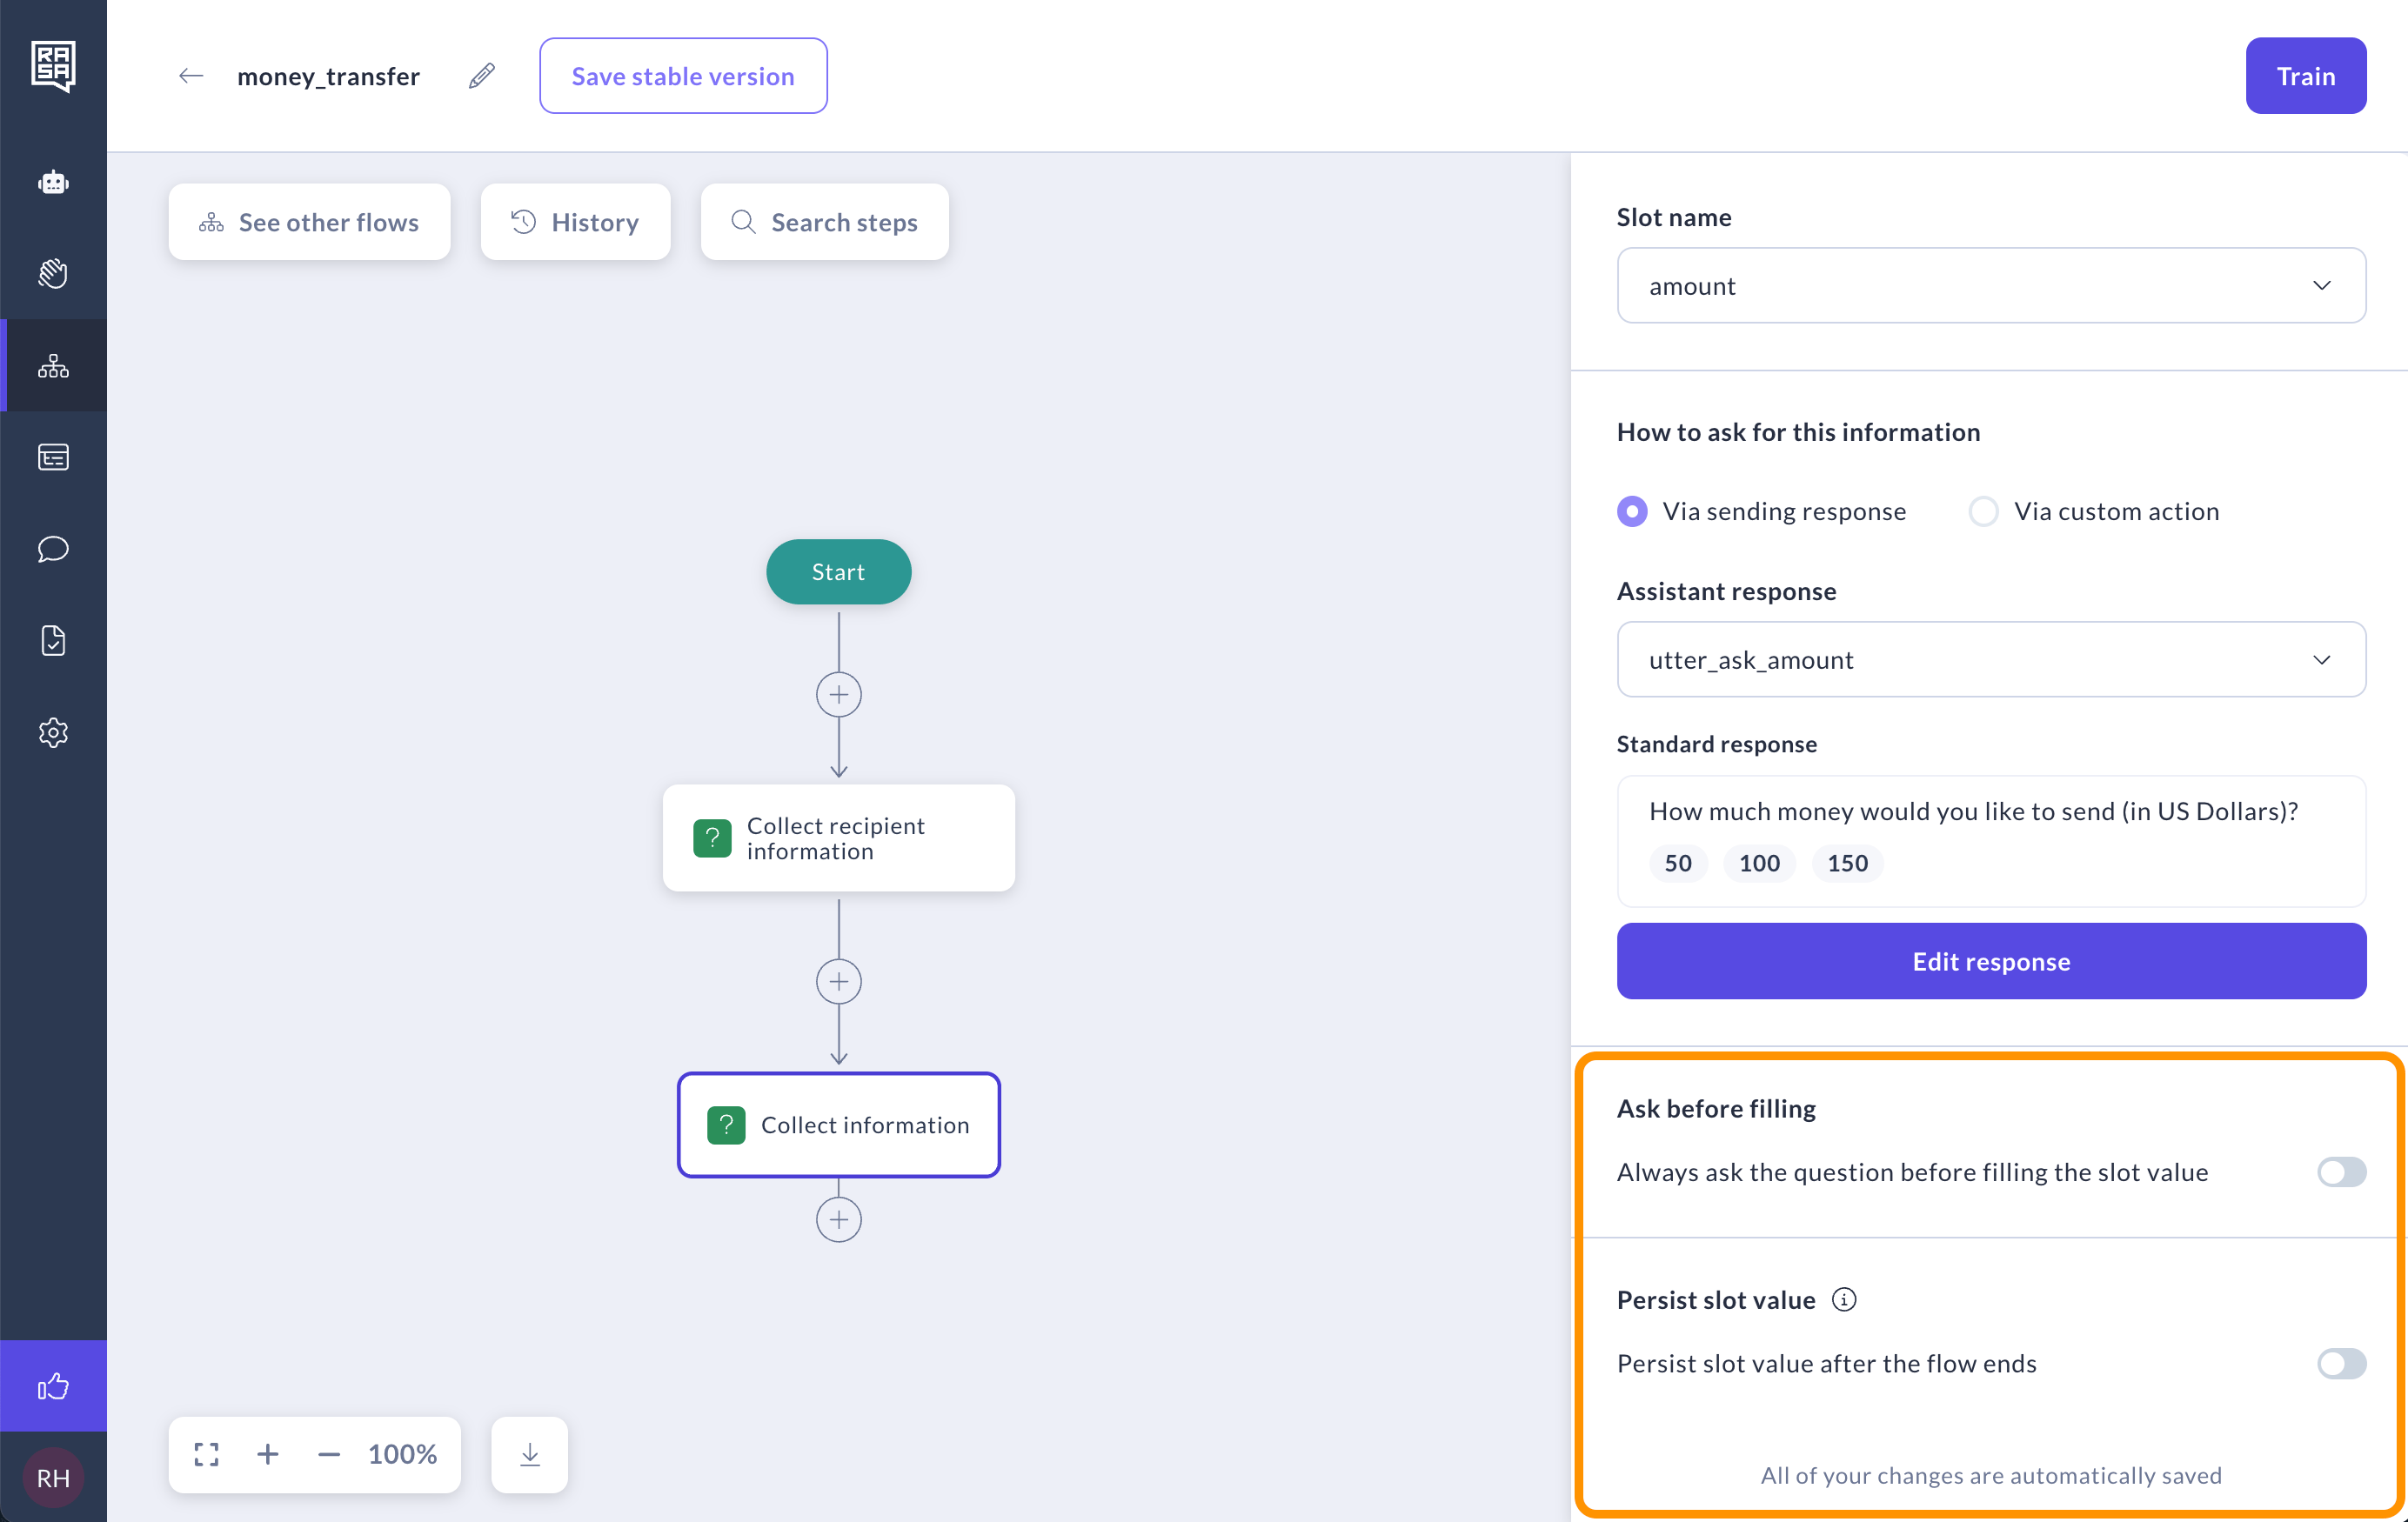
 11. Leave "Ask before filling" option disabled. If a user starts the conversation with "I want to transfer 50 dollars", the assistant will already fill the slot and won't to ask for the amount again.
Also leave "Persist slot value" disabled to ensure that the next time a user requests a money transfer, the assistant will ask for the amount again.
11. Leave "Ask before filling" option disabled. If a user starts the conversation with "I want to transfer 50 dollars", the assistant will already fill the slot and won't to ask for the amount again.
Also leave "Persist slot value" disabled to ensure that the next time a user requests a money transfer, the assistant will ask for the amount again.
 ### Verifying if funds are sufficient
In this step, we aim to verify whether the user has sufficient funds for the transfer. Ideally, this is done using a custom action (API call) to check the user's balance and return a response. However, for the first part of the tutorial, we'll use Logic to mock the result of this custom action.
1. Add a "Logic" step. This type of step allows you to branch the flow based on a condition.
### Verifying if funds are sufficient
In this step, we aim to verify whether the user has sufficient funds for the transfer. Ideally, this is done using a custom action (API call) to check the user's balance and return a response. However, for the first part of the tutorial, we'll use Logic to mock the result of this custom action.
1. Add a "Logic" step. This type of step allows you to branch the flow based on a condition.
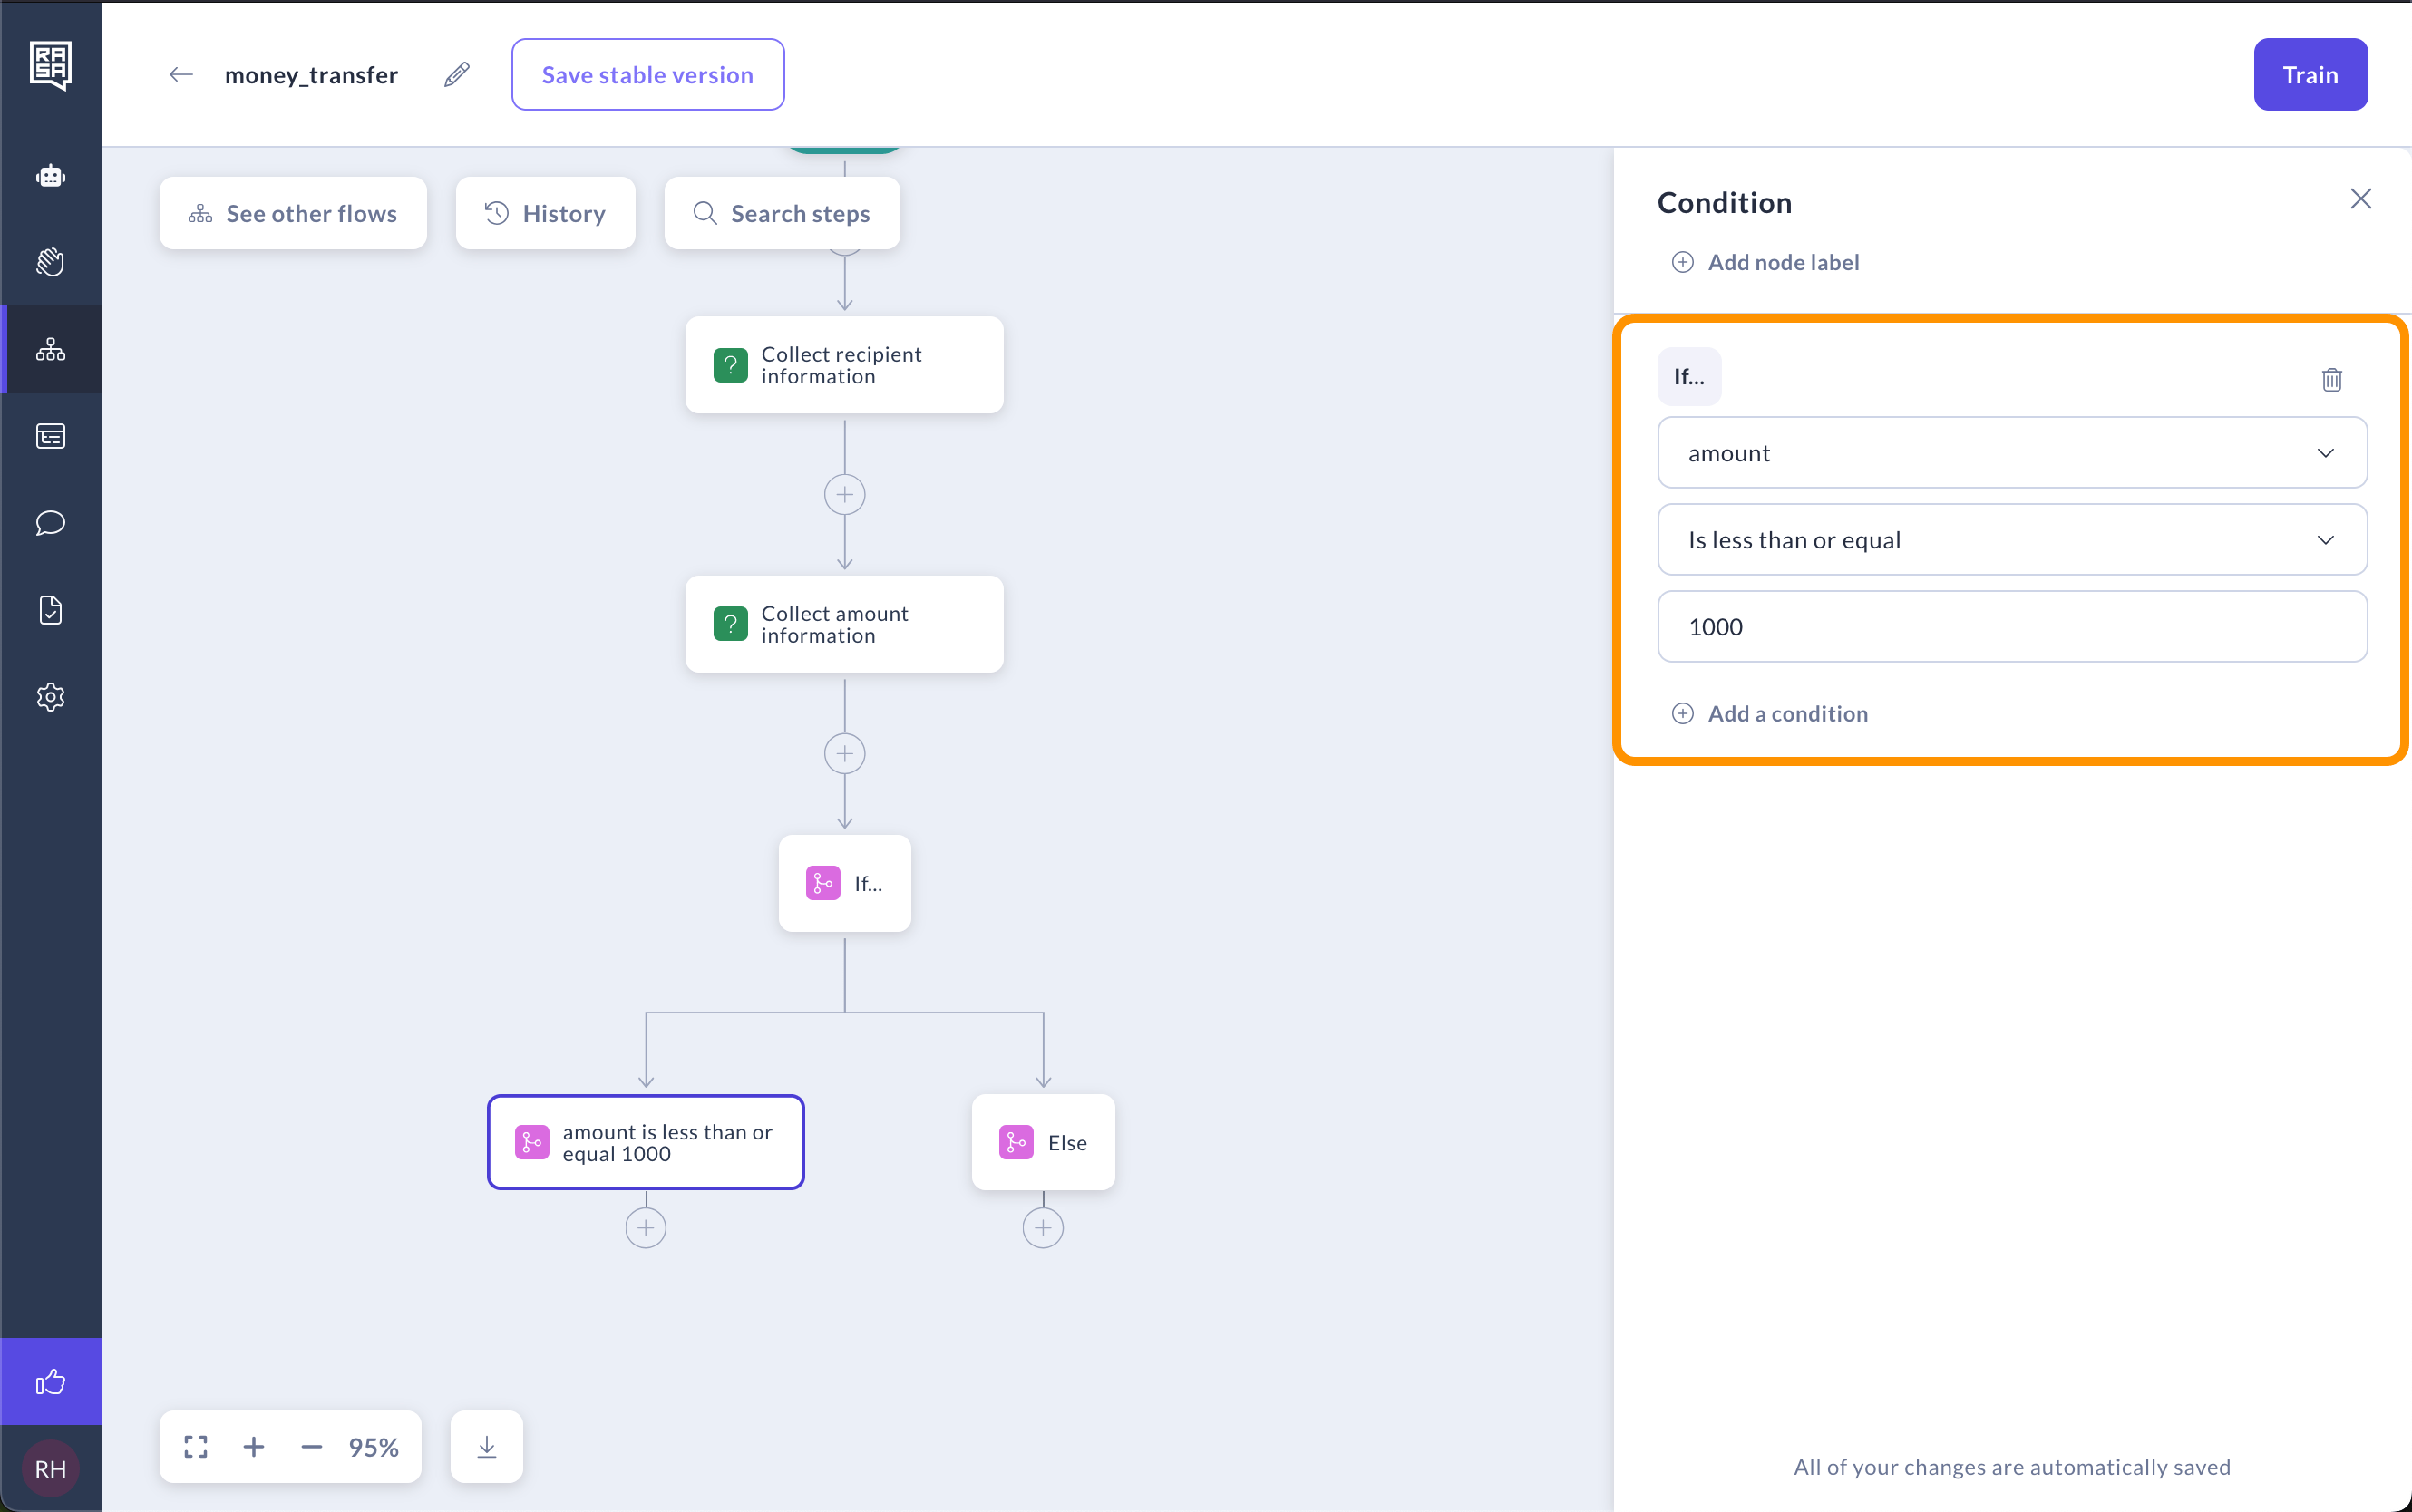
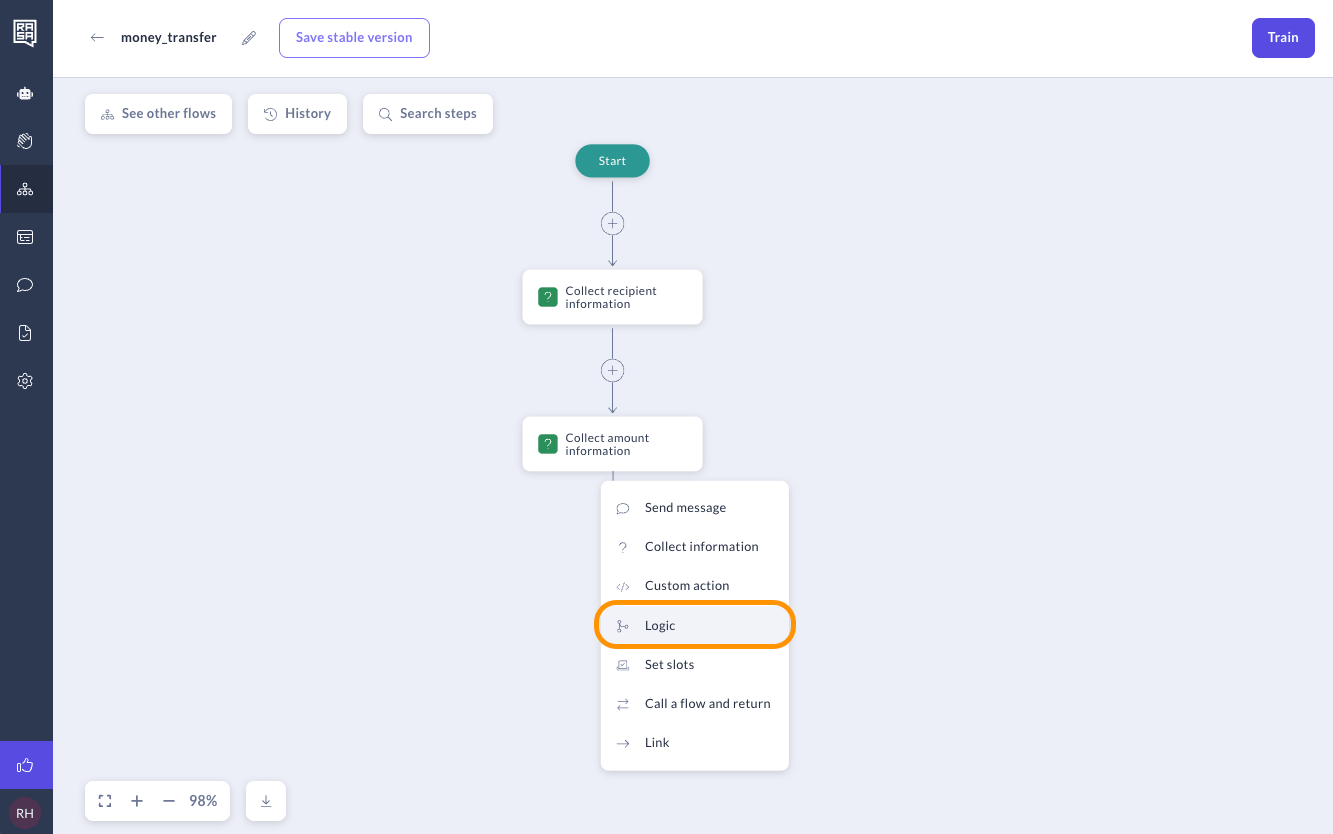 2. Define the condition for sufficient funds. Click on the first logic branch to create a scenario where the transaction amount is less than or equal to \$1000. If the transaction amount is less than the available funds, it indicates sufficient funds are available. Select the first condition and set it to `amount` `is less than or equal` `1000`.
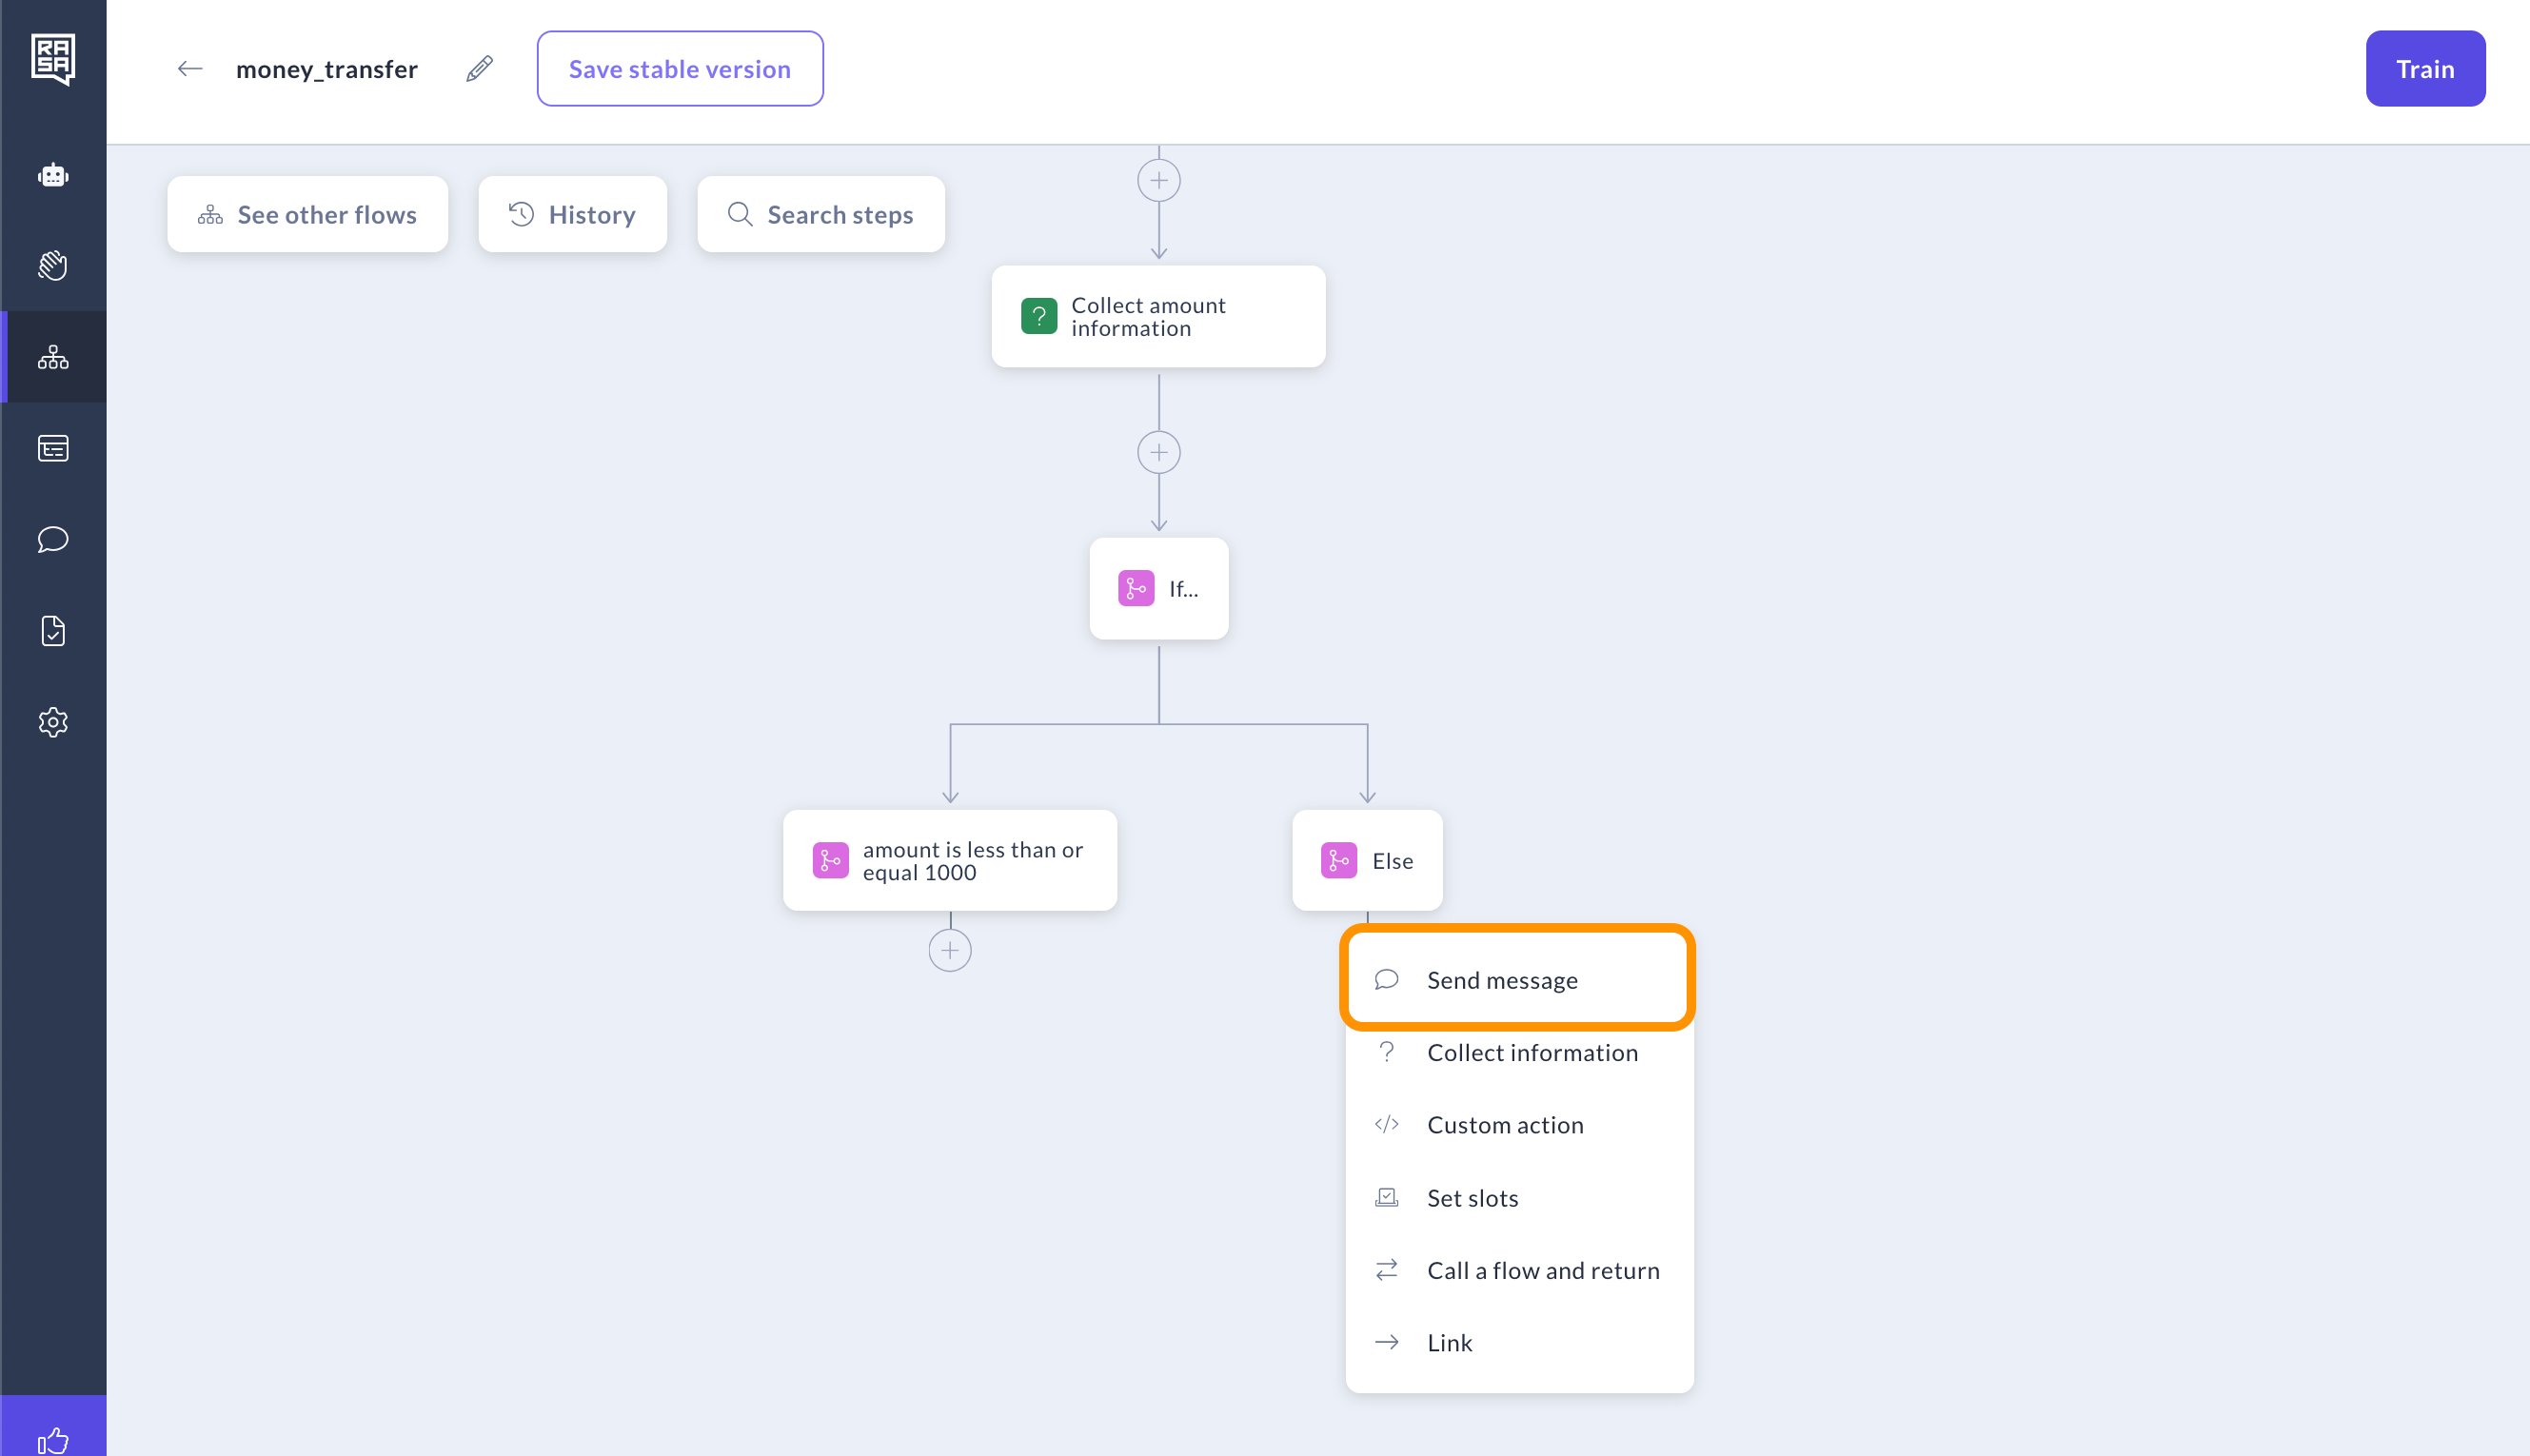
 3. For cases where the user does not have enough funds, the "Else" logic branch will be activated. In this case, we need to notify the user that the transfer amount is insufficient. To do so, add a "Send message" step after the "Else" branch.
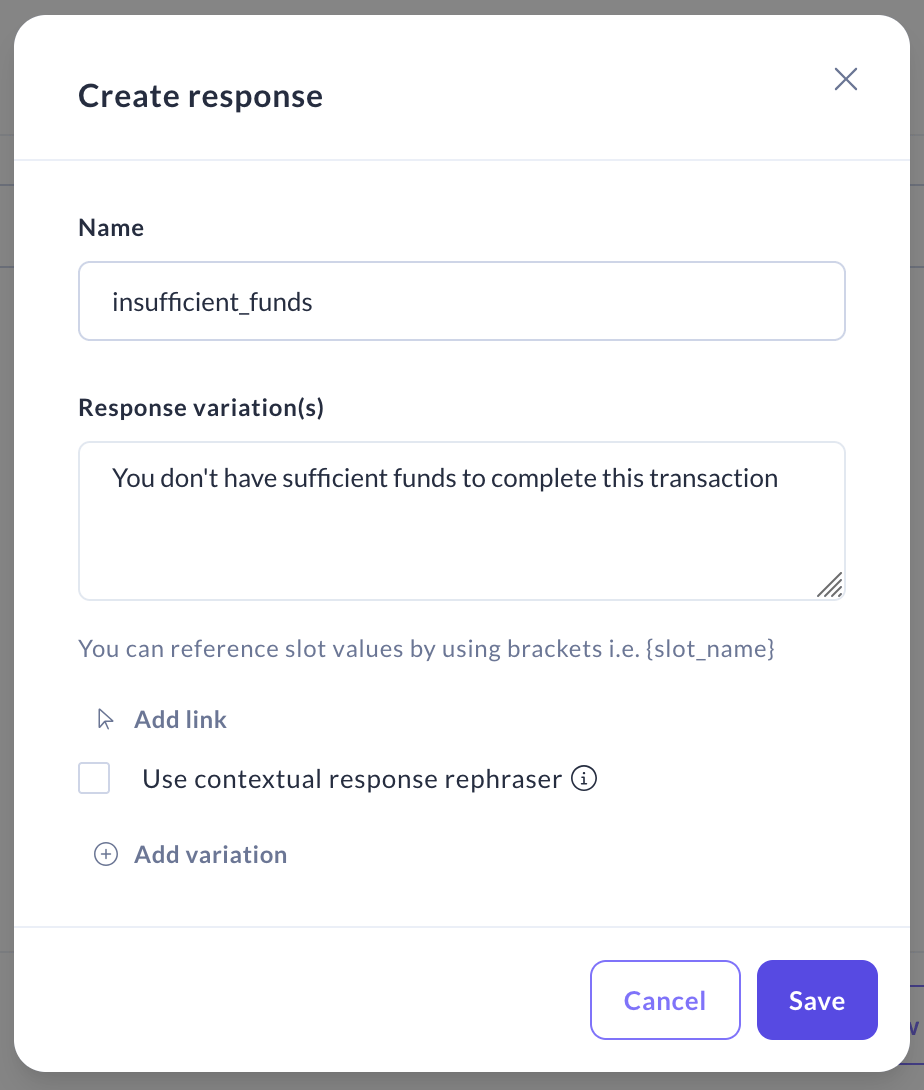
 4. Create the response. Name it `insufficient_funds` and add the text "You don't have sufficient funds to complete this transaction." Click "Save."
 ### Confirming the request
If the user has sufficient funds, we can proceed to the next step: verifying the transfer details.
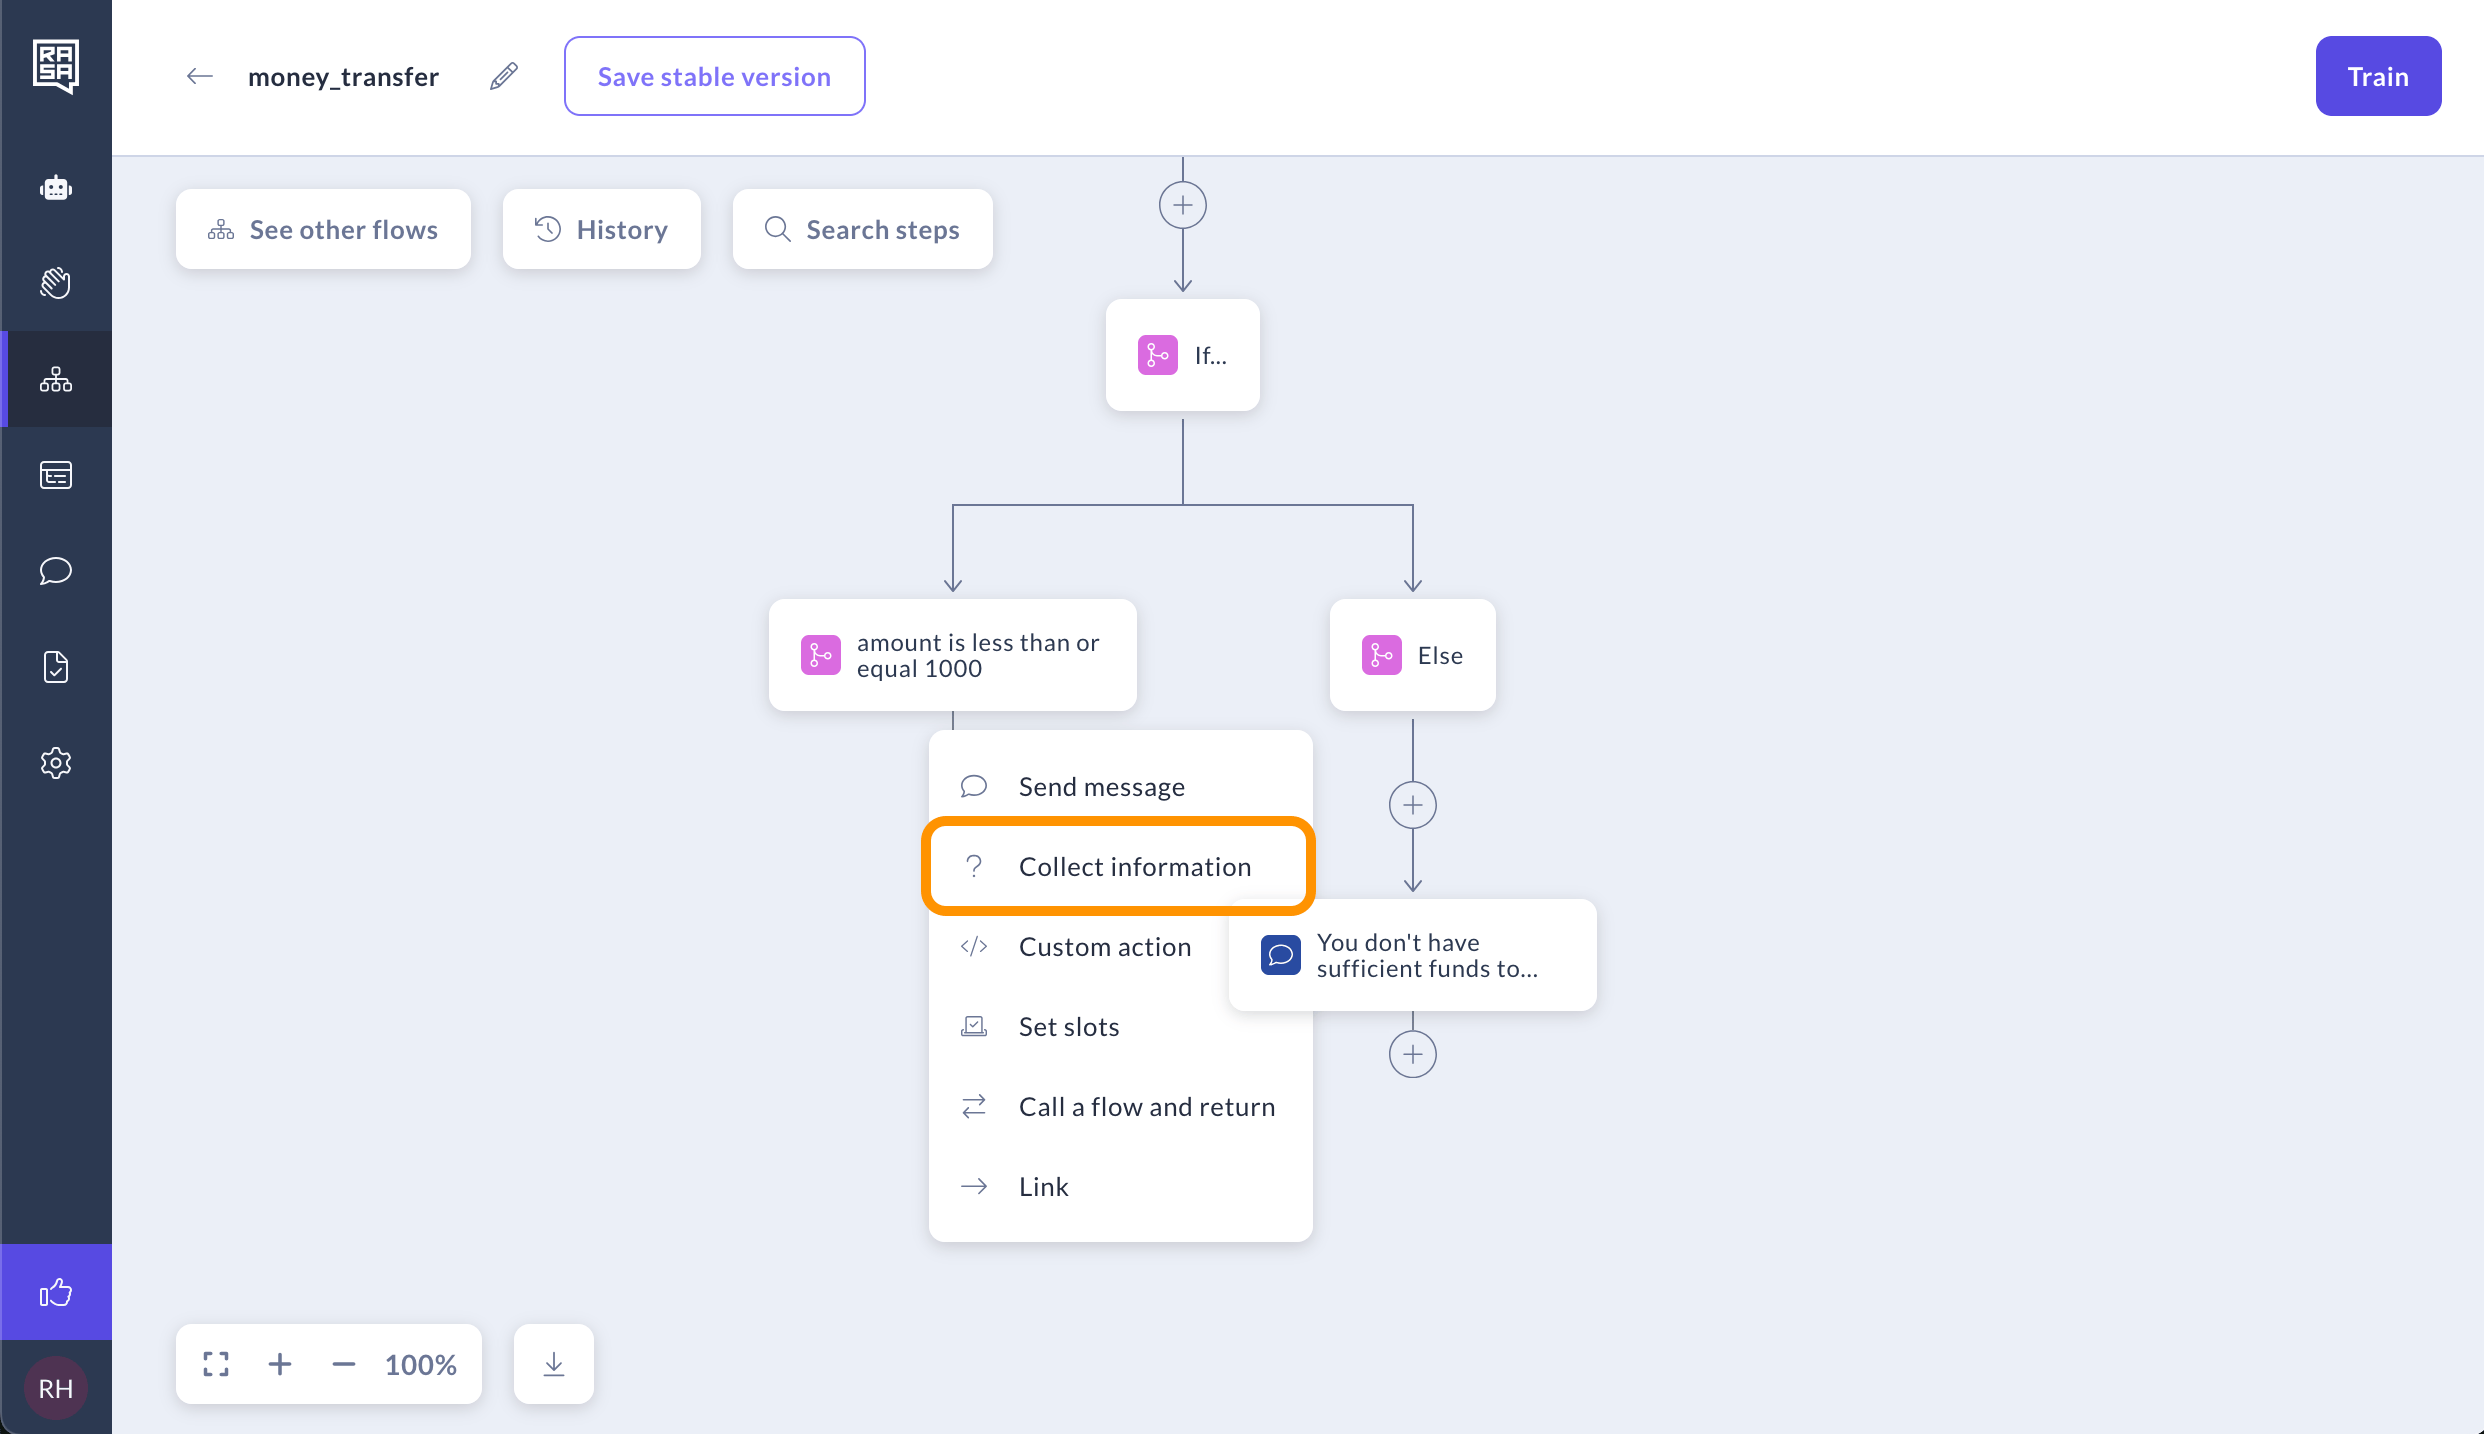
1. After the first condition, add the "Collect information" step.
### Confirming the request
If the user has sufficient funds, we can proceed to the next step: verifying the transfer details.
1. After the first condition, add the "Collect information" step.
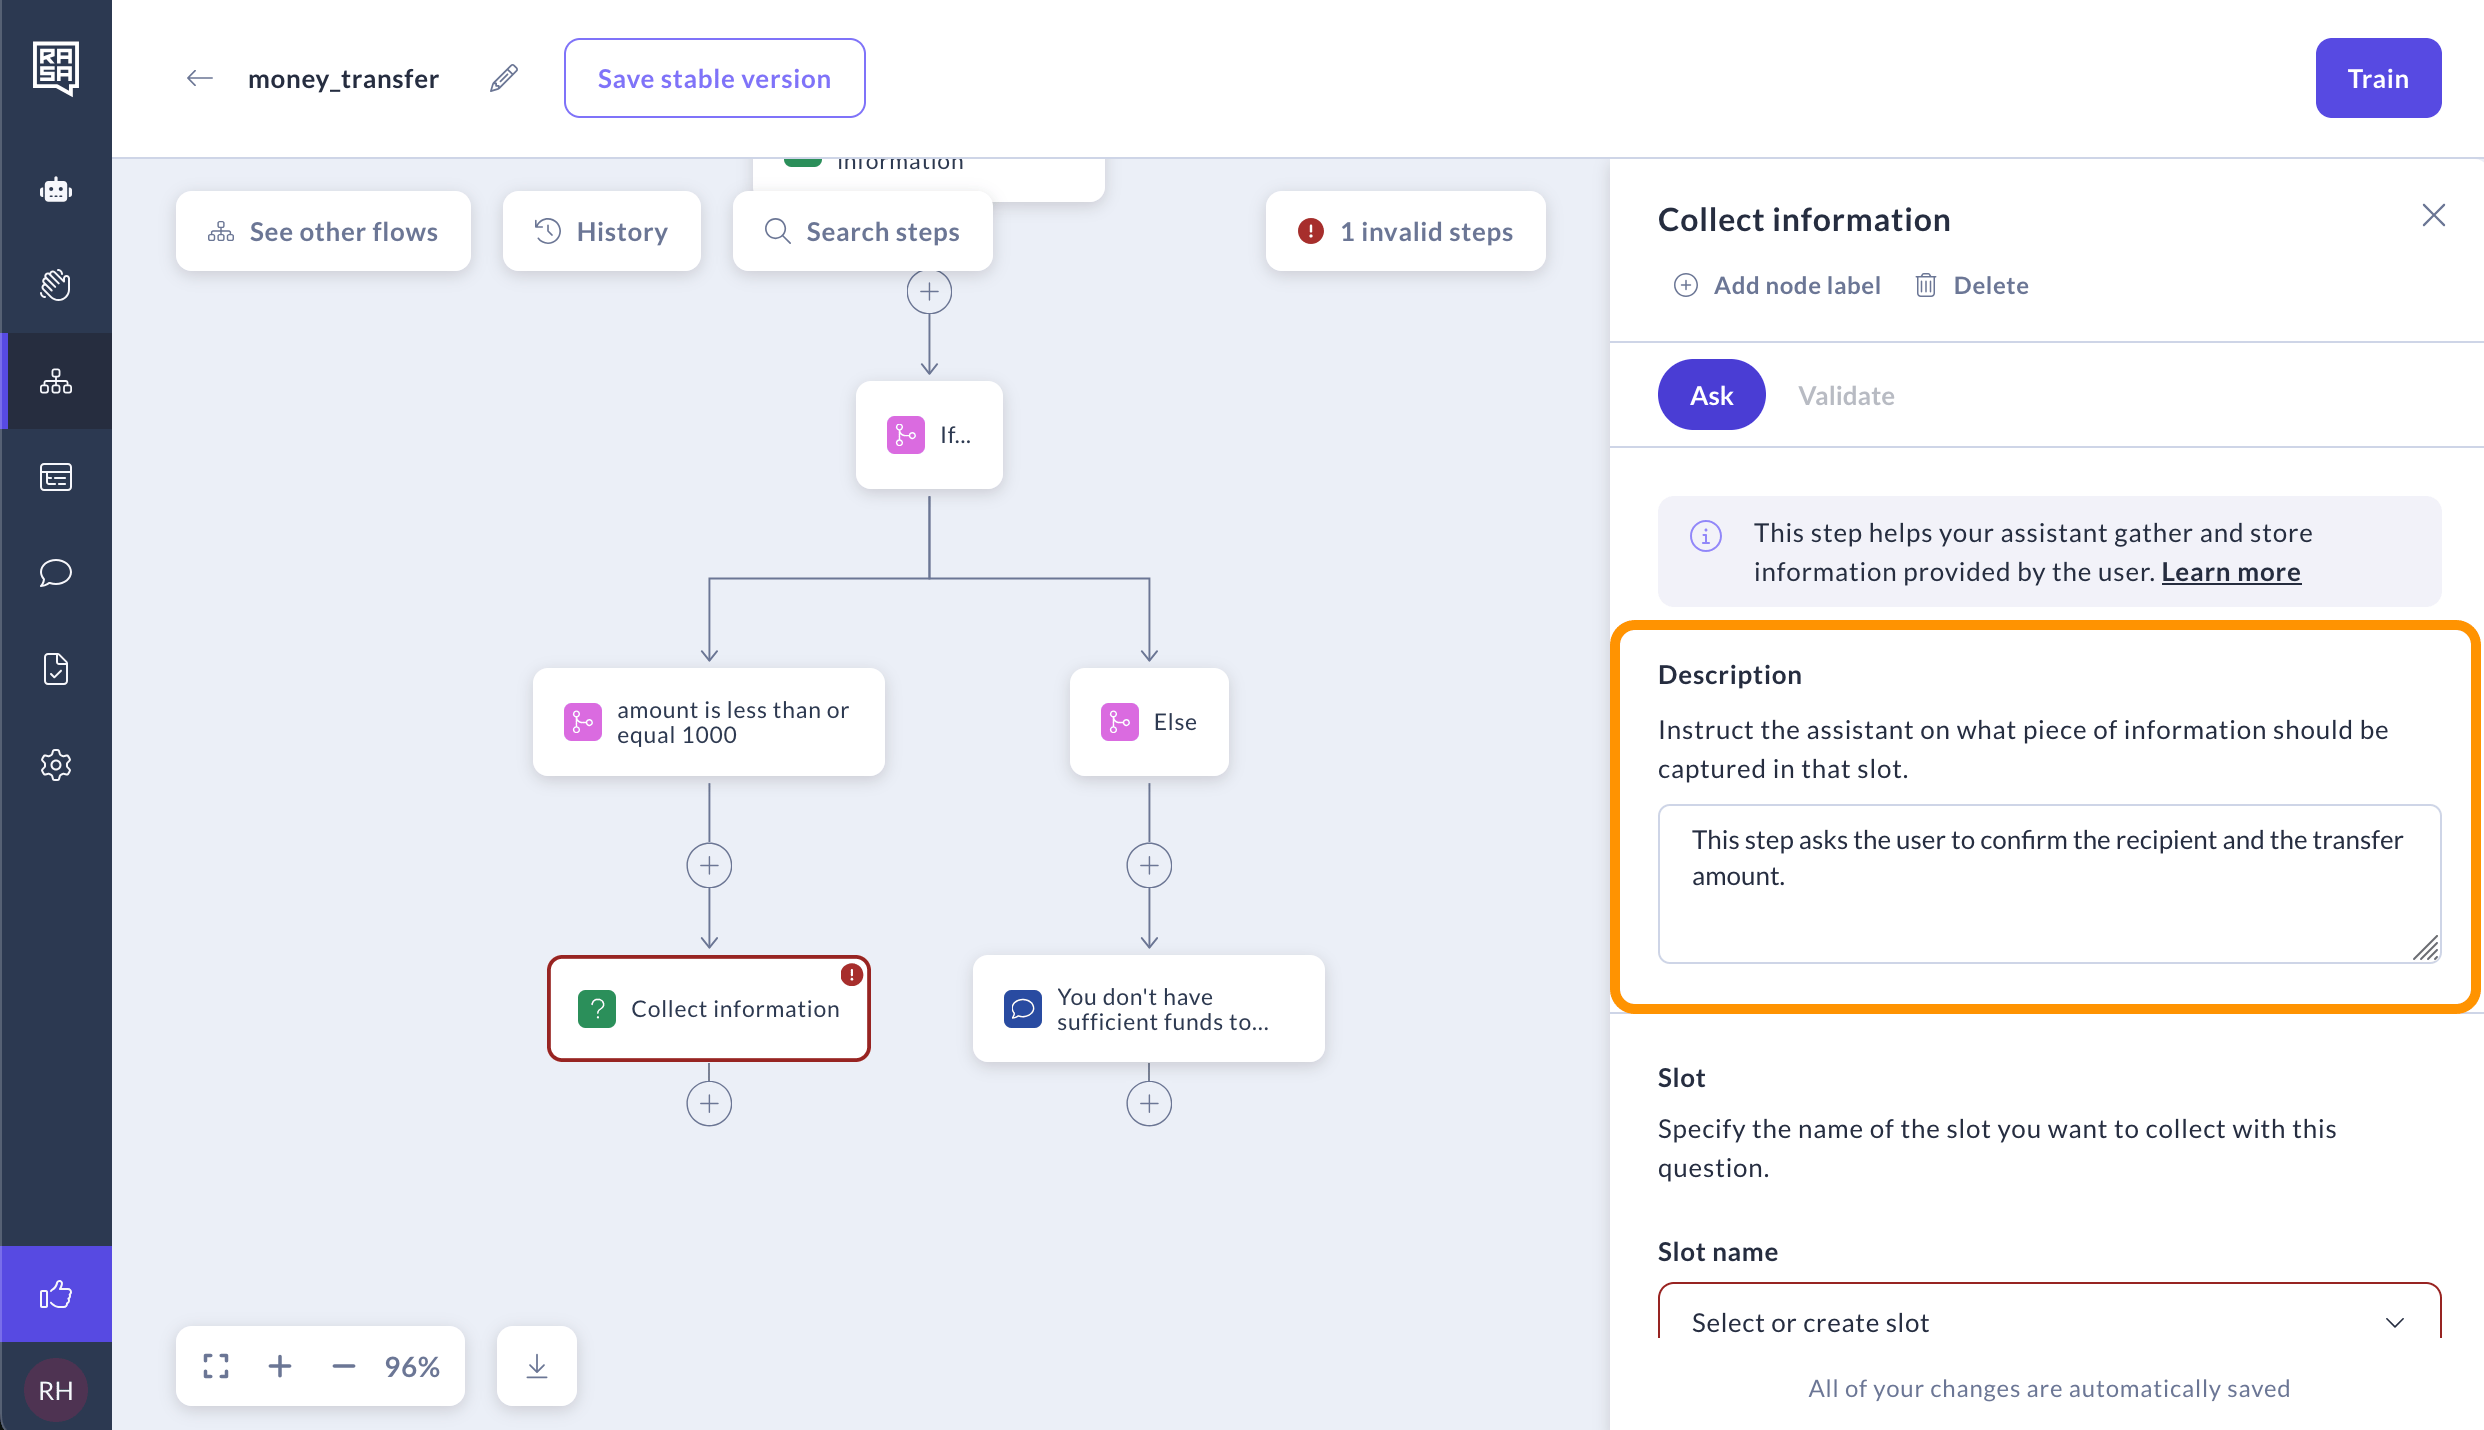
 2. Add the description "This step asks the user to confirm the recipient and the transfer amount."
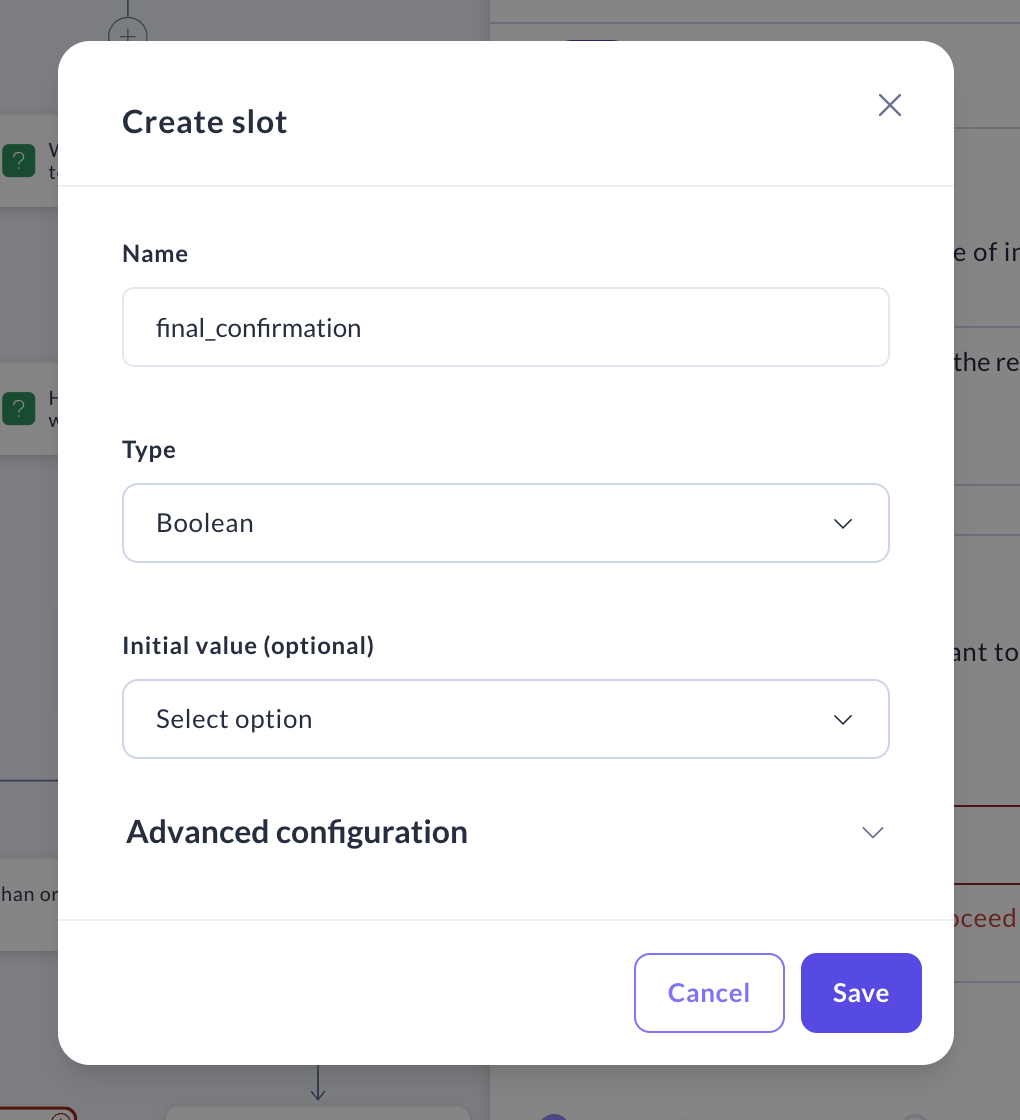
 3. Create a slot and call it `final_confirmation`. Since you are asking a Yes or No question, you can store the result as a `Boolean` type. Click "Save".
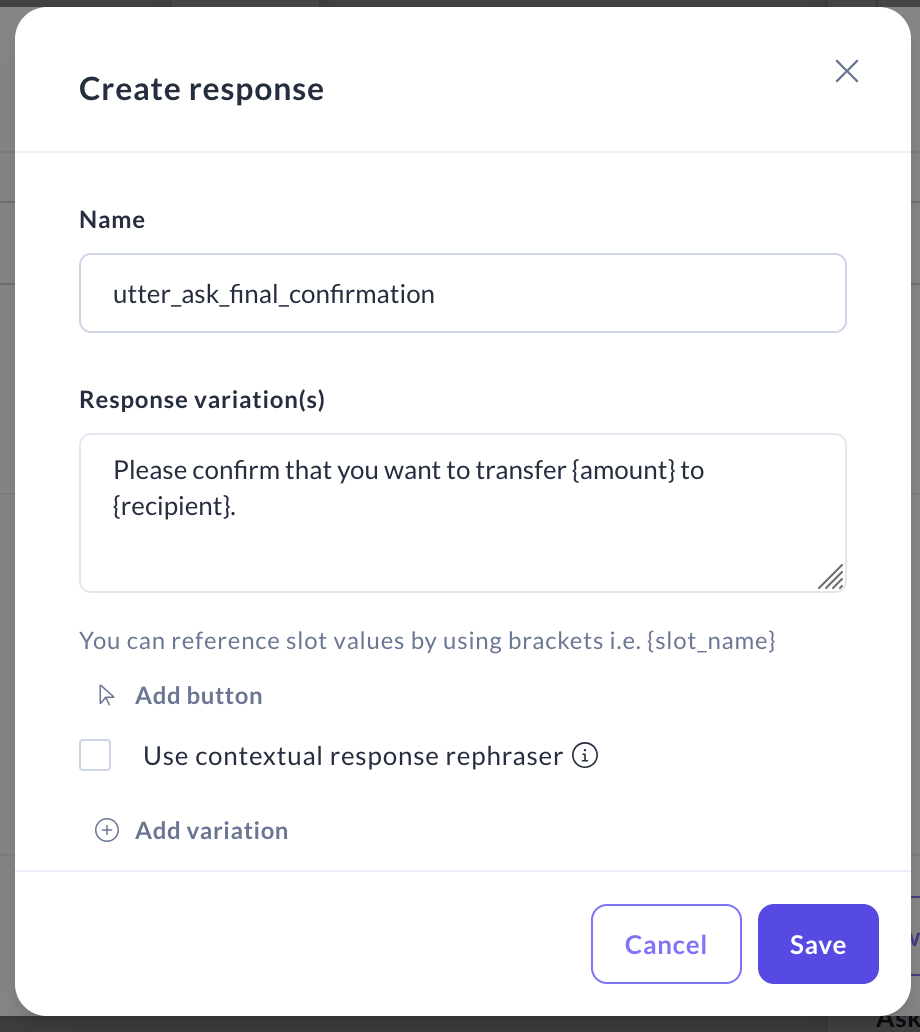
 4. Create a new assistant response, which will be automatically named `utter_ask_final_confirmation`. Enter the text "Please confirm that you want to transfer \{amount} to \{recipient}." We use curly brackets to reference slot values, so the amount and recipient saved from previous questions will be inserted here.
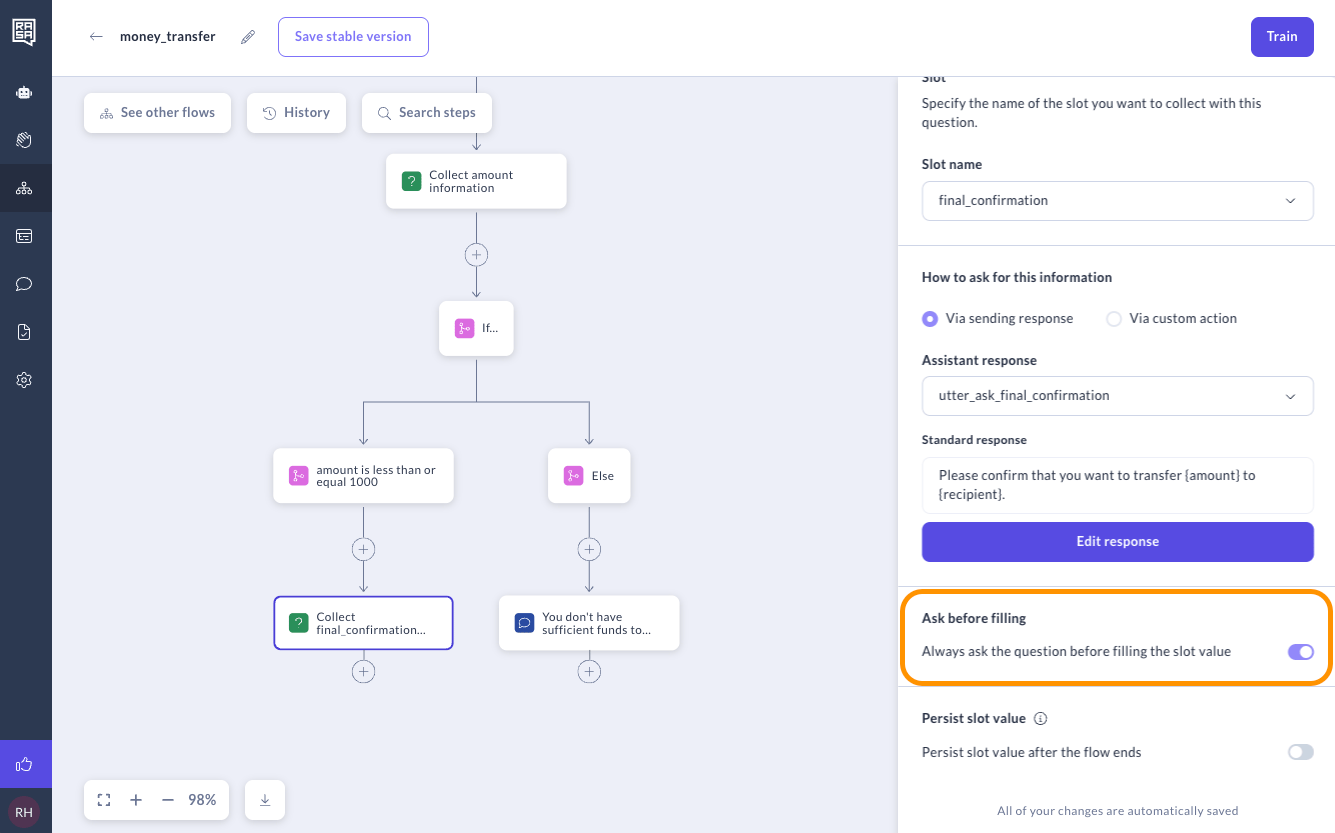
 5. Enable "Ask before filling" so that with the next transfer, the assistant will not automatically fill this slot and will ask for confirmation again.
 6. After the "Collect information", add the "Logic" step.
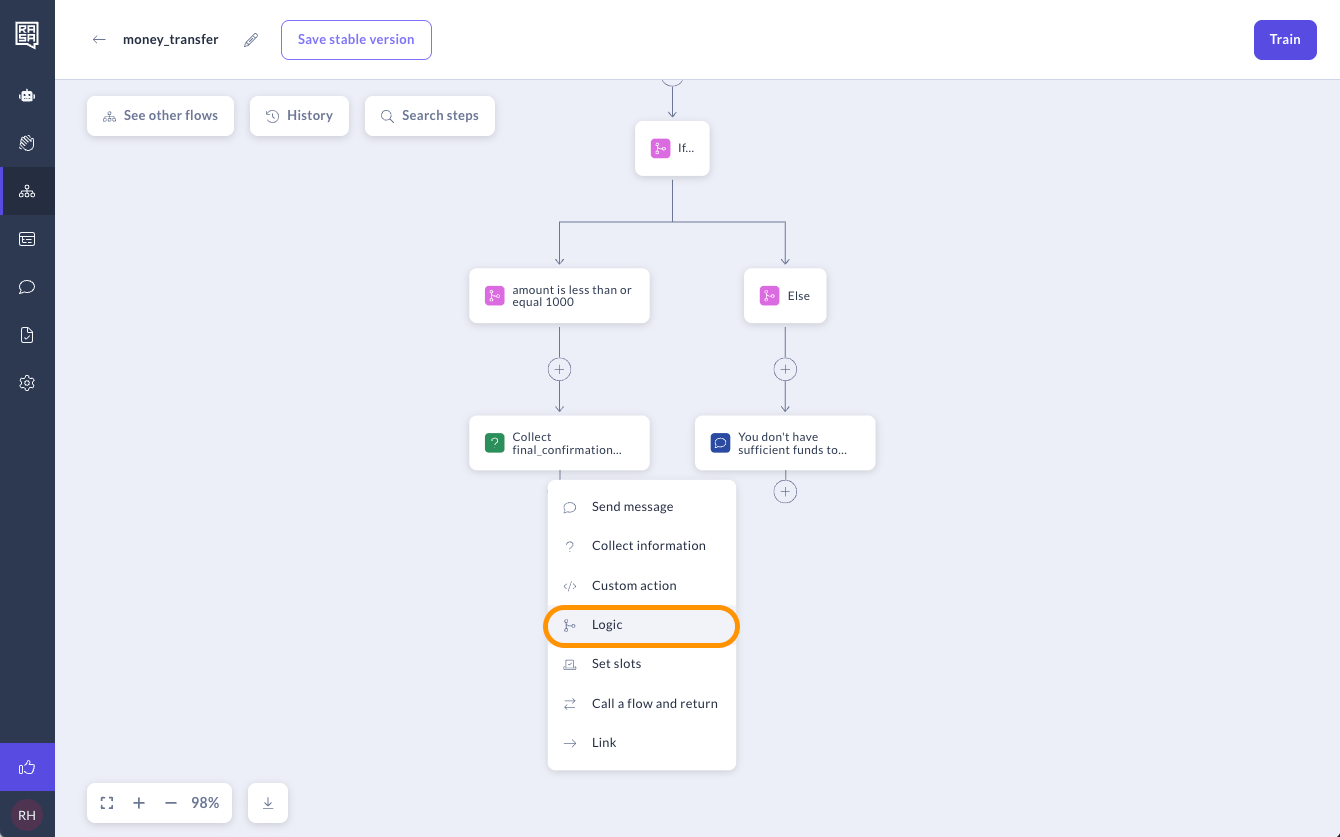 7. For the scenario where the user confirms the request (first logic branch), enter the following details: `final_confirmation` `is` `True`.
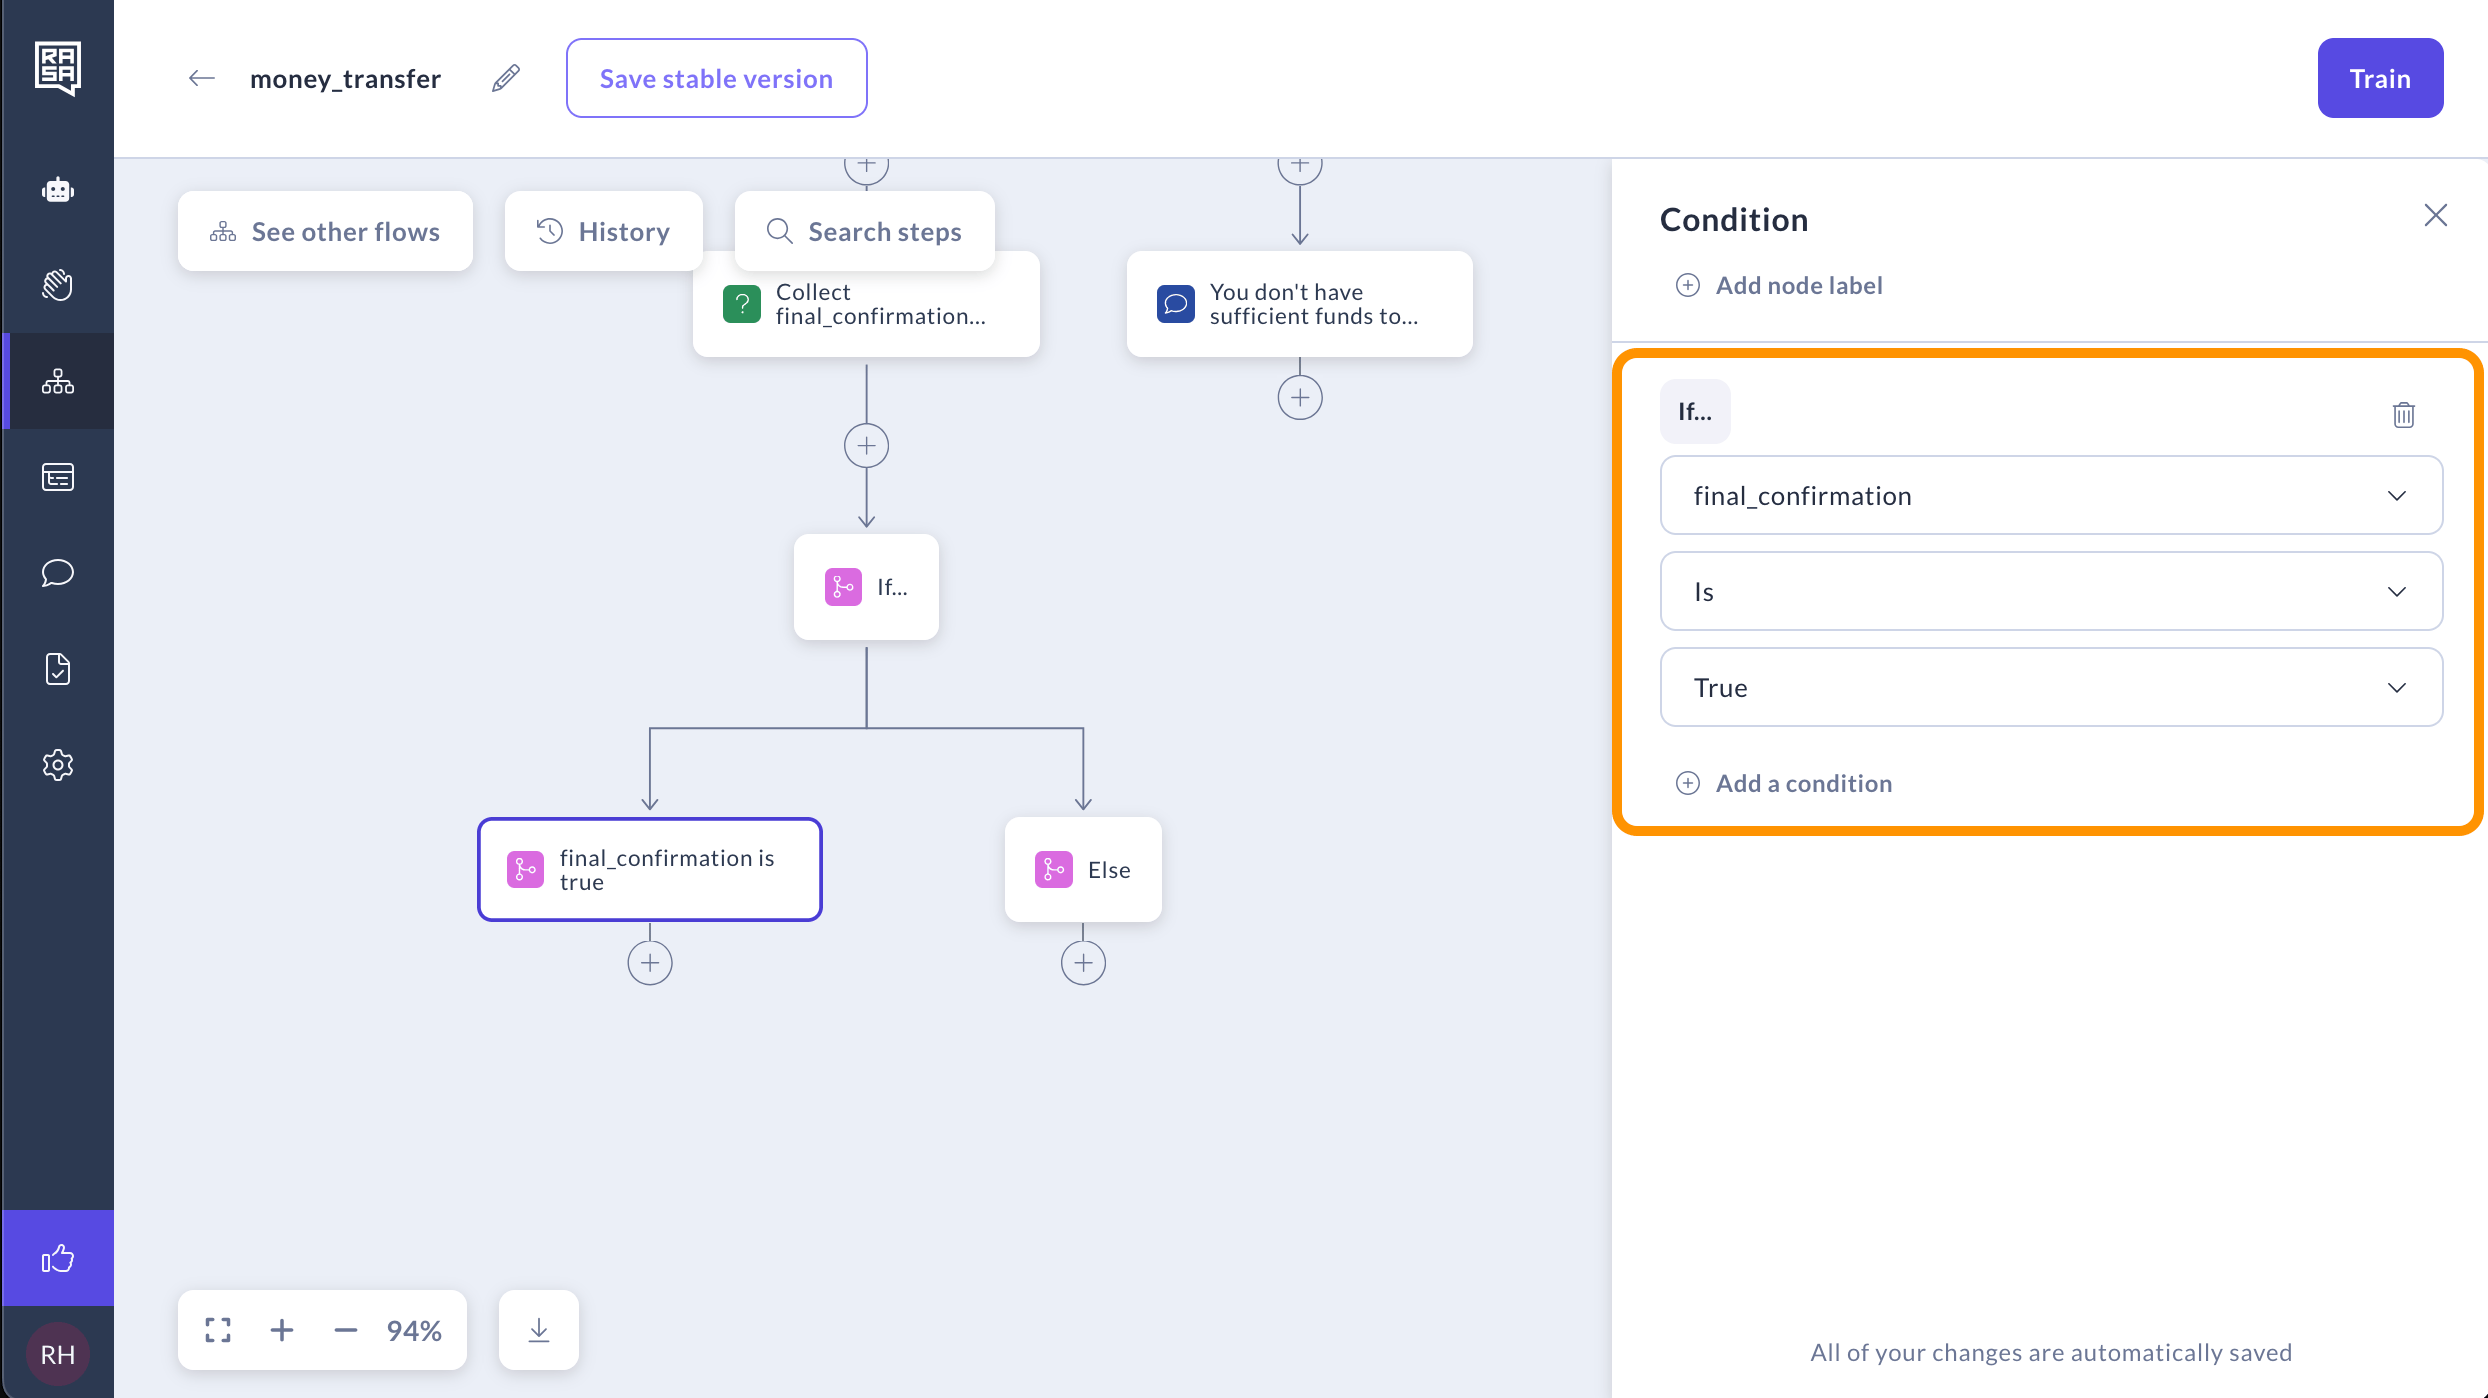 8. The Else branch will automatically cover any other scenarios, such as the user denying the transfer or sending messages outside of the flow's business logic.
### Displaying success and cancel messages
If the user confirms the transaction request, we'll provide a success message.
1. After the `final_confirmation is true` branch, add the "Send message" step.
8. The Else branch will automatically cover any other scenarios, such as the user denying the transfer or sending messages outside of the flow's business logic.
### Displaying success and cancel messages
If the user confirms the transaction request, we'll provide a success message.
1. After the `final_confirmation is true` branch, add the "Send message" step.
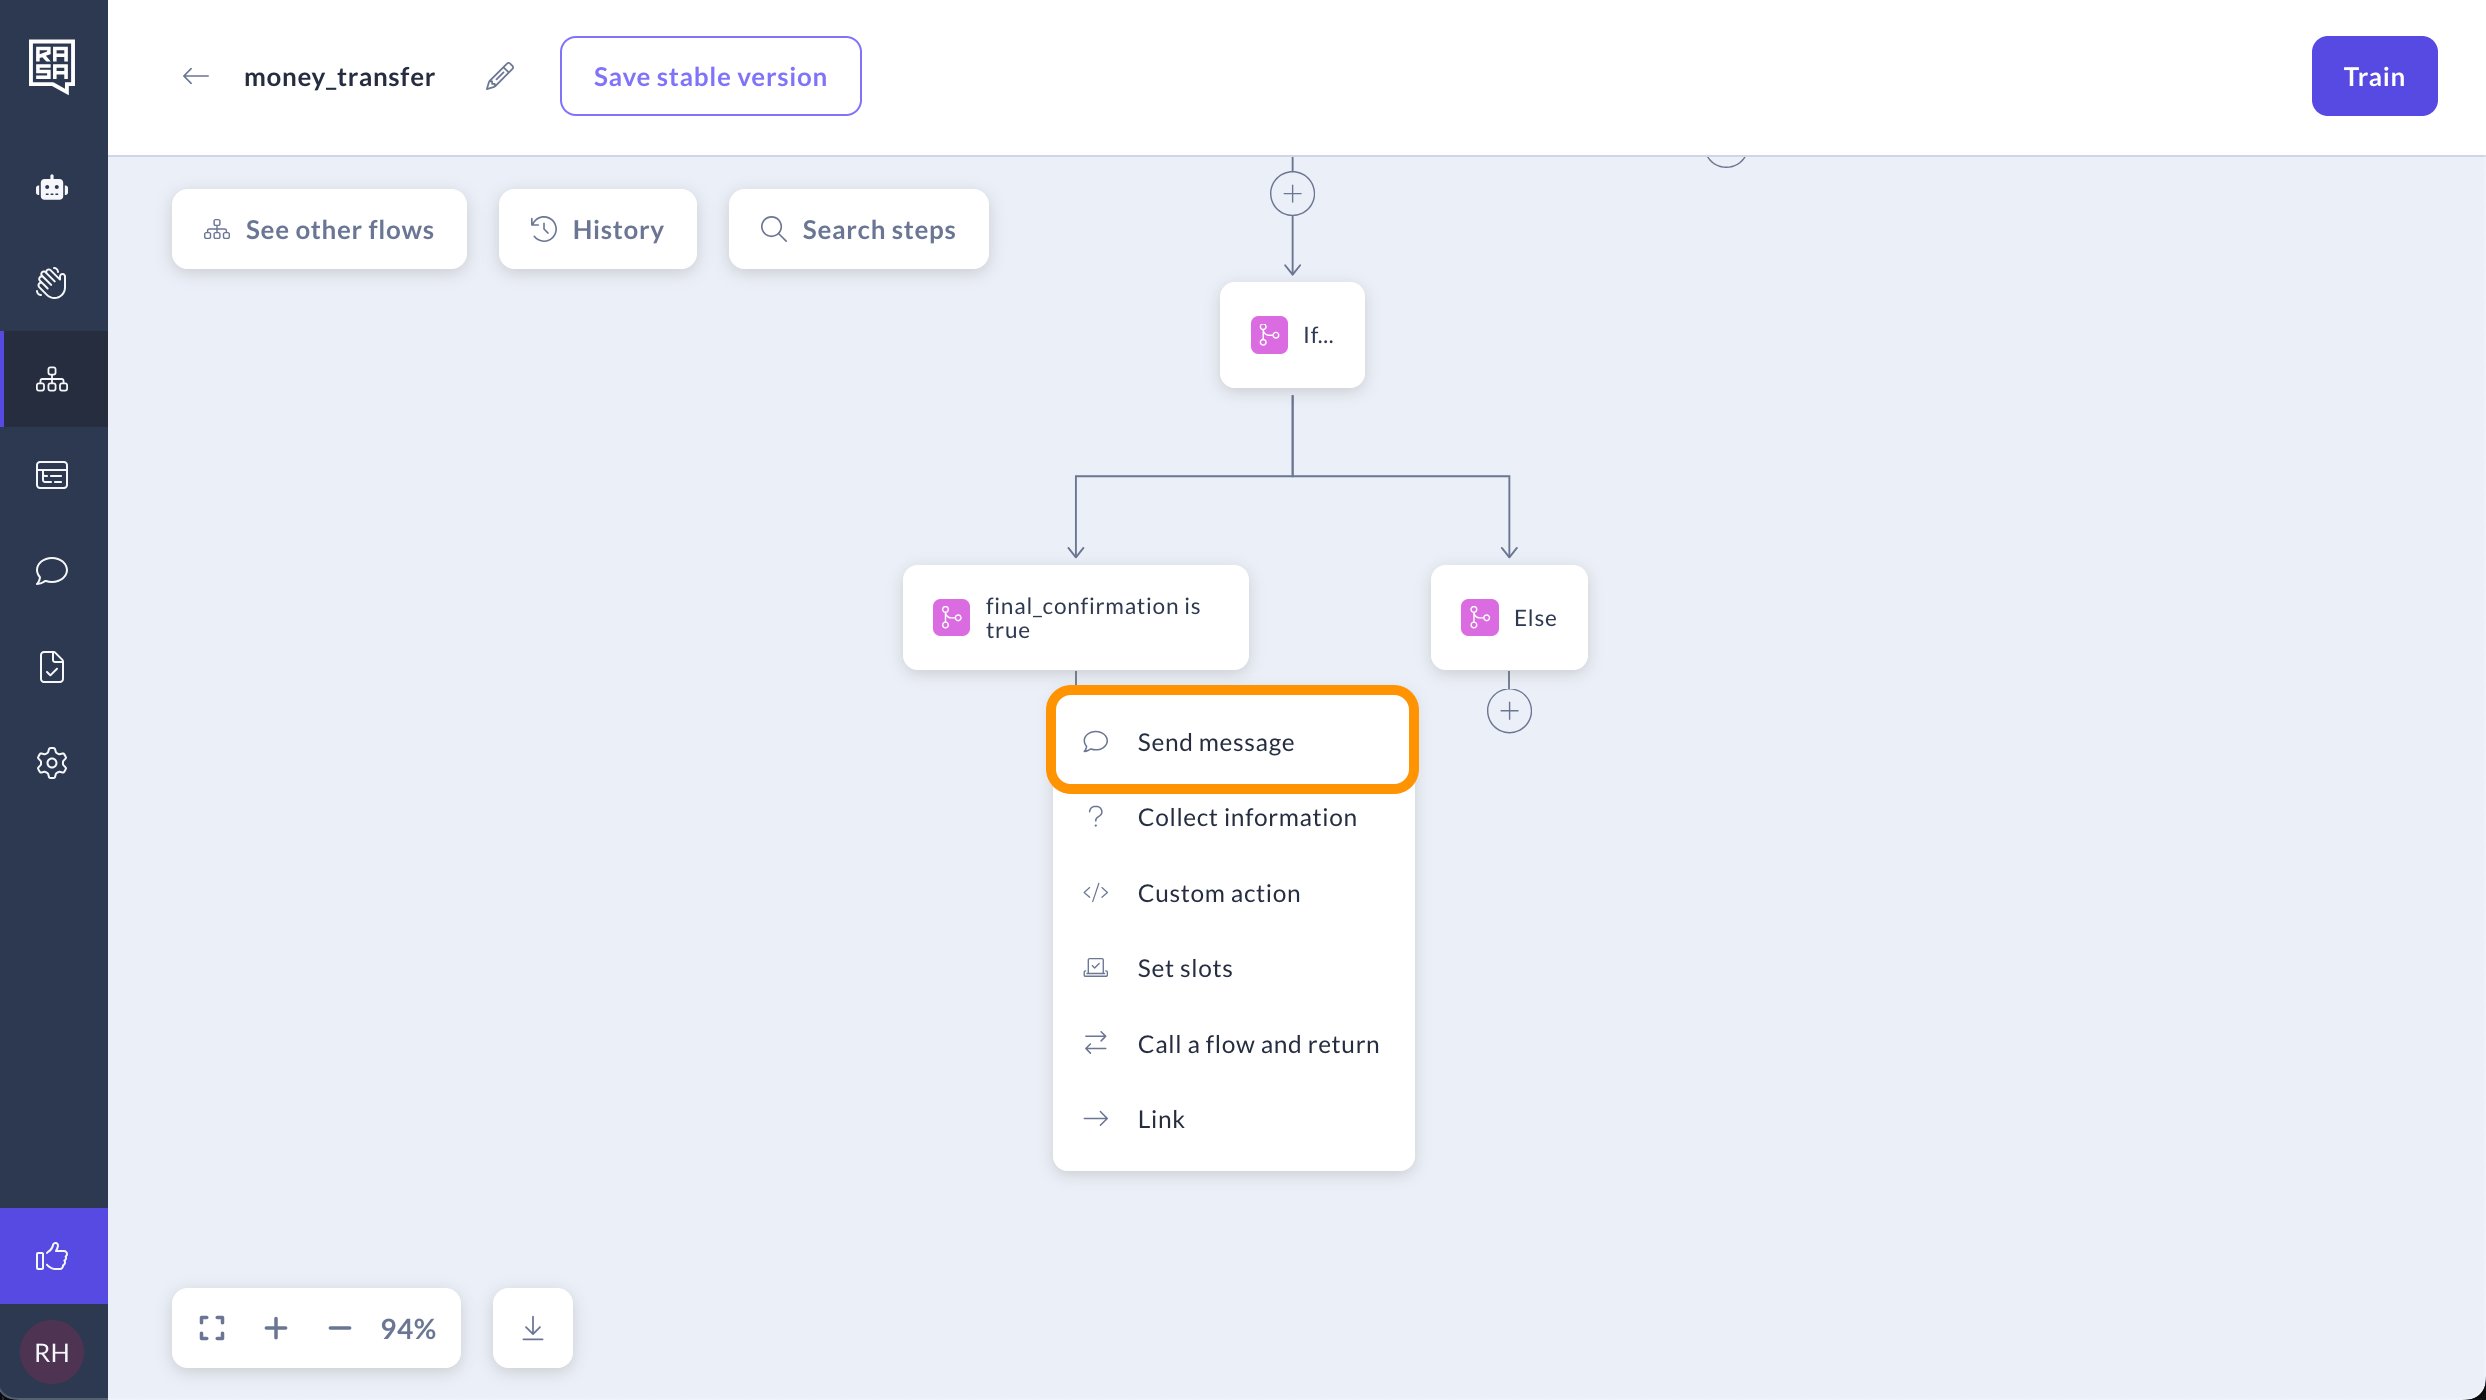 2. Create a new response named `transfer_successful` with the text "All done. \{amount} USD has been sent to \{recipient}."
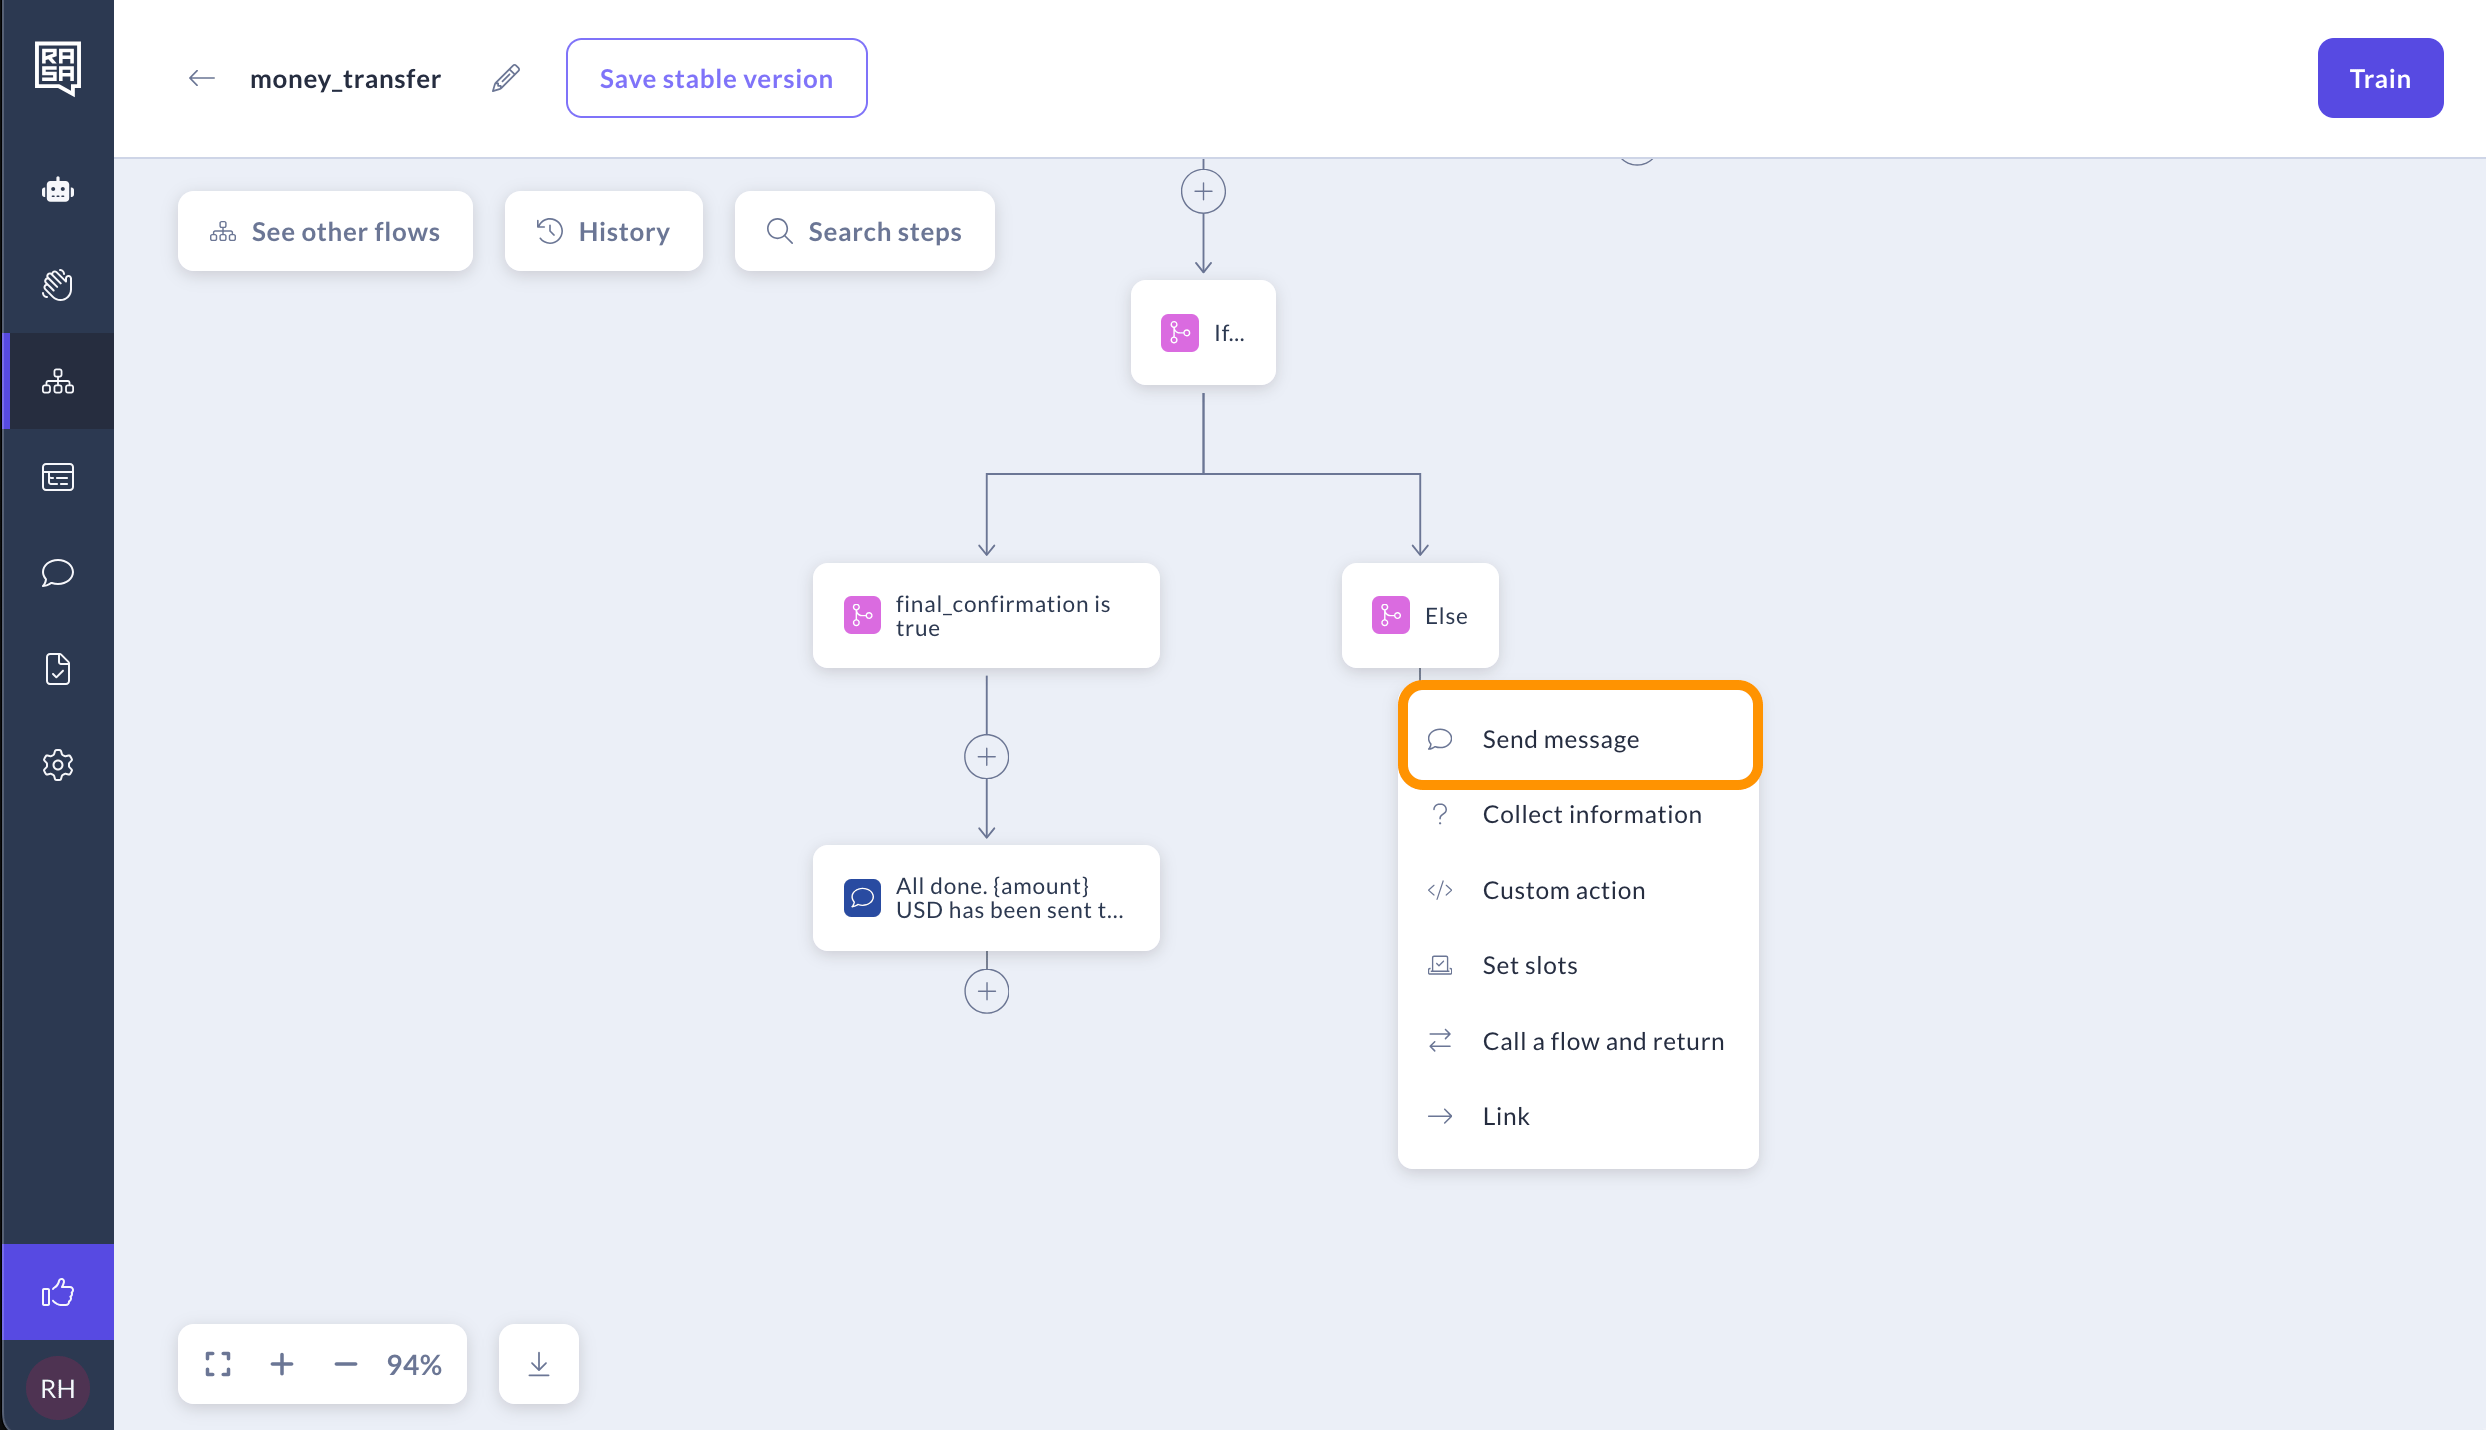
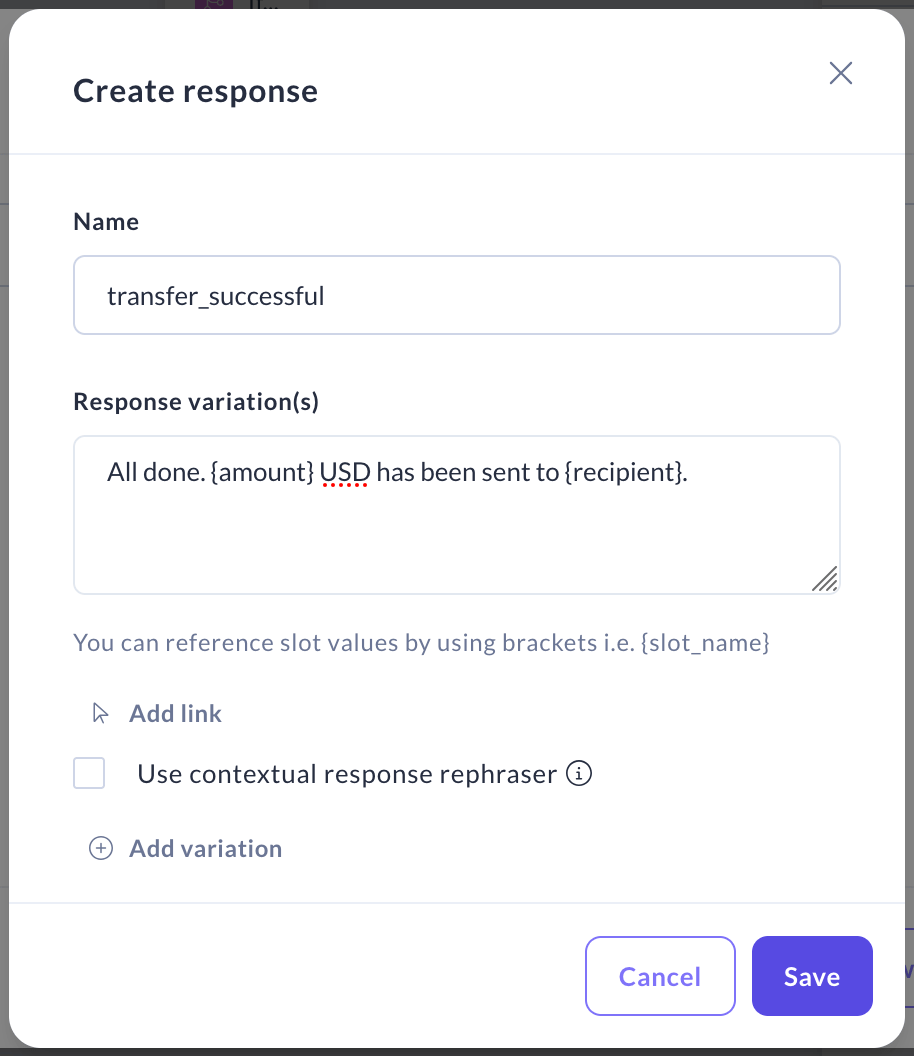 3. For the Else branch, also add the "Send message" step.
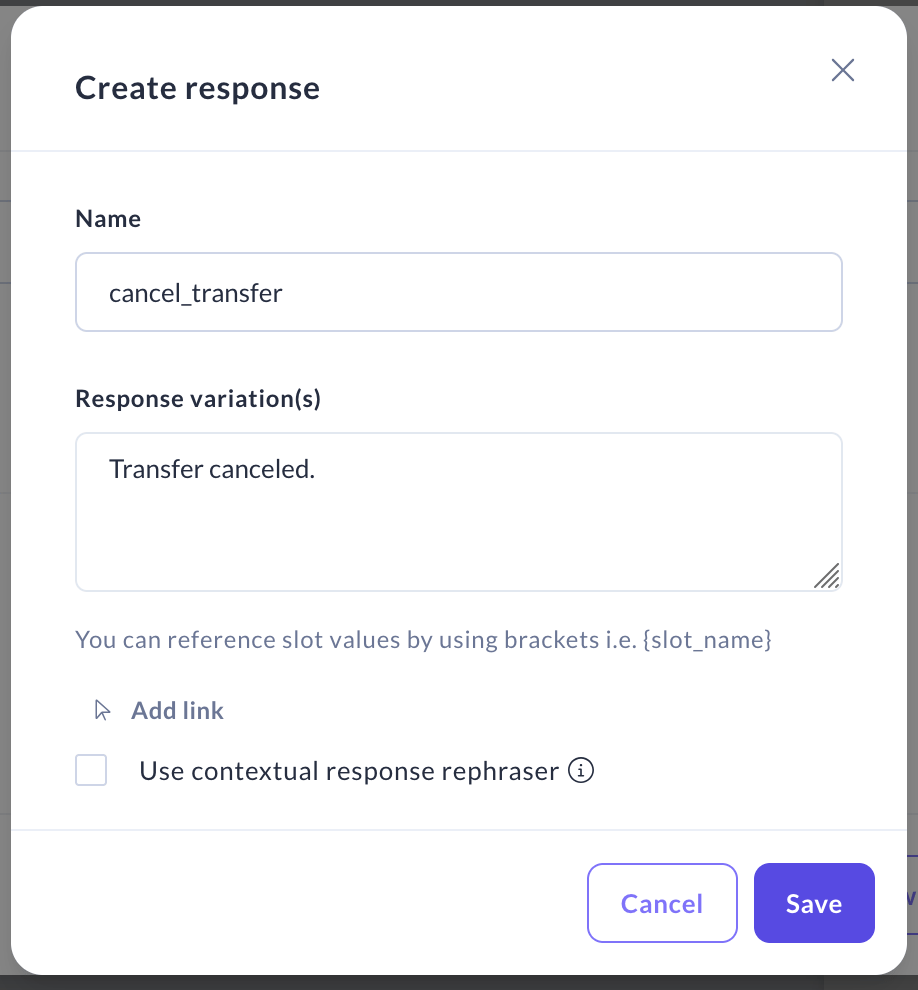
 4. Create a new message. Name it `cancel_transfer` and add the text "Transfer canceled". Click "Save".
 ### Linking to Feedback flow
Let's now ask users to leave feedback on the assistant's performance. For a complex assistant, this feedback logic can be reused in multiple scenarios, so it makes sense to separate it into a different flow.
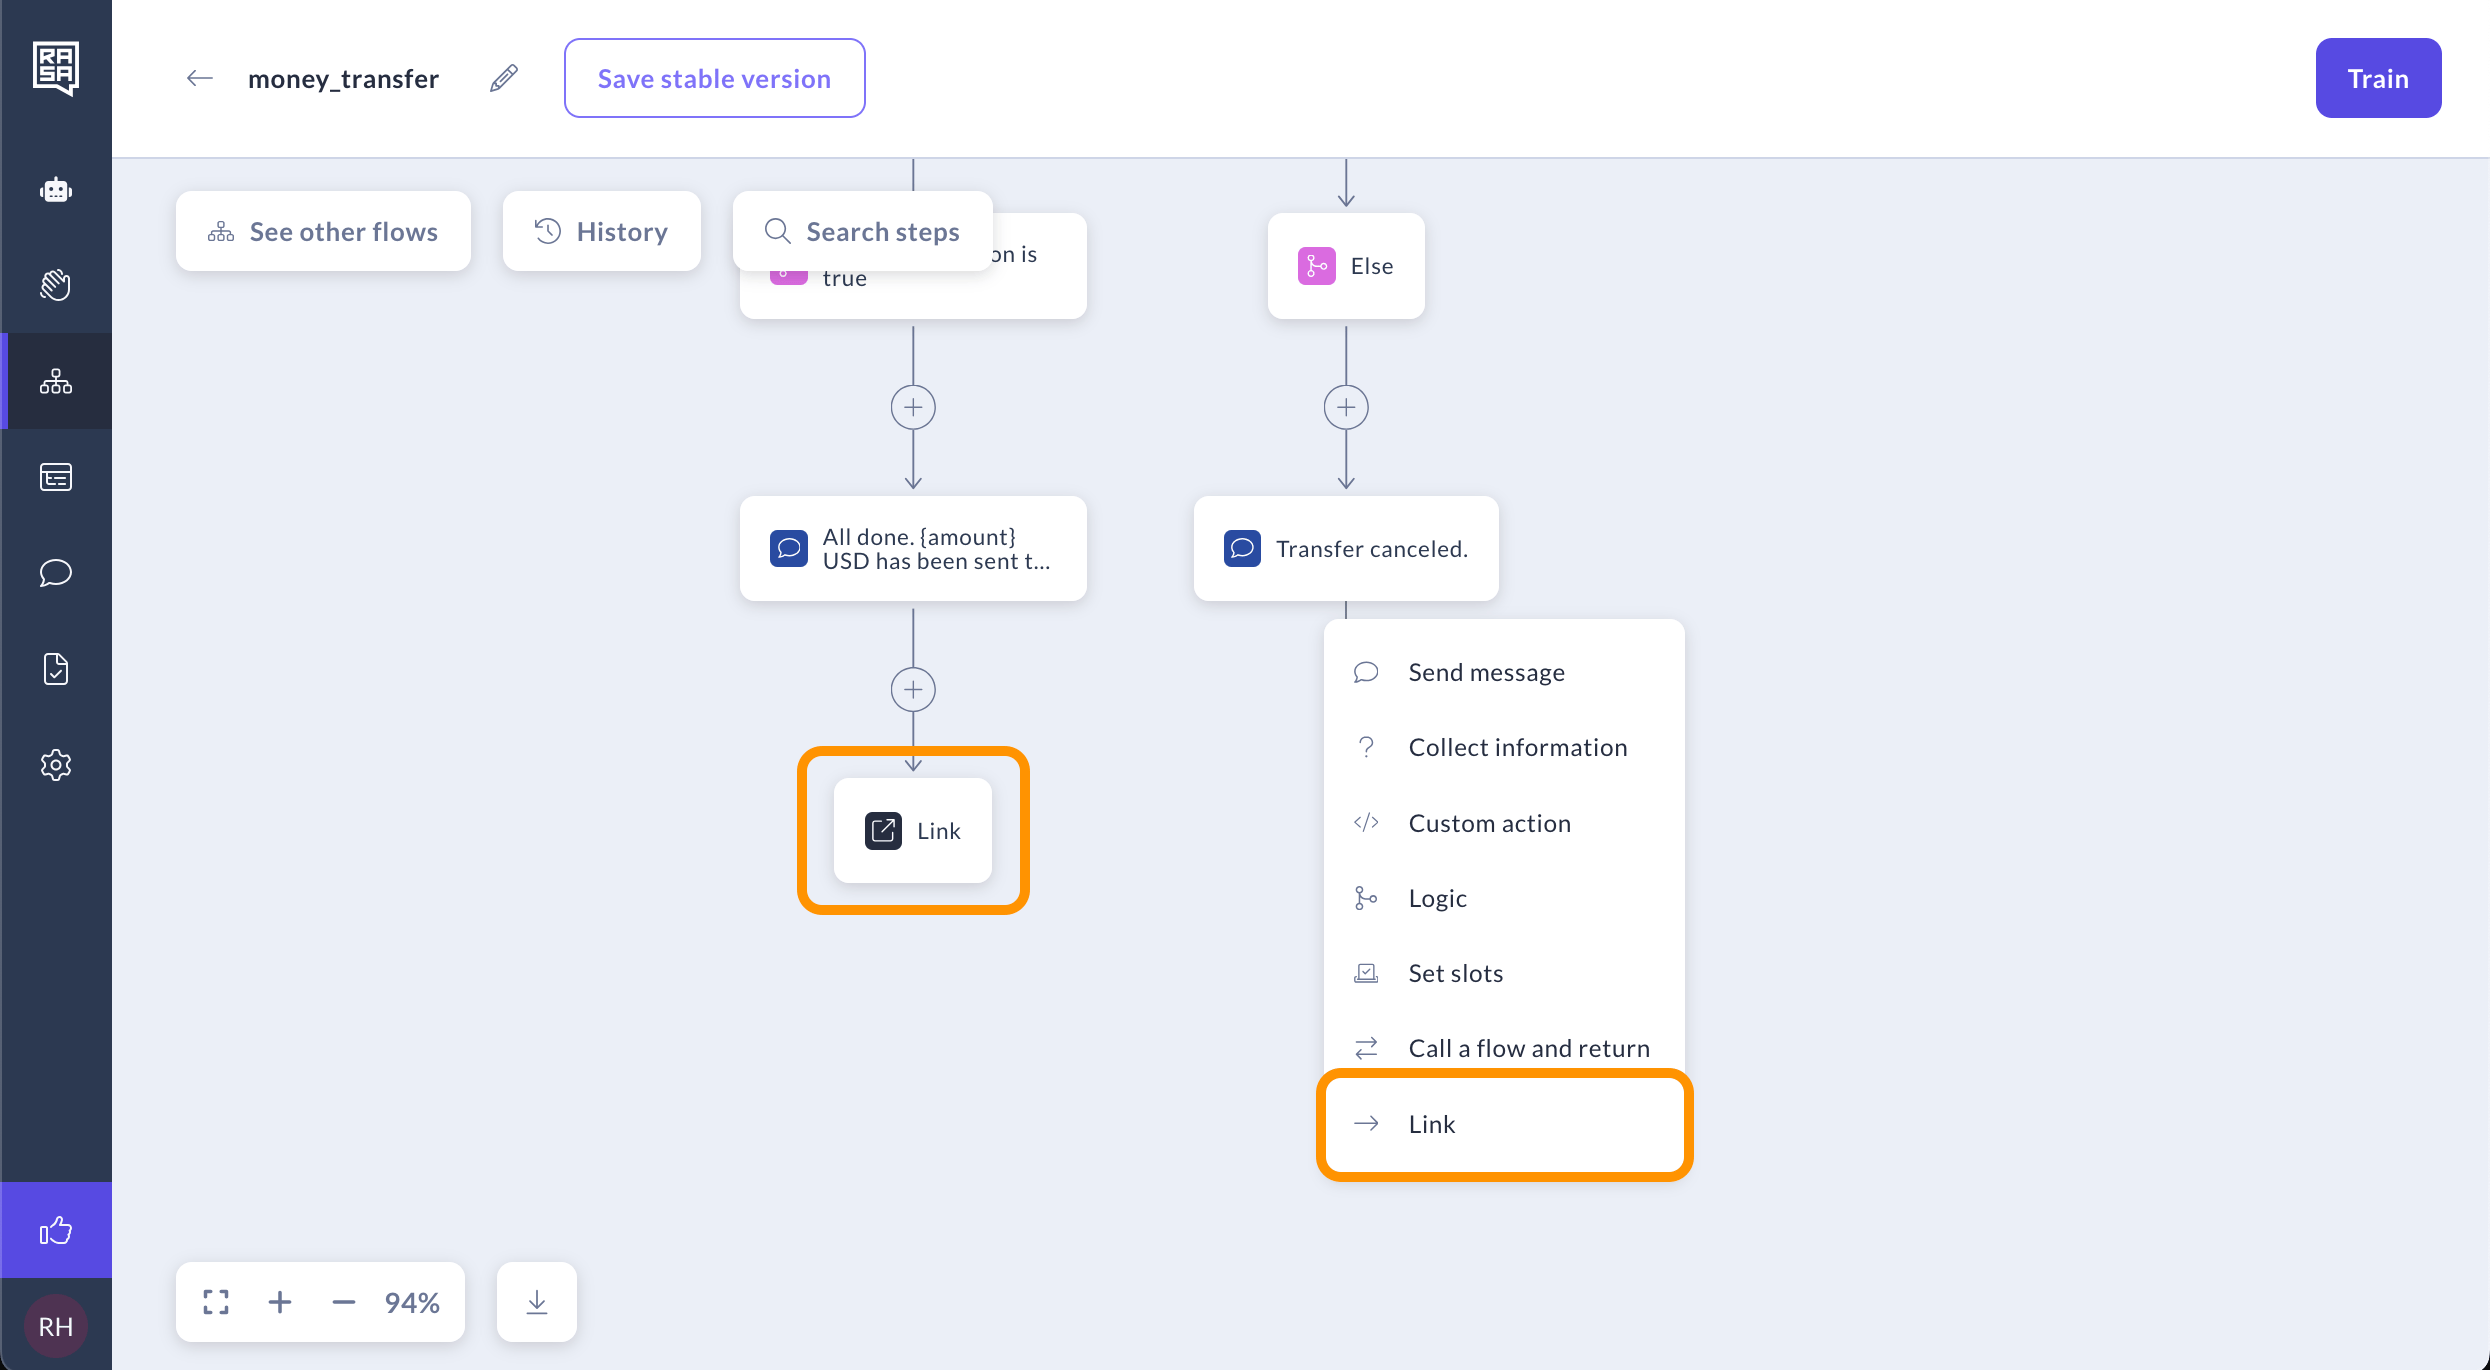
1. Add a “Link” step after both “Transfer successful” and “Transfer canceled” messages. This step links flows together by ending the current flow and starting the target one.
### Linking to Feedback flow
Let's now ask users to leave feedback on the assistant's performance. For a complex assistant, this feedback logic can be reused in multiple scenarios, so it makes sense to separate it into a different flow.
1. Add a “Link” step after both “Transfer successful” and “Transfer canceled” messages. This step links flows together by ending the current flow and starting the target one.
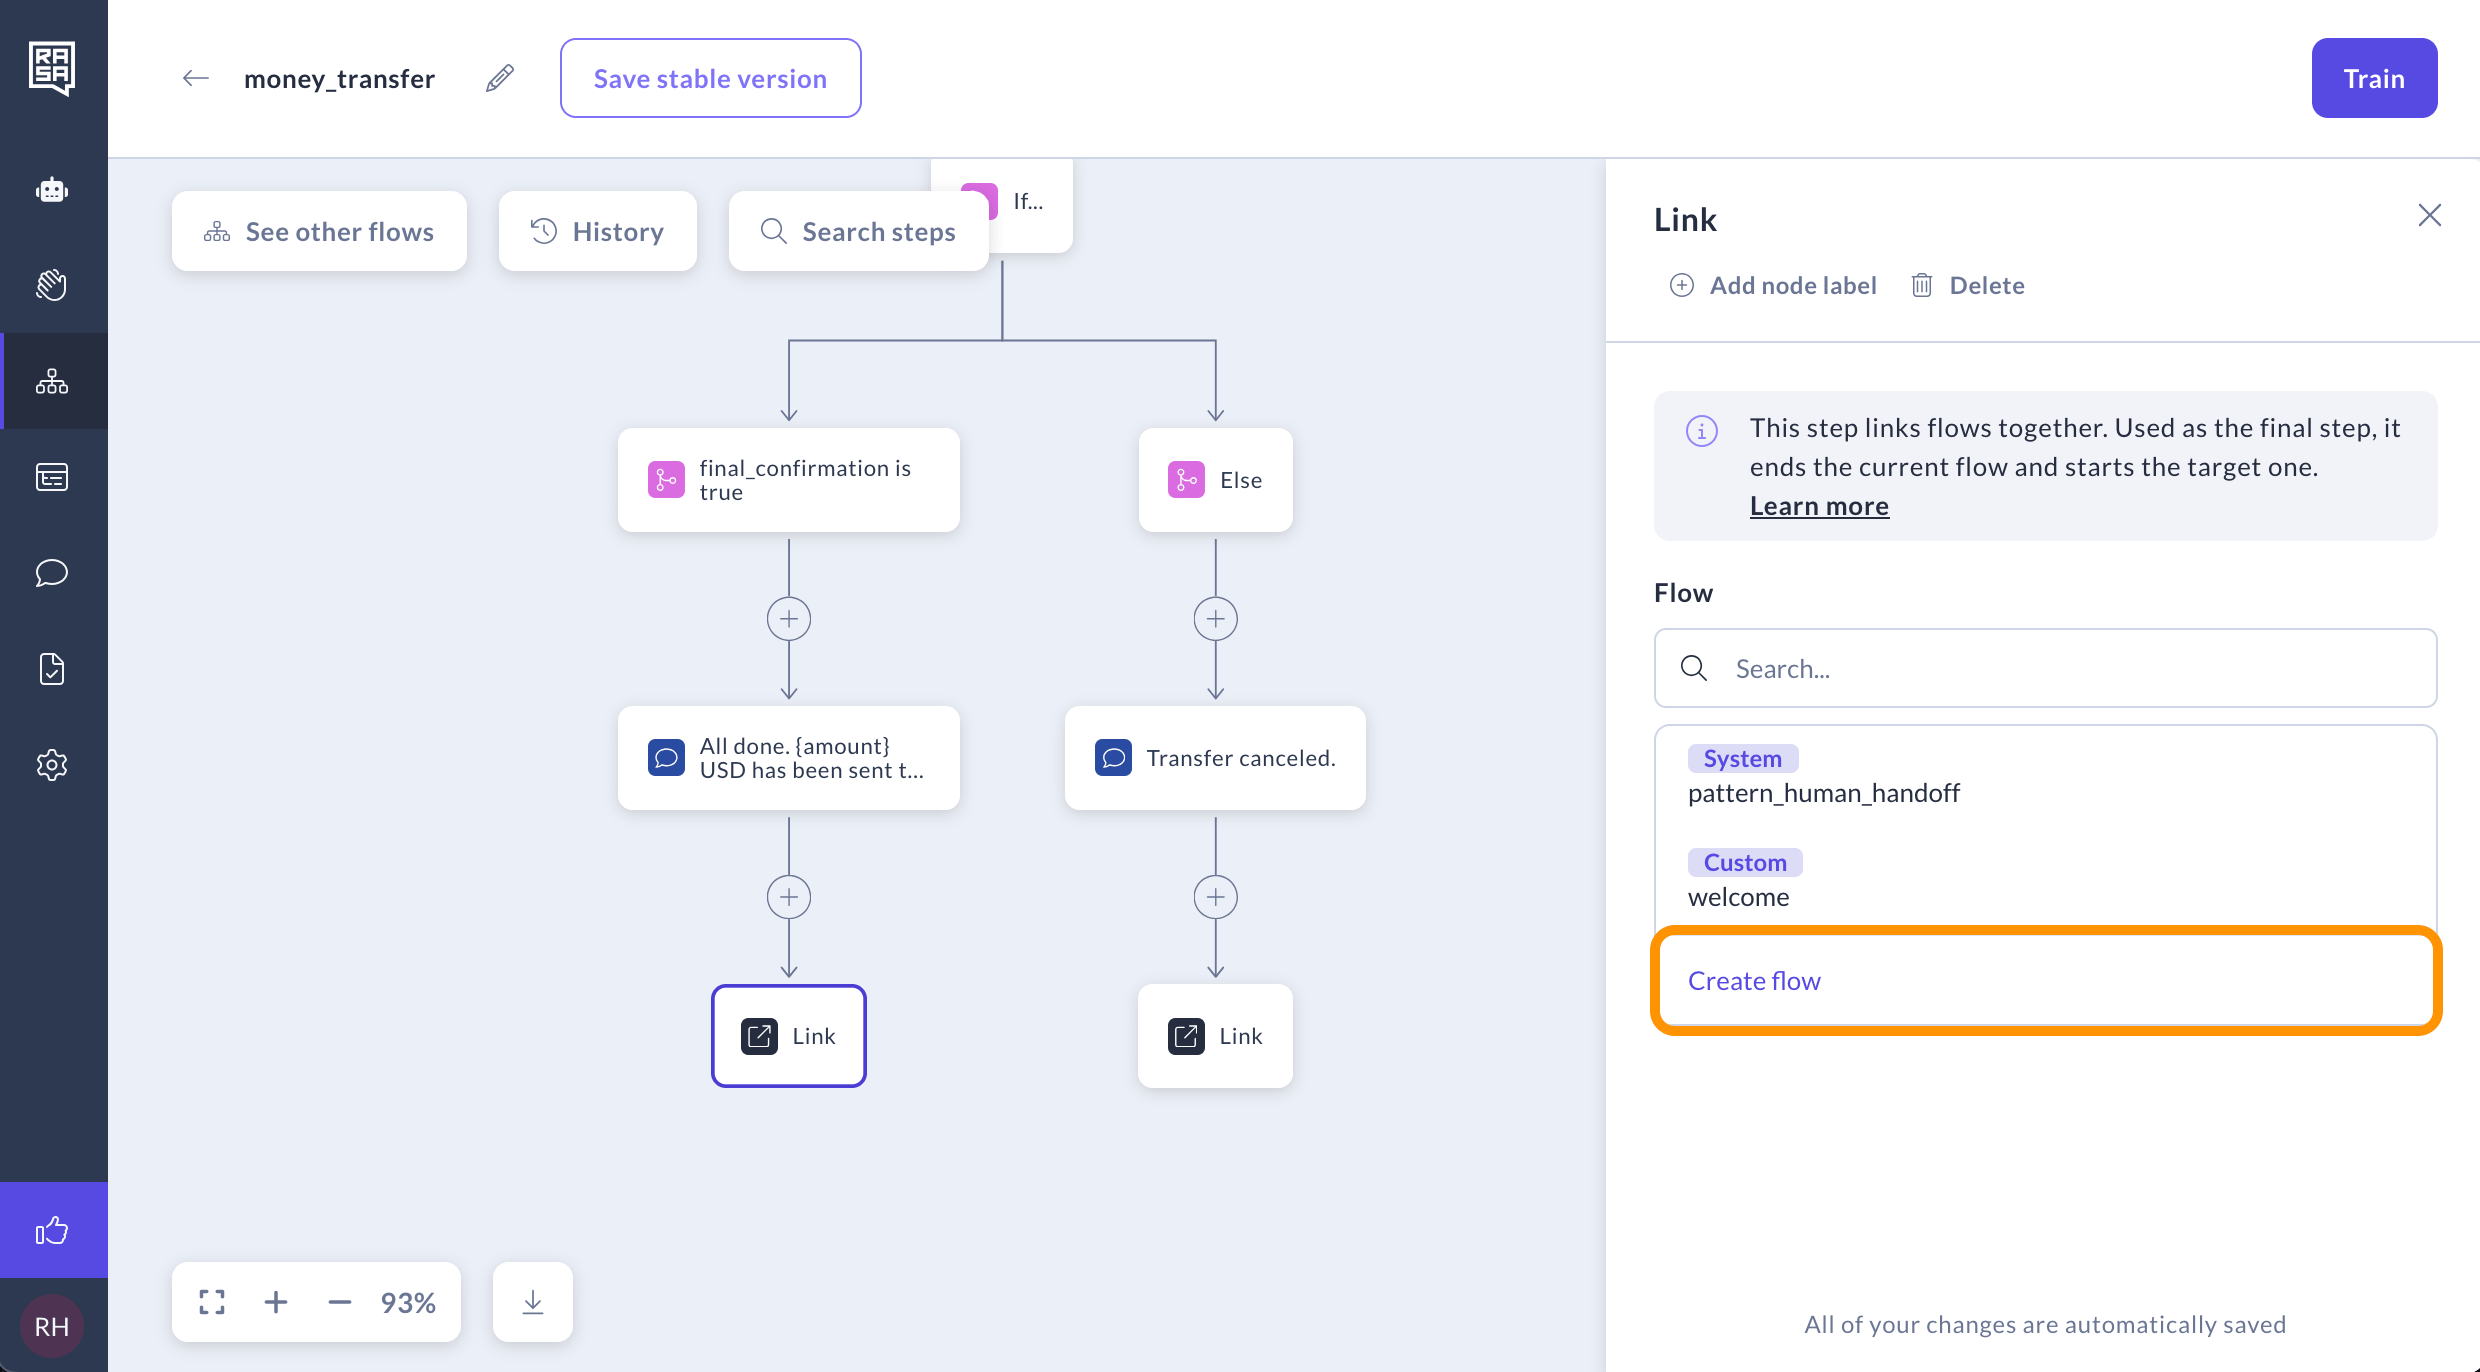
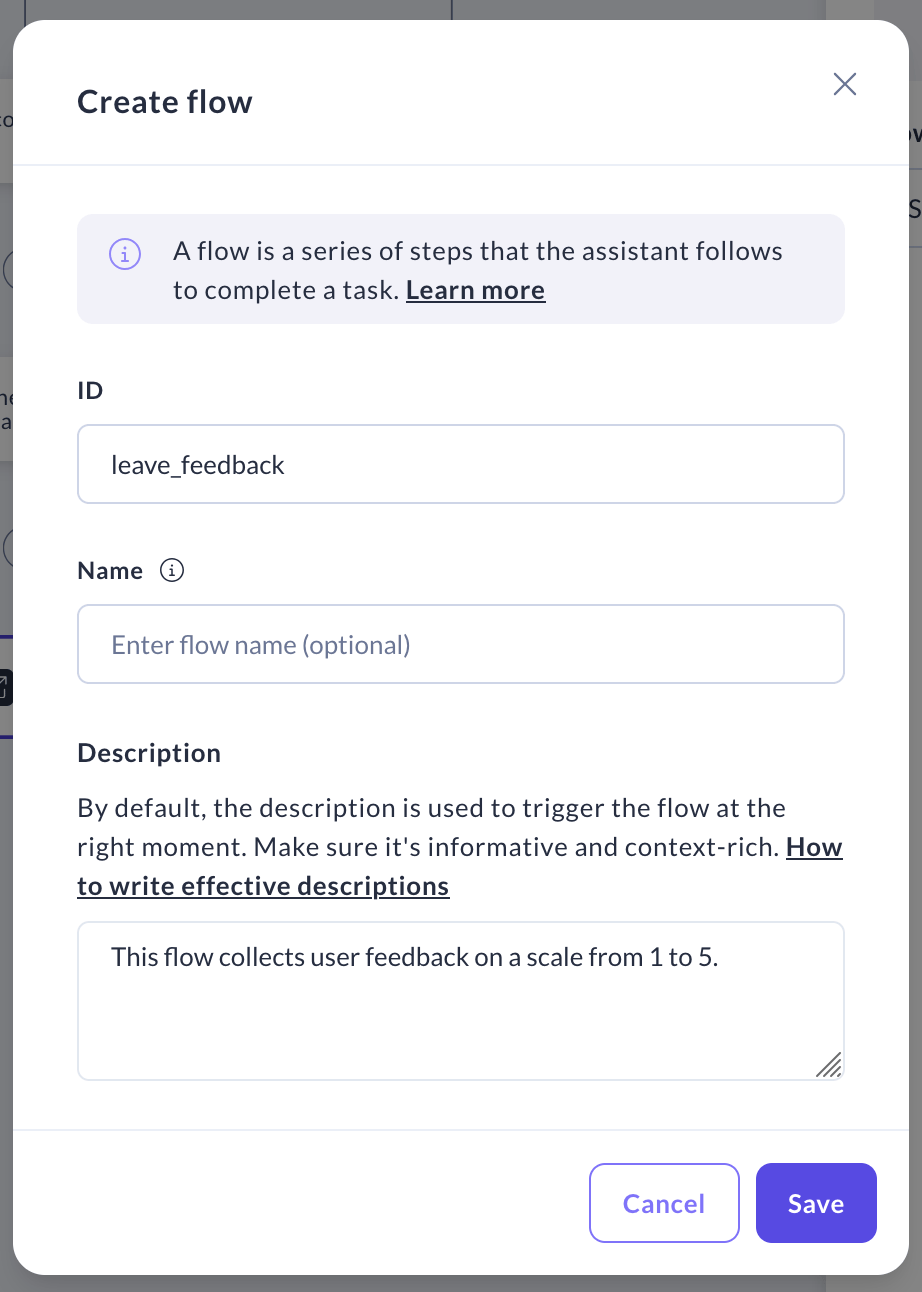
 2. In one of those Link steps, select "Create flow" in the dropdown.
 3. Name the new flow `leave_feedback`. Enter the description: "This flow collects user feedback on a scale from 1 to 5."
 4. Select the same flow in another Link step.
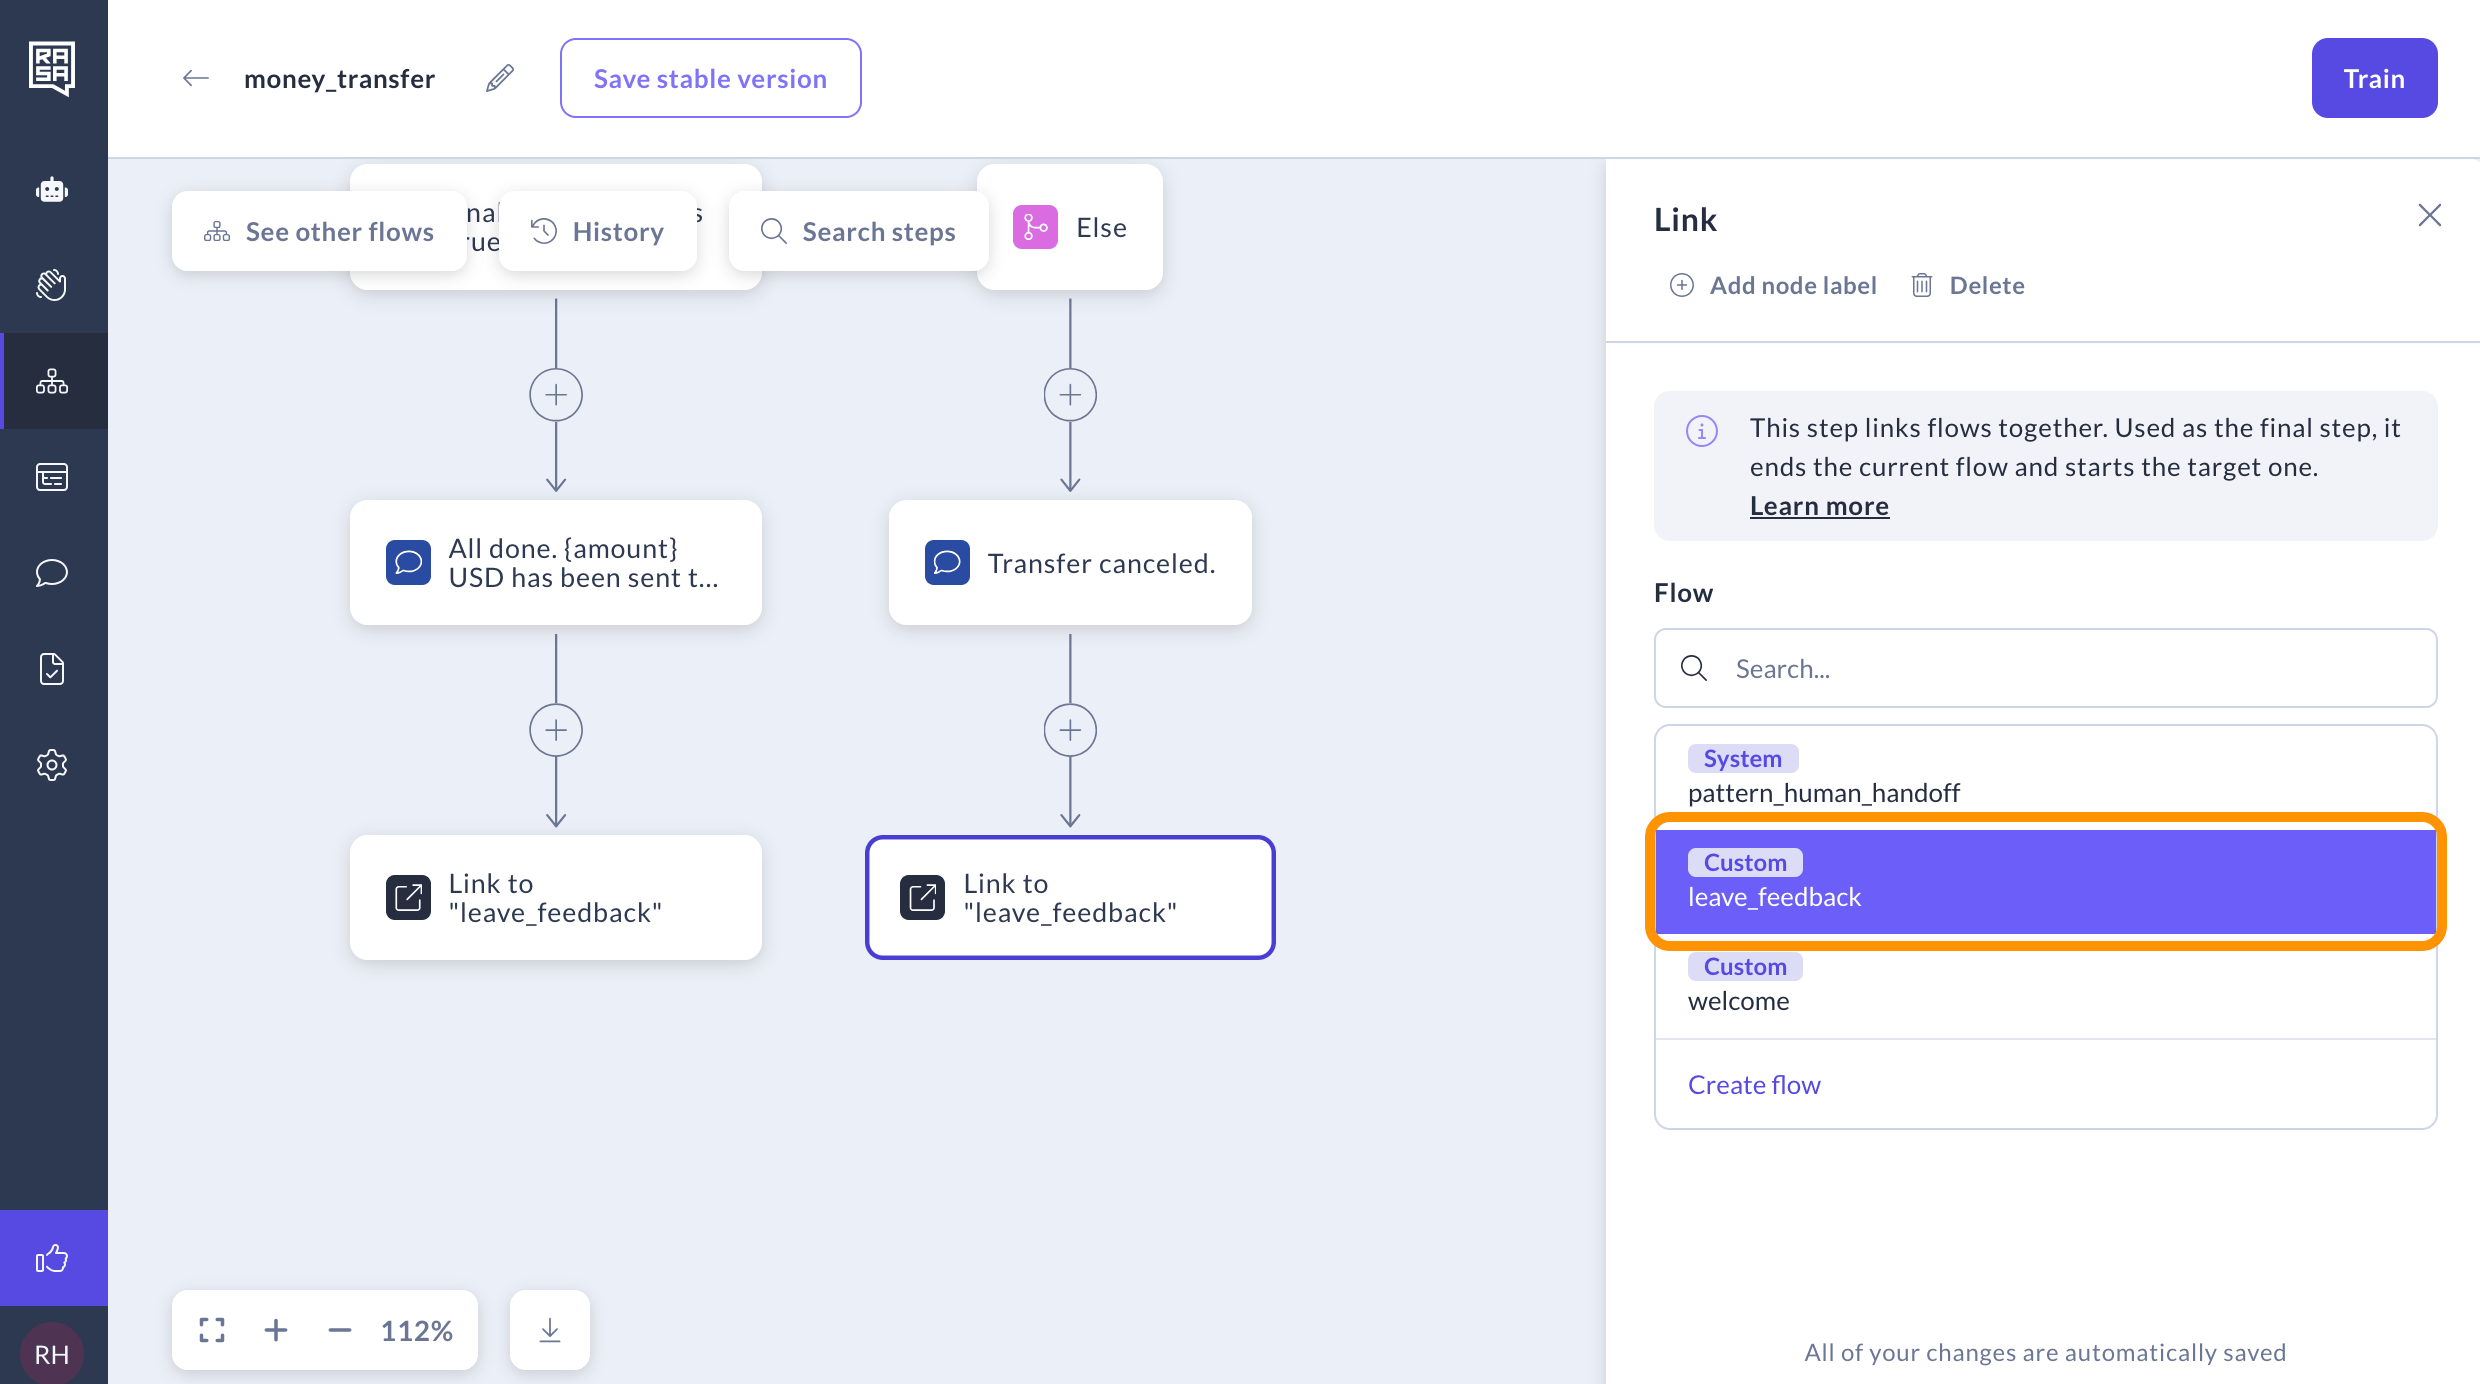 ## Step 4: Building Feedback flow
1. Go to the `leave_feedback` flow that you’ve just created. You can do this by clicking on the "Open the flow in a new tab" link.
## Step 4: Building Feedback flow
1. Go to the `leave_feedback` flow that you’ve just created. You can do this by clicking on the "Open the flow in a new tab" link.
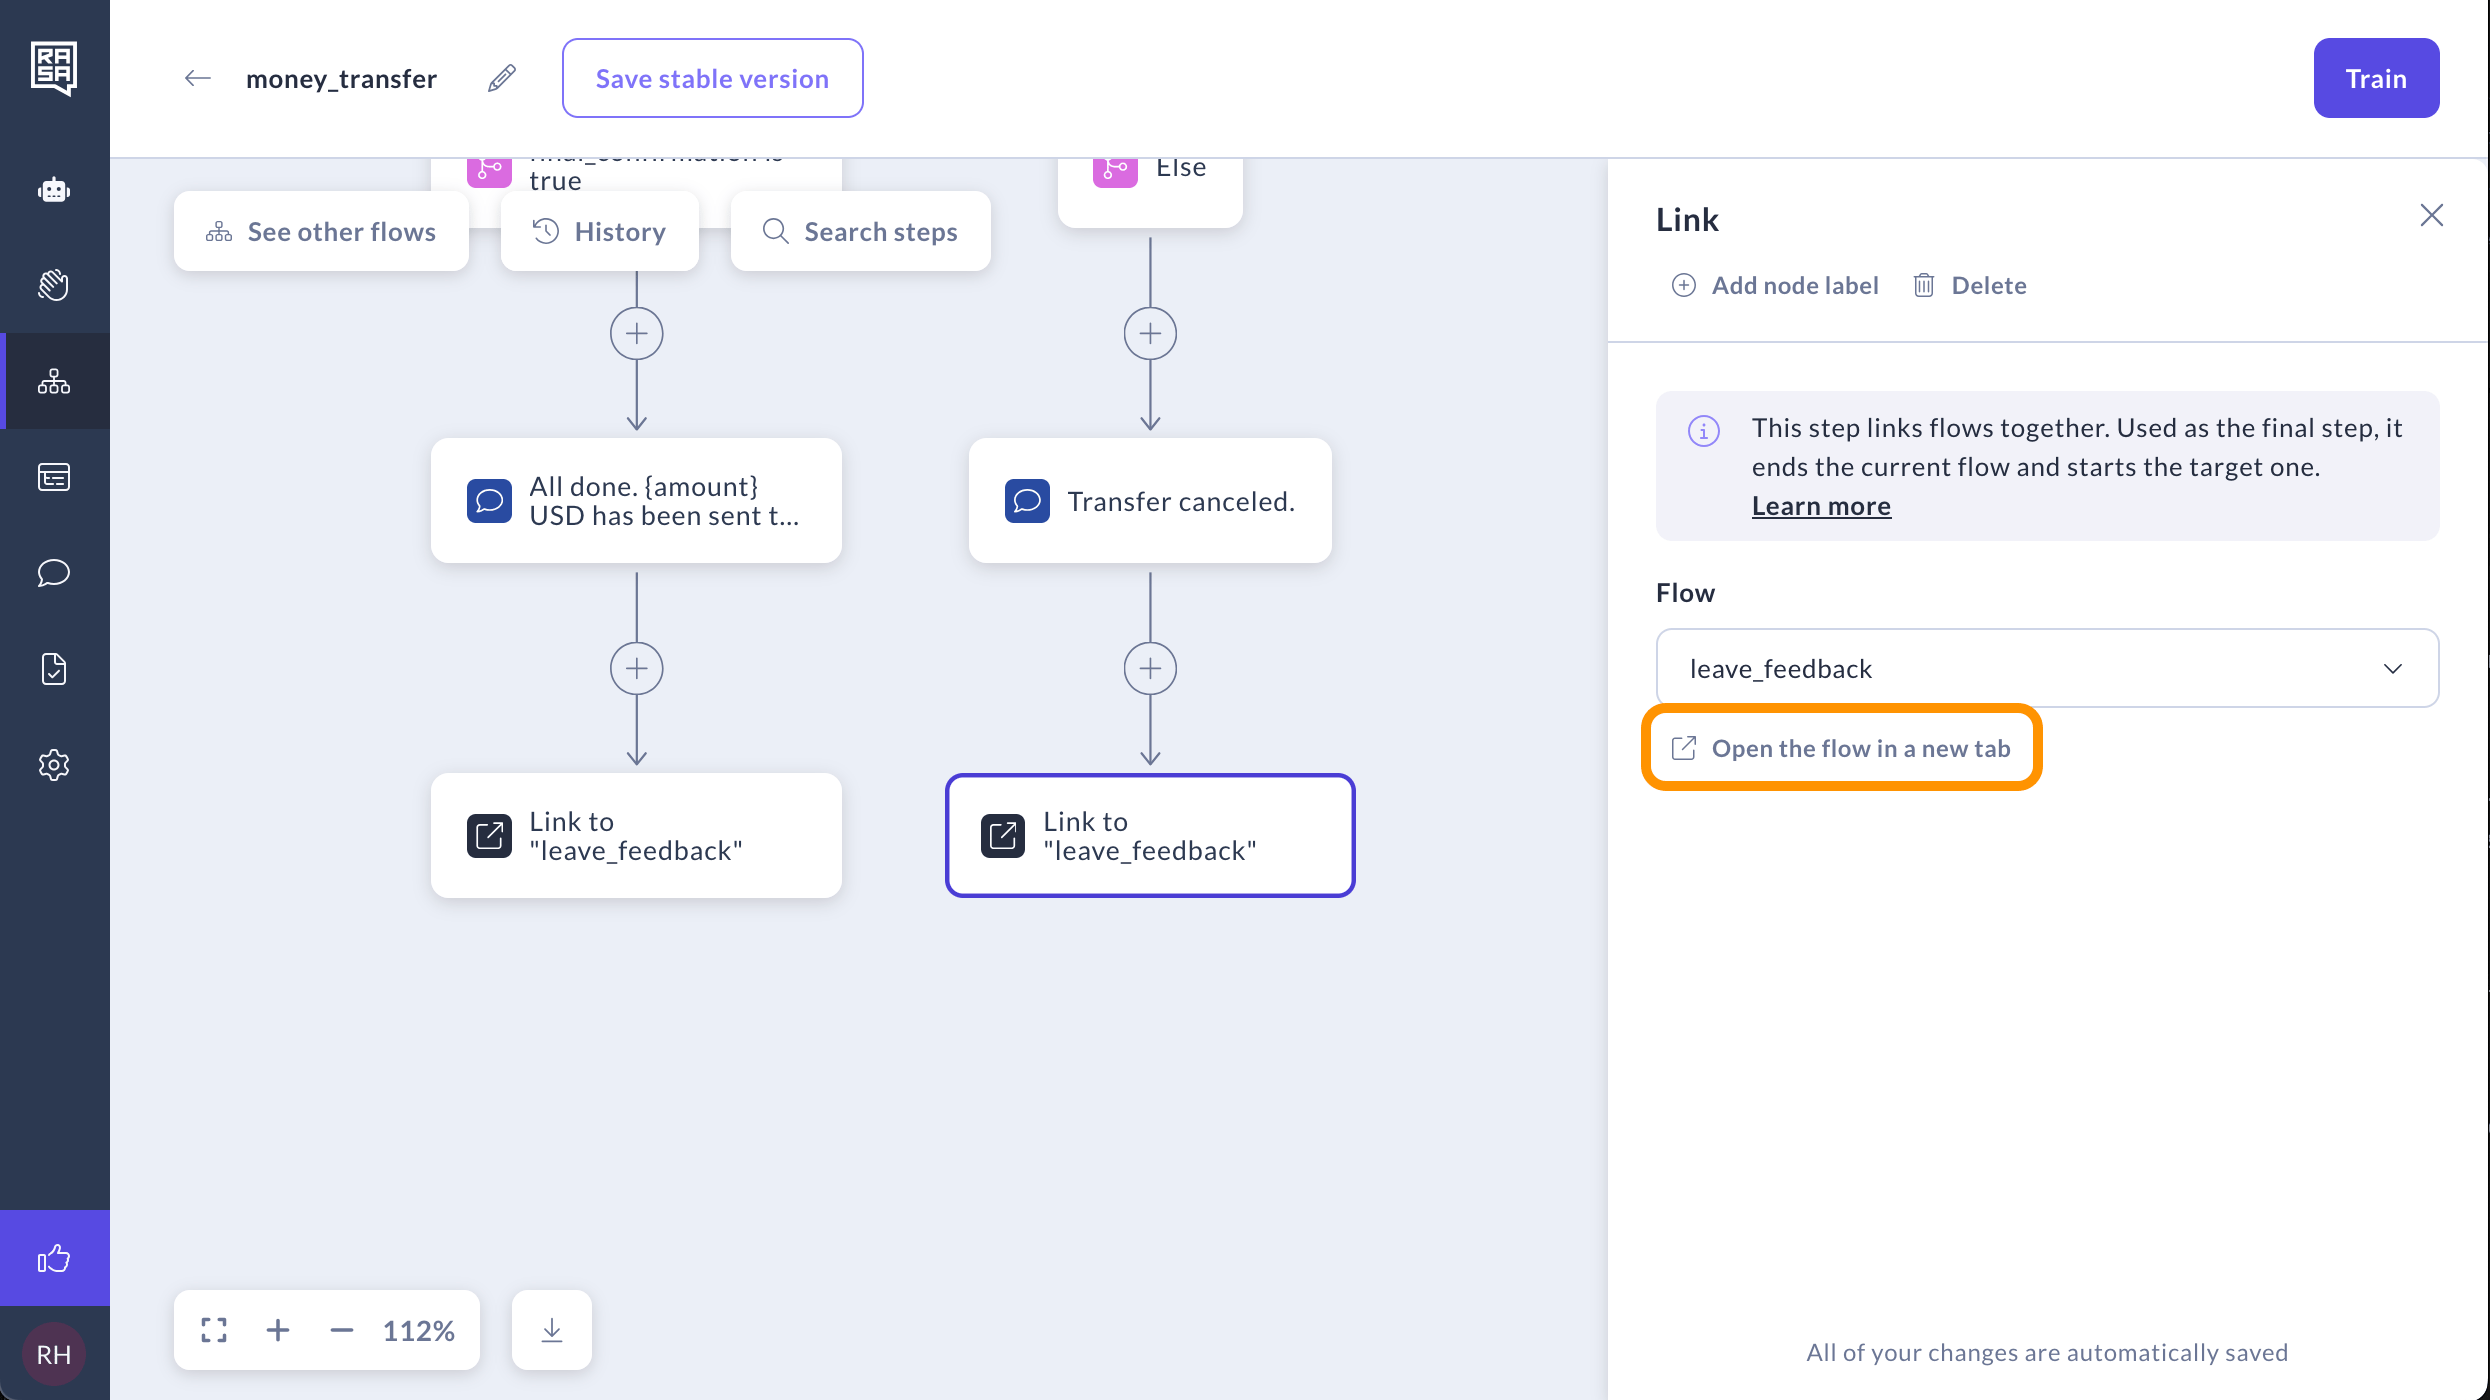 2. We don't want the user to see the feedback flow out of nowhere and want it to only be triggered after particular operations with the assistant. To add this restriction, let's use [Flow guards](/docs/studio/build/flow-building/trigger-flows#flow-guards). Flow guards help you start the flow only if specific conditions are met, preventing automatic triggering with CALM or intents.
To add a flow guard, select the "Start" step. This is where you configure how the flow can be started. Click on the "Flow guards" section.
2. We don't want the user to see the feedback flow out of nowhere and want it to only be triggered after particular operations with the assistant. To add this restriction, let's use [Flow guards](/docs/studio/build/flow-building/trigger-flows#flow-guards). Flow guards help you start the flow only if specific conditions are met, preventing automatic triggering with CALM or intents.
To add a flow guard, select the "Start" step. This is where you configure how the flow can be started. Click on the "Flow guards" section.
 3. Select "Start the flow exclusively via links". This setting will ensure that this flow won't be started automatically by the LLM and will only be initiated after the "Link" step in the `transfer_money` flow.
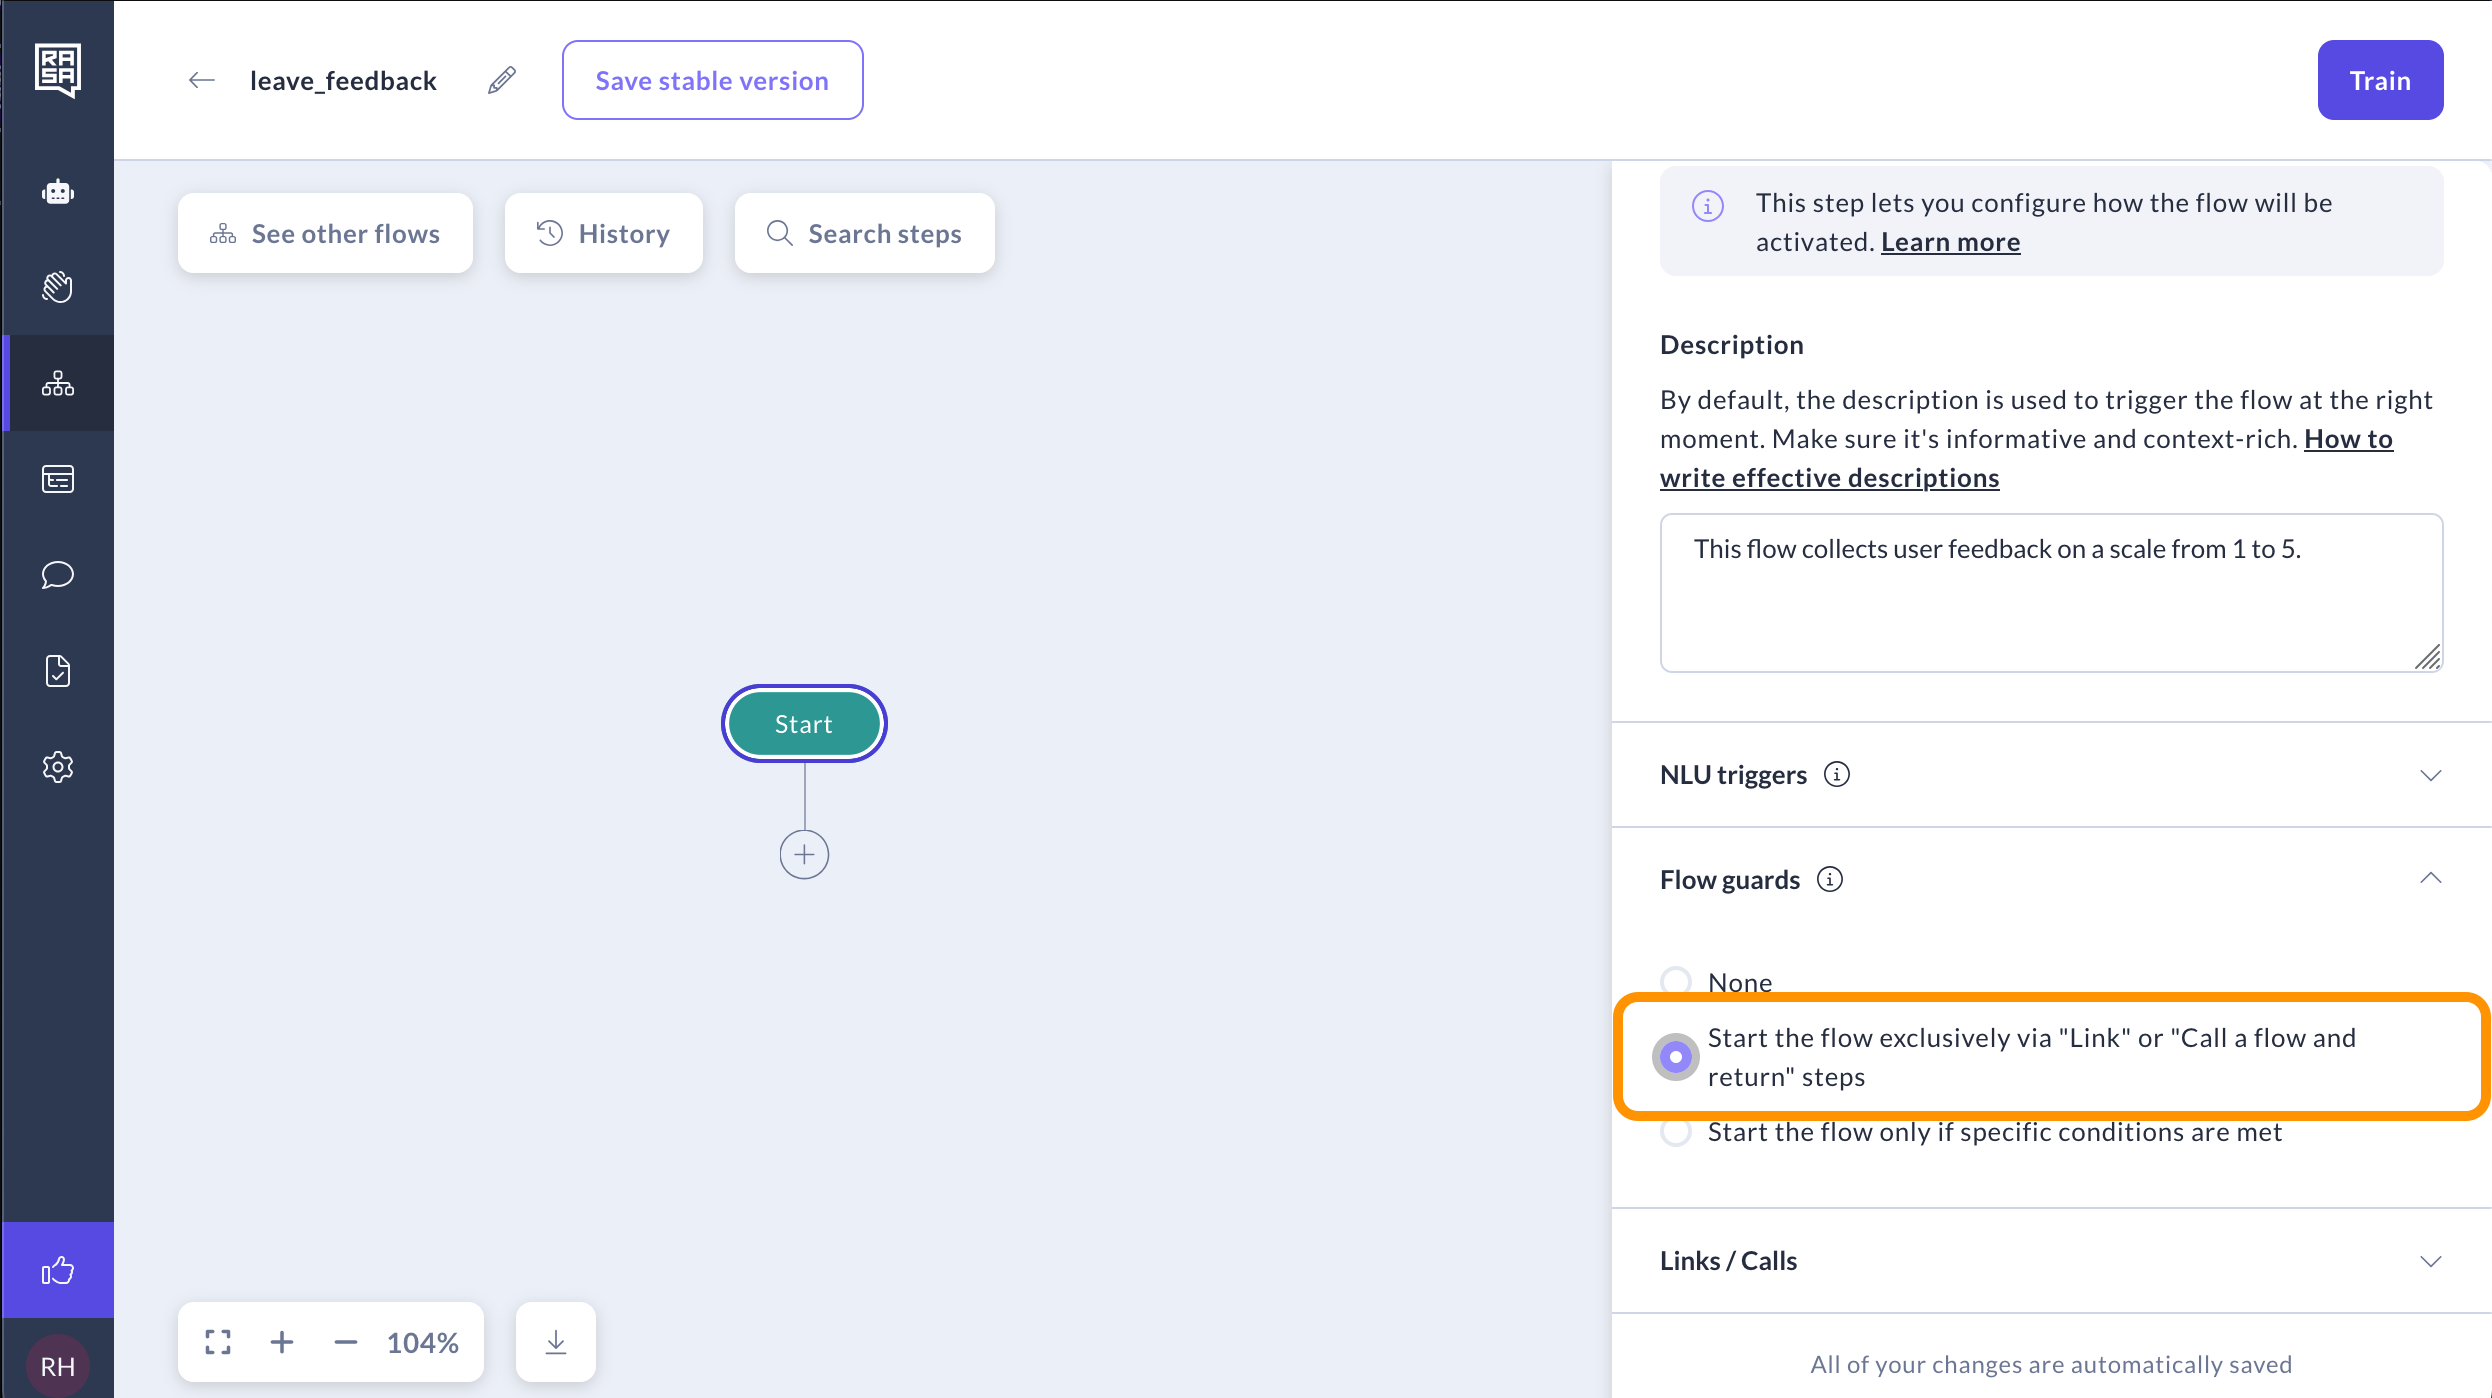 4. Now we can proceed to building the flow. Add the “Collect Information” step to ask the user if they want to leave feedback. Fill it with the following details:
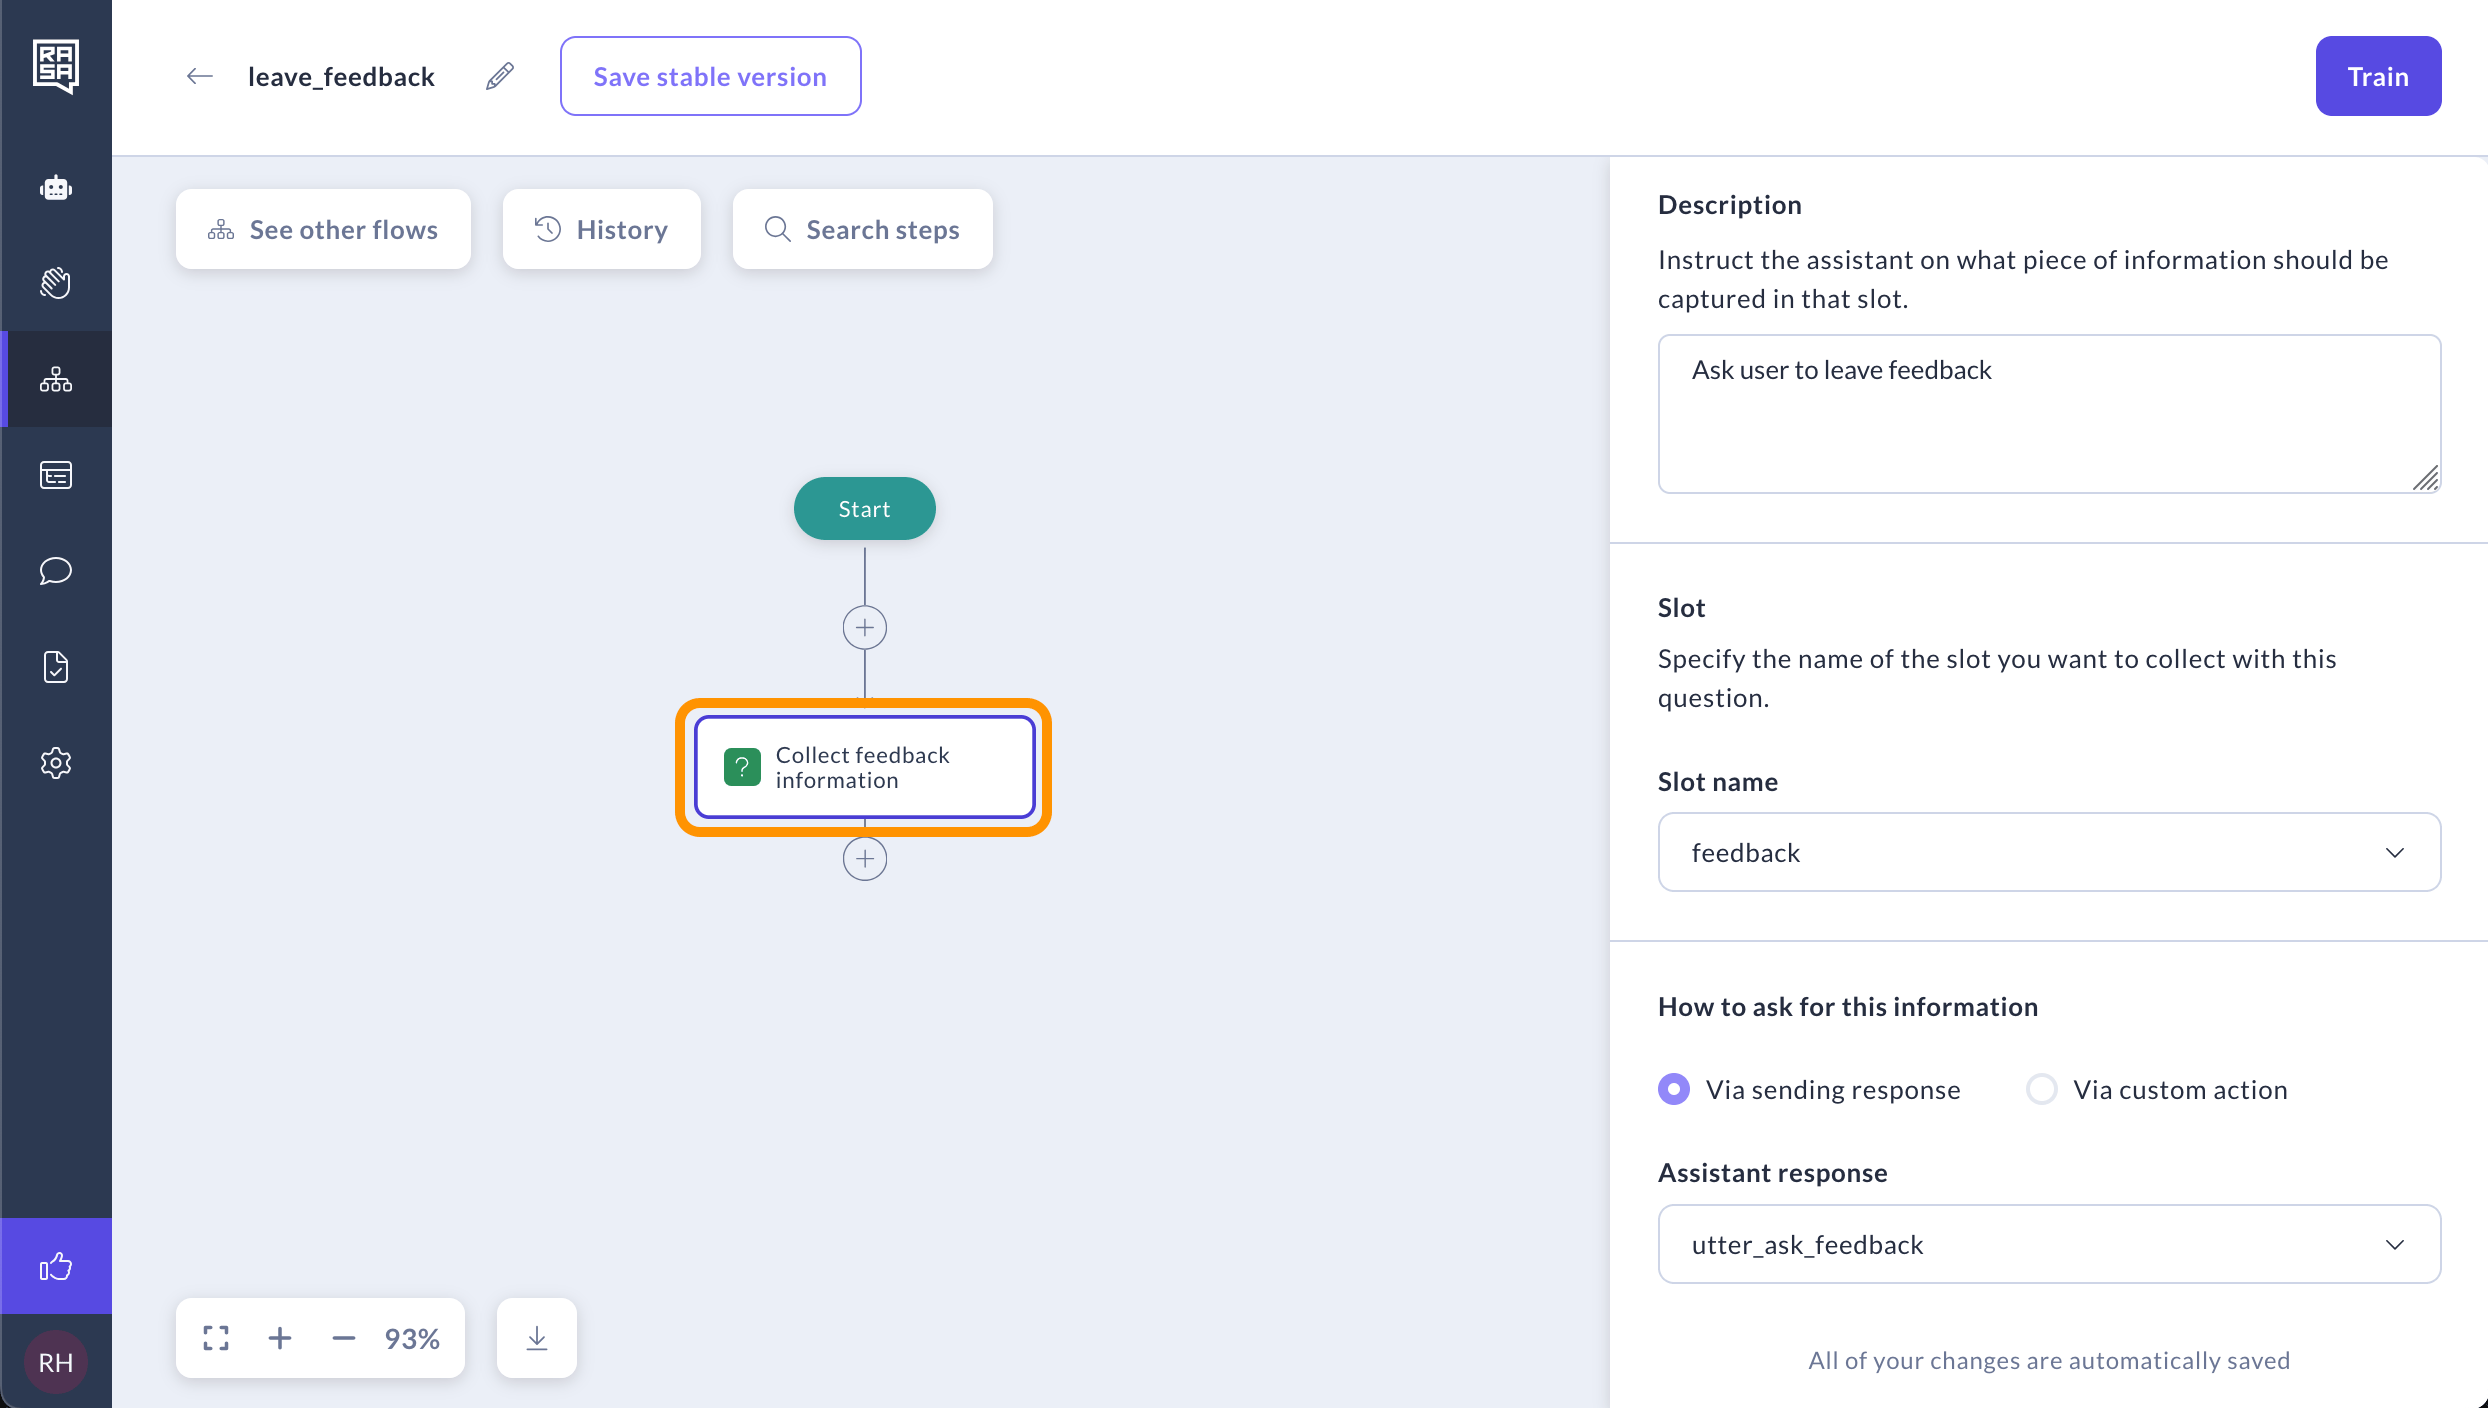
1. Add the step description "Ask user to leave feedback."
2. Create a slot named `feedback` with a `Boolean` type, as it's a yes or No question.
3. Add an assistant's message with the name `utter_ask_feedback` and the text "Do you want to leave feedback?"
4. The result should look like this:
4. Now we can proceed to building the flow. Add the “Collect Information” step to ask the user if they want to leave feedback. Fill it with the following details:
1. Add the step description "Ask user to leave feedback."
2. Create a slot named `feedback` with a `Boolean` type, as it's a yes or No question.
3. Add an assistant's message with the name `utter_ask_feedback` and the text "Do you want to leave feedback?"
4. The result should look like this:
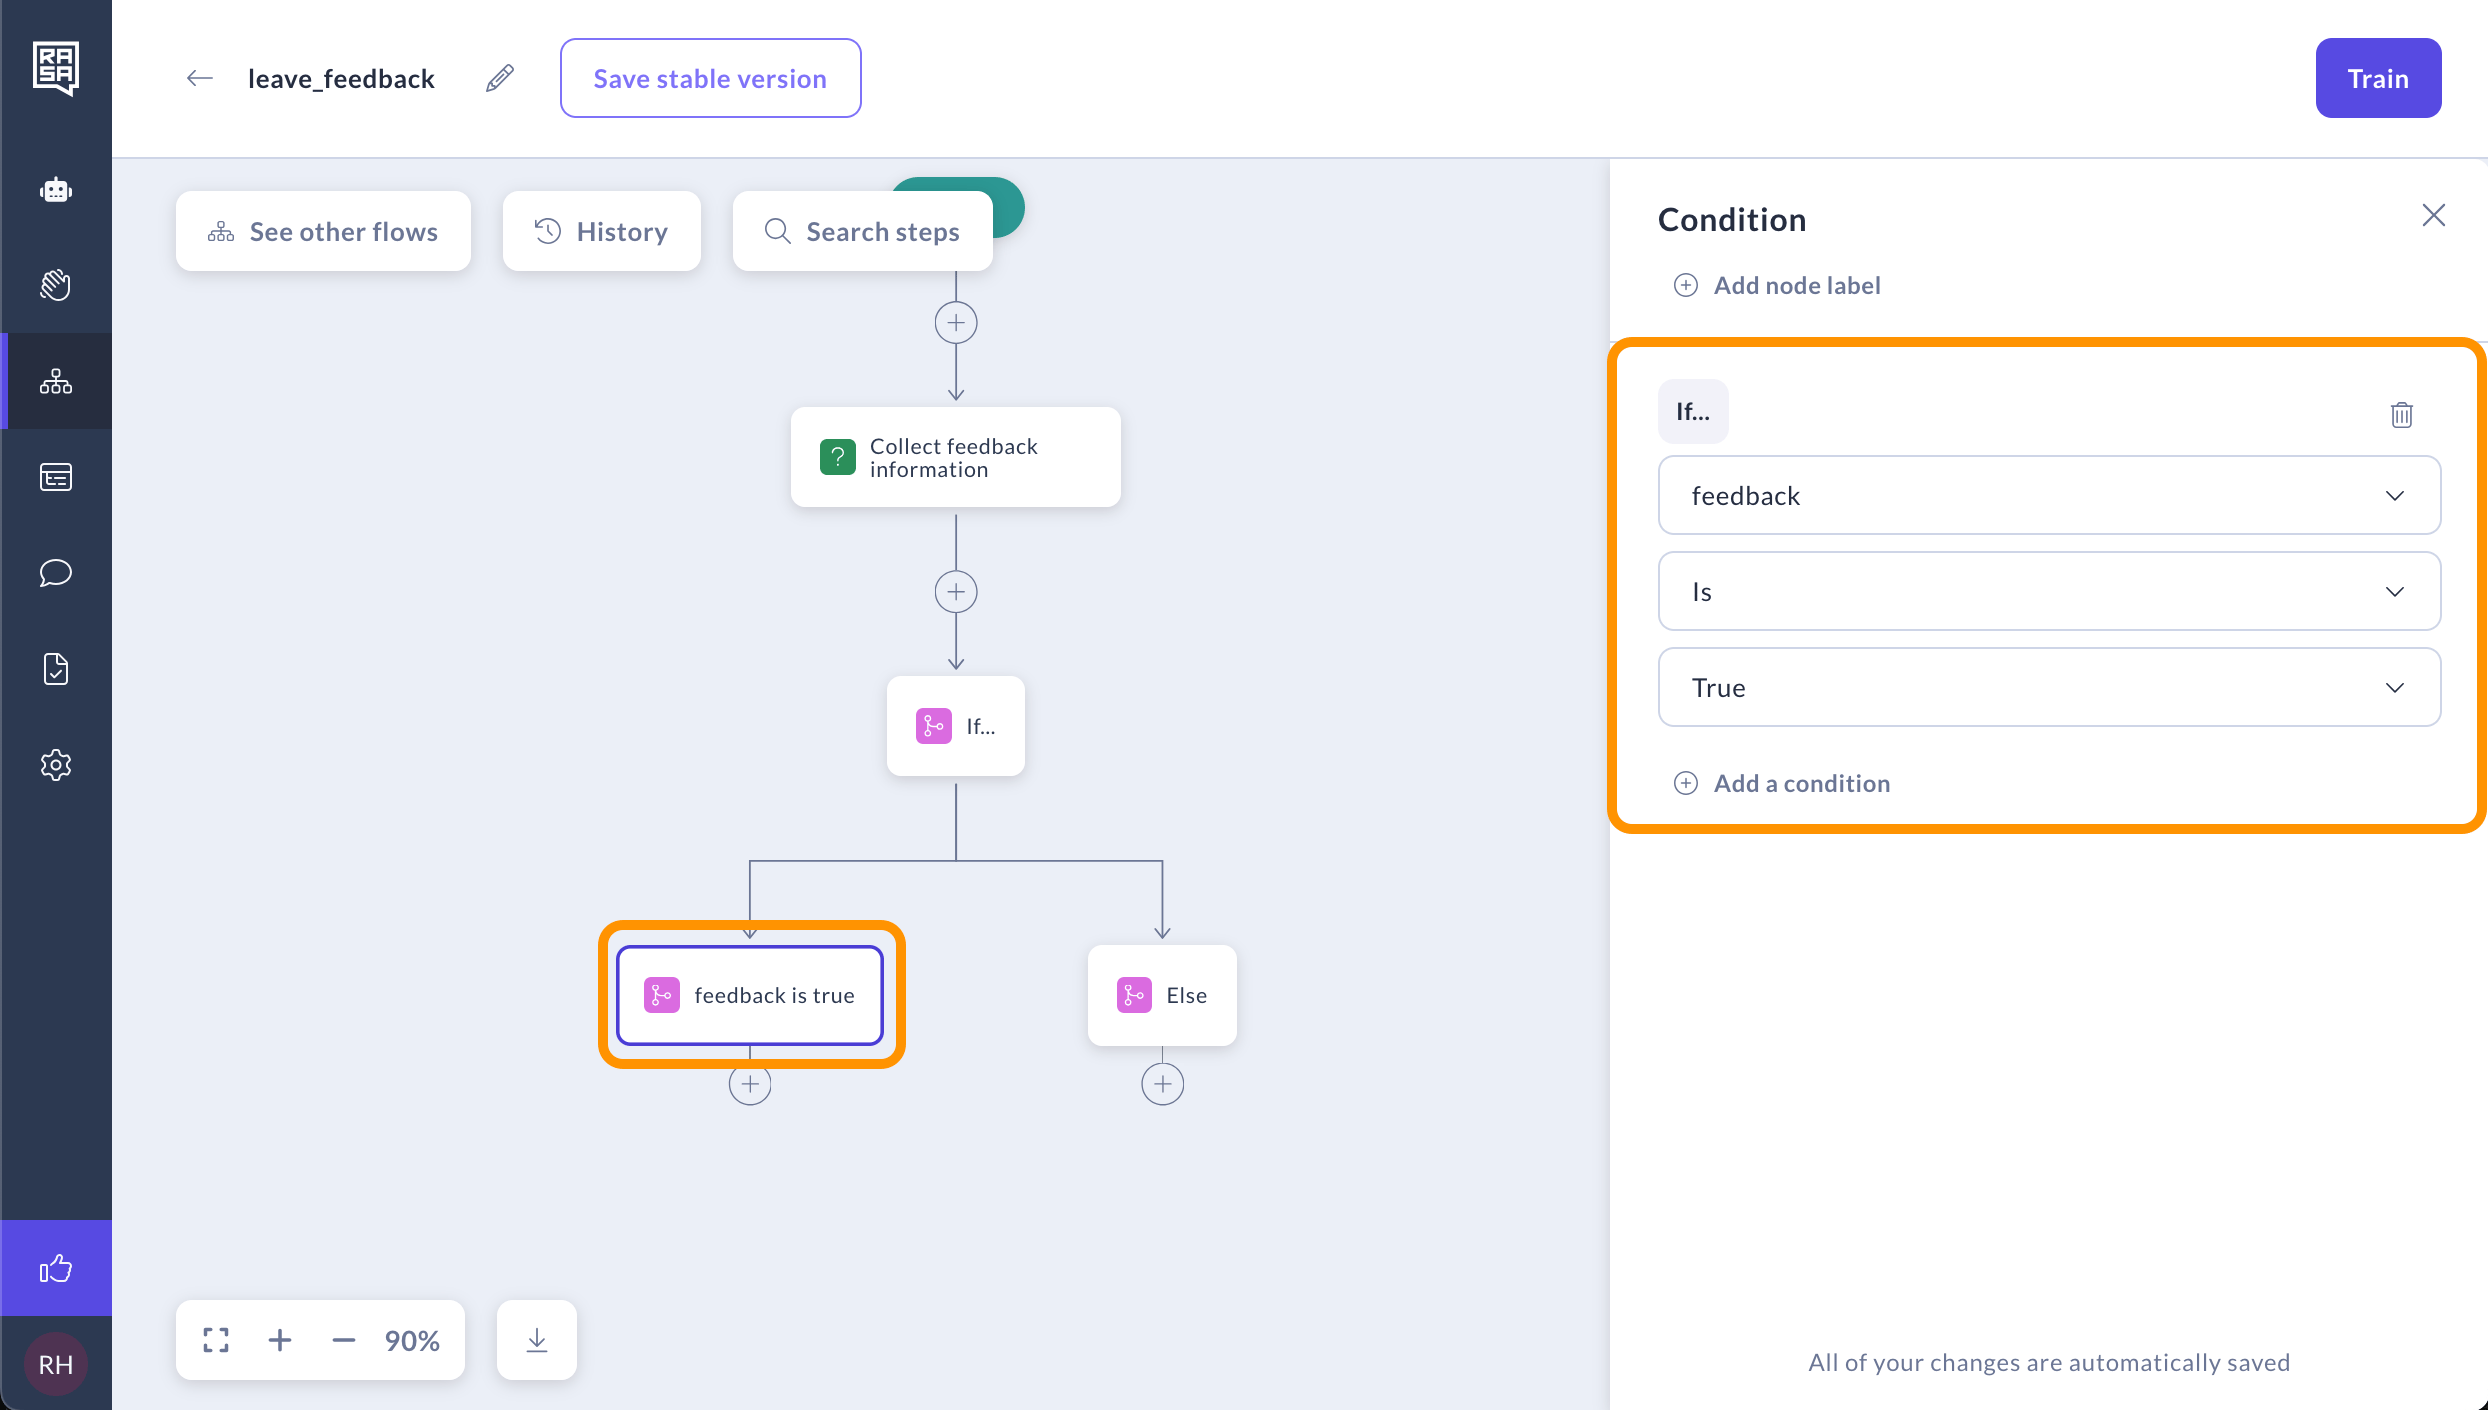
 5. Following this question, insert the "Logic" step, and set the first logic branch to `feedback` `is` `true`. If the user is willing to leave feedback, the conversation will follow this branch.
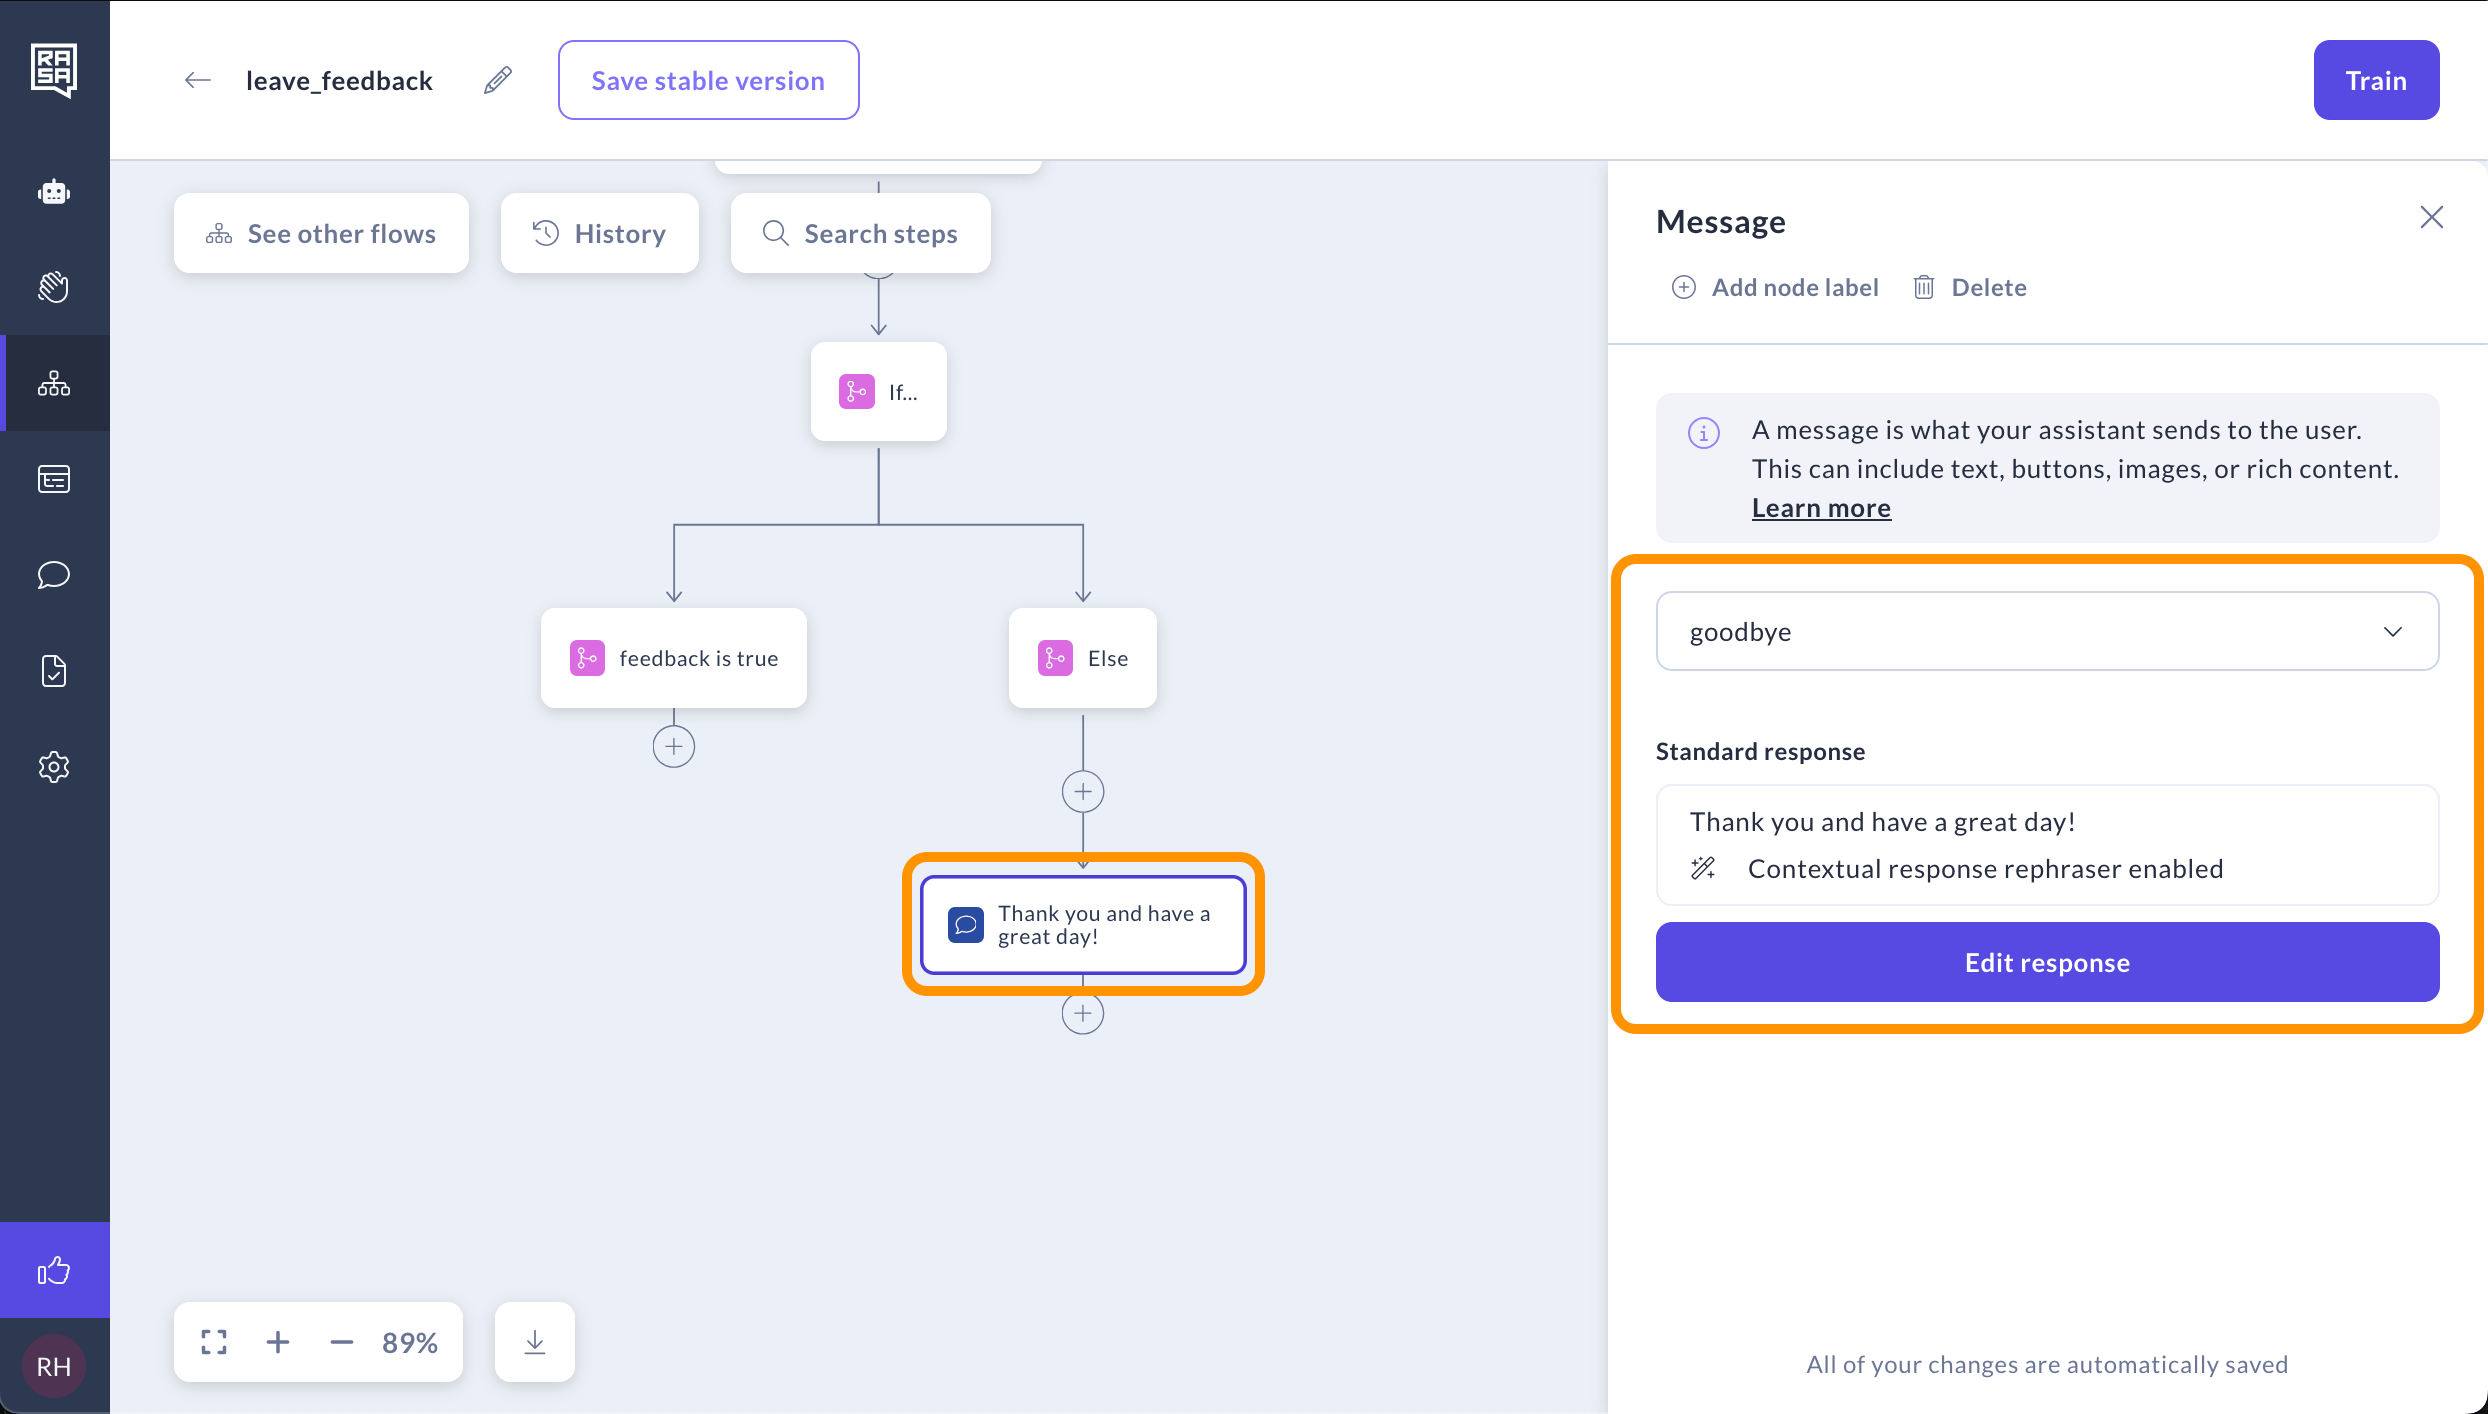
 6. After the Else branch — the case when the user doesn’t want to leave feedback — add the "Message" step. Name the new message `goodbye` and add the text "Thank you and have a great day!"
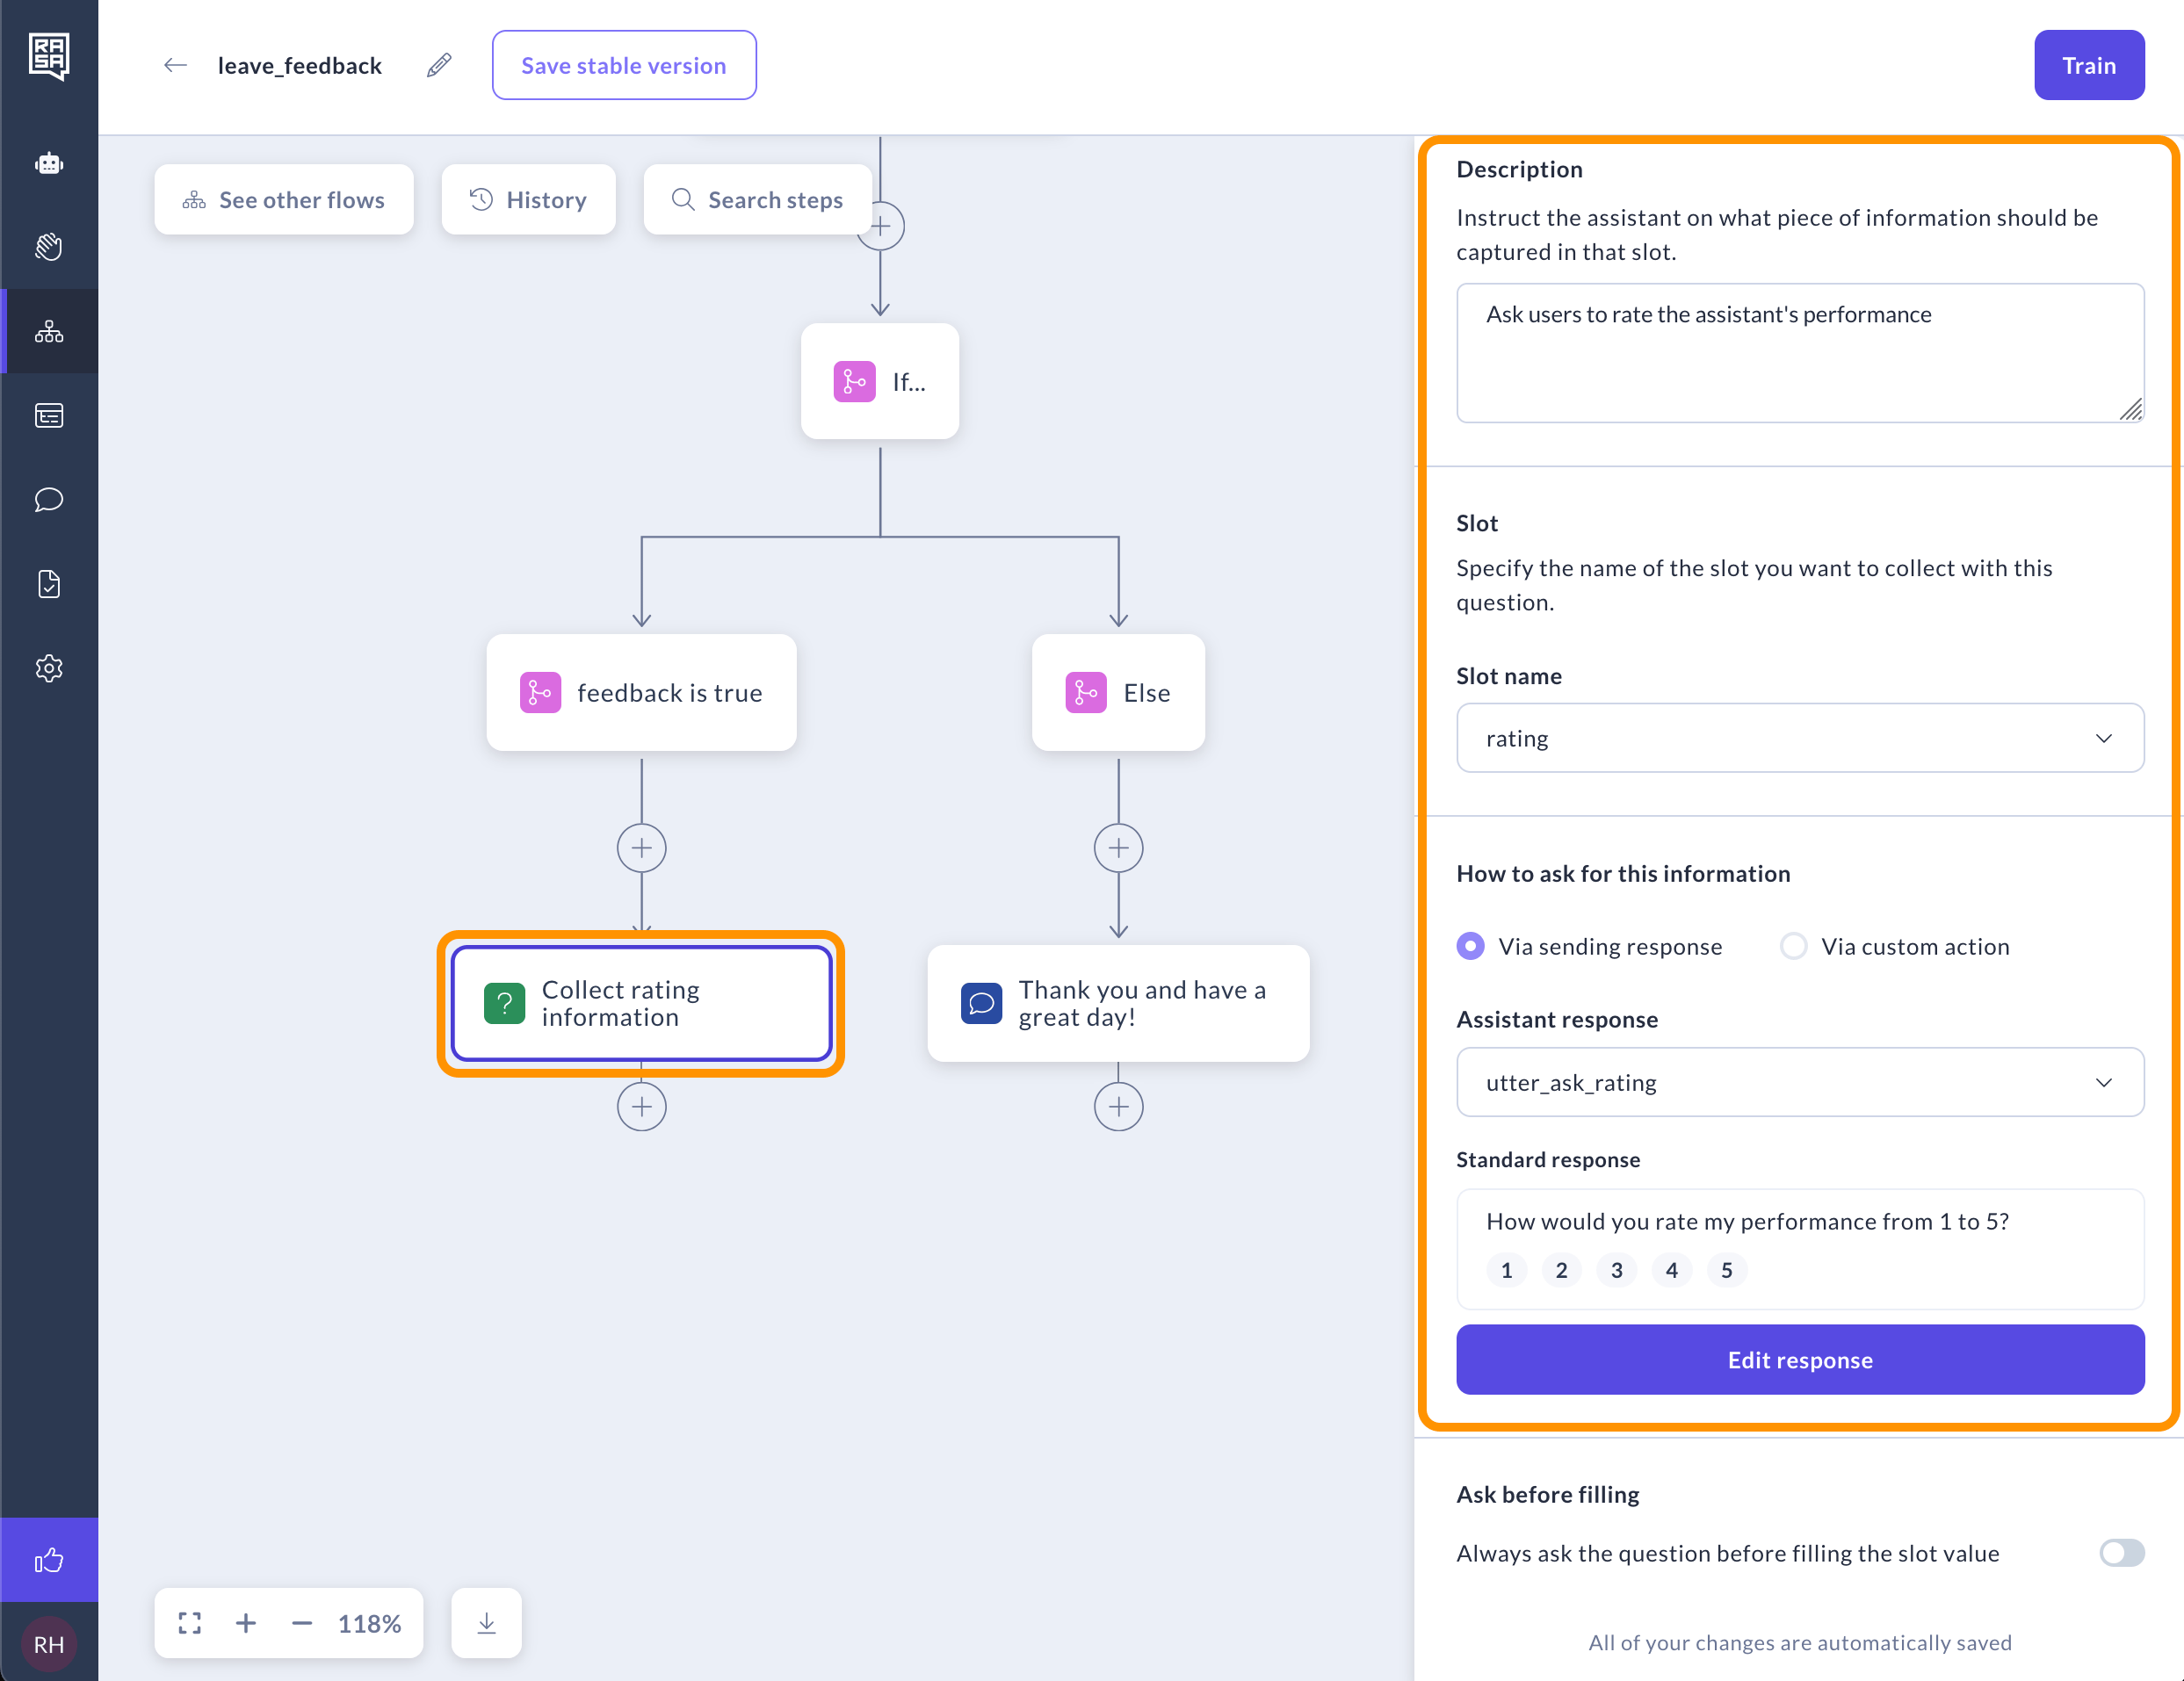
 7. After `feedback` `is` `true` branch, add the “Collect information” step to collect feedback from the users. Fill it with the following details:
1. Add the step description "Ask users to rate the assistant's performance."
2. Create a slot named `rating` with a `float` type, as we'll accept the number from 1 to 5.
3. Add an assistant's message with the name `utter_ask_rating` and the text "How would you rate my performance from 1 to 5?" Optionally you can add buttons so user could easily pick the answer.
4. The result should look like this:
7. After `feedback` `is` `true` branch, add the “Collect information” step to collect feedback from the users. Fill it with the following details:
1. Add the step description "Ask users to rate the assistant's performance."
2. Create a slot named `rating` with a `float` type, as we'll accept the number from 1 to 5.
3. Add an assistant's message with the name `utter_ask_rating` and the text "How would you rate my performance from 1 to 5?" Optionally you can add buttons so user could easily pick the answer.
4. The result should look like this:
 Your simple assistant is ready!
## Step 5: Training and testing the assistant
Training and testing a model are fundamental steps in developing an assistant. Studio users can directly train their assistant within the user interface. To train your assistant:
1. Click the "Train" button.
Your simple assistant is ready!
## Step 5: Training and testing the assistant
Training and testing a model are fundamental steps in developing an assistant. Studio users can directly train their assistant within the user interface. To train your assistant:
1. Click the "Train" button.
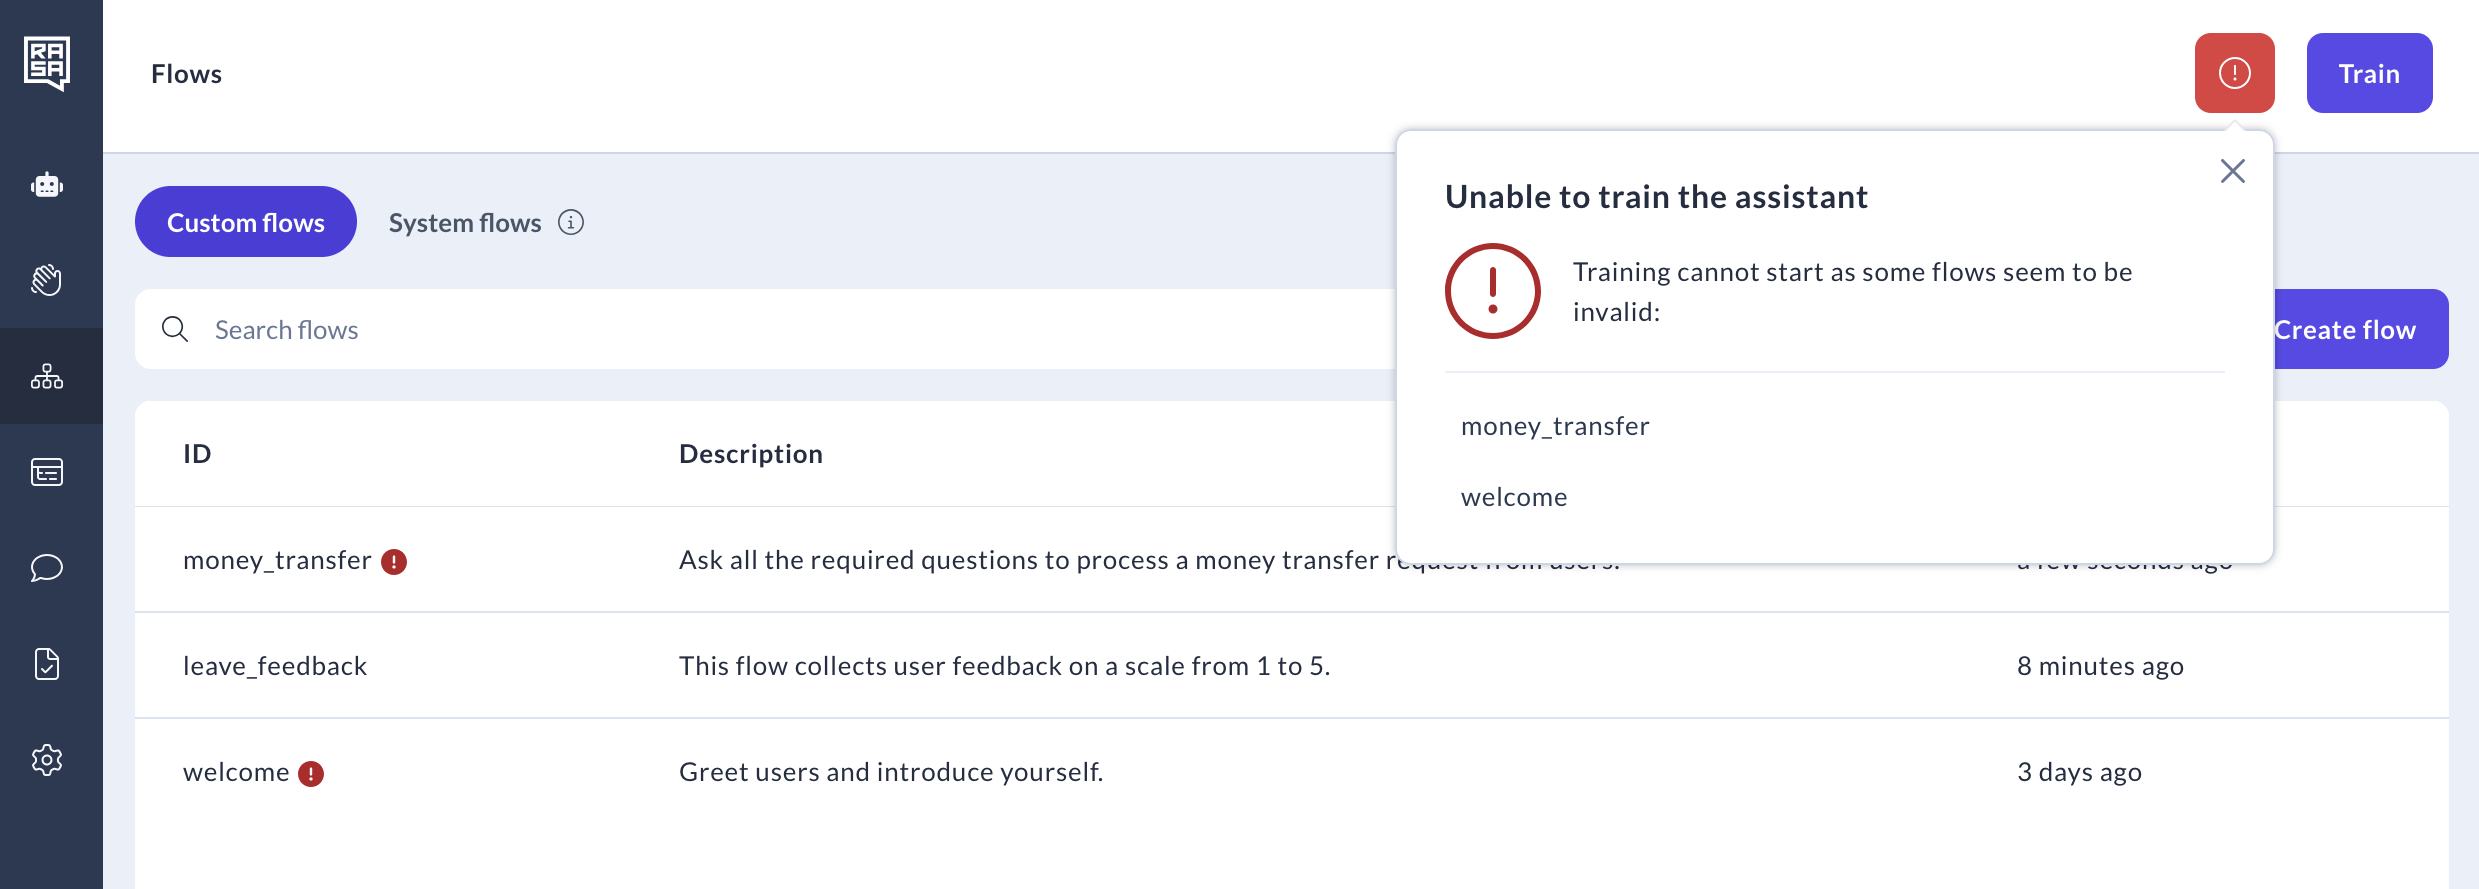
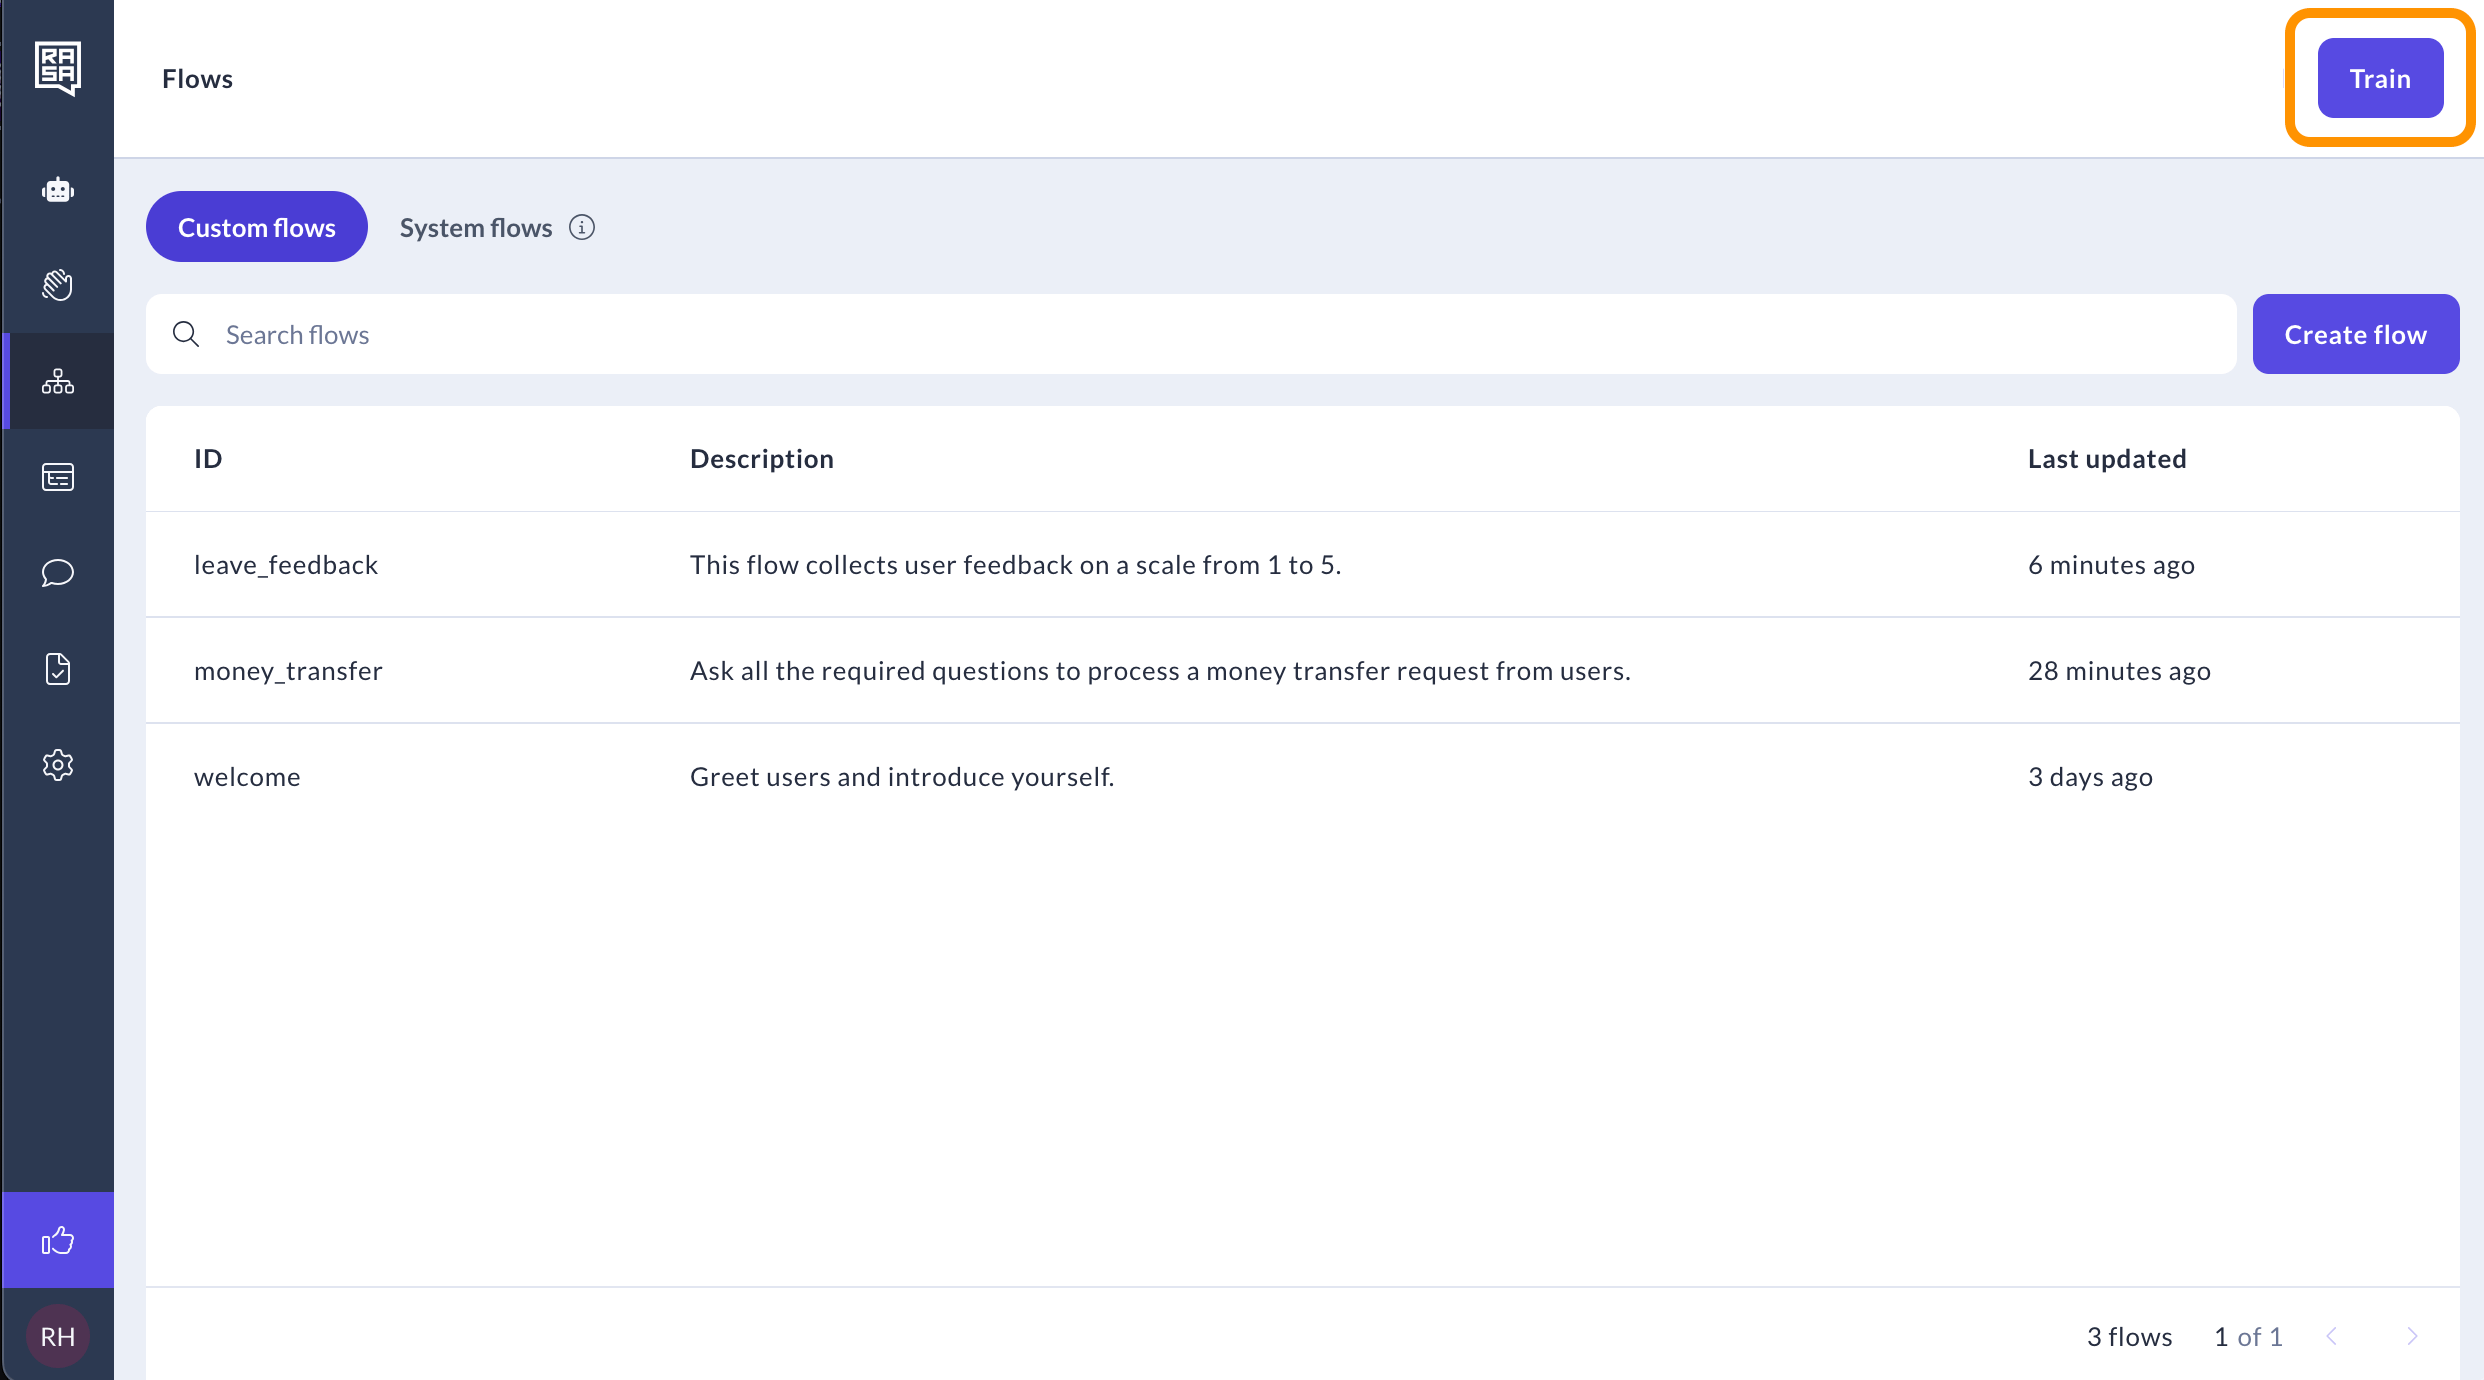 2. In the training panel, select the flows you want to include in the training. Select all flows, then click the "Start training" button.
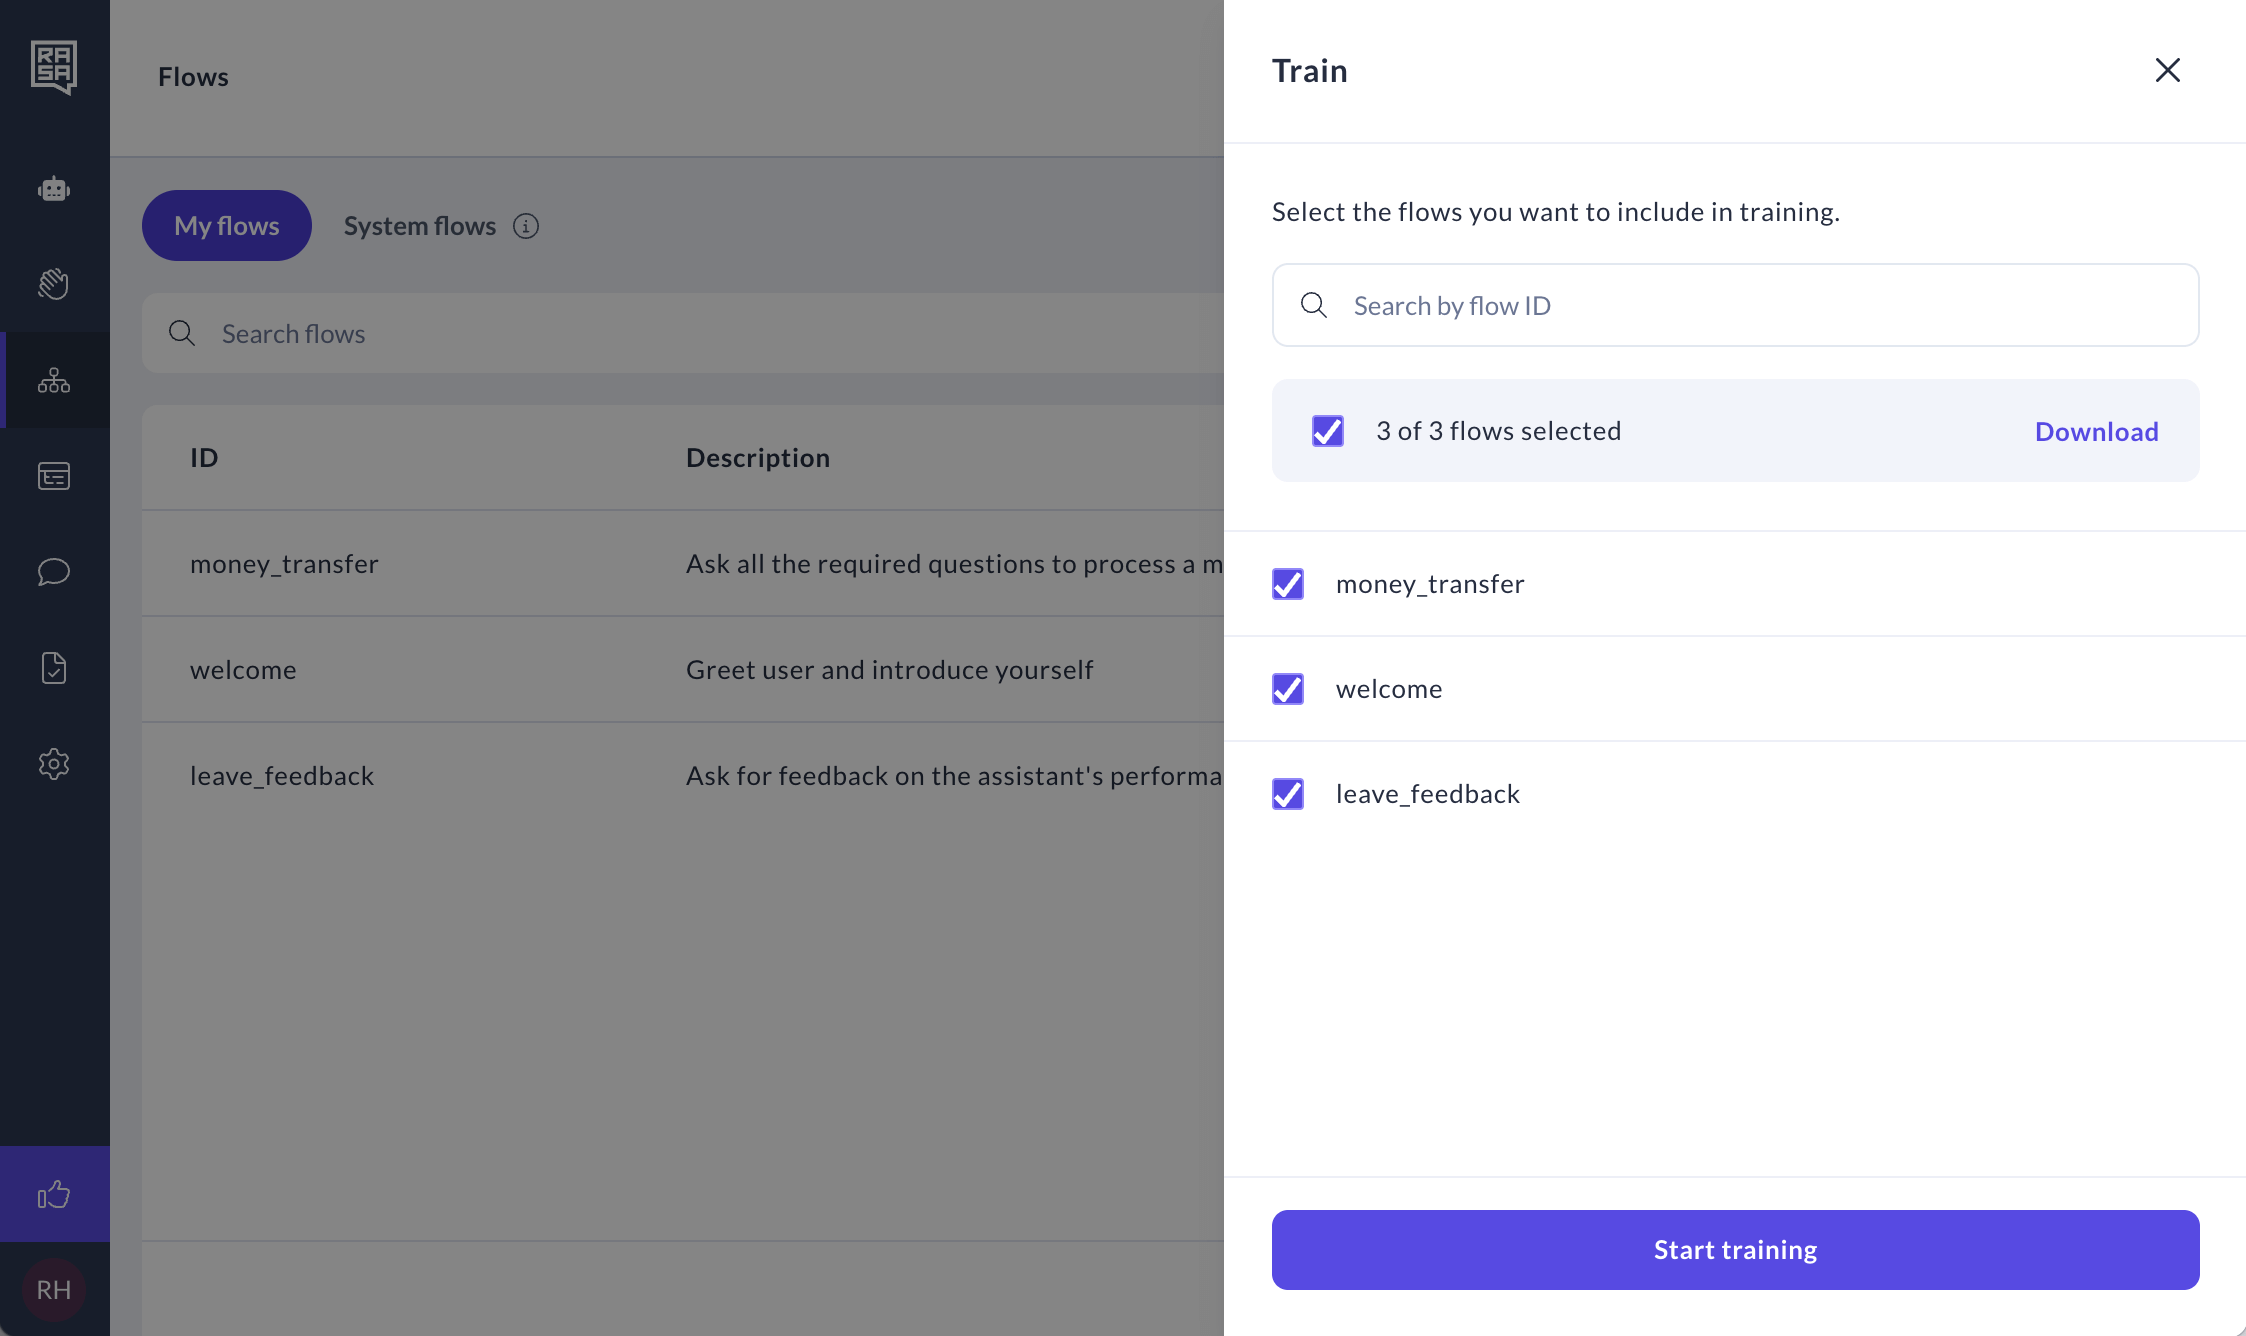 3. First, Studio will validate all your flows. If there are errors that could lead to training failures, you will see the "Unable to train the assistant" message. You can navigate through the list of flows with errors by clicking on their names. Once all errors are corrected, you can try to train the assistant again.
 4. Once the training has started, you will see the following message:
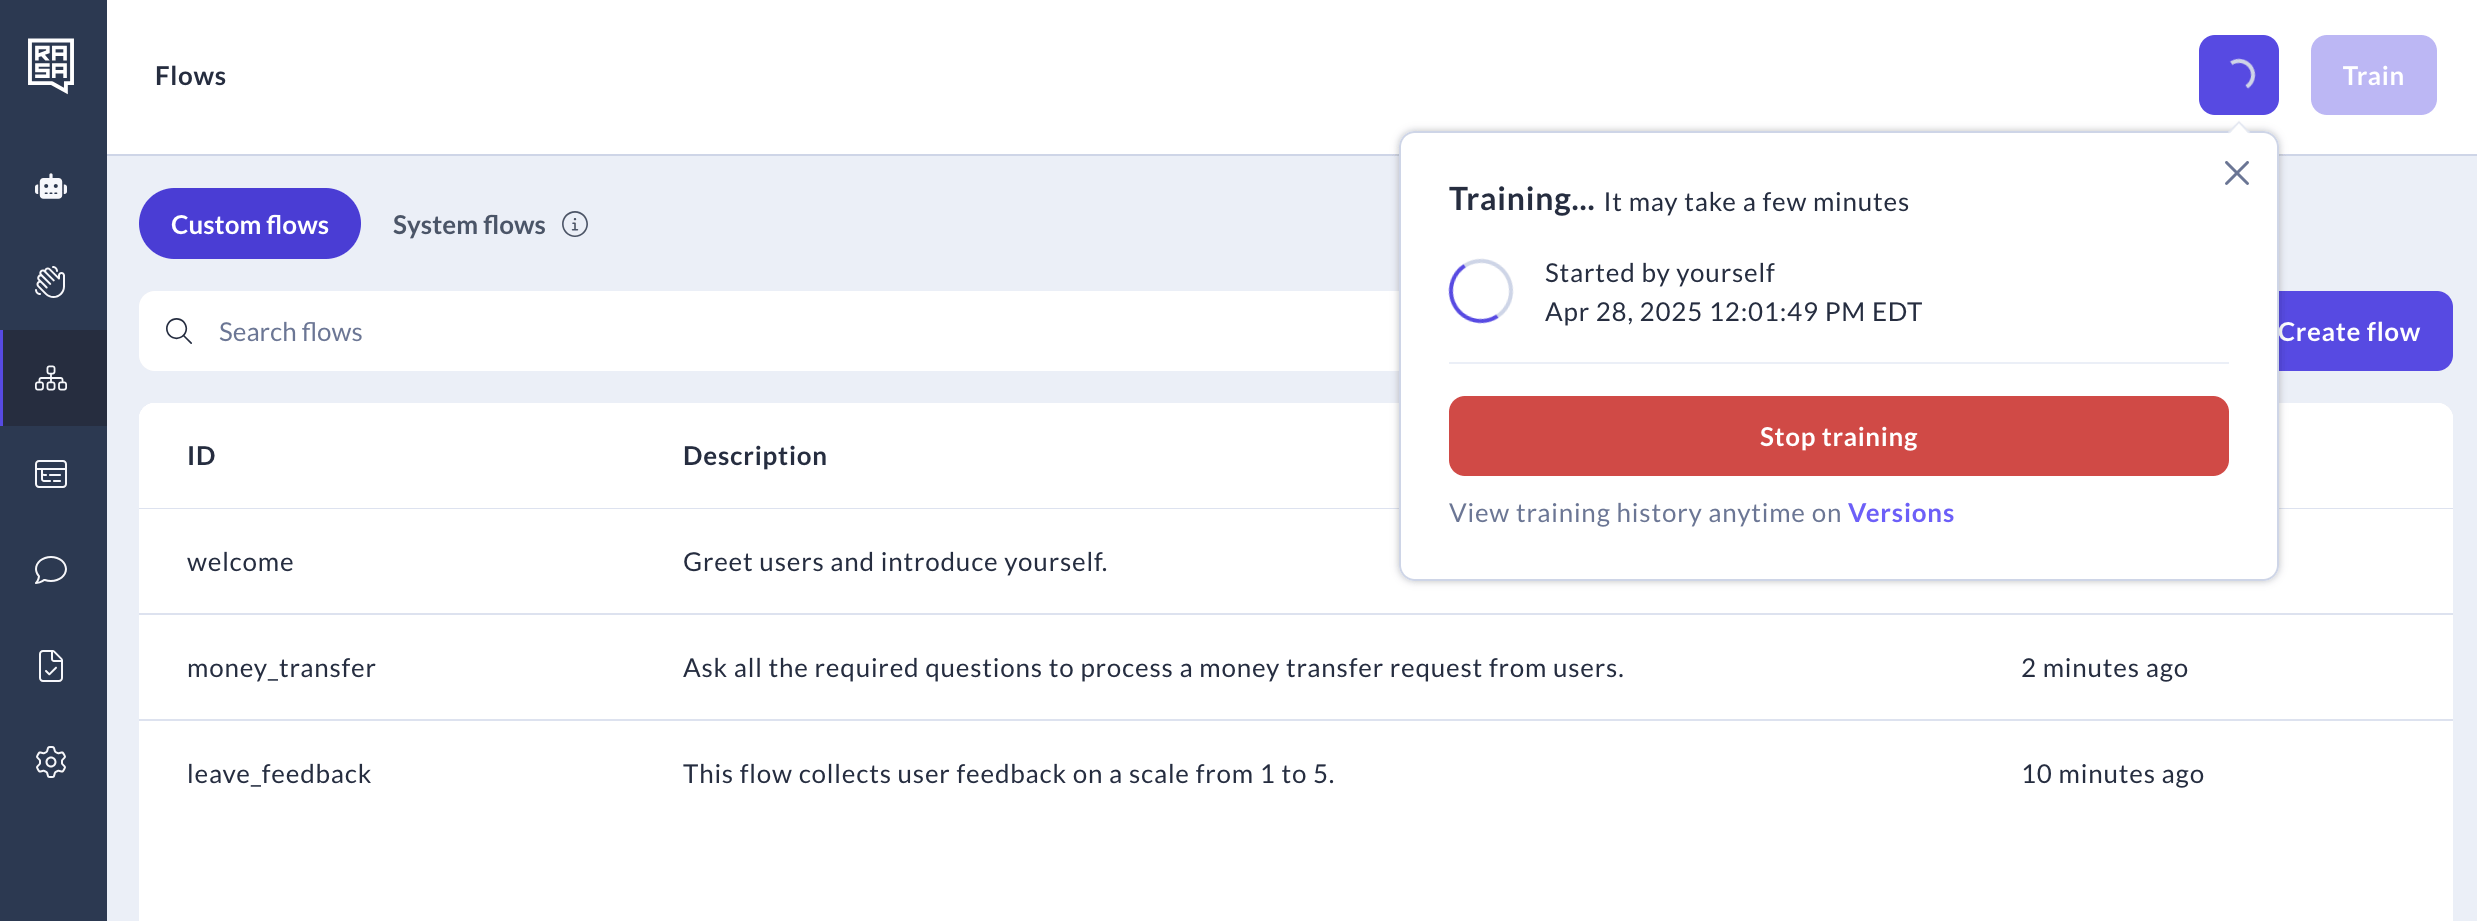 5. If the training process encounters an issue or fails, the following message will appear. You can download training log and investigate the reason for the failure.
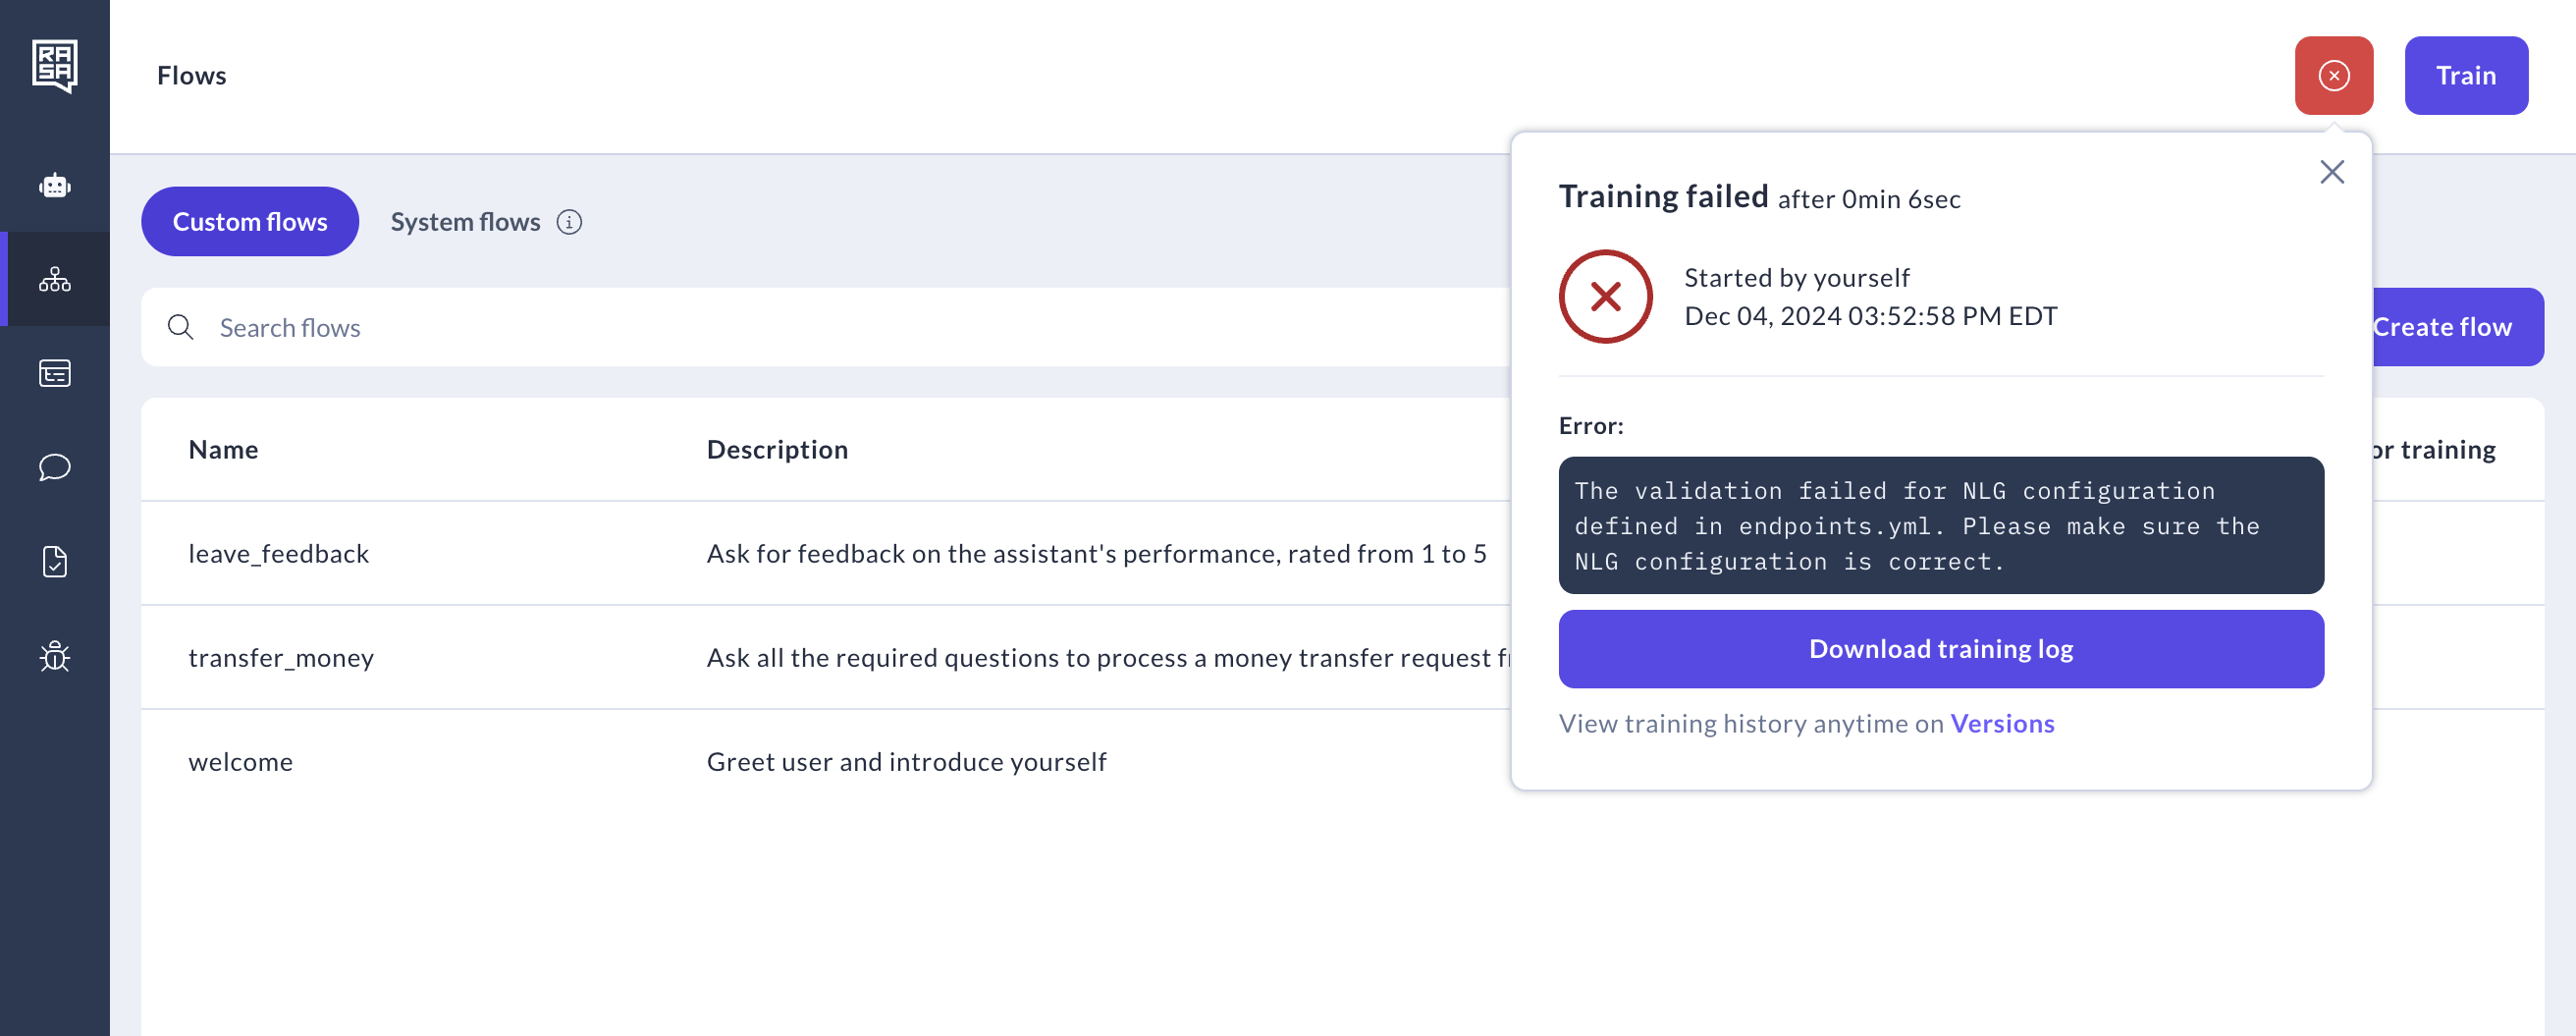 6. In the event of a successful model training, you will see the green tick and the following message:
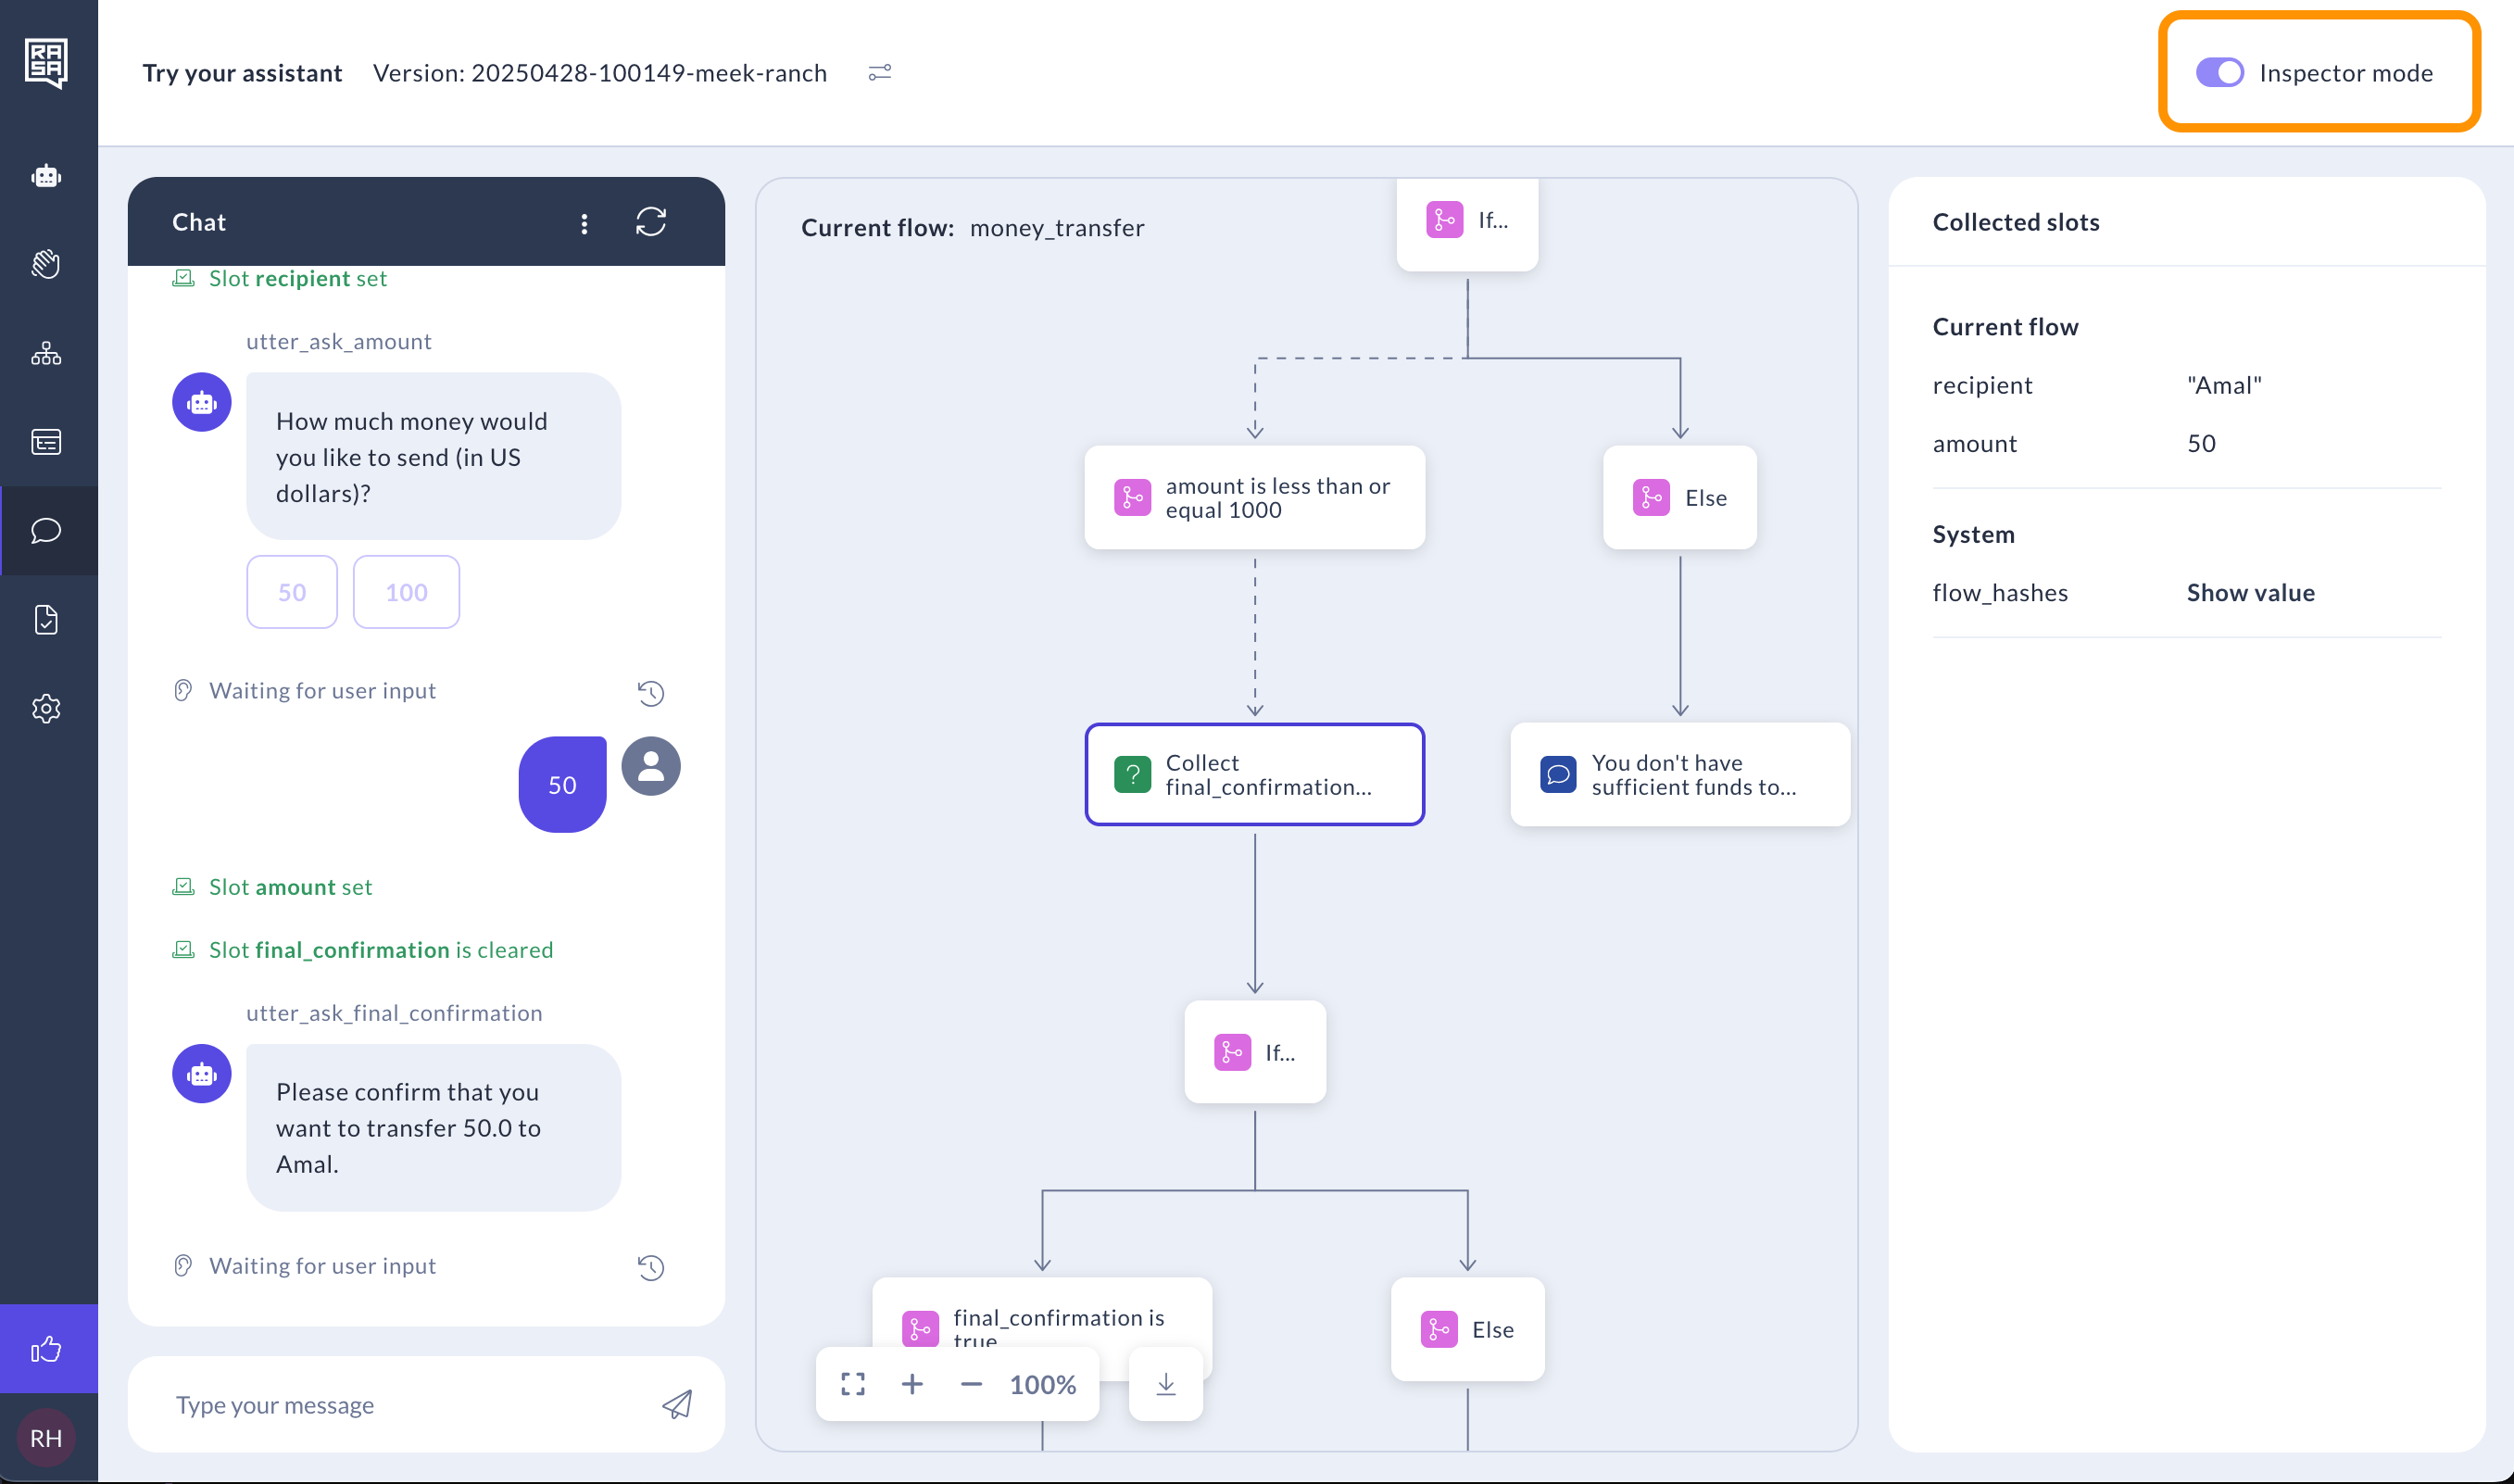
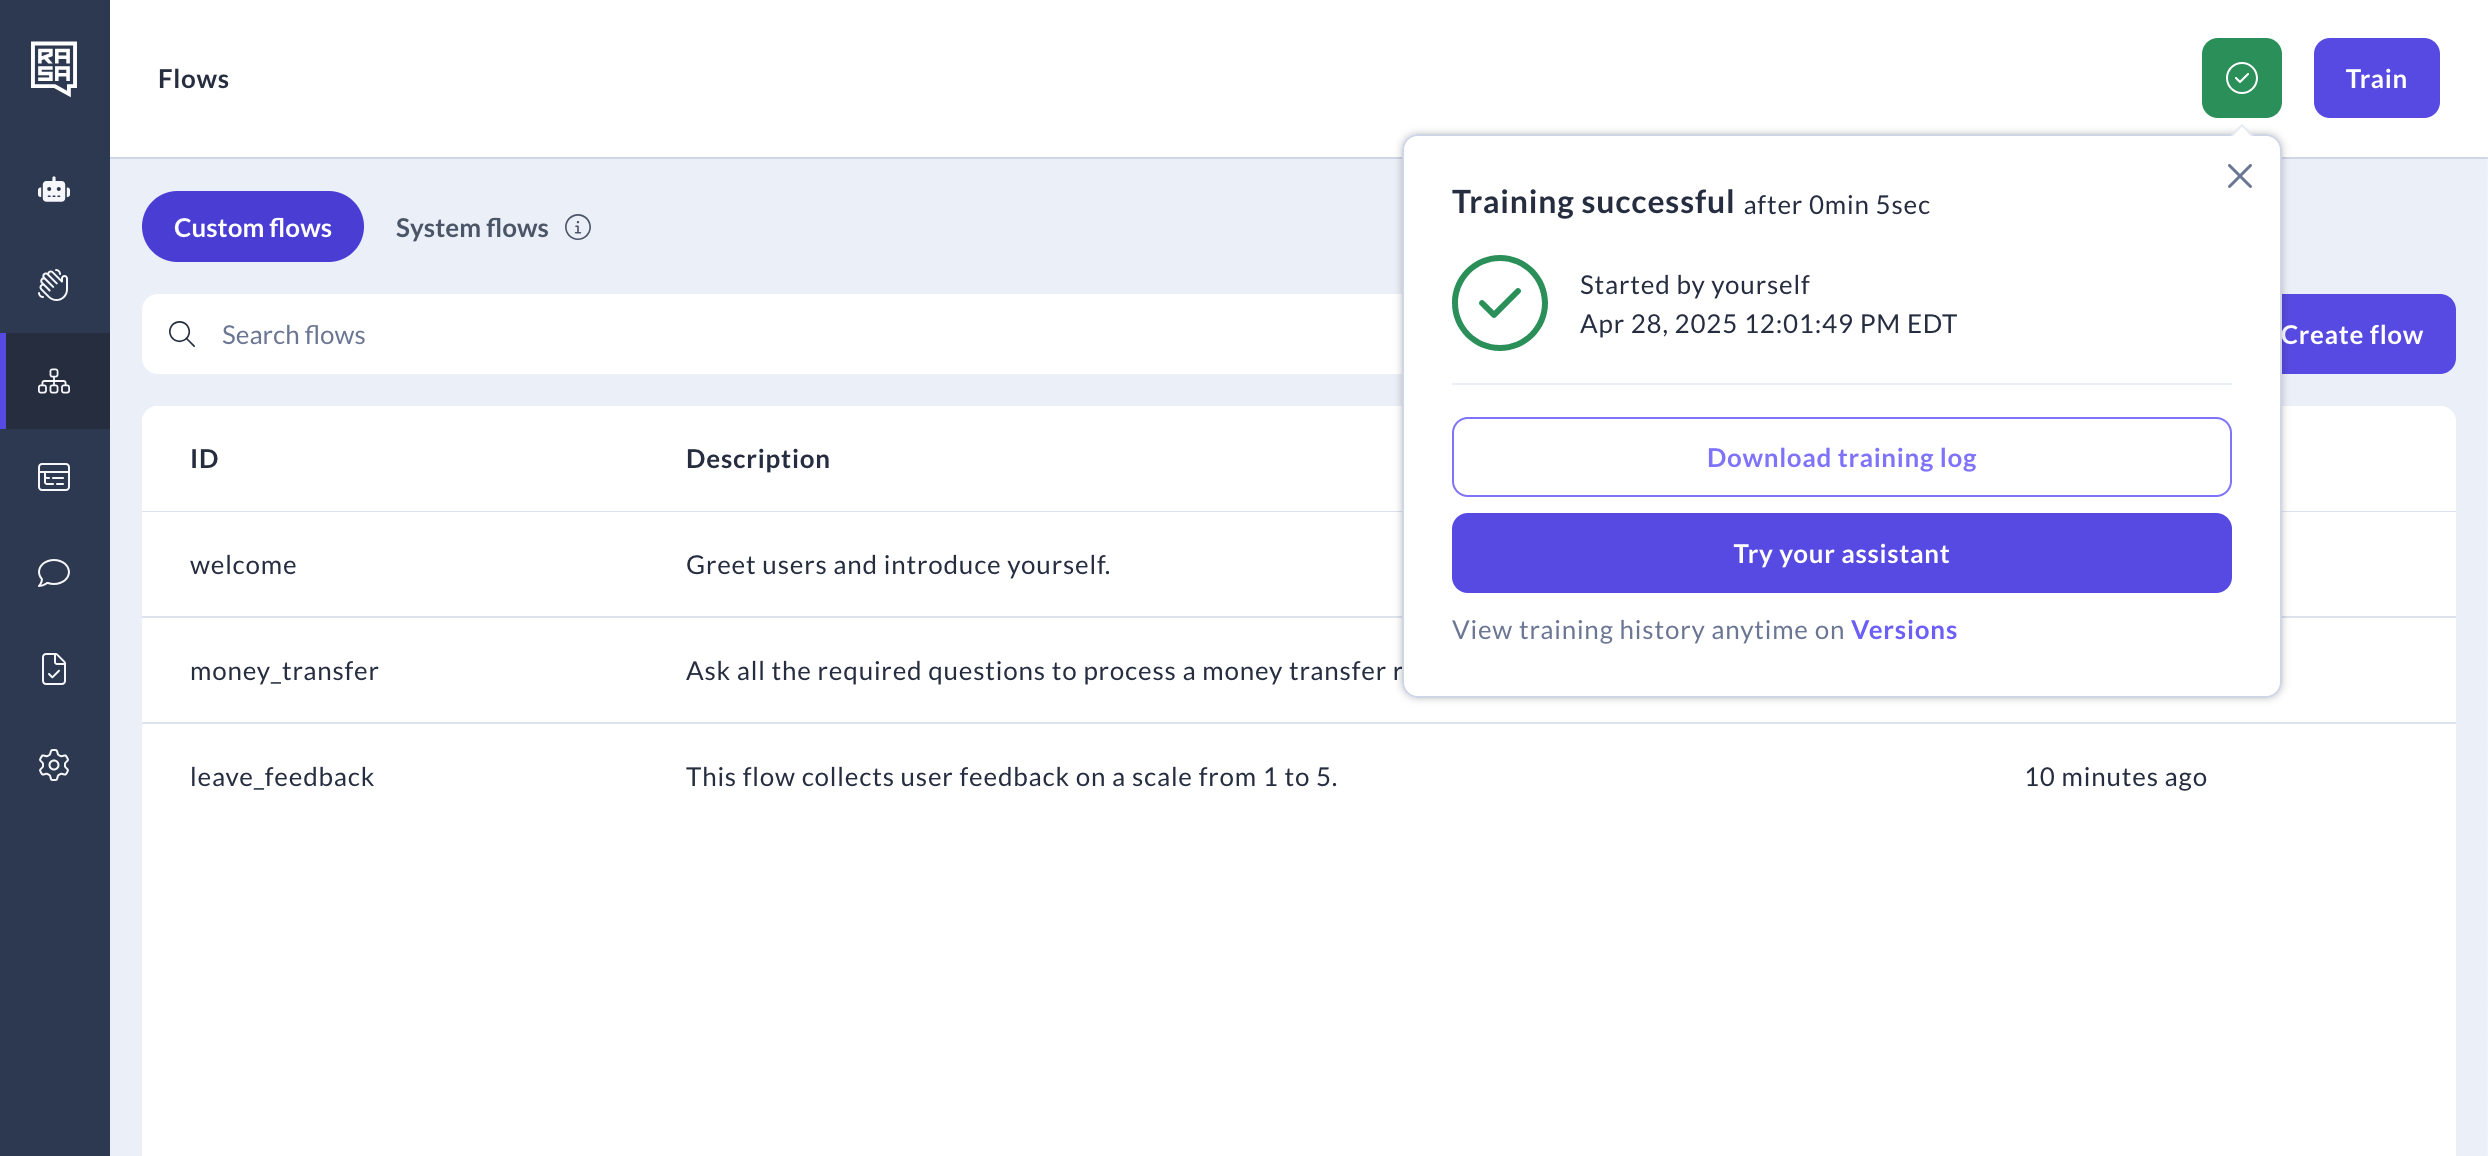 7. After successful training, go to "Try your assistant" page to test how well the assistant navigates between your flows and provides the correct answers.
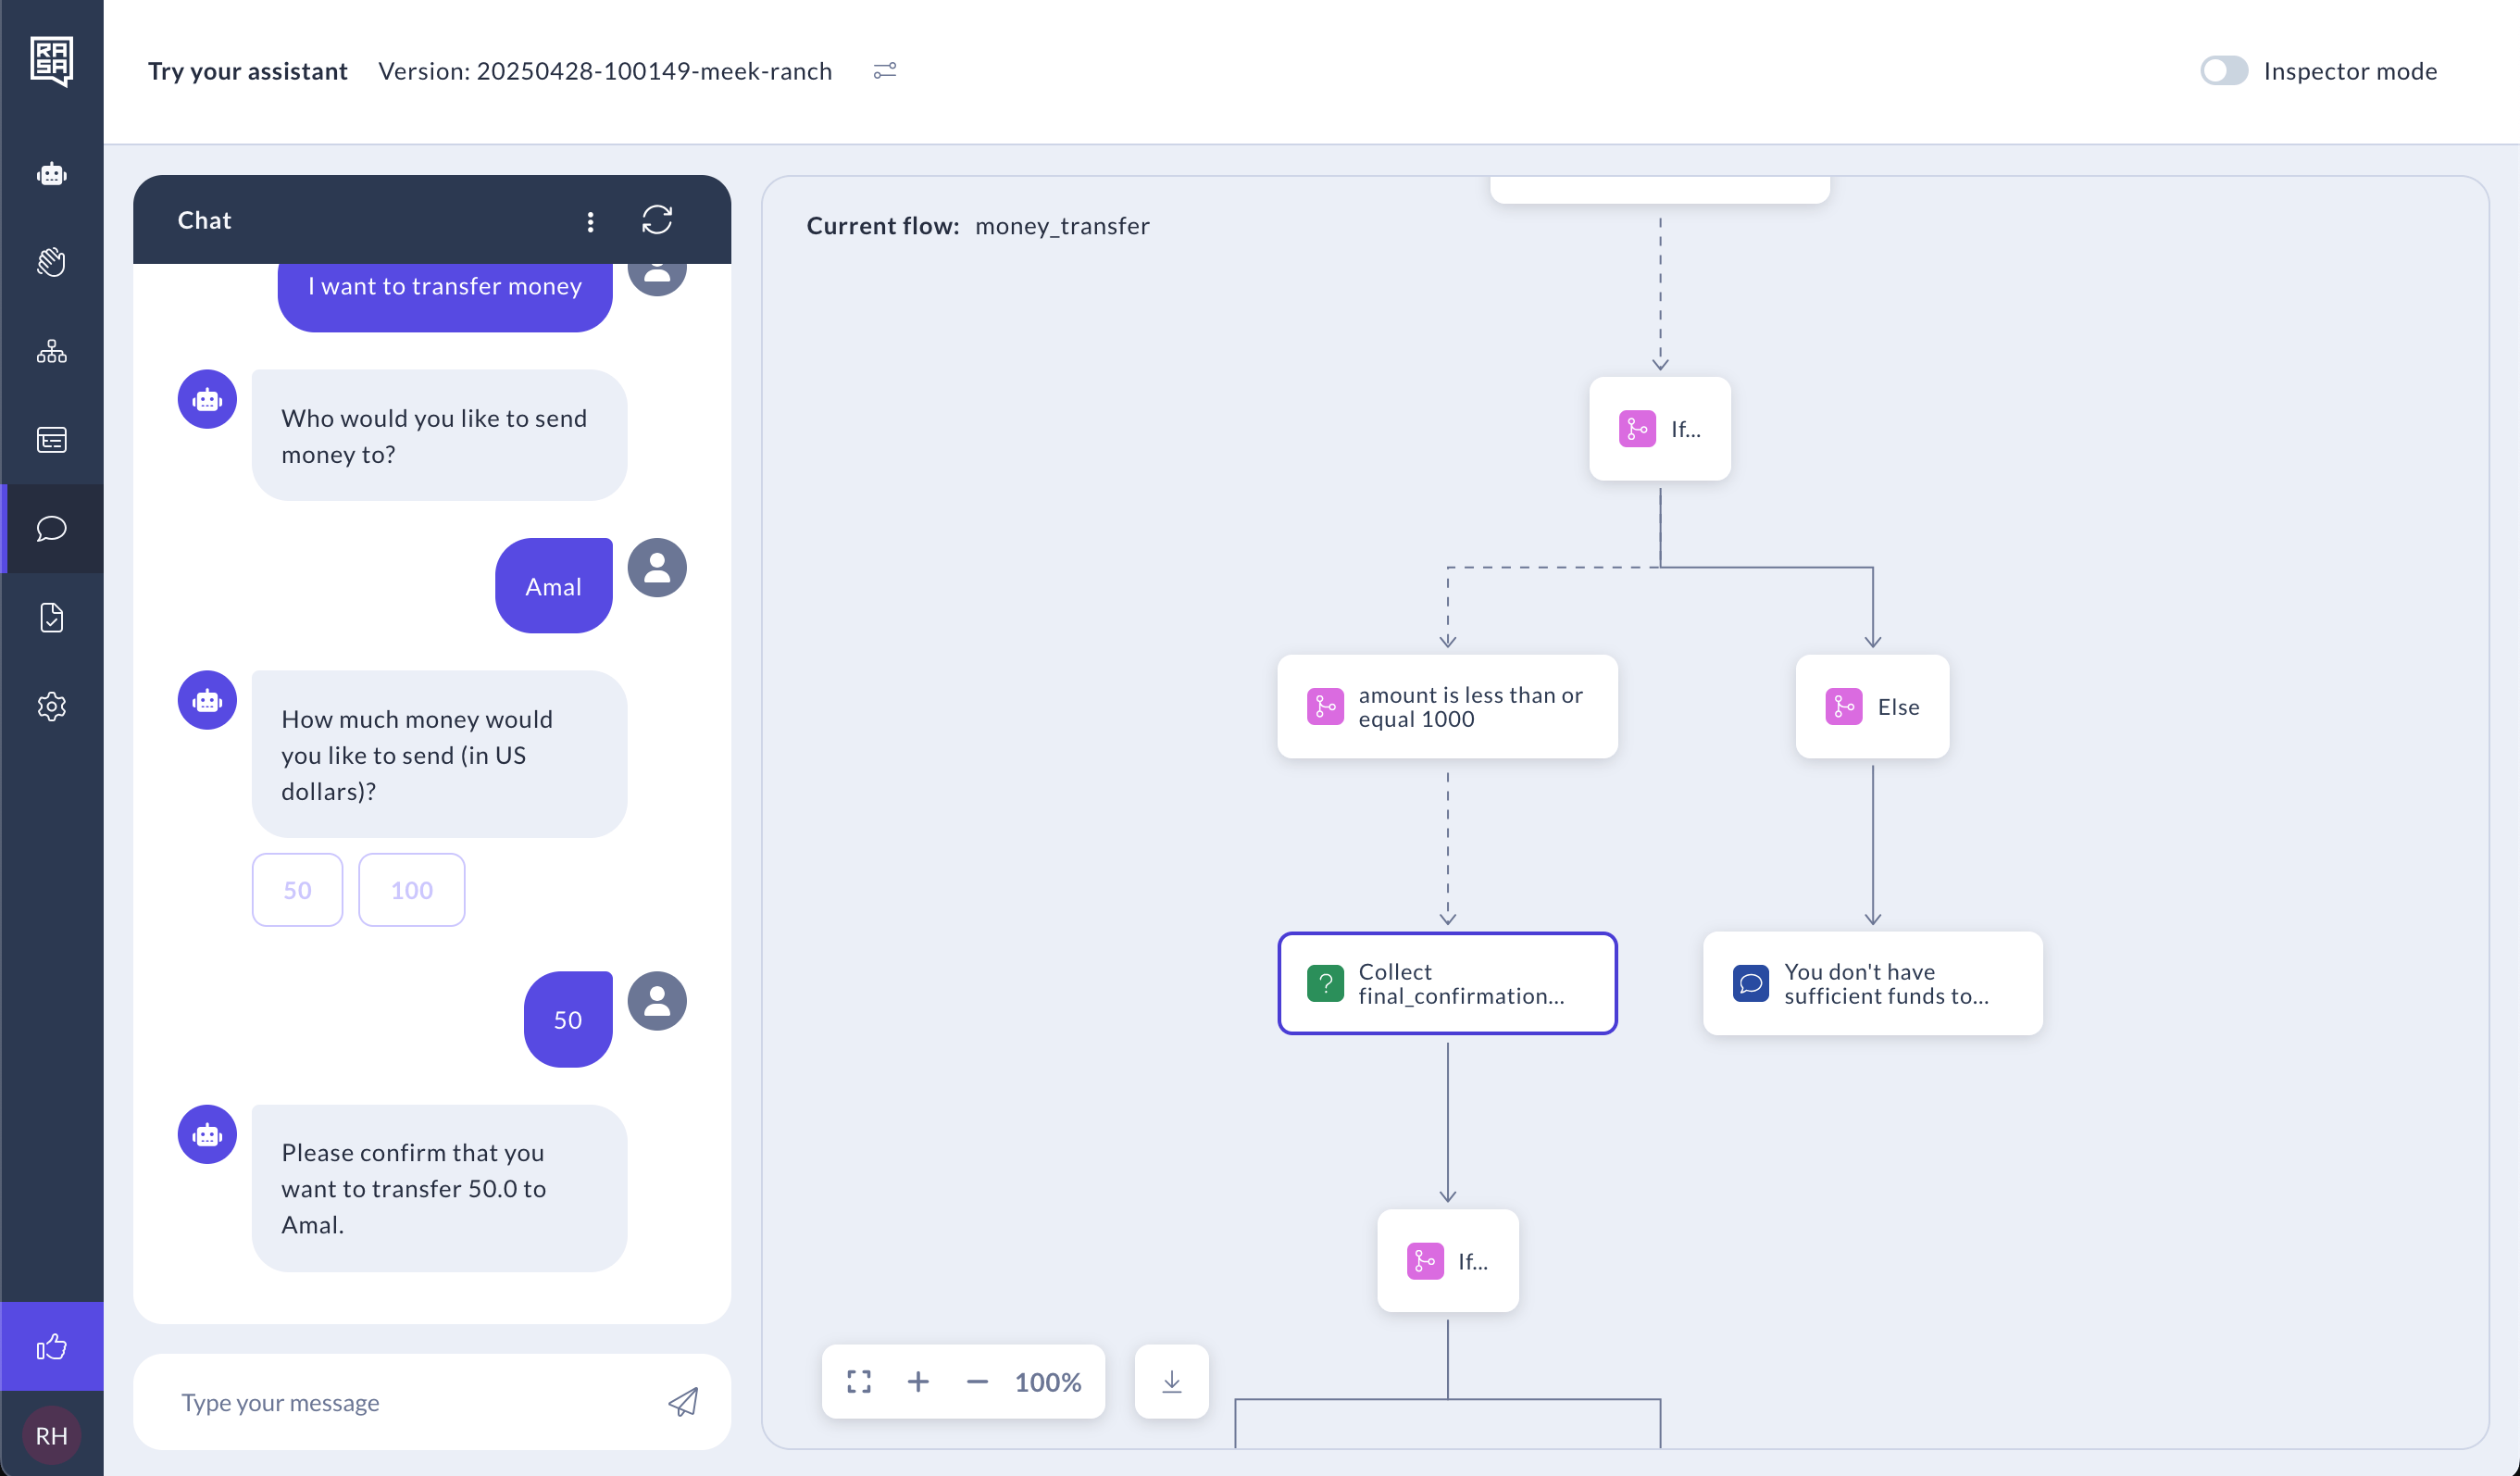 8. Optionally, enable "Inspector mode" to access detailed event information and debugging tools.
 ## Step 6 \[Advanced]: Adding a custom action
A Custom action step can execute any code you desire, including API calls, database queries, and more. Whether it's turning on the lights, adding an event to a calendar, checking a user's bank balance, or anything else you can imagine, custom actions offer extensive flexibility.
As of now, custom actions can only be implemented outside of Studio. For details on how to implement a custom action, please refer to [the SDK Action Server documentation](/docs/reference/integrations/action-server/running-action-server). Any custom action that you want to use in flows should be added into the actions section of your [domain](/docs/reference/config/domain).
In this part of the tutorial, we are going to replace the previously created amount validation logic with a custom action.
1. Return to the `money_transfer` flow.
2. After the question about how much money you would like to transfer and before the logic branch, add a "Custom action" step.
## Step 6 \[Advanced]: Adding a custom action
A Custom action step can execute any code you desire, including API calls, database queries, and more. Whether it's turning on the lights, adding an event to a calendar, checking a user's bank balance, or anything else you can imagine, custom actions offer extensive flexibility.
As of now, custom actions can only be implemented outside of Studio. For details on how to implement a custom action, please refer to [the SDK Action Server documentation](/docs/reference/integrations/action-server/running-action-server). Any custom action that you want to use in flows should be added into the actions section of your [domain](/docs/reference/config/domain).
In this part of the tutorial, we are going to replace the previously created amount validation logic with a custom action.
1. Return to the `money_transfer` flow.
2. After the question about how much money you would like to transfer and before the logic branch, add a "Custom action" step.
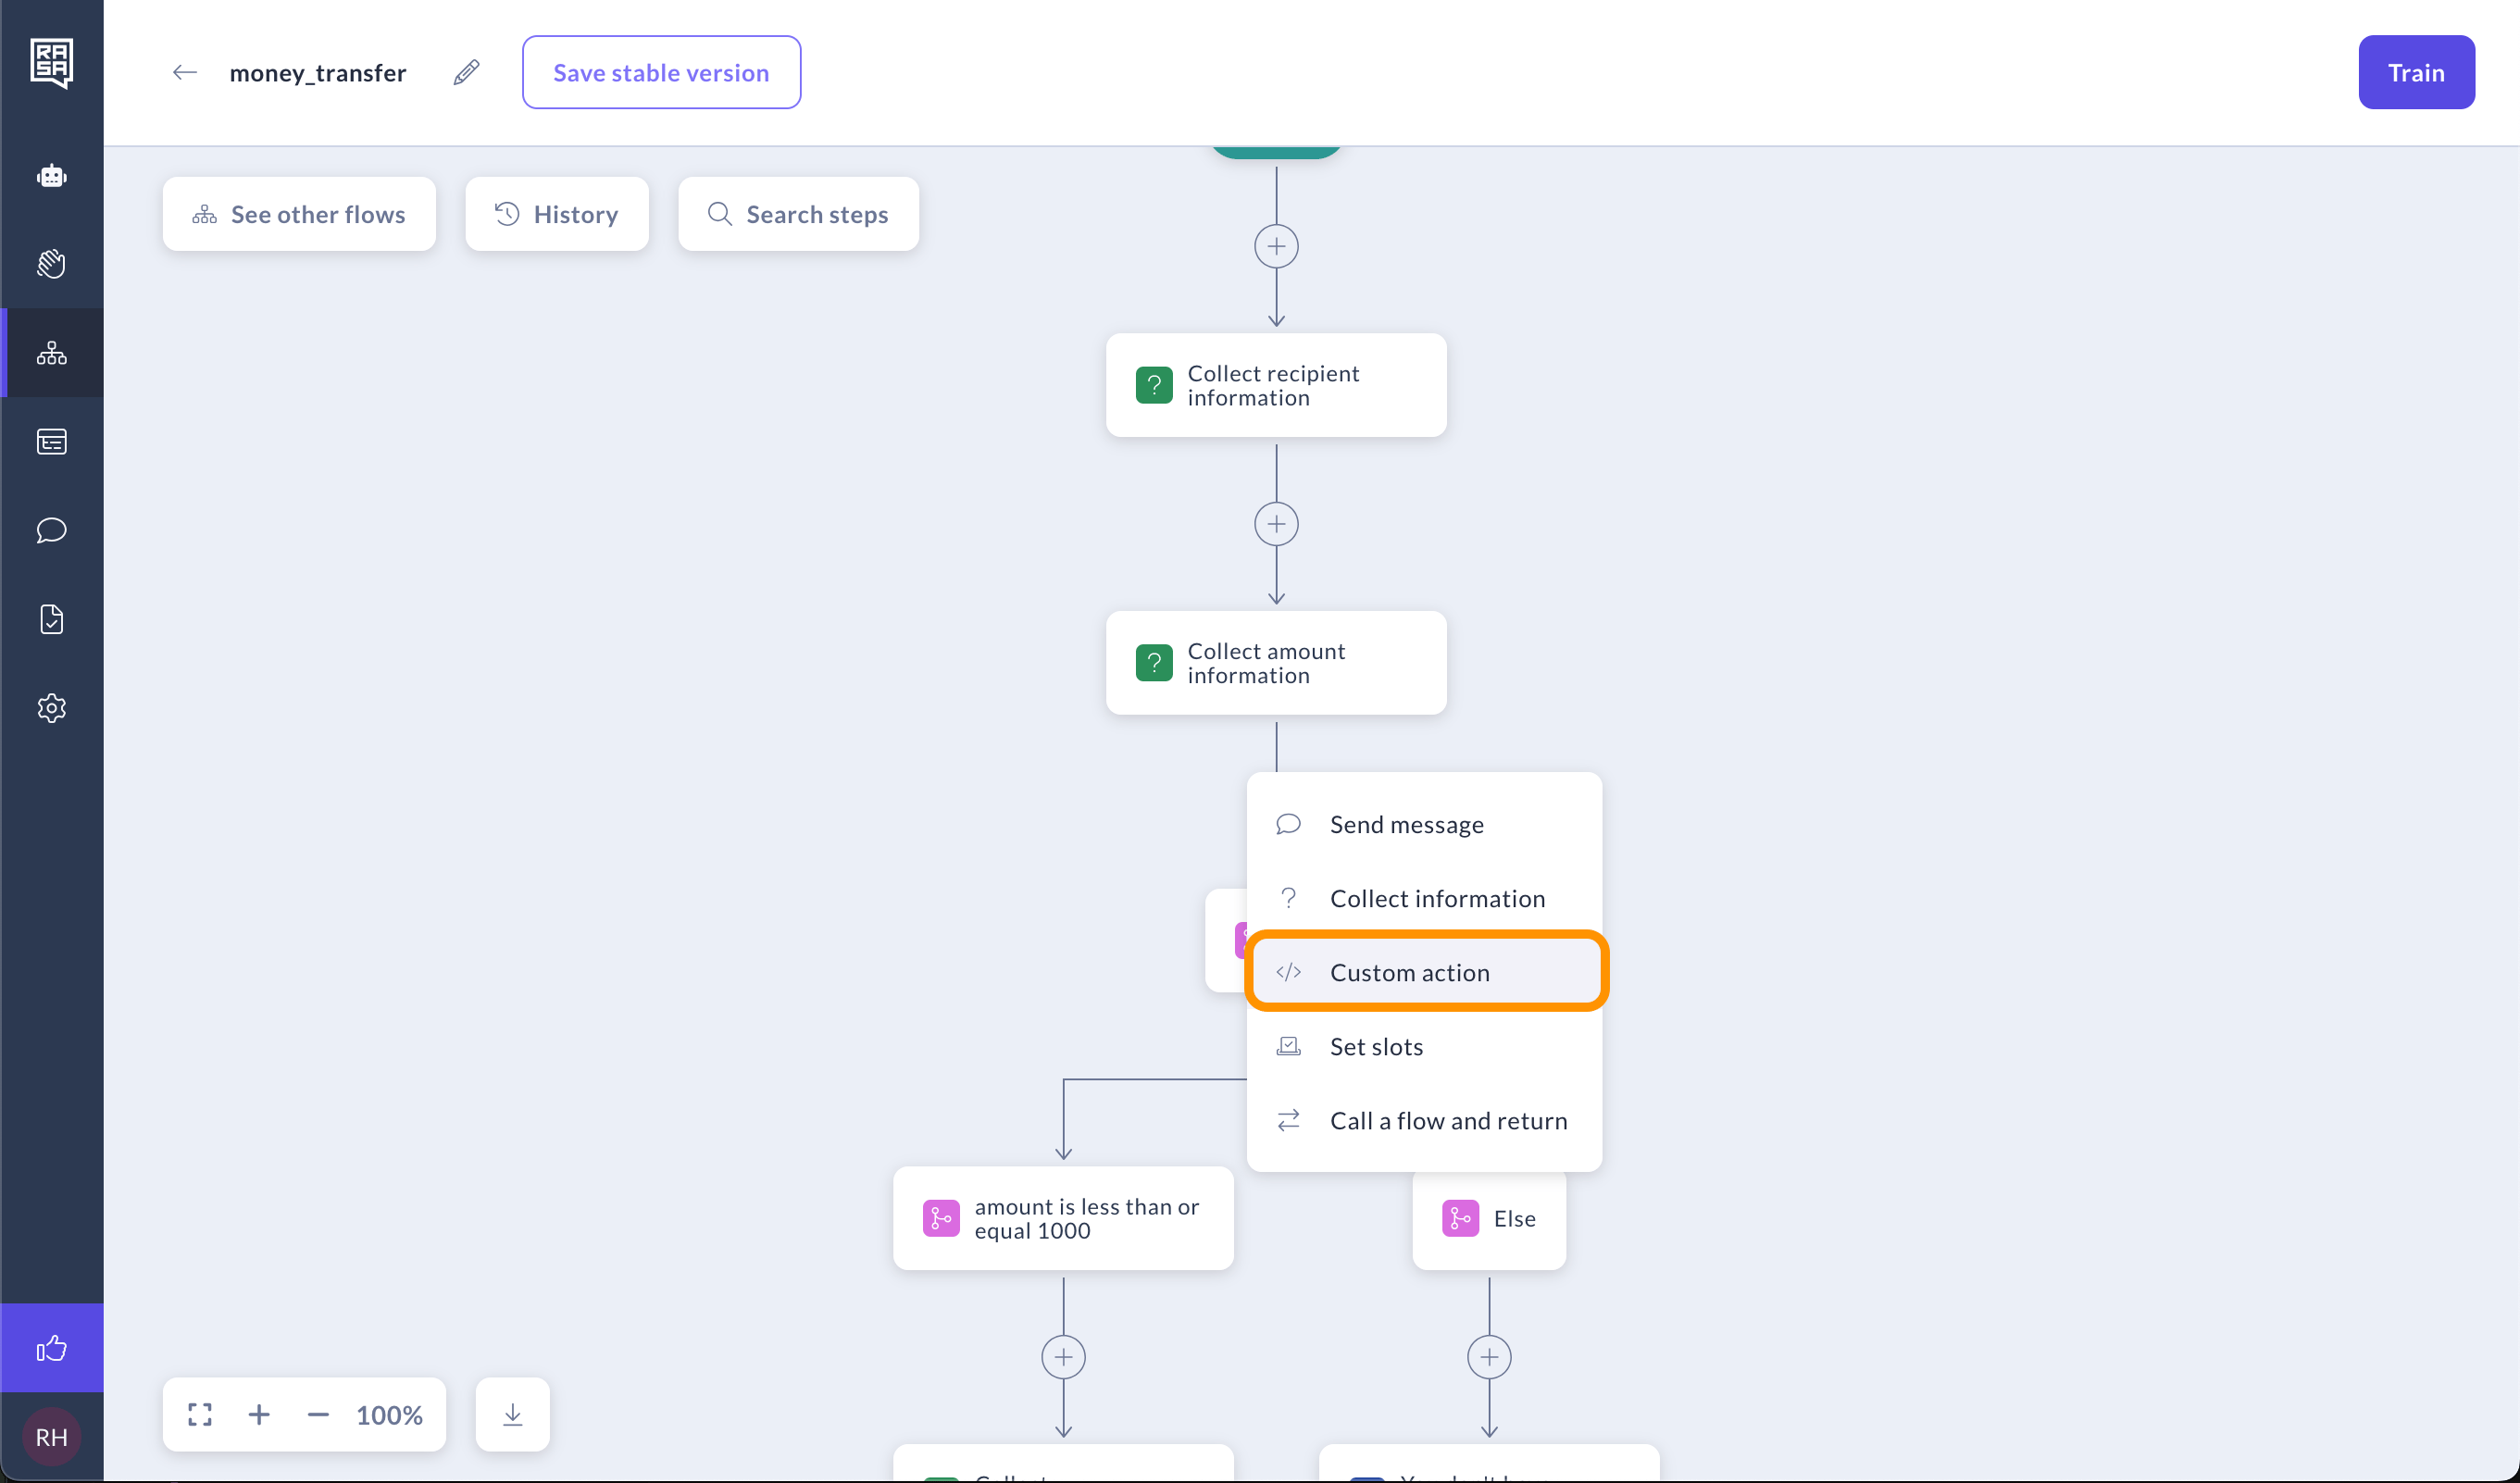 3. Open the custom action dropdown and click "Create custom action."
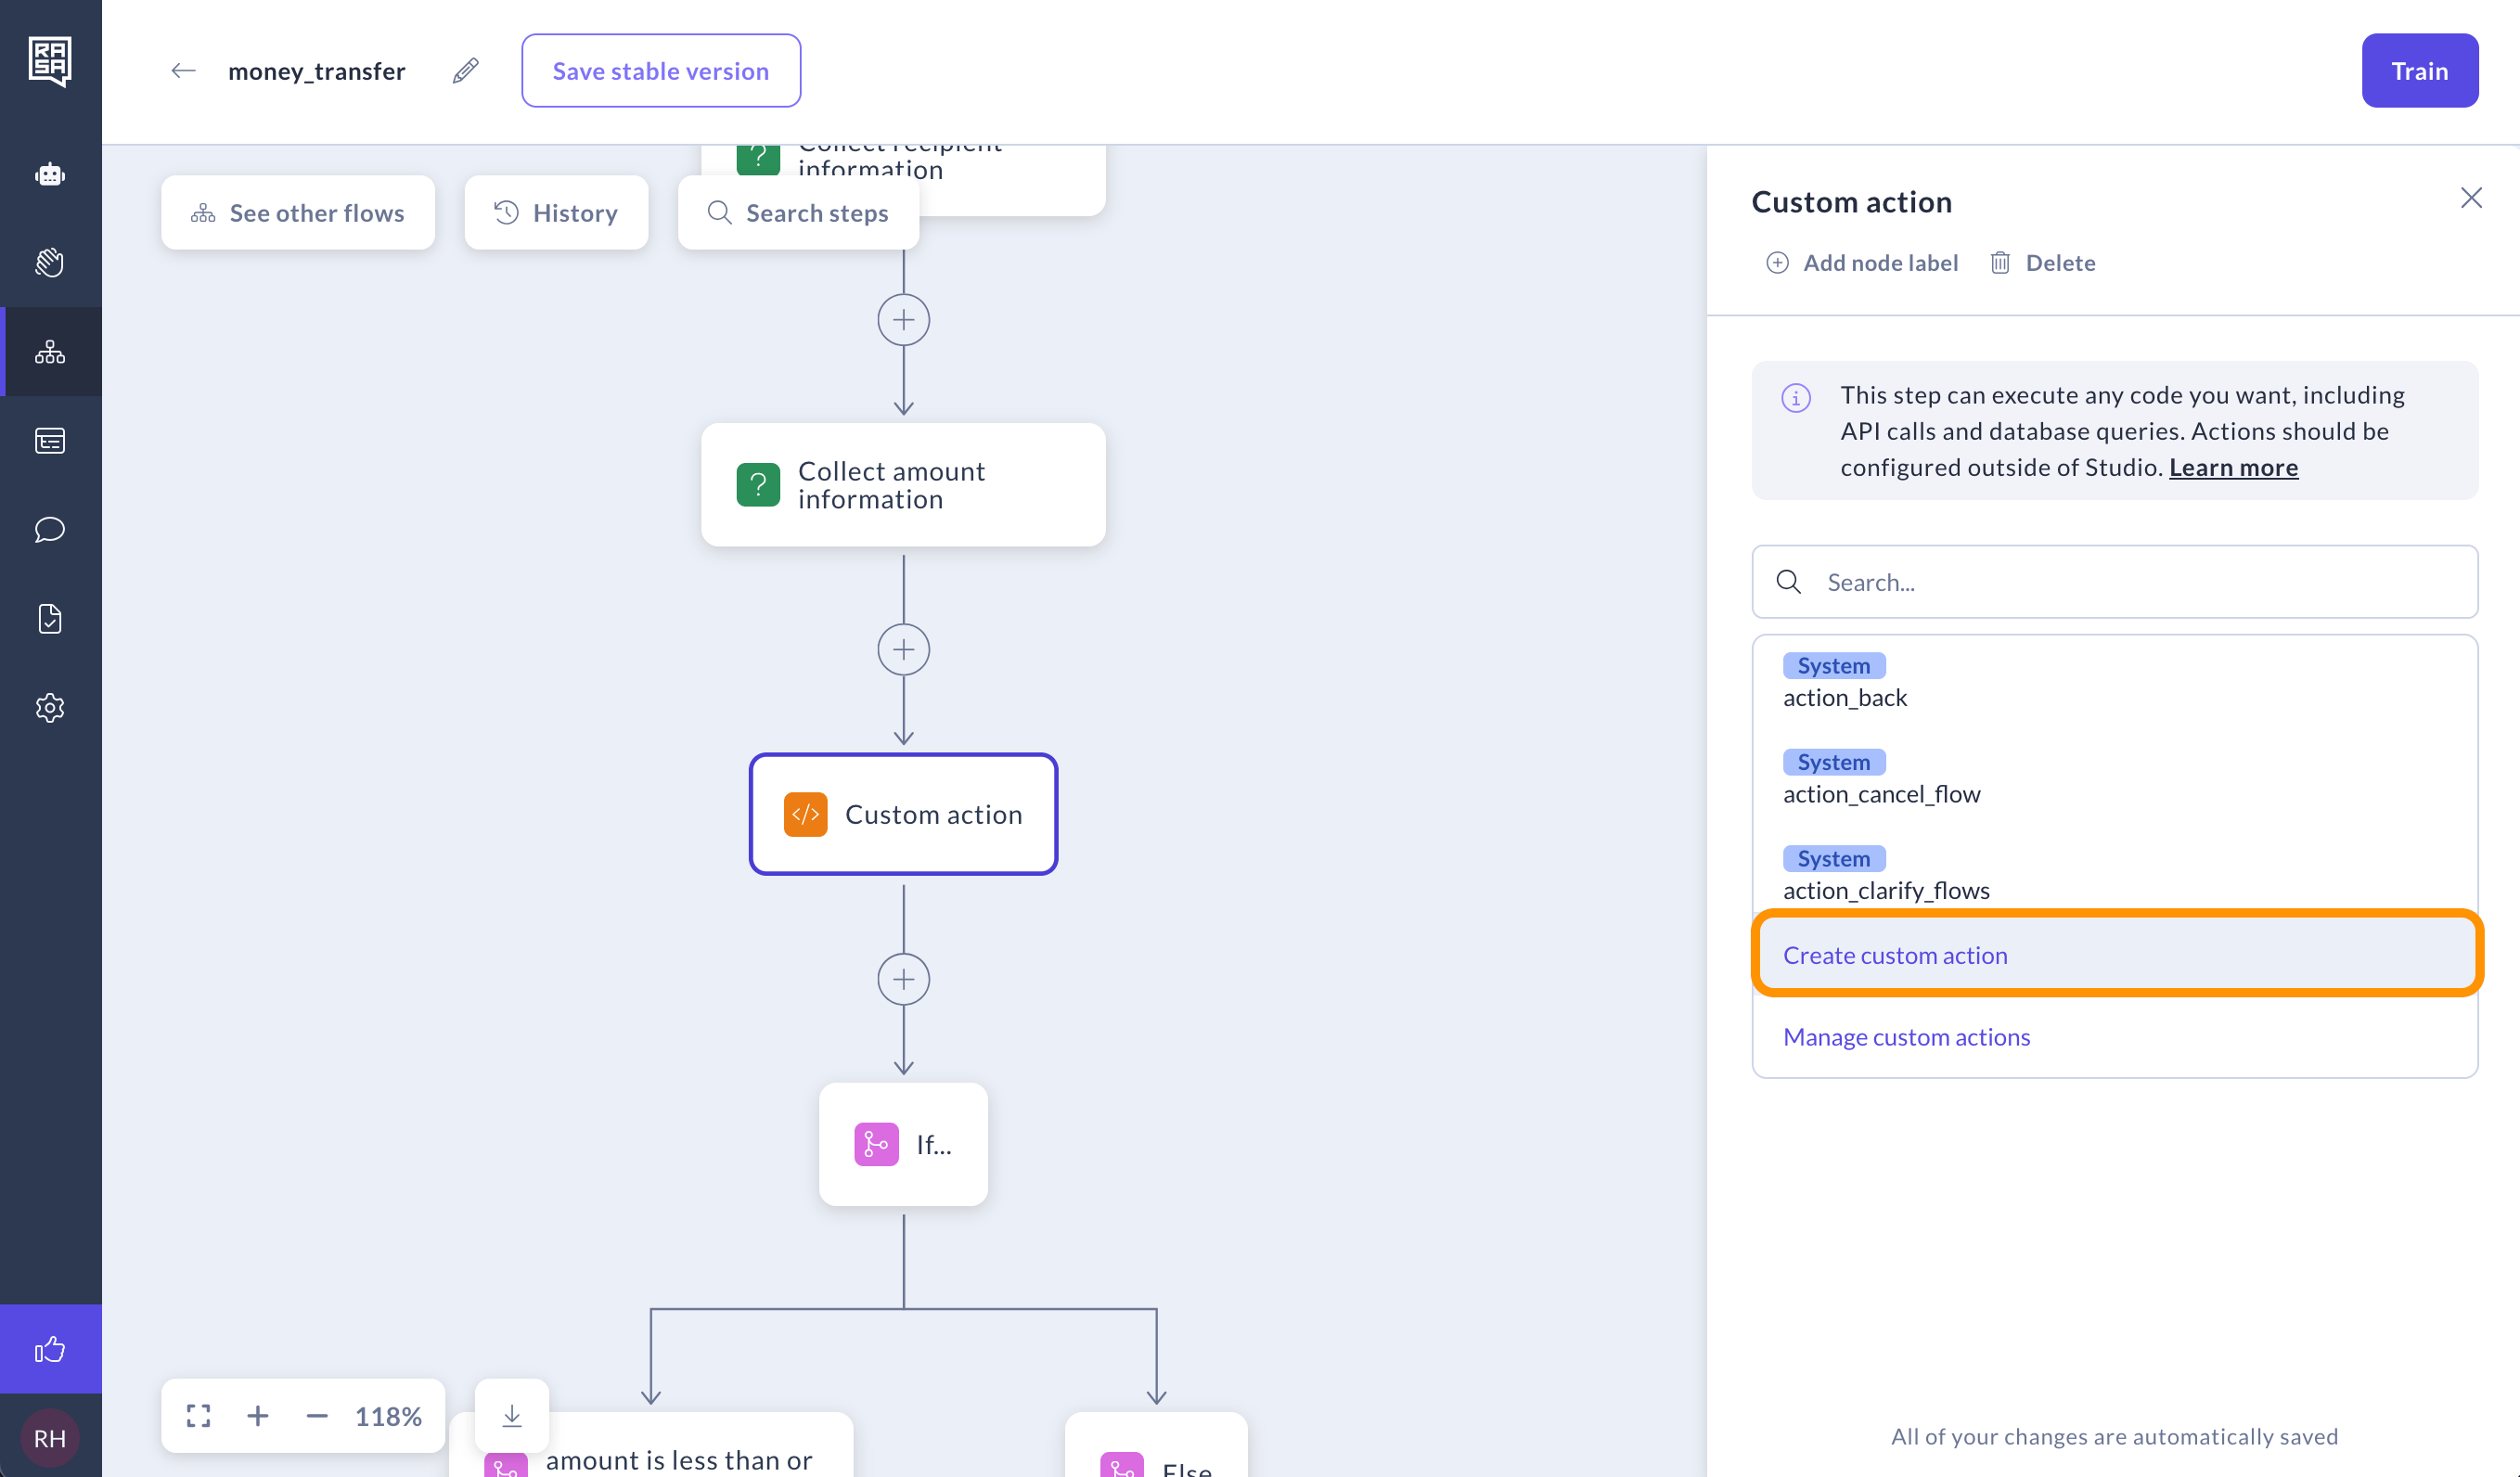 4. Enter the name `action_validate_sufficient_funds` and a description: "Goal: Validate whether the funds are sufficient for the transfer.
Requirement: Check if the slot `amount` is greater than 1000. If true, return a `true` value for the slot `has_sufficient_funds`. If false, return a `false` value for the slot `has_sufficient_funds`."
4. Enter the name `action_validate_sufficient_funds` and a description: "Goal: Validate whether the funds are sufficient for the transfer.
Requirement: Check if the slot `amount` is greater than 1000. If true, return a `true` value for the slot `has_sufficient_funds`. If false, return a `false` value for the slot `has_sufficient_funds`."
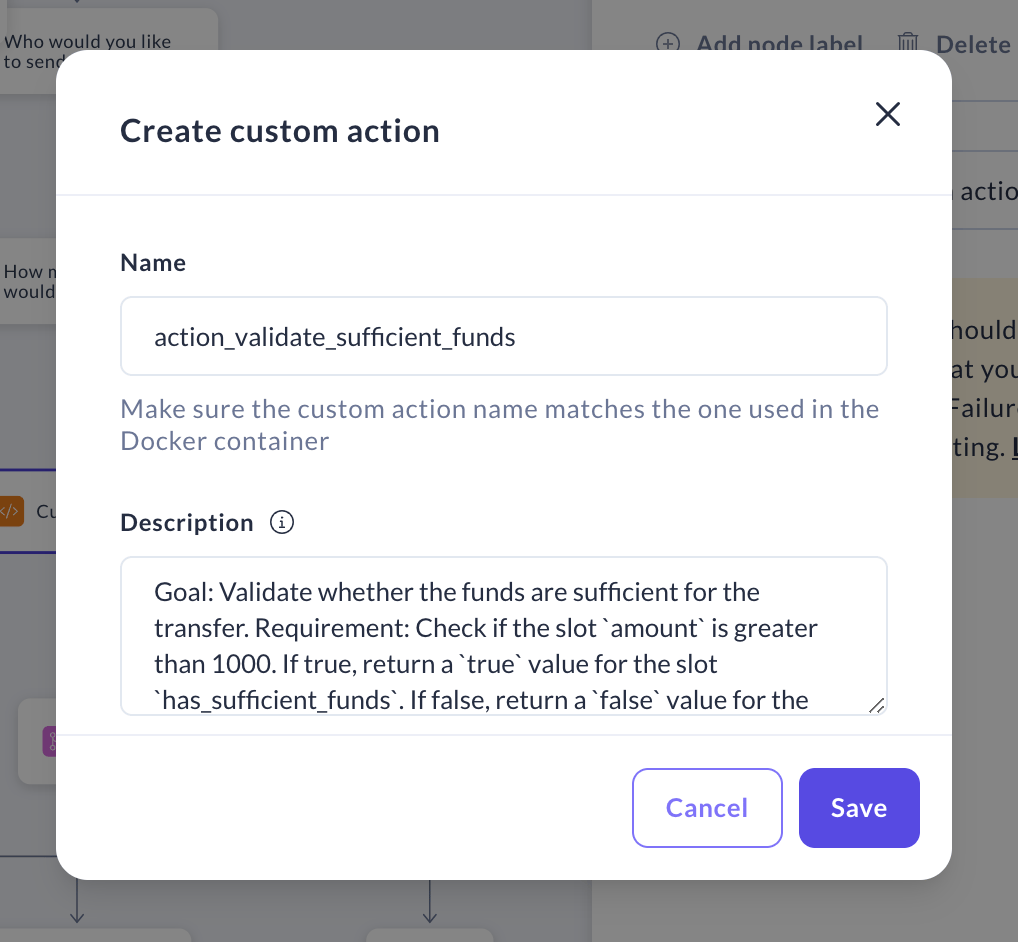 5. Select the first logic branch, the one labeled `amount` `is less_or_equal` `1000`. We’ll need to replace this with validation from the custom action. Instead of `amount`, create a new slot.
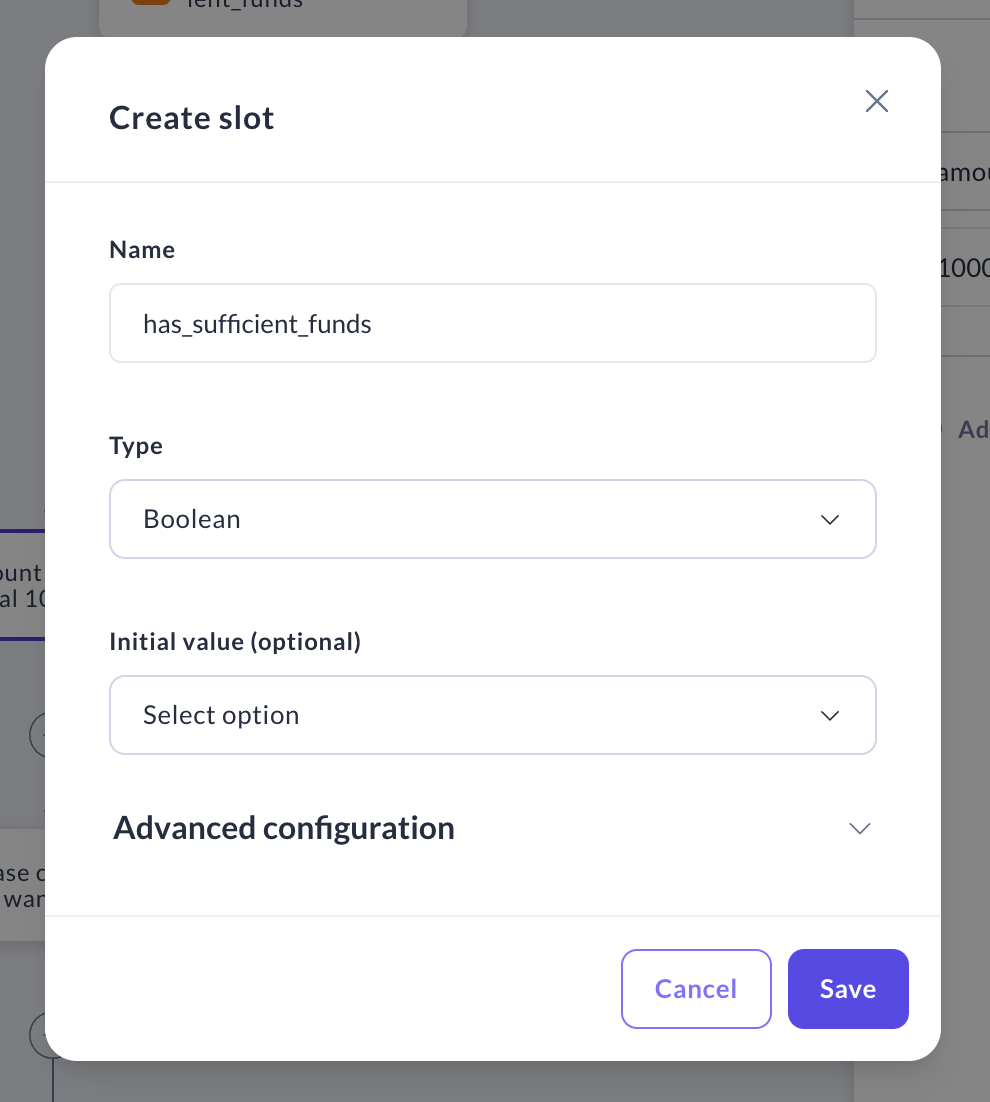
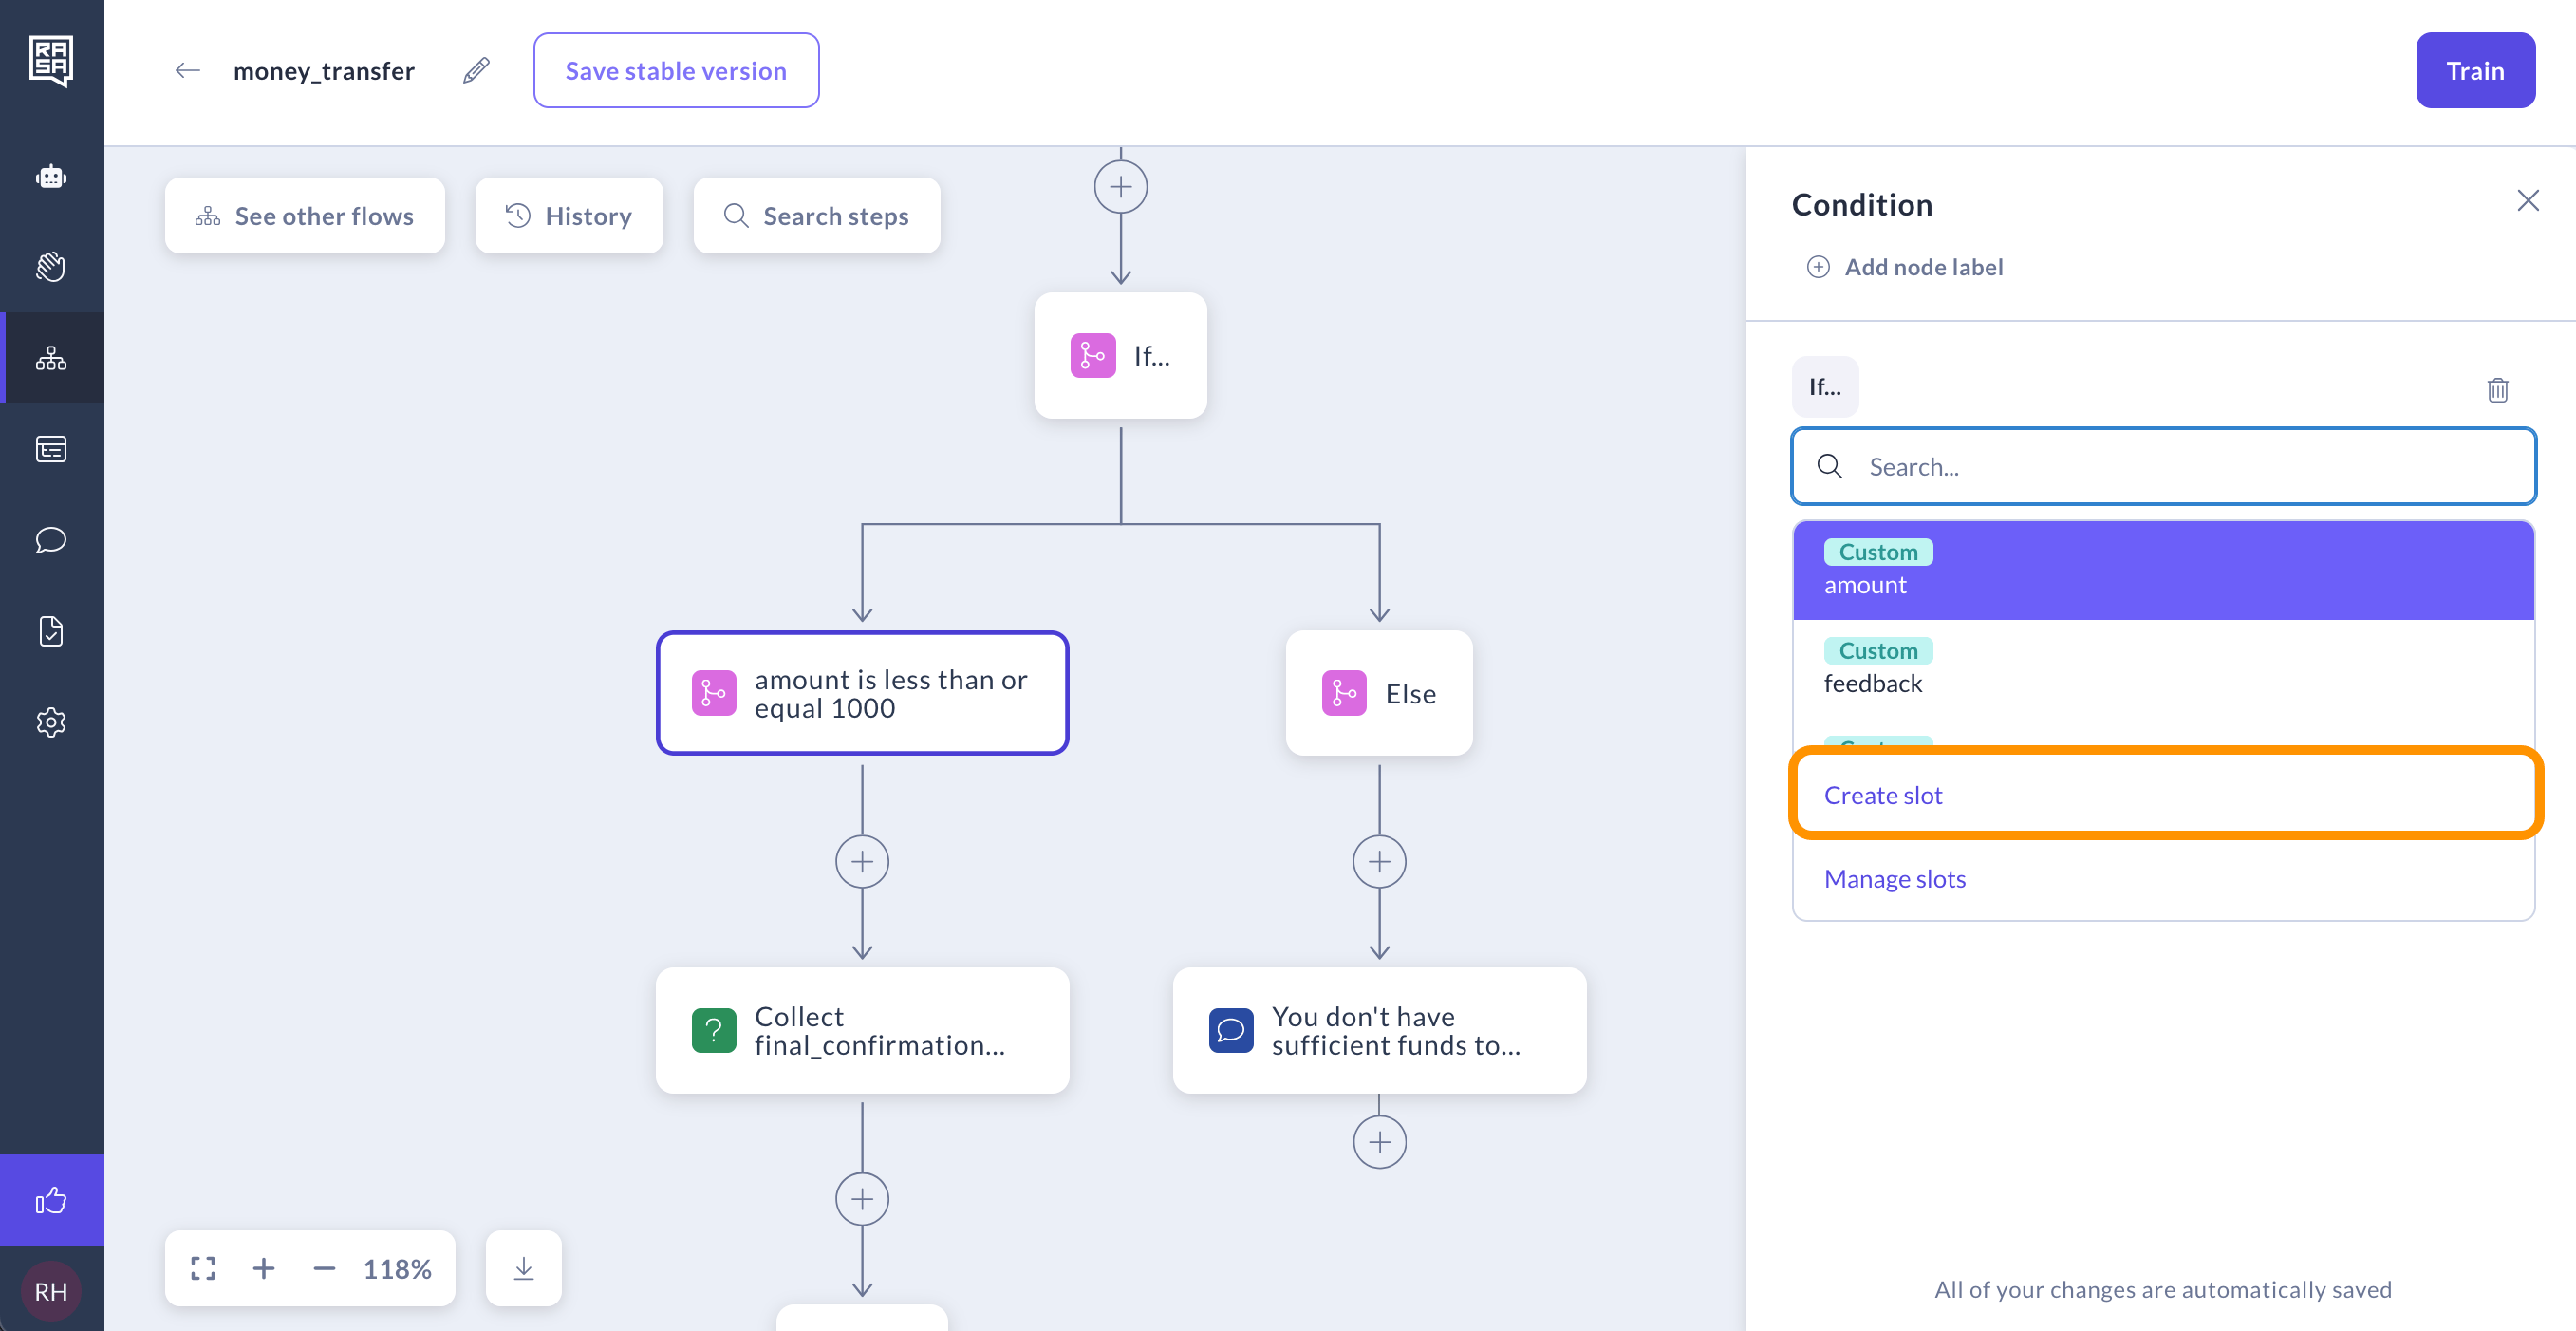 6. Enter slot name `has_sufficient_funds`. Select `Boolean` as a type and click "Save".
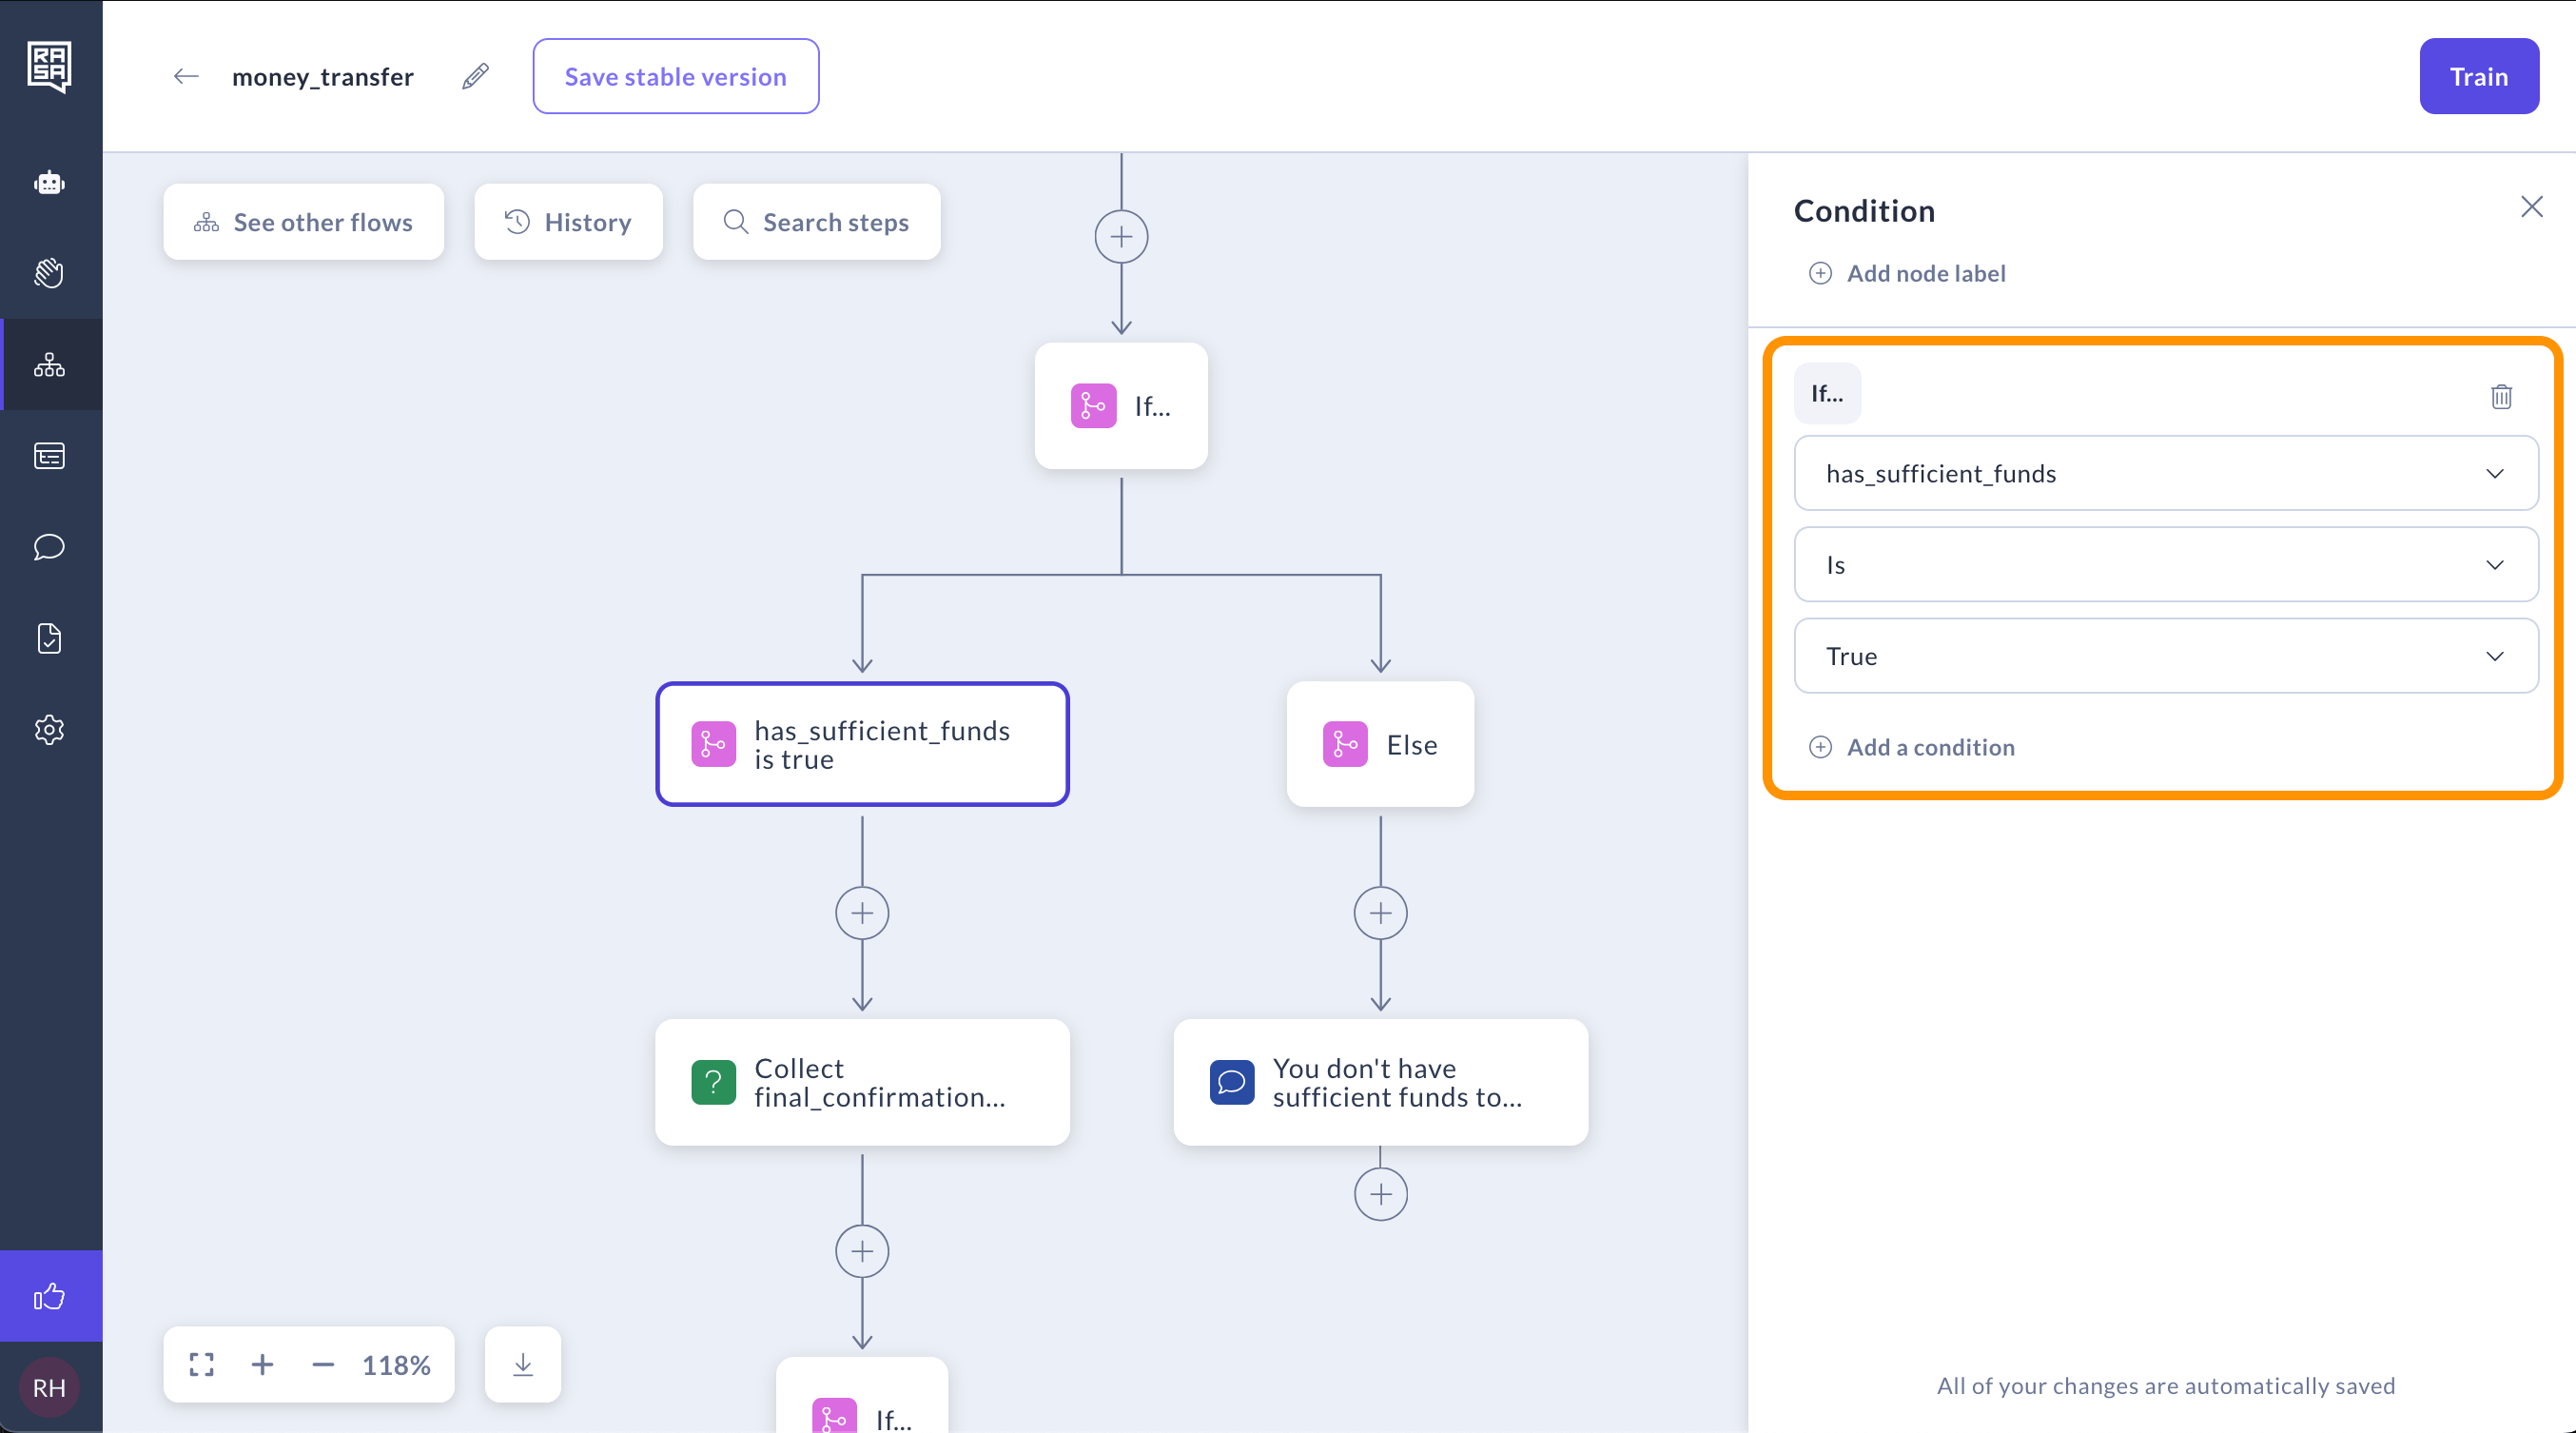
 7. Set the condition so that `has_sufficient_funds` `is` `true`.
 8. Switch to an IDE to set up your own Rasa Action Server.
To do this, you need Rasa Pro 3.7.0 or newer.
**Create a local Rasa project**
```shell theme={null}
rasa init --template calm
```
9. Implement the custom action that validates the amount of funds.
You can copy/paste the following Python code in `actions/actions.py`:
```
# These files contains your custom actions which can be used to run
# custom Python code.
#
# See this guide on how to implement these action:
# https://rasa.com/docs/reference/primitives/custom-actions
from typing import Any, Text, Dict, List
from rasa_sdk import Action, Tracker
from rasa_sdk.executor import CollectingDispatcher
from rasa_sdk.events import SlotSet
class ActionValidateSufficientFunds(Action):
def name(self) -> Text:
return "action_validate_sufficient_funds"
def run(self, dispatcher: CollectingDispatcher,
tracker: Tracker,
domain: Dict[Text, Any]) -> List[Dict[Text, Any]]:
# hard-coded balance for tutorial purposes. in production this
# would be retrieved from a database or an API
balance = 1000
transfer_amount = tracker.get_slot("amount")
has_sufficient_funds = transfer_amount <= balance
return [SlotSet("has_sufficient_funds", has_sufficient_funds)]
```
10. Run action server using Rasa CLI.
```
rasa run actions
```
11. Use a reverse proxy like `ngrok` to expose the action server running on your local machine to the public internet and pass this to Studio for training. This can help you with quick prototyping & testing.
Optionally you can also deploy this action server in your chosen cloud environment and pass the public URL to Studio to connect with your assistant.
```
ngrok http 5055
```
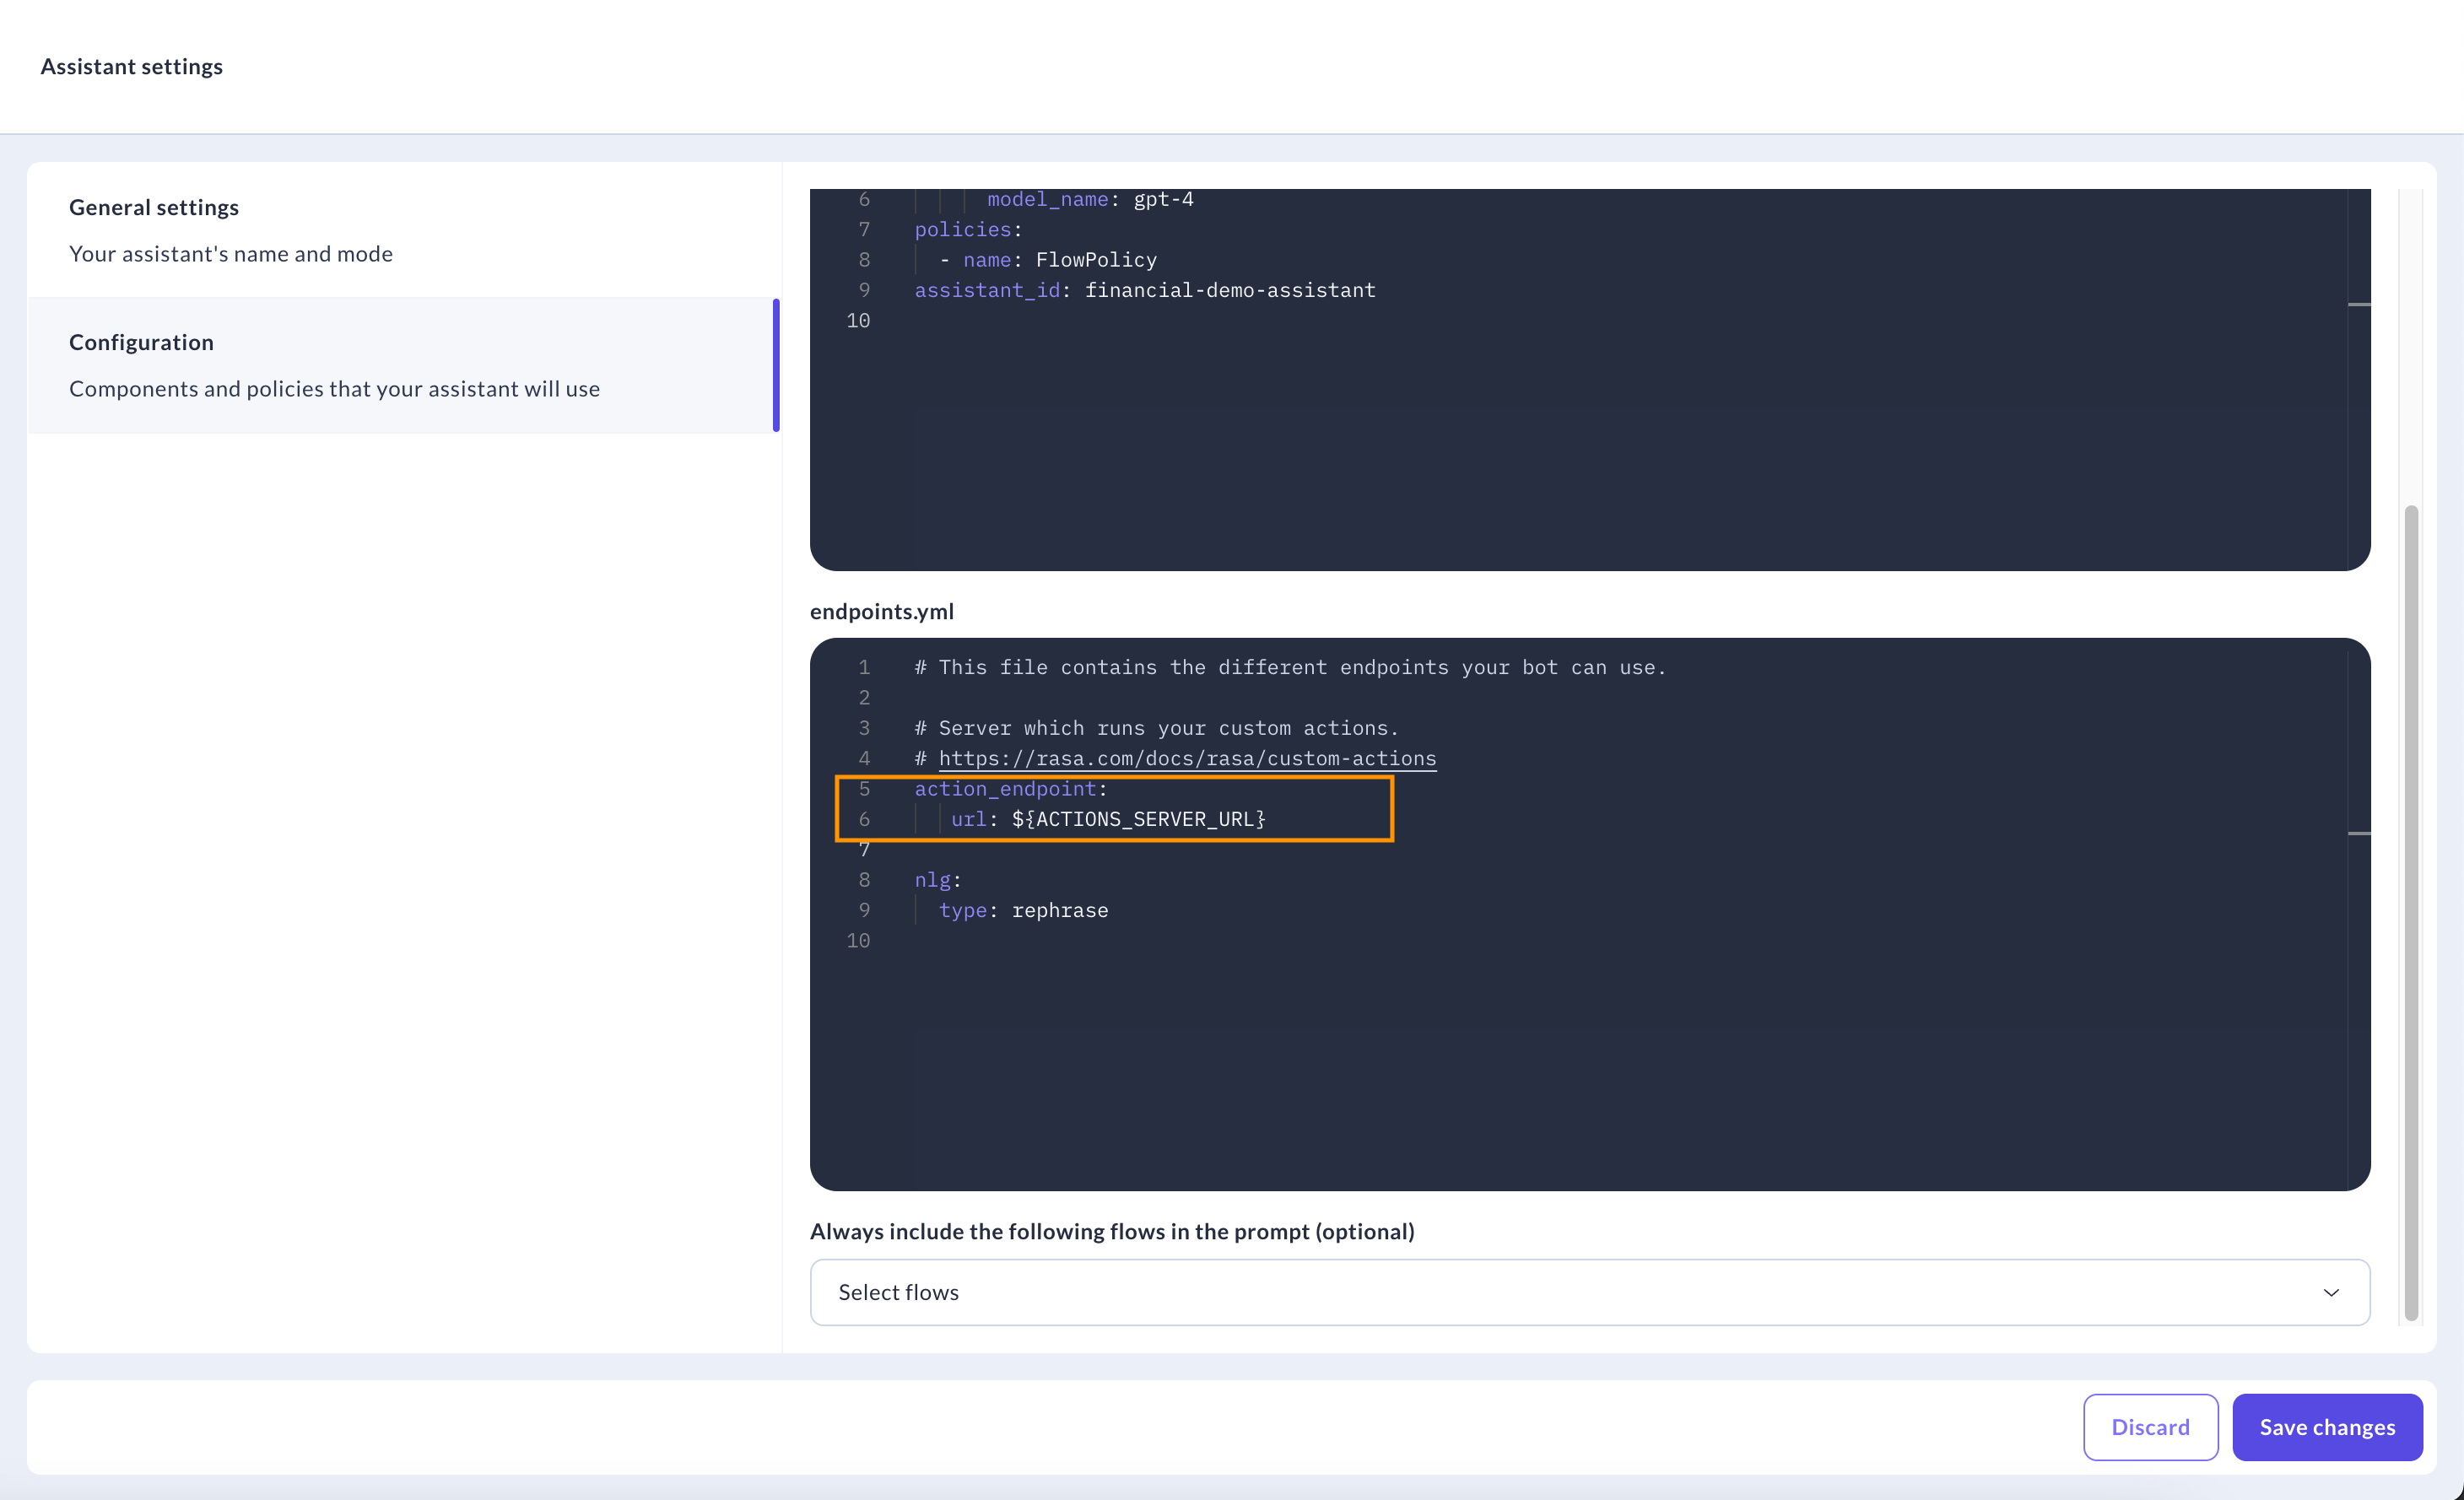
12. You can provide the URL + `/webhook` in **Assistant Settings - Configuration - Action Endpoint**:
8. Switch to an IDE to set up your own Rasa Action Server.
To do this, you need Rasa Pro 3.7.0 or newer.
**Create a local Rasa project**
```shell theme={null}
rasa init --template calm
```
9. Implement the custom action that validates the amount of funds.
You can copy/paste the following Python code in `actions/actions.py`:
```
# These files contains your custom actions which can be used to run
# custom Python code.
#
# See this guide on how to implement these action:
# https://rasa.com/docs/reference/primitives/custom-actions
from typing import Any, Text, Dict, List
from rasa_sdk import Action, Tracker
from rasa_sdk.executor import CollectingDispatcher
from rasa_sdk.events import SlotSet
class ActionValidateSufficientFunds(Action):
def name(self) -> Text:
return "action_validate_sufficient_funds"
def run(self, dispatcher: CollectingDispatcher,
tracker: Tracker,
domain: Dict[Text, Any]) -> List[Dict[Text, Any]]:
# hard-coded balance for tutorial purposes. in production this
# would be retrieved from a database or an API
balance = 1000
transfer_amount = tracker.get_slot("amount")
has_sufficient_funds = transfer_amount <= balance
return [SlotSet("has_sufficient_funds", has_sufficient_funds)]
```
10. Run action server using Rasa CLI.
```
rasa run actions
```
11. Use a reverse proxy like `ngrok` to expose the action server running on your local machine to the public internet and pass this to Studio for training. This can help you with quick prototyping & testing.
Optionally you can also deploy this action server in your chosen cloud environment and pass the public URL to Studio to connect with your assistant.
```
ngrok http 5055
```
12. You can provide the URL + `/webhook` in **Assistant Settings - Configuration - Action Endpoint**:
 13. Train and test your assistants again, as described in **Step 5**.
## Step 7: Editing YAML files \[Advanced]
1. Download YAML files from Studio via Rasa CLI.
To do this, you need Rasa Pro 3.7.0 or newer. We recommend the latest Rasa version in order to use the latest features and improvements.
Starting from Rasa Pro 3.9.8, you can download endpoint and config files as well.
**Note:** Make sure you pass the value for `studio-url`, `realm-name` and `client-id` based on variables used during your Studio deployment
**Create a new folder**
```shell theme={null}
mkdir my-assistant-name
cd my-assistant-name
```
**Configure CLI to connect to Studio**
```shell theme={null}
rasa studio config
```
Provide the Studio URL to configure the connection.
**Log in to Studio as a developer**
```shell theme={null}
rasa studio login
```
Provide the credentials of the user belonging to the developer group.
**Download assistant by assistant-name**
Run the below command to download the assistant files.
```shell theme={null}
rasa studio download
```
This will download the assistant's files to the current directory. The default directory structure will look like this:
```
|-endpoints.yml
|-config.yml
|-domain.yml
|-data
| |-studio_flows.yml
| |-studio_nlu.yml
```
Run `rasa studio download --help` to see the full list of arguments.
2\. Apply changes, you can’t apply in Studio but only in YAML:
* view Tracing (Observability)
* add IVR Channel with AudioCodes
* run End-to-End Test
* use Secrets Management
* use PII Management
* add markers
* use Custom Information Retrieval
* add Conversation Tracking
* add Generation prompt in flow\.yml
3. Train the rasa model locally using rasa CLI.
```
rasa train
```
4. Test your assistant with custom action using Rasa Inspector.
```
rasa inspect
```
## Related topics
- [How to Set Up Your Assistant](/docs/studio/build/set-up-your-assistant.md)
- [Trying Your Assistant](/docs/pro/testing/trying-assistant.md)
- [Developer Quickstart](/docs/learn/quickstart/pro.md)
- [Flow Policy](/docs/reference/config/policies/flow-policy.md)
- [Responses](/docs/reference/primitives/responses.md)
13. Train and test your assistants again, as described in **Step 5**.
## Step 7: Editing YAML files \[Advanced]
1. Download YAML files from Studio via Rasa CLI.
To do this, you need Rasa Pro 3.7.0 or newer. We recommend the latest Rasa version in order to use the latest features and improvements.
Starting from Rasa Pro 3.9.8, you can download endpoint and config files as well.
**Note:** Make sure you pass the value for `studio-url`, `realm-name` and `client-id` based on variables used during your Studio deployment
**Create a new folder**
```shell theme={null}
mkdir my-assistant-name
cd my-assistant-name
```
**Configure CLI to connect to Studio**
```shell theme={null}
rasa studio config
```
Provide the Studio URL to configure the connection.
**Log in to Studio as a developer**
```shell theme={null}
rasa studio login
```
Provide the credentials of the user belonging to the developer group.
**Download assistant by assistant-name**
Run the below command to download the assistant files.
```shell theme={null}
rasa studio download
```
This will download the assistant's files to the current directory. The default directory structure will look like this:
```
|-endpoints.yml
|-config.yml
|-domain.yml
|-data
| |-studio_flows.yml
| |-studio_nlu.yml
```
Run `rasa studio download --help` to see the full list of arguments.
2\. Apply changes, you can’t apply in Studio but only in YAML:
* view Tracing (Observability)
* add IVR Channel with AudioCodes
* run End-to-End Test
* use Secrets Management
* use PII Management
* add markers
* use Custom Information Retrieval
* add Conversation Tracking
* add Generation prompt in flow\.yml
3. Train the rasa model locally using rasa CLI.
```
rasa train
```
4. Test your assistant with custom action using Rasa Inspector.
```
rasa inspect
```
## Related topics
- [How to Set Up Your Assistant](/docs/studio/build/set-up-your-assistant.md)
- [Trying Your Assistant](/docs/pro/testing/trying-assistant.md)
- [Developer Quickstart](/docs/learn/quickstart/pro.md)
- [Flow Policy](/docs/reference/config/policies/flow-policy.md)
- [Responses](/docs/reference/primitives/responses.md)