Fine-tuning Recipe for Command Generator
The feature is available starting
with version 3.10.0 as a beta feature. If you are already familiar with the concepts of the recipe, head over to
the user guide to follow the exact steps needed to try the recipe.
CALM is LLM agnostic which means that when you start building your CALM assistant, you can use an off the shelf powerful LLM like GPT-4o via the OpenAI / Azure OpenAI platform. This is a great way to bootstrap your CALM assistant.
However, as the assistant is scaled up to more use cases and higher traffic, the assistant can run into the following issues -
- Response time of the assistant can be high, spoiling the UX of the end user talking to the assistant.
- Relying on 3rd party LLM providers can mean having to adhere to rate limits imposed by them resulting in some user messages not receiving a reply.
- Some of these powerful LLMs can be quite costly at scale.
Fine-tuning recipe helps you to fine-tune a small language model, for e.g. Llama-3.1 8B, for the task of command generation and integrate it with your CALM assistant. Doing so can help mitigate the issues around response times and LLM availability by a huge margin and lowers down the runtime costs of the assistant as well.
This page provides a conceptual understanding of how the recipe works under the hood. You can refer to the user guide to follow the exact steps needed to try the recipe.
Conceptual Overview
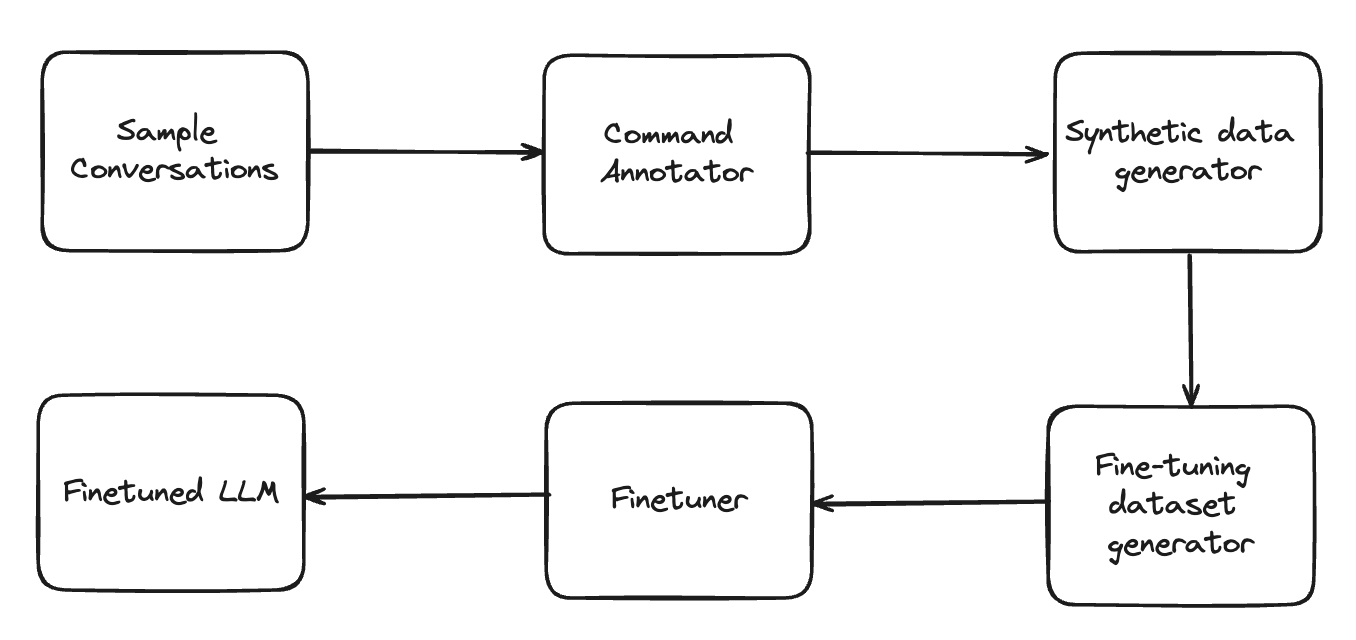
The recipe semi-automates the following steps in order to produce a fine-tuned LLM:
- Annotate commands for each user step for every sample conversation available.
- Generate synthetic data using an LLM to create new conversations by rephrasing every user step.
- Construct a fine-tuning dataset by aggregating prompt and commands of every user step across all generated conversations.
- Fine-tune an LLM on the fine-tuning dataset.
We explain each of the steps in more detail in the following sections.
Preparation
The feature assumes that the user already has a CALM assistant built with the CompactLLMCommandGenerator as
the command generator using a strong LLM like gpt-4o-2024-11-20 and
E2E tests written for the same assistant.
To fine-tune your model effectively, it’s crucial to ensure that your system is comprehensively covered by E2E tests. These tests provide the data needed for fine-tuning. If your E2E tests do not sufficiently cover the assistant's functionality, the fine-tuned model may not perform well due to a lack of relevant training examples.
To address this, you can use an E2E test diagnostic tool, which is available as part of Rasa’s CLI. This tool helps you evaluate whether your E2E tests adequately cover the system's capabilities. It also identifies areas where existing tests may need to be updated or where new tests should be created before proceeding with fine-tuning.
Assessing test coverage for fine-tuning
When reviewing the results of the coverage report, there are three key areas to focus on to ensure your data is suitable for fine-tuning:
- Representation of All Commands: Ensure that all commands your assistant might generate are represented in your tests. If certain commands are not covered, the model may struggle to generate them correctly, having never "seen" these scenarios during training. This can evaluated by inspecting the command coverage histograms
- Demonstration of Desired Skills: Ensure that the skills you want your bot to demonstrate are well-represented in the tests. This ensures the model learns from a variety of examples and scenarios, increasing its robustness and reliability. This can evaluated by inspecting the flow coverage report
By carefully analyzing and expanding your test coverage, you can better prepare your model for fine-tuning, resulting in improved performance and a more reliable assistant.
Command Annotation
If an E2E test is failing on your assistant, it will be ignored by the command annotation module and subsequently by all other steps of the recipe. Hence, please ensure that the assistant is able to successfully pass the input E2E tests. We also recommend using the E2E coverage analysis tool to understand the coverage of the passing tests against the flows of your assistant.
As the first step of the recipe, the command annotator module runs the E2E tests through the CALM assistant
and extracts commands predicted by the CompactLLMCommandGenerator at every user step.
The module is run as part of the
rasa llm finetune prepare-data CLI command
and each E2E test is augmented with the commands the LLM should predict at every user step. The output of this step
converts each E2E test into a conversation finally looking like this:
conversations:
- original_test_case: ../e2e_tests/user_books_car_and_hotel.yml::car booking combined with hotel
  steps:
  - user: I'd like to book a car
    llm_commands:
    - start flow search_rental_car
  - bot: in which city?
  - user: to Basel
    llm_commands:
    - set slot trip_destination Basel
  - bot: When would you like to pick up the car?
  - user: from may 14th to the 17th
    llm_commands:
    - set slot car_rental_start_date "may 14th"
    - set slot car_rental_end_date "may 17th"
  - utter: utter_ask_car_rental_selection
  - user: I'll take the luxury one! looks nice
    llm_commands:
    - set slot car_rental_selection "Avis - Luxury"
Only user steps that the CompactLLMCommandGenerator processes, are annotated with commands and will
end up in the final training dataset for fine-tuning.
For example, if you bypass the CompactLLMCommandGenerator by using
buttons that issue set slot commands the user step will not
be annotated.
Synthetic data generation
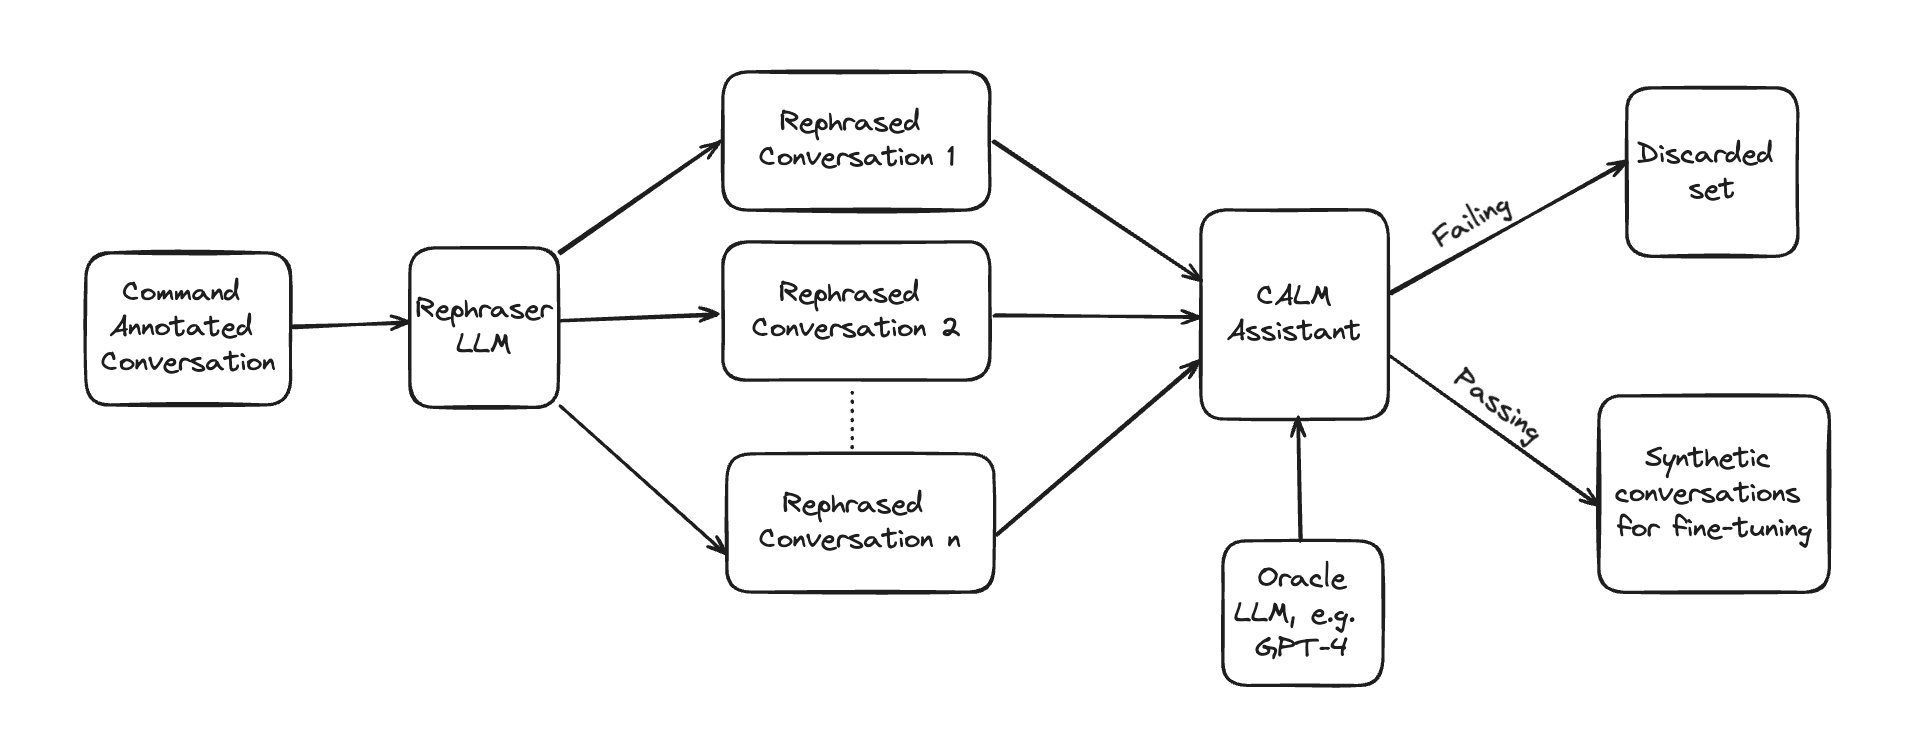
After the user steps of each conversation are annotated with commands, the synthetic data generation module creates n number of rephrases for each annotated user step and validates if the rephrased user step produces the same set of commands as the original user step in the corresponding conversation. Only the rephrased user steps that pass this validation are taken for the fine-tuning dataset.
Note: User utterances that come from buttons, e.g. the user clicked on a button instead of typing a response, are not rephrased and skipped by the synthetic data generator.
The conversation with its failed and passing rephrased user steps looks like this, assuming we produced 3 rephrasings per user step:
conversations:
- original_test_case: ../e2e_tests/user_books_car_and_hotel.yml::car booking combined with hotel
  steps:
  - user: I'd like to book a car
    llm_commands:
    - start flow search_rental_car
    passing_rephrasings:
    - I need to reserve a car.
    - Could I arrange for a car rental?
    - I'm interested in hiring a car.
  - bot: in which city?
  - user: to Basel
    llm_commands:
    - set slot trip_destination Basel
    passing_rephrasings:
    - The destination is Basel.
    - I'd like to go to Basel.
    failed_rephrasings:
    - I'll need the car in Basel.
  - bot: When would you like to pick up the car?
  - user: from may 14th to the 17th
    llm_commands:
    - set slot car_rental_start_date "may 14th"
    - set slot car_rental_end_date "may 17th"
    passing_rephrasings:
    - I need the car from May 14th to May 17th.
    - The rental period will be May 14th to 17th.
    - I'll require the vehicle from the 14th to the 17th of May.
  - utter: utter_ask_car_rental_selection
  - user: I'll take the luxury one! looks nice
    llm_commands:
    - set slot car_rental_selection "Avis - Luxury"
    passing_rephrasings:
    - I'd like to go with the luxury option; it looks appealing.
    - I'll choose the luxury model; it seems nice.
    - I'm opting for the luxury car; it looks great.
Rephraser LLM
The Rephraser LLM uses, by default, gpt-4o-mini to create 10 paraphrases of a user step.
The rephraser uses the following prompt to create the rephrasings:
Objective:
Create multiple rephrasings of user messages tailored to the "{{ test_case_name }}" conversation scenario.

===
Conversation overview:
{{ transcript or "Not provided." }}

===
Task:
Produce {{ number_of_rephrasings }} rephrasings for each user message that are diverse yet contextually appropriate.
Preserve the intent and content, but vary the structure, formality, and detail.
Only rephrase messages prefixed with "{{ user_prefix }}:".

Guidelines:
- Use a variety of expressions from brief and casual to elaborate and formal.
- Vary sentence structures, vocabularies, and expressions creatively.
- Keep the core message intact with concise and simple modifications.

Format:
- Each original user message should be prefixed with "USER: ".
- Enumerate the rephrasing.
- Separate each user message set with a line break.

===
Example output for 3 rephrasings of 2 user messages:
"""
USER: Show invoices
1. I want to see my bills.
2. I mean bills
3. Yes, I want to see the invoices.

USER: I'd like to book a car
1. I need to reserve a car.
2. Could I arrange for a car rental?
3. I'm interested in hiring a car.
"""

===
Expected output:
{{ number_of_rephrasings }} rephrasings for the following {{ number_of_user_messages }} user messages in the expected
format:
{% for message in user_messages -%}
- {{ message }}
{% endfor %}
If you want to modify the prompt or use a different LLM for the Rephraser LLM you can specify a custom config via
the argument --rephrase-config <path-to-config-file> on the CLI command
rasa llm finetune prepare-data.
The default config looks like this
prompt_template: default_rephrase_prompt_template.jina2
llm:
  model: gpt-4o-mini
  provider: openai
You can specify the number of rephrasings per user step by adding the flag --num-rephrases <number> on the CLI
command rasa llm finetune prepare-data.
If you set num-rephrases to 0, the synthetic data generator will be skipped.
As the synthetic data generator adds linguistic diversity to the dataset it is recommended to use at least a couple
of rephrases.
Our internal experiments showed that adding rephrases to the dataset increases the performance of the fine-tuned model.
Validation of rephrased user steps
To validate the rephrased user steps we take the prompt of the original user step and update it, i.e. we replace the original user utterance with the rephrased one. Then the prompt is sent to the same LLM that was used to annotate the conversation. If the response of the LLM after parsing and processing matches the response of the original user step, the rephrased user utterance passes the test and is added to the synthetic conversation dataset for fine-tuning.
Fine-tuning dataset generator
The fine-tuning dataset generator takes passing rephrasings for each user step across all sample conversations and creates new conversations out of them. Each user step in a new conversation is then converted into a data point for fine-tuning. Each data point contains the prompt, which includes the conversation history and the current user message (original or rephrased), and the commands that should be produced by the prompt. Afterwards, the data points are split into a training and validation dataset that can then be used to fine-tune a base LLM.
Every data point is added to the final .jsonl file (train / val) and would look like this:
{
    "prompt": "## Task Description\nYour task is to analyze the current conversation context and generate a list of actions to start new business processes that we call flows, to extract slots, or respond to small talk and knowledge requests.\n\n---\n\n## Available Flows and Slots\nUse the following structured data:\n```json\n{\"flows\":[{\"name\":\"list_bookings\",\"description\":\"list flight bookings - booked flights\"},{\"name\":\"search_rental_car\",\"description\":\"search for rental cars\",\"slots\":[{\"name\":\"trip_destination\"},{\"name\":\"car_rental_start_date\"},{\"name\":\"car_rental_end_date\"},{\"name\":\"car_rental_search_results_readable\"},{\"name\":\"car_rental_selection\",\"description\":\"Car rental option which the user has selected. Must be an exact element of the slot car_rental_search_results_readable. If the user wants an option that isn't listed, do not fill the slot with that value.\"}]},{\"name\":\"welcome\",\"description\":\"greet the user and ask how you can help\"},{\"name\":\"list_skills\",\"description\":\"tell the user what i can do\"},{\"name\":\"goodbye\",\"description\":\"say goodbye to user\"},{\"name\":\"search_hotel\",\"description\":\"search for hotels\",\"slots\":[{\"name\":\"trip_destination\"},{\"name\":\"hotel_price_range\"},{\"name\":\"hotel_start_date\",\"description\":\"check in date for the hotel. Do not fill this slot unless user explicitly specifies it in the conversation.\"},{\"name\":\"hotel_end_date\",\"description\":\"check out date for the hotel. Do not fill this slot unless user explicitly specifies it in the conversation.\"},{\"name\":\"hotel_search_results_readable\"},{\"name\":\"hotel_name\",\"description\":\"Name of the hotel which the user has selected. Must be an exact element of the slot \"hotel_search_results_readable\". If the user wants an option that isn't listed, do not fill the slot with that value.\"}]},{\"name\":\"book_excursion\",\"description\":\"search and book an excursion\",\"slots\":[{\"name\":\"trip_destination\"},{\"name\":\"excursion_name\",\"description\":\"use the official name as stated by the assistant\"}]},{\"name\":\"change_flight\",\"description\":\"change an existing booking to a new flight\",\"slots\":[{\"name\":\"flight_search_start_date\",\"description\":\"start date for flight search. Refer to the current time available and always output this in the ISO format.\"},{\"name\":\"flight_search_end_date\",\"description\":\"end date for flight search. Refer to the current time available and always output this in the ISO format.\"},{\"name\":\"selected_flight_id\",\"description\":\"the selected id number from the search results presented to the user.)\"}]},{\"name\":\"out_of_scope\",\"description\":\"trigger this if the user asks for something we don't have a flow for or an existing command does not apply for it. Conversation repair flow for off-topic interactions that won't disrupt the main conversation. should not respond to greetings or anything else for which there is a flow defined or an existing command is apt for it.\"}]}\n```\n\n---\n\n## Available Actions:\n* `start flow flow_name`: Starting a flow. For example, `start flow transfer_money` or `start flow list_contacts`.\n* `set slot slot_name slot_value`: Slot setting. For example, `set slot transfer_money_recipient Freddy`. Can be used to correct and change previously set values.\n* `cancel flow`: Cancelling the current flow.\n* `disambiguate flows flow_name1 flow_name2 ... flow_name_n`: Disambiguate which flow should be started when user input is ambiguous by listing the potential flows as options. For example, `disambiguate flows list_contacts add_contact remove_contact ...` if the user just wrote \"contacts\".\n* `provide info`: Responding to the user's questions by supplying relevant information, such as answering FAQs or explaining services.\n* `offtopic reply`: Responding to casual or social user messages that are unrelated to any flows, engaging in friendly conversation and addressing off-topic remarks.\n* `hand over`: Handing over to a human, in case the user seems frustrated or explicitly asks to speak to one.\n\n---\n\n## General Tips\n* Do not fill slots with abstract values or placeholders.\n* For categorical slots try to match the user message with allowed slot values. Use \"other\" if you cannot match it.\n* Set the boolean slots based on the user response. Map positive responses to `True`, and negative to `False`.\n* Extract text slot values exactly as provided by the user. Avoid assumptions, format changes, or partial extractions.\n* Only use information provided by the user.\n* Use clarification in ambiguous cases.\n* Multiple flows can be started. If a user wants to digress into a second flow, you do not need to cancel the current flow.\n* Do not cancel the flow unless the user explicitly requests it.\n* Strictly adhere to the provided action format.\n* Focus on the last message and take it one step at a time.\n* Use the previous conversation steps only to aid understanding.\n\n---\n\n## Current State\nUse the following structured data:\n```json\n{\"active_flow\":\"\",\"current_step\":{\"requested_slot\":\"\",\"requested_slot_description\":\"\"},\"slots\":[{\"name\":\"transfer_money_recipient\",\"value\":\"John\",\"type\":\"text\",\"description\":\"the name of a person\"},{\"name\":\"transfer_money_amount_of_money\",\"value\":\"120\",\"type\":\"text\",\"description\":\"the amount of money without any currency designation\"},{\"name\":\"transfer_money_final_confirmation\",\"value\":\"undefined\",\"type\":\"text\",\"description\":\"accepts True or False\"}]}\n```\n\n---\n\n## Conversation History\nUSER: I'd like to book a car\n\n---\n\n## Task\nCreate an action list with one action per line in response to the user's last message: \"\"\"I'd like to book a car\"\"\".\n\nYour action list:\n",
    "completion": "start flow search_rental_car"
}
Creating new conversations
Let's take a look at an example to understand how we construct the new conversations. Take this original conversation:
- user: I'd like to book a car
- bot: in which city?
- user: to Basel
- bot: When would you like to pick up the car?
- user: from may 14th to the 17th
- utter: utter_ask_car_rental_selection
- user: I'll take the luxury one! looks nice
and the following rephrasings per user step:
| orginal user message | passing rephrase 1 | passing rephrase 2 | passing rephrase 3 |
|---|---|---|---|
| I'd like to book a car | I need to reserve a car. | Could I arrange for a car rental? | I'm interested in hiring a car. |
| to Basel | The destination is Basel. | I'd like to go to Basel. | |
| from may 14th to the 17th | The rental period will be May 14th to 17th. | I need the car from May 14th to May 17th. | I'll require the vehicle from the 14th to the 17th of May. |
| I'll take the luxury one! looks nice | I'd like to go with the luxury option; it looks appealing. | I'll choose the luxury model; it seems nice. | I'm opting for the luxury car; it looks great. |
To construct a new conversation, we combine passing rephrases at the same index position to build a new conversation. If no passing rephrase exists for a particular user step at a specific index, we reset the index for the user step and use the first passing rephrase for that user step again.
So, the final conversations would look like this:
# conversation 1 (original conversation)
- user: I'd like to book a car
- bot: in which city?
- user: to Basel
- bot: When would you like to pick up the car?
- user: from may 14th to the 17th
- utter: utter_ask_car_rental_selection
- user: I'll take the luxury one! looks nice

# conversation 2
- user: I need to reserve a car.
- bot: in which city?
- user: The destination is Basel.
- bot: When would you like to pick up the car?
- user: The rental period will be May 14th to 17th.
- utter: utter_ask_car_rental_selection
- user: I'd like to go with the luxury option; it looks appealing.

# conversation 3
- user: Could I arrange for a car rental?
- bot: in which city?
- user: I'd like to go to Basel.
- bot: When would you like to pick up the car?
- user: I need the car from May 14th to May 17th.
- utter: utter_ask_car_rental_selection
- user: I'll choose the luxury model; it seems nice.

# conversation 4
- user: I'm interested in hiring a car.
- bot: in which city?
- user: The destination is Basel.
- bot: When would you like to pick up the car?
- user: I'll require the vehicle from the 14th to the 17th of May.
- utter: utter_ask_car_rental_selection
- user: I'm opting for the luxury car; it looks great.
Split data into training and validation
By default we take 80% of the fine-tuning data for the training dataset.
The remaining data points go to the validation set.
During that process we ensure that all commands present in the fine-tuning dataset will end up at least once in the
training dataset.
This ensures that the fine-tuned model sees all available commands during training.
You can update the fraction of data that goes into the training dataset by setting the flag
--train-frac <float-number> on the CLI command rasa llm finetune prepare-data.
When you fine-tune a base model, the base model expects the data to be in a specific format.
By default the training and validation datasets are in the
instruction data format.
If you want to use the conversational data format
instead set the flag --output-format conversational on the CLI command rasa llm finetune prepare-data.
Model Fine-tuning
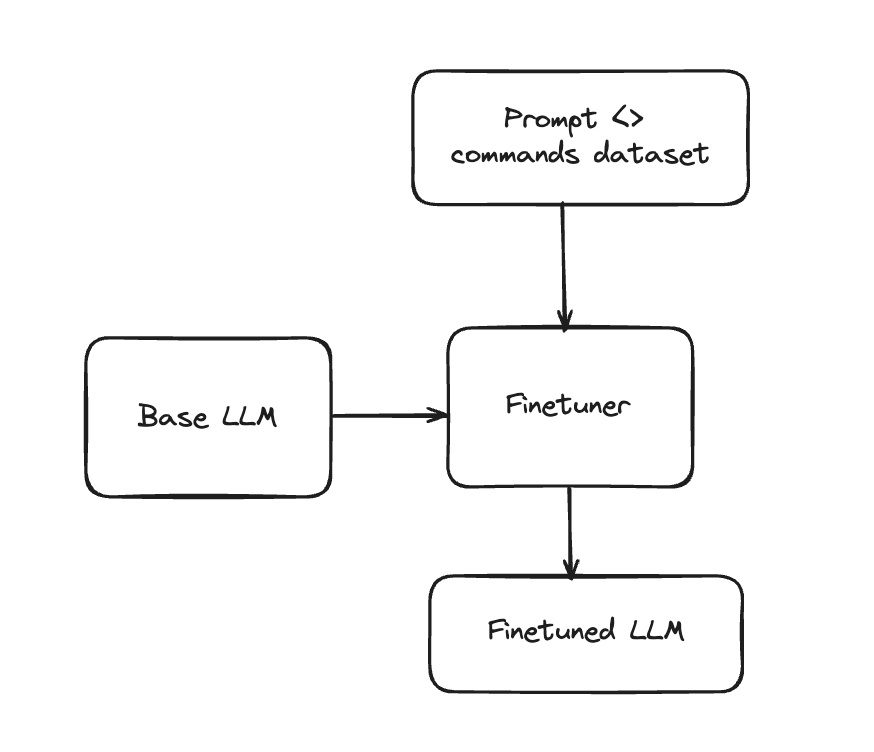
Once you have the dataset prepared, the next logical step is to actually fine-tune a small enough open source LLM to help it excel at the task of command generation. Specifically, parameter efficient finetuning using LoRA is employed with input being the prompt prepared for every data point in the previous step and and the output being the set of commands to be predicted by the LLM.
Rasa provides this example python notebook as a reference for fine-tuning. It has been tested on GCP Vertex AI and AWS Sagemaker, it can be easily adapted to work on other cloud platforms. By default, it:
- Uses the Unsloth library as it comes with a lot of optimizations for memory and speed.
- Downloads a base model from huggingface hub. Using Llama-3.1 8b Instruct model is recommended.
- Loads the base model in 8 bit using BitsandBytes library for efficient memory usage.
- Provides default hyperparameters that have worked well in our internal experiments.
- A chat template will be persisted if the model does not already have one.
- Runs the fine-tuning and visualizes loss as the metric to monitor across training and validation set. When testing this step on an NVIDIA A100 with the default hyperparameters, it took around 12 minutes to perform fine-tuning with a training dataset containing around 500 examples. Hence, this step is relatively cheap and quick to run.
- Allows persisting the model on the cloud.
CALM exclusively utilizes the chat completions endpoint of the model server, so it's essential that the model's tokenizer includes a chat template. Models lacking a chat template will not be compatible with CALM.