Genesys Cloud
The Genesys Cloud connector is available from Rasa Pro 3.12
There are two ways to connect a Voice Assistant to Genesys Cloud:
-
Using the built-in Genesys Channel to stream conversation audio from Genesys to your Rasa Assistant. This is a Voice-Stream channel connector. Steps for setting this up are described in section Stream Conversation Audio From Genesys
-
A Voice Ready channel connector can also be made using Data Actions where transcription (speech-recognition) and speech-to-text is handled within Genesys Architect. Go to Integration With Data Action section for more details
Stream Conversation Audio From Genesys
Genesys Channel Connector allows you to stream conversation audio to your Voice Assistant from Genesys using AudioConnector Integration.
Before you begin, ensure:
- You have AudioConnector Integration available on your Genesys Account
- You have the required permissions for creating Architect flows for Inbound or Outbound Calls
- You have permissions to create/modify Call Routing
Prepare Rasa Assistant
Create a file credentials.yml at the root of Rasa assistant project
and add Genesys channel configuration:
# websocket_url: wss://<your-domain>/webhooks/genesys/websocket
genesys:
  api_key: "<api_key>"
  client_secret: "<client_secret>"
  server_url: "<your-domain>"
  asr:
    name: deepgram
  tts:
    name: cartesia
wss or ws?Depending on your domain's TLS configuration, the WebSocket URL could be
ws://example.com or wss://example.com.
Genesys channel configuration accepts the following properties:
-
api_key(required): API Key configured on Genesys with AudioConnector integration. It is the value ofX-Api-Keyheader. -
server_url(required): The domain at which Rasa server is available. Do not include protocol (ws:// or wss://). For example, if your server is deployed onhttps://example.ngrok.app,server_urlshould beexample.ngrok.app. -
asr(required): Configuration for Automatic Speech Recognition. See Speech Integrations for a list of ASR engines for which Rasa provides built-in integration with. -
tts(required): Configuration for Text-To-Speech. See Speech Integrations for a list of TTS engines for which Rasa provides built-in integration with. -
client_secret(optional): Client Secret configured on Genesys with AudioConnector Integration. It is used to sign connection requests. It must be base-64 encoded. Signature verification is skipped ifclient_secretis not provided.
You can run the assistant using the command rasa run.
You can also run it with a development inspector using rasa run --inspect.
To see all available parameters, use rasa run -h.
Install AudioConnector Integration
To install & configure AudioConnector Integration,
-
Go to Integrations Page, it should be listed on Genesys Cloud Admin Home.
-
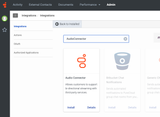
Click "+ Integrations" button on the top right corner to install a new Integration.
-
Search for "AudioConnector" and install it. If you cannot find it, make sure that your Genesys Account has access to it. You might want to speak to your Genesys Account Manager or Customer Support if you have further issues.
-
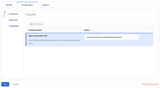
Now that you have installed AudioConnector Integration, you can add an appropriate name and description. Go to the Configuration page to set a Base Connection URI to your Rasa Assistant, this would be the domain where your assistant is deployed.
The webhook URL will be in the format, (attention, with a trailing slash!)
- With TLS:
wss://example.com/webhooks/genesys/ - Without TLS:
ws://example.com/webhooks/genesys/
- With TLS:
If the Rasa WebSocket URL is wss://<your-domain>/webhooks/genesys/websocket.
In this documentation we split it into:
- Base URI:
wss://<your-domain>/webhooks/genesys/ - Connector ID:
websocket
However any other combination should also work just OK.
-
Advanced Tab can be left blank. In Credentials tab, create a credential with an API Key and an optional client secret.
-
Hit Save button and change the status of Integration to Active. You will not see the Integration on Architect if it is not active.
Create a Call Flow in Architect
Once you have installed the AudioConnector Integration, you can use it in a Call Flow with Genesys Architect.
Create a new call flow in Architect. In this call flow, create a reusable
task. This task should use "Call Audio Connector" action from Toolbox (Listed under "🤖 Bot"). Set the Connector ID to websocket
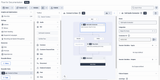
Ensure that the Reusable Task is connected to an option in the Main Menu. Once you are done, "Publish" the flow.
Set Call Routing
If you have created an Inbound Call Flow in the previous step, then you will need to setup a Call Route to connect a Phone Number to this Call Flow.
-
Navigate to Admin Home > Routing > Call Routing.
-
Create a new Call Route or modify an existing one. Select Inbound numbers that you would like to activate for the flow.
In case you do not see any phone numbers, please reach out to a Genesys Expert within your organization or to Genesys Support. It could be possible that the DID numbers are not made available for Call Routing
- In the section "What call flow should be used?" select the Architect flow that you created in the previous step.
Once you save the call route, you should be able to call the phone number to connect to the Architect flow you created. Using the options in the Main Menu, you can connect to your Rasa voice assistant.
Rate Limits
Audio is sent to Genesys over WebSocket as binary messages. Genesys enforces rate limits on binary messages which could impact your assistant.
These rate limits are,
-
The allowed average rate per second of inbound binary data (
global.inbound.binary.average.rate.per.second): 5 -
The maximum number of inbound binary data messages that can be sent instantaneously (
global.inbound.binary.max): 25
You can read more about these rate limits on Genesys Documentation
To avoid rate limit Errors, Rasa buffers the audio messages and sends them only if,
- Audio Buffer is more than 32KB
- Audio Synthesis is complete
Please keep in mind these rate limits when designing flows for a Rasa Voice Assistant. Avoid using two or more utterances consecutively in flows as these will be sent as multiple binary messages.
Call Metadata
Metadata about the call can be accessed by the slot session_started_metadata
in the beginning of the call. Following fields are available:
| Field Name | Description | Source |
|---|---|---|
call_id | The unique call identifier from Genesys | conversationId parameter as sent by Genesys |
user_phone | The phone number of the user | ani parameter, with tel: prefix removed |
bot_phone | The phone number of the bot | dnis parameter as sent by Genesys |
A custom action_session_start can be used to store this information to a slot.
Integration With Data Action
A voice-ready channel connector with Genesys can also be created using Rasa's REST channel connector and using Genesys Data Actions. This requires more familiarity with Genesys Architect and Data Actions.
You can create a Call flow in Architect with a reusable-task that would:
- Capture caller's speech using Transcribe action.
- Send the transcribed text to Rasa using Call Data Action.
- Get the bot's response and play it back to the caller using Play Audio action.
These steps can be done in a loop based on the response of Rasa. Genesys also allows using 3rd Party services for Transcription (Speech-To-Text) and Text-To-Speech. You can read more about Speech-To-Text Engines in Genesys here and Text-To-Speech Engines in Genesys here
Prepare Rasa Assistant
Add the REST channel to your credentials.yml:
# webhook URL: https://<your-domain>/webhooks/rest/webhook
rest:
  # you don't need to provide anything here - this channel doesn't
  # require any credentials
You can run the assistant using the command rasa run.
You can also run it with a development inspector using rasa run --inspect.
To see all available parameters, use rasa run -h.
You can test your Rasa server with a curl request,
curl -X POST \
  http://localhost:5005/webhooks/rest/webhook \
  -H 'Content-Type: application/json' \
  -d '{
    "sender": "unique-sender-id",
    "message": "Hi bot, what can you do?"
  }'
Create a Data Action
On Genesys, create a Data Action. You will need to specifically create a Web Services Data Action Integration.
Ensure that the payload sent by the Data Action to Rasa is in the following format:
{
    "sender": "<genesys-call-id>",
    "message": "<transcribed-user-message>"
}
The sender key must have a unique key to identify the conversation while
message contains the result of Speech-To-Text component.
Disconnecting a Call
You cannot use a Data Action to perform actions on conversations, like disconnecting the call. Genesys documentation specifies that "Only direct participants in a conversation, such as an agent or a customer, can modify the conversation using call controls."
You can, however, modify your Architect Call Flow to disconnect a call based on the response from Data Action.