Replicated Installation Guide
Requirements
To deploy Studio with Replicated you need:
- Rasa Account: An enterprise Rasa account and a Rasa Pro and Studio license keys.
- LLM API Key: OpenAI API key or credentials for another LLM.
- VM Specs: 4 vCPUs, 16GB RAM, 100GB disk space (x86 CPU only). Suggested configurations for some public cloud providers are documented here.
- OS: Ubuntu 22.04, 24.04 or RHEL 9.
- DNS: A DNS record pointing at your VM.
- Security:
sudoaccess on the VM, with open ports for22 (SSH),443 (HTTPS),30000 (Admin Console), and optionally30002for Kafka. - Network: Your VM must be able to access specific domains on the internet. These are documented here.
Get Started
The installation is in two parts: firstly you will install the embedded Kubernetes cluster onto your VM and then you will deploy Rasa Studio on top.
Step 1: Install the Embedded Cluster
To install the embedded cluster in your VM, your Rasa account team will provide you with a URL and password to download an installation bundle. You can either download this bundle directly onto your VM or transfer it across using a tool such as SCP.
-
Run the download command provided to you by your Rasa account team. It will look like this, but be sure to replace it with the correct one given to you:
curl -f "https://replicated.rasa.com/embedded/studio-dragon/stable" -H "Authorization: XXXXXXXXXXXXXXXX" -o studio-dragon-stable.tgz -
Extract the installation bundle
tar -xvzf studio-dragon-stable.tgz -
Install the embedded cluster. If you are performing an online install, use:
sudo ./studio-dragon install --license license.yamlIf you are performing an airgap install, use:
sudo ./studio-dragon install --license license.yaml --airgap-bundle studio-dragon.airgap -
You'll be prompted for an Admin Console password. This will allow you to access the Replicated Admin Console to deploy Studio. You must remember this password as you proceed with the installation.
-
Wait for the install to complete. You'll be told when it is ready:
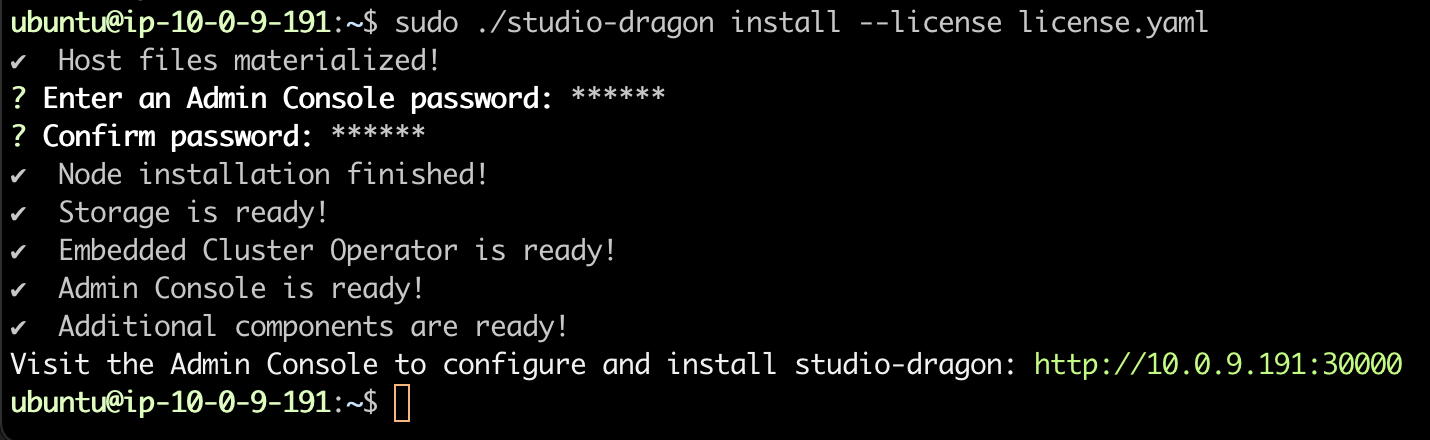
You can now visit the Admin Console on
https://<external-ip-or-hostname>:30000and proceed past any browser TLS warnings you receive. Note that depending on the network architecture of where you deployed the VM, you may have to use a public or private IP. -
You will now be guided through the setup and installation of Rasa Studio. Click the Start button to begin.
-
The first screen "Secure the Admin Console" will explain to you how to pass the self-signed certificate warning in your browser. This is a normal part of the installation process. Click Continue and follow the instructions.
-
The next screen will ask if you want to continue to use a self-signed certificate or upload your own. You can upload your own and set a hostname if you want, but it is also safe to use a self-signed certificate. Click Continue.
-
You will now be prompted to login to the Admin Console. Use the password that you set in Step 4.
-
After logging in, you'll be presented with the Nodes page where you'll see the node you've just installed the embedded cluster on. Click Continue. Do not add any additional nodes.

Step 2: Configure Rasa Studio
We can now proceed to the install of Studio itself. You will be presented with a configuration screen where the sections are described below. Only the fields marked as Required must be filled - you are free to leave the rest of the configuration options as their default values.
Container Images & API Keys
Here you will supply the versions of products that you wish to deploy and add the OpenAI API key that is required for building CALM bots in Studio. We recommend that you stick to the default versions set on this page to ensure good compatibility.
If you're not sure what "Private Registry" means, you can safely skip this tip. You can choose here to use a Private Registry for if you're using an on-prem Docker image registry such as Artifactory. To do this, you'll need to first create a Kubernetes ImagePullSecret object on the embedded cluster to authenticate with your private registry. On your VM, run the following command to get a shell into the embedded Kubernetes cluster:
sudo ./studio-dragon shell
Create an ImagePullSecret following the official Kubernetes documentation:
kubectl create secret docker-registry regcred --docker-server=<your-registry-server> --docker-username=<your-name> --docker-password=<your-pword> --docker-email=<your-email>
Accessing Rasa Studio
You must provide an Ingress DNS Hostname for Studio to be accessible after the installation. This should be the domain you have pointing to your VM that was a prerequisite. We recommend setting your Connection Type to https to provide the best security.
If you're deploying on AWS and accessing the machine over the internet, you can use the instance's default public DNS name eg ec2-[IP-ADDRESS].[REGION].compute.amazonaws.com.
Model Training and Bot Runs
By default, a Rasa Studio deployment can support simultaneously running and training 10 different assistants at the same time. If you anticipate needing more than this, increase the values here.
Keycloak
Set administrator credentials for Keycloak, which is the authentication provider for Studio that allows you to connect it to your own SSO provider. We recommend changing the password to something secure and keeping note of it.
Database
You can use an embedded PostgreSQL server or connect to an existing external PostgreSQL database.
- If you choose to use embedded PostgreSQL, all of the setup will be handled for you. Select this if you're not sure what option to pick.
- If you choose to use an external PostgreSQL database, you must configure the hostname and authentication credentials. Select this if your Studio installation is for production usage or you are confident in deploying and managing PostgreSQL databases.
Kafka
You can use an embedded Kafka deployment or connect to an existing external Kafka deployment.
- If you choose to use embedded Kafka, no further configuration is required. Select this if you're not sure what option to pick.
- If you choose to use an external Kafka deployment, you must configure the hostname, authentication, security settings and pre-create topics on your Kafka deployment yourself before connecting it. Select this if your Studio installation is for production usage and you expect to ingest a large volume of assistant data using the Conversation Review feature.
You may optionally choose to expose the embedded Kafka deployment to be accessible from outside of your VM so that you can connect a deployed bot to your Studio instance. If you enable this, Kafka will be exposed on the VM on port 30002 and you must ensure that appropriate security group or firewall rules are configured on your VM to be able to access this port.
Resource Management
Optionally configure Kubernetes resource limits and requests for Studio components. This is advanced configuration to allow people who are familiar with Kubernetes to manually set resource usage requirements. If you're not sure what this is, you can safely ignore this section.
Step 3: Install Rasa Studio
-
When you've supplied all of the configuration values, click Continue.
-
You'll move on to the Preflight Checks screen, which will identify any issues with your infrastructure that may prevent you from successfully deploying Studio. Be sure to resolve any issues that are found before going further.

-
When all checks have passed, click Deploy.
-
Wait for the installation to complete. This will take about 20 minutes. When the deployment is complete, the status on the dashboard will say Ready and you'll be able to use the Access Studio link to use Rasa Studio.

- You can access the Rasa Studio UI by visiting
https://HOSTNAMEin your browser whereHOSTNAMEis the DNS name you provided in the configuration.. - You can access the Rasa Studio User Management UI (Keycloak) by visiting the URL
https://HOSTNAME/auth. The credentials to login to the Keycloak administration console are the values you set in the Keycloak section of the Studio Configuration above.
- You can access the Rasa Studio UI by visiting
🎉 That's it! You can now proceed to activate your license