notice
This is unreleased documentation for Rasa Documentation Main/Unreleased version.
For the latest released documentation, see the latest version (3.x).
Getting started with Analytics
Visualise and process Rasa assistant metrics in the tooling of choice.
Rasa Pro License
You'll need a license to get started with Rasa Pro. Get it here
Analytics Data Pipeline helps visualize and process Rasa assistant metrics in the tooling (BI tools, data warehouses) of your choice. Visualizations and analysis of the production assistant and its conversations allow you to assess ROI and improve the performance of the assistant over time.
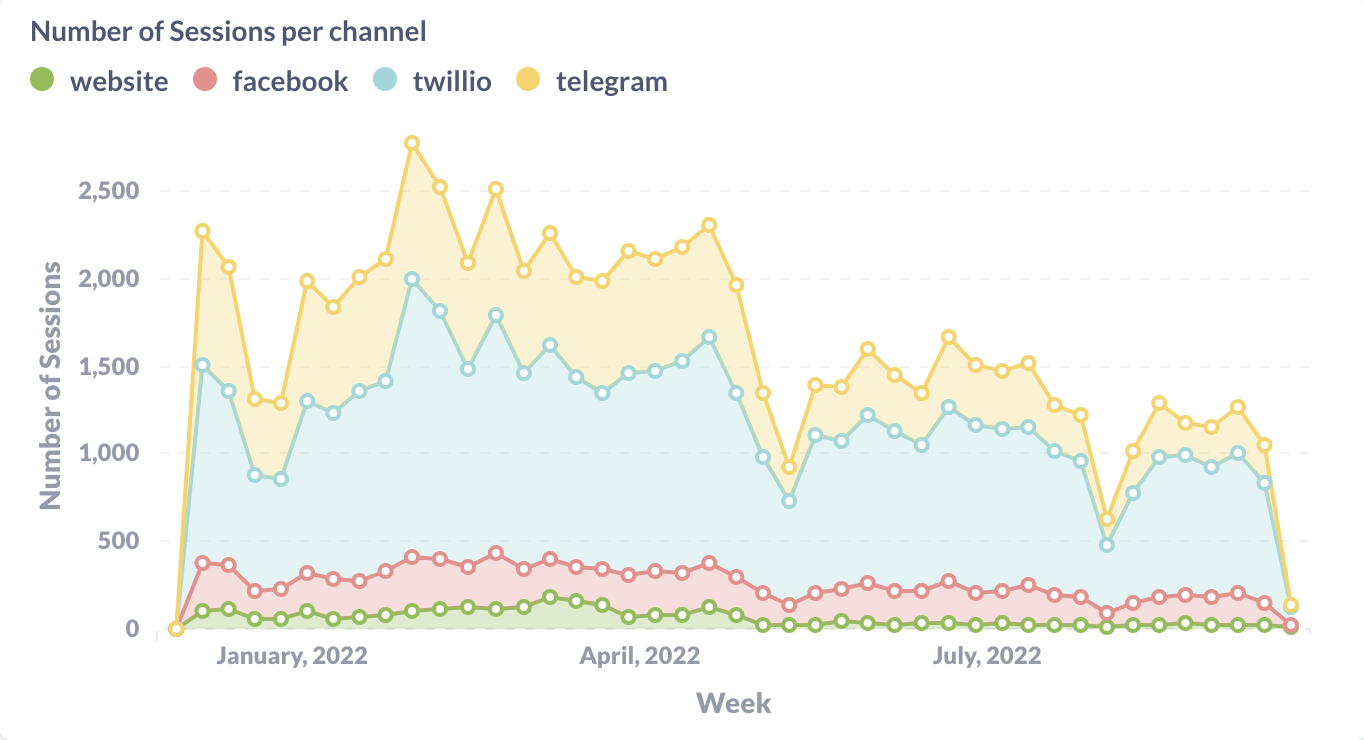
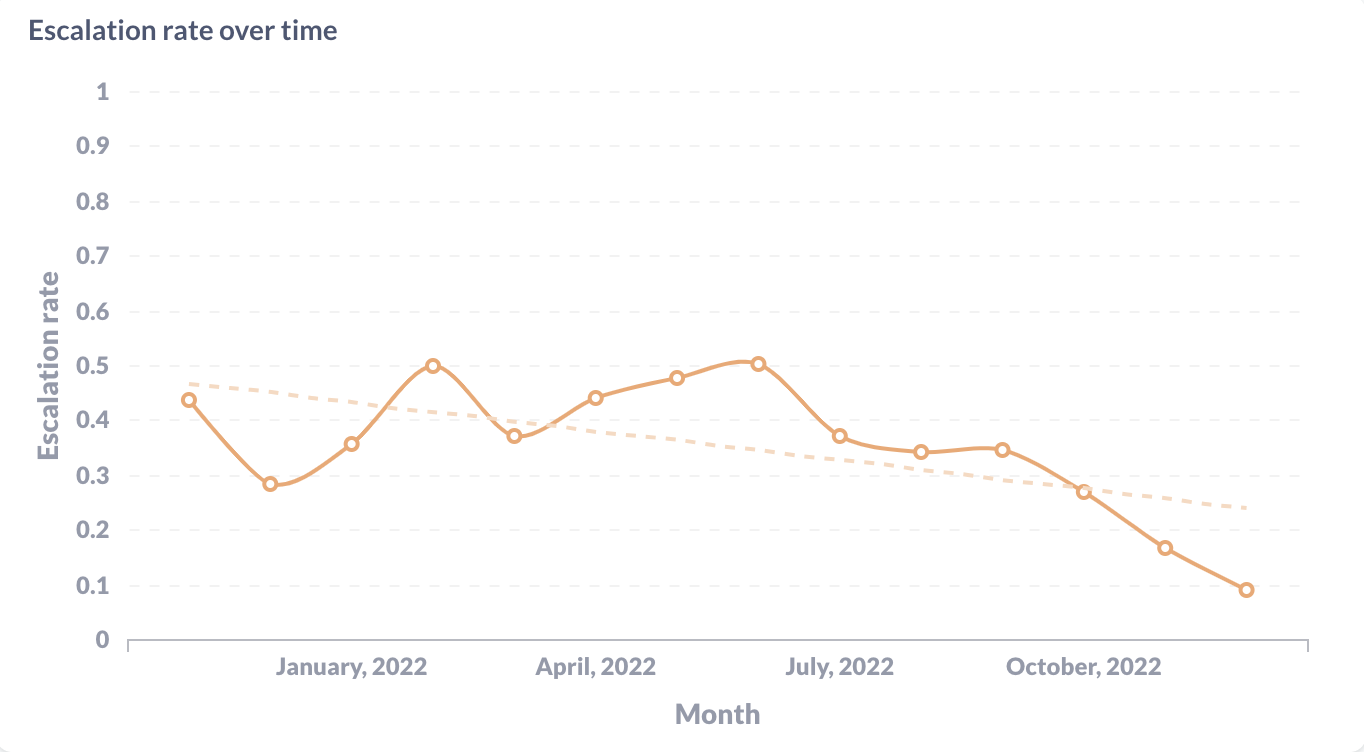
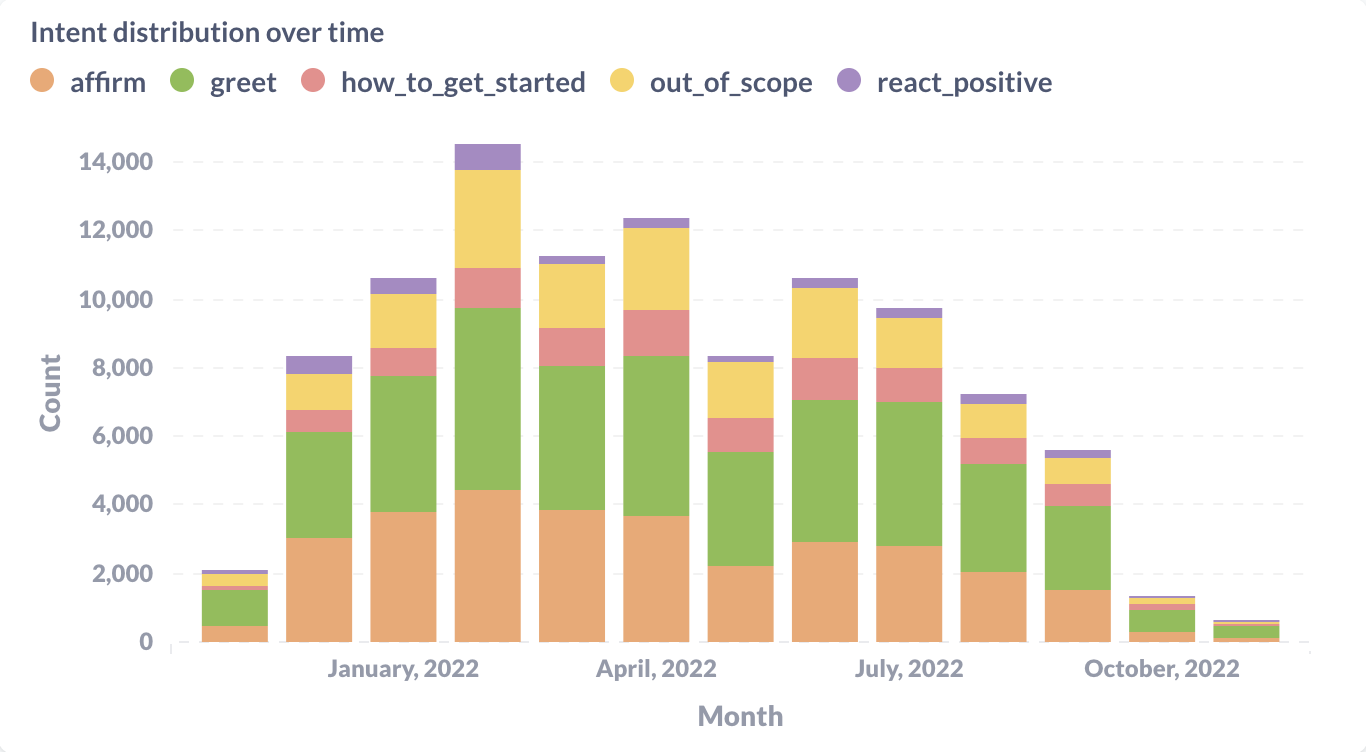
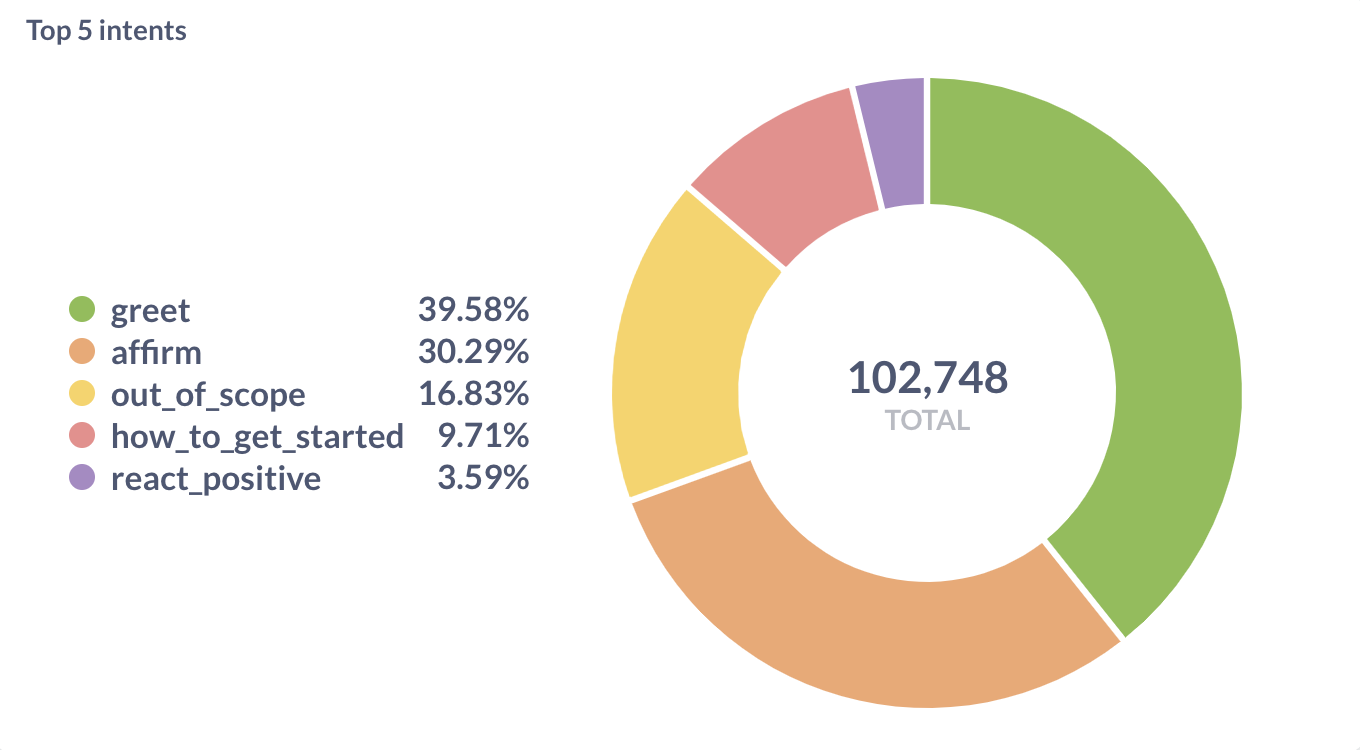
Measuring a Rasa assistant's success and making strategic investments will lead to better business outcomes. It will also help you understand the needs of your end users and better serve them.
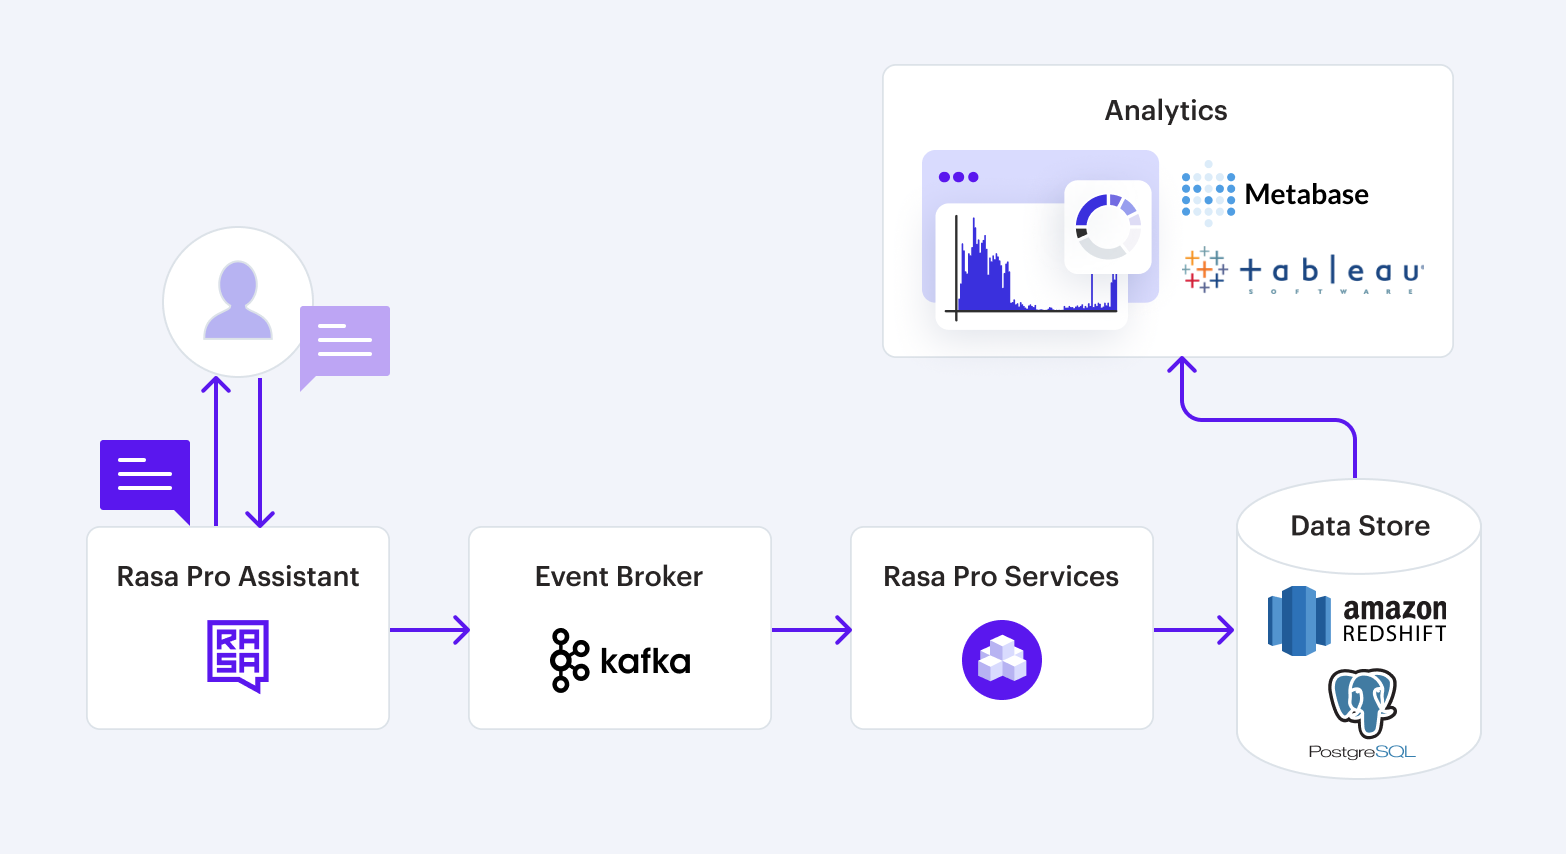
Rasa Pro will connect to your production assistant using Kafka. The pipeline will compute analytics as soon as the docker container is successfully deployed and connected to your data warehouse and Kafka instances.
Types of metrics
Metrics collected from your assistant can broadly be categorized as
- User Analytics: Who are the users of the assistant, and how do they feel about it? Examples: demographics, channels, sentiment analysis
- Usage Analytics: How is the assistant’s overall health and what kind of traffic is coming to it? Examples: total number of sessions, time per session, errors and error rates
- Conversation Analytics: What happened during the conversation? Examples: number of messages sent, abandonment depth, number of topics introduced by user, top N intents
- Business Analytics: How is the assistant performing with regard to business goals? Examples: ROI of assistant per LoB, time comparison of assistant vs agent, containment rate
In this version of the Analytics pipeline, measurement of the following metrics is possible
| Metric | Category | Meaning |
|---|---|---|
| Number of conversations | Usage Analytics | Total number of conversations |
| Number of users | Usage Analytics | Total number of users |
| Number of sessions | Usage Analytics | Gross traffic to assistant |
| Channels used | Usage Analytics | Sessions by channel |
| User session count | User Analytics | Total number of user sessions or average sessions per user |
| Top N intents | Conversation Analytics | Top intents across all users |
| Avg response time | Conversation Analytics | Average response time for assistant |
| Containment rate | Business Analytics | % of conversations handled purely by assistant (not handed to human agent |
| Abandonment rate | Business Analytics | % of abandoned conversations |
| Escalation rate | Business Analytics | % of conversations escalated to human agent |
For examples of how you can extract these metrics, see Example queries.
Prerequisites
A production deployment of Kafka is required to set up Rasa Pro. We recommend using Amazon Managed Streaming for Apache Kafka.
A production deployment of a data lake needs to be connected to the data pipeline. Rasa Pro directly supports the following data lakes:
- PostgreSQL ( recommended. All PostgreSQL >= 11.0 are supported)
- Amazon Redshift
Virtually any other data lakes can be configured to sync with your deployment of PostgreSQL. You can find additional instructions on how to connect your PostgreSQL deployment to either BigQuery or Snowflake in the Connect a data warehouse step.
We recommend managed deployments of your data lake to minimize maintenance efforts.
1. Connect an assistant
To connect an assistant to Rasa Pro Services, you need to connect the assistant to an event broker. The assistant will stream all events to the event broker, which will then be consumed by Rasa Pro Services.
The configuration of the assistant is the first step of Installation and Configuration. No additional configuration is required to connect the assistant to the Analytics pipeline. After the assistant is deployed, the Analytics pipeline will receive the data from the assistant and persist it to your data warehouse which will be configured in the next step.
2. Connect a data warehouse
You can choose to configure the analytics pipeline to stream the transformed conversational data to two different data warehouse types in AWS:
Additionally, any data warehouse is supported if it is configured in sync with your deployment of PostgreSQL, as recommended for Redshift.
We have included brief instructions for syncing your PostgreSQL deployment with:
PostgreSQL
You can use Amazon Relational Database Service (RDS) to create a PostgreSQL DB instance which is the environment that will run your PostgreSQL database.
First, you must set up Amazon RDS by completing the instructions listed here. Next, create the PostgreSQL DB instance. You can follow one of the following instruction sets:
- the AWS Easy create instructions listed in the Creating a PostgreSQL DB instance section
- the AWS Standard create instructions
To build the DB URL in the DBAPI format specified in the Connect an assistance section you must enter the database credentials. You must obtain the database username and password after you select a database authentication option during the process of the PostgreSQL DB instance creation:
- Password authentication to use database credentials only, in which case you must enter a username for the master username, as well as generate the master password.
- Password and IAM DB authentication to use IAM users and roles for the authentication of database users.
- Password and Kerberos authentication
Finally, when running the Analytics pipeline Docker container, set the
environment variable RASA_ANALYTICS_DB_URL
to the PostgreSQL Amazon RDS DB instance URL.
Redshift
If you prefer instead to set up Amazon Redshift as your choice of data lake, you can choose to either stream the data from the PostgreSQL source database within the Amazon RDS DB instance created at the PostgreSQL step to the Redshift target or connect directly to Amazon Redshift.
Streaming from PostgreSQL to Redshift
If you meet the prerequisites for using an Amazon Redshift database as a target, you will need to implement two steps:
- configure the PostgreSQL source for AWS Database Migration Service (DMS) by following these instructions
- configure the Redshift target for AWS DMS following the instructions here.
Direct connection
You can get started on enabling the direct connection with Redshift by following these resources on creating an Amazon Redshift cluster. Before you do so, you should take into account that streaming historical data directly to Redshift could take much longer than streaming directly to or via the PostgreSQL RDS instance.
You must update the RASA_ANALYTICS_DB_URL to the Redshift cluster DB URL
which must follow the following format:
For example:
Redshift write performance
As a result of performance considerations, we strongly advise against choosing a direct connection to Redshift. Redshift is a great data lake for analytics but lacks the necessary write performance to directly stream data to it.
BigQuery
To stream data from PostgreSQL to BigQuery, you can use Datastream for BigQuery. Datastream for BigQuery supports several PostgreSQL deployment types, including CloudSQL.
Before you begin, make sure to check the Datastream prerequisites, as well as additional Datastream networking connectivity requirements.
You can closely follow this quickstart guide on replicating data from PostgreSQL CloudSQL to BigQuery with Datastream.
Alternatively, you can deep dive into the following Datastream set-up guides:
- Configure your source PostgreSQL database
- Optional: use customer-managed encryption keys
- Create a connection profile for PostgreSQL database
- Create a stream
Snowflake
You can sync your PostgreSQL deployment manually or via an automated partner solution.
The instructions for manual sync include the following steps:
- Extract data from PostgreSQL to file using
COPY INTOcommand. You should also explore the Snowflake data loading best practices before extraction. - Stage the extracted data files to either internal or external locations such as AWS S3, Google Cloud Storage or Microsoft Azure.
- Copy staged files to Snowflake tables using
COPY INTOcommand. You can decide to use bulk data loading into Snowflake or to load continuously using Snowpipe. Alternatively you can also benefit from this plugin to load data to an existing Snowflake table.
3. Ingest past conversations (optional)
When Analytics is connected to your Kafka instance, it will consume all prior events on the Kafka topic and ingest them into the database. Kafka has a retention policy for events on a topic which defaults to 7 days.
If you want to process events from conversations that are older than the retention policy configured for the Rasa topic, you can manually ingest events from past conversations.
Manually ingesting data from past conversations requires a connection to the
tracker store. The tracker store contains past conversations and a
connection to the Kafka cluster. Use the rasa export command to export
the events stored in the tracker store to Kafka:
Configure the export to read from your production tracker store and write to Kafka as an event broker, e.g.
note
Running manual ingestion of past events multiple times will result in duplicated events. There is currently no deduplication implemented in Analytics. Every ingested event will be stored in the database, even if it was processed previously.
4. Connect a BI Solution
Connecting a business intelligence platform to the data warehouse varies for each platform. We provide example instructions for Metabase and Tableau but you can use any BI platform which supports AWS Redshift or PostgreSQL.
Example: Metabase
Metabase is a free and open-source business intelligence platform. It provides a simple interface to query and visualize data. Metabase can be connected to PostgreSQL or Redshift databases.
Example: Tableau
Tableau is a business intelligence platform. It provides a flexible interface to build business intelligence dashboards. Tableau can be connected to PostgreSQL or Redshift databases.
