TL;DR
Platforms like Google Assistant makes it easy to build custom voice assistants. But what if you wanted to build and assistant that runs locally and ensures the privacy of your data? You can do it using open source Rasa, Mozilla DeepSpeech and Mozilla TTS tools. Check out this tutorial to find out how.
With platforms like Google Assistant and Alexa becoming more and more popular, voice-first assistants are destined to be the next big thing for customer interactions across various industries. However, unless you use hosted of-the-shelf solutions, development of voice assistants come with a whole new set of challenges that go beyond NLU and dialogue management - in addition to those, you need to take care of speech-to-text, text-to-speech components as well as the frontend. We touched on the voice topic some time ago when we experimented with building a Rasa-powered Google Assistant. Leveraging platforms like Google Assistant removes the hurdle of implementing the voice processing and frontend components, but it forces you to compromise on the security of your data and the flexibility of the tools you use. So, what options do you have if you want to build a voice assistant that runs locally and ensures the security of your data? Well, let's find out. In this post, you will learn how you can build a voice assistant using only open source tools - from backend, all the way to the frontend.
Outline
- Tools and software overview
- The Rasa assistant
- Implementing the speech-to-text component
- Implementing the text-to-speech component
- Putting it all together
- What's next?
- Summary and resources
1.Tools and software overview
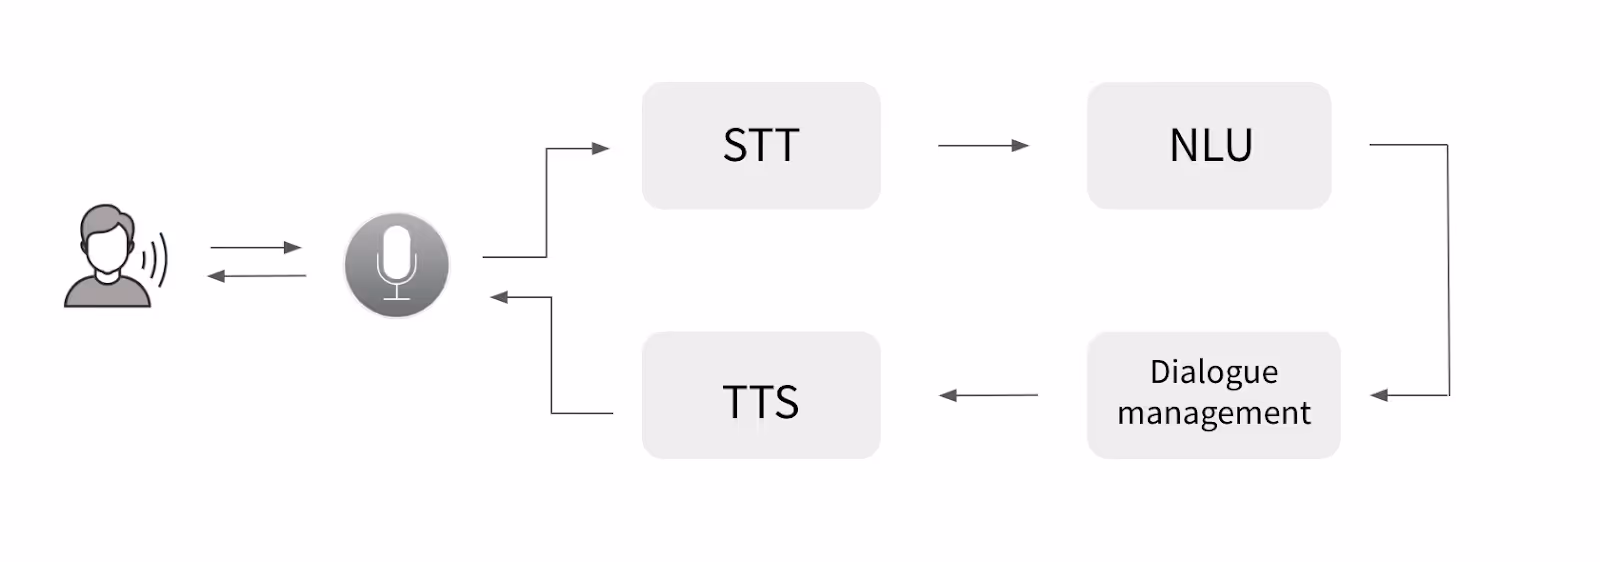
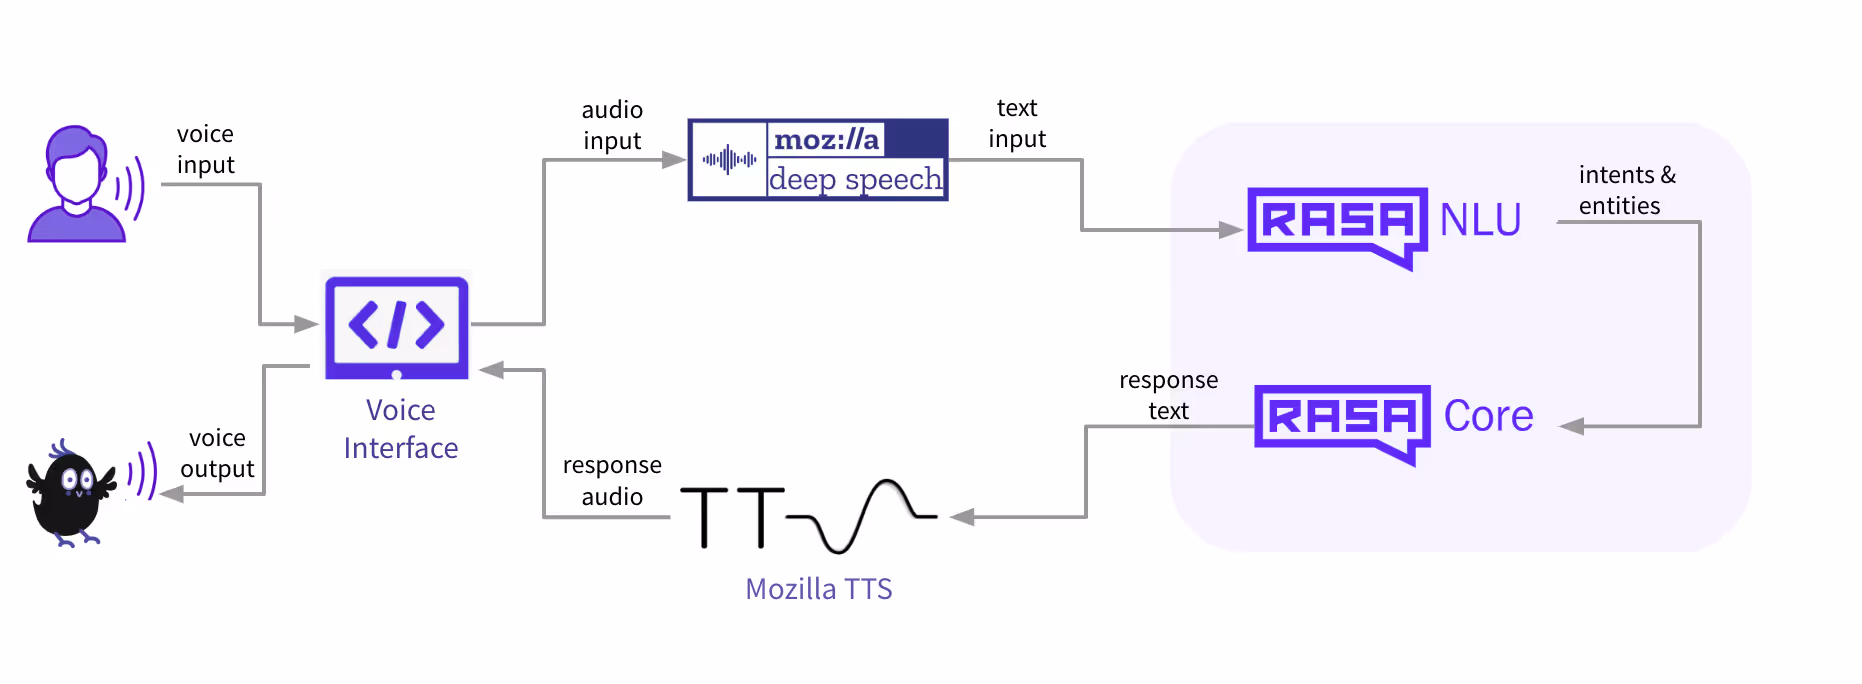
The goal of this post is to show you how you can build your own voice assistant using only open source tools. In general, there are five main components which are necessary to build a voice assistant:
- Voice interface - a frontend which users use to communicate with the assistant (web or mobile app, smart speaker, etc)
- Speech-to-text (STT) - a voice processing component which takes user input in an audio format and produces a text representation of it
- NLU - a component which takes user input in text format and extract structured data (intents and entities) which helps and assistant to understand what the user wants
- Dialogue management - a component which determines how an assistant should respond at specific state of the conversation and generates that response in a text format
- Text-to-speech (TTS) - a component which takes the response of the assistant in a text format and produces a voice representation of it which is then sent back to the user
While open source Rasa is a rather obvious choice for NLU and dialogue management, deciding on STT and TTS is a more difficult task simply because there aren't that many open source frameworks to choose from. After exploring the currently available options: CMUSphinx, Mozilla DeepSpeech, Mozilla TTS, Kaldi, we decided to go with Mozilla tools - Mozilla DeepSpeech and Mozilla TTS. Here is why:
- Mozilla tools come with a set or pre-trained models, but you can also train your own using custom data. This allows you to implement things quickly, but also gives you all the freedom to build custom components.
- In comparison to alternatives, Mozilla tools seem to be the most OS agnostic.
- Both tools are written in Python which makes it slightly easier to integrate with Rasa.
- It has a big and active open source community ready to help out with technical questions.
What is Mozilla DeepSpeech and Mozilla TTS? Mozilla DeepSpeech is a speech-to-text framework which takes user input in an audio format and uses machine learning to convert it into a text format which later can be processed by NLU and dialogue system. Mozilla TTS takes care of the opposite - it takes the input (in our case - the response of the assistant produced by a dialogue system) in a text format and uses machine learning to create an audio representation of it.
NLU, dialogue management and voice processing components cover the backend of the voice assistant so what about the frontend? Well, this is where the biggest problem lies - if you search for the open source voice interface widgets, you will very likely end up with no results. At least this is what happened to us and that's why we developed our own Rasa voice interface which we used for this project and are happy to share with the community!
So, to summarise, here are the ingredients of the open source voice assistant:
2. The Rasa assistant
For this project, we are going to use an existing Rasa assistant - Sara. It's a Rasa-powered open source assistant which can answer various questions about the Rasa framework and help you get started. Below is an example conversation with Sara:
Here are the steps on how to set Sara up on your local machine:
- Clone the Sara repository:
Shellcopy
git clone https://github.com/RasaHQ/rasa-demo.git
cd rasa-demo
- Install the necessary dependencies:
Shellcopy
pip install -e .
- Train the NLU and dialogue models:
Shellcopy
rasa train --augmentation 0
- Test Sara on your terminal:
Shellcopy
docker run -p 8000:8000 rasa/duckling
rasa run actions --actions demo.actions
rasa shell --debug
To turn Sara into a voice assistant we will have to edit some of the project files in the later stages of the implementation. Before we do that, let's implement the TTS and STT components.
3. Implementing the speech-to-text component
Let's implement the speech-to-text component - Mozilla DeepSpeech model. Check out this blogpost by Rouben Morais to learn more about how Mozilla DeepSpeech works under the hood. Mozilla DeepSpeech comes with a few pre-trained models and allows you to train your own. For the sake of simplicity we use a pre-trained model for this project. Here are the steps for how to setup the STT on your local machine:
- Install mozilla deepspeech:
Shellcopy
pip3 install deepspeech
- Download a pre-trained text-to-speech model and unpack it in your project directory:
Shellcopy
wget https://github.com/mozilla/DeepSpeech/releases/download/v0.5.1/deepspeech-0.5.1-models.tar.gz
tar xvfz deepspeech-0.5.1-models.tar.gz
After running the commands above, you should have a directory called deepspeech-0.5.1-models created in your project directory. It contains the files of the model.
- Test the model.
The best way to check if the component was set up correctly is to test the model on some sample audio inputs. The script below will help you to do that:
- Function record_audio() captures a 5 second audio and save it as a test_audio.wav file
- Function deepspeech_predict() loads a deepspeech model and passes a test_audio.wav file to make a prediction on how the voice input should look like in a text format
Run the script using the command below and once you see a message 'Recording...' pronounce a sentence you would like to test the model on:
Shellcopy
python deepspeech_test_prediction.py
In the next part of this post you will learn how to set up the third piece of the project - the text-to-speech component.
4. Implementing the text-to-speech component
To enable the assistant to respond with voice rather than a text, we have to set up the text-to-speech component which will take the response generated by Rasa and convert it into a sound. For that, we use Mozilla TTS. Just like Mozilla DeepSpeech, it comes with pre-trained models, but you can also train your own models using custom data. This time we will use a pre-trained TTS model as well. Here's how to set up the TTS component on your local machine:
- Clone the Mozilla TTS repository:
Shellcopy
git clone https://github.com/mozilla/TTS.git
cd TTS
git checkout db7f3d3
- Install the package:
Shellcopy
python setup.py develop
- Download the model:
In your Sara directory, create a folder called _tts_mode_l and place the model files downloaded from here (you only need config.json and best_model.th.tar)
- Test the component:
You can use the script below to test the text-to-speech component. Here's whatthe script does:
- Function load_model() loads the tts model and prepares everything for processing
- Function tts() takes the text input and creates an audio file test_tts.wav
You can change the sentence variable with a custom input which you would like to test the model on. Once the script stops running, the result will be saved in the test_tts.wav file which you can listen to to test the performance of the model.
At this point you should have all of the most important components running on the local machine - Rasa assistant, speech-to-tech and text-to-speech components. All that is left to do is to put all these components together and connect the assistant to the Rasa voice interface. Learn how you can do it in the next step of this post.
5. Putting it all together
To put all the pieces together and test the voice assistant in action we need two things:
- Voice interface
- A connector to establish the communication between the UI and the backend (Mozilla and Rasa components)
Let's set up the Rasa voice interface first. Here is how to do it:
- Install npm and node following the instructions provided here.
- Clone the Rasa Voice UI repository:
Shellcopy
git clone https://github.com/RasaHQ/rasa-voice-interface.git
cd rasa-voice-interface
- Install the component:
Shellcopy
npm install
- Test it:
Shellcopy
npm run serve
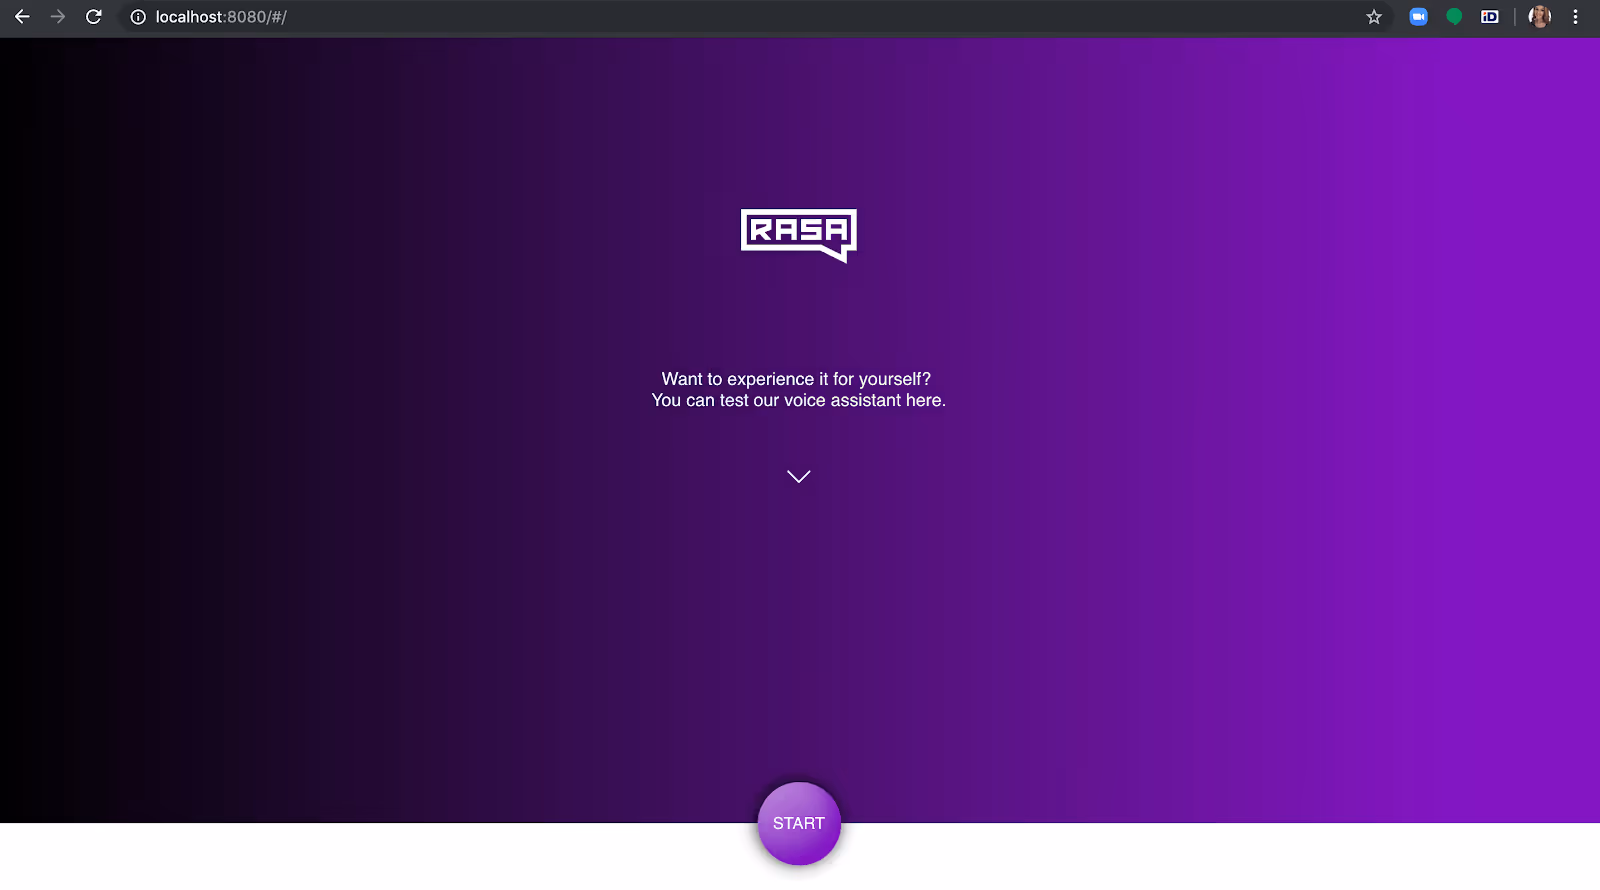
Once you run the command above, open a browser and navigate to https://localhost:8080 to check if the voice interface is loading.A jumping ball indicates that it has loaded successfully and is waiting for the connection.
To connect the assistant to the interface you need a connector. The connector will also determine what happens when the user says something as well as how the audio response is passed back to the frontend component. To create a connector, we can use an existing socketio connector and update it with a few new components:
- SocketIOInput() class event 'user_utter' is updated to receive the audio data sent as a link from the Rasa voice interface and save it on disc as a .wav file. Then, we load the Mozilla STT model to convert the audio into text representation and pass it to Rasa:
- SocketIOutput() class gets a new method _send_audio_message() which retrieves a response predicted by the Rasa dialogue management model in a text format, loads the Mozilla TTS model which then converts text into an audio format and sends it back to the frontend.
Below, you can find a full code of the updated connector:
Save this code in your project directory as a socketio_connector.py.
The last thing that needs to be set before you can give it a spin is a connector configuration - since we built a custom connector, we have to tell Rasa to use this custom connector for receiving user inputs and sending back the responses. To do that, create a credentials.yml file in Sara's project directory and provide the following details (here socketio_connector is the name of the module where the custom connector is implemented while SocketIOInput is the name of the input class of the custom connector):
Shellcopy
socketio_connector.SocketIOInput:
bot_message_evt: bot_uttered
session_persistence: true
user_message_evt: user_uttered
And that's it! All that is left to do is to launch the assistant and have a conversation with it. Here's how to do it:
- While in your working directory, start a Rasa assistant on a server:
Shellcopy
rasa run --enable-api -p 5005
- Start the Rasa custom action server:
Shellcopy
rasa run actions --actions demo.actions
- One of the Sara's components is a DucklingHTTPExtractor component. To use it, start a server for the duckling component by running:
Shellcopy
docker run -p 8000:8000 rasa/duckling
- Start a simple http server for sending the audio files to the client:
Shellcopy
python3 -m http.server 8888
If you refresh the Rasa voice interface in your browser, you should see that an assistant is ready to talk:
Click start, and have a conversation with a voice assistant built using only open source tools!
6. What's next?
Development of voice assistants comes with a whole new set of challenges - it's not just about the good NLU and dialogue anymore, you need good STT and TTS components and your NLU has to be flexible enough to compensate for the mistakes made by STT. If you replicate this project you will notice that the assistant is not perfect and there is a lot of room for improvement, especially at the STT and NLU stage. How can you improve it? Here are some ideas for you:
- Pre-trained STT models are trained on a quite generic data which makes the model prone to mistakes when used on more specific domains. Building a custom STT model with Mozilla DeepSpeech could lead to a better performance of STT and NLU.
- Improving the NLU could potentially compensate for some of the mistakes made by STT. A rather simple way to improve the performance of the NLU model is to enhance the training data with more examples for each intent and to add a spellchecker to the Rasa NLU pipeline to correct some smaller STT mistakes.
7. Summary and resources
At Rasa, we constantly look for ways to push the limits of the tools and software that empower developers to build great things. By building this project, we wanted to show you that you can use Rasa to build not only text, but also voice assistants and inspire you to build great applications without compromising on security and the flexibility of the tools you use. Have you built a voice assistant with Rasa? What tools did you use? Share your experience with us by posting about it on the Rasa community forum.
Acknowledgments
Rasa Voice Interface was developed by INTEGR8 dev team and is maintained by Rasa.