


You've been developing your assistant locally, and now it can handle a set of basic tasks-as long as users don't stray too far from the happy path. Now's the time to get your assistant in the hands of testers so you can start to build based on real-world data. To get to that next stage of development, you need to deploy your assistant and share it with the world.
The Rasa stack runs on prem or on your own cloud account, which means you have choices when it comes to deploying your assistant. The deployment strategy you choose depends on a range of factors: the amount of complexity you want to take on as a developer, hardware constraints, and the traffic you expect your assistant to receive.
With Rasa X 0.26.0, we released a new deployment method that makes this choice a whole lot easier. Our new one-line deploy script spins up a production-ready Kubernetes cluster for both Rasa X and your assistant, in about five minutes. This new method isn't just fast, it's also a great fit for the majority of use cases.
In this guide, we'll compare the one-line deploy script with two other methods for deploying your Rasa assistant-Docker Compose and a manual Kubernetes install-to help you make an informed decision about the deployment method that's right for you. Once you've selected a deployment strategy, we'll provide a launch checklist detailing how to set up your assistant in a production environment.
Should you deploy your assistant with Rasa X?
The short answer: yes.
When preparing to deploy your assistant, you might not be thinking about Rasa X just yet, but here's why you should: deploying Rasa X is the easiest way to deploy your assistant to production while getting the most out of the entire Rasa stack.
The methods we'll discuss in this guide deploy both Rasa X and Rasa Open Source. Once you connect your assistant via Integrated Version Control and activate a model, your assistant is ready for you to share with users. When users start talking to your assistant, all of their conversations are collected in Rasa X, so you can review and annotate messages to start improving your assistant.
Docker Compose vs Kubernetes
Let's start by breaking down the differences between the two main deployment models available for Rasa assistants: Docker Compose and Kubernetes.
Docker Compose is a tool for running multi-container applications on a single host machine. Kubernetes, on the other hand, is a container orchestration platform that runs multi-container applications on multiple host machines.
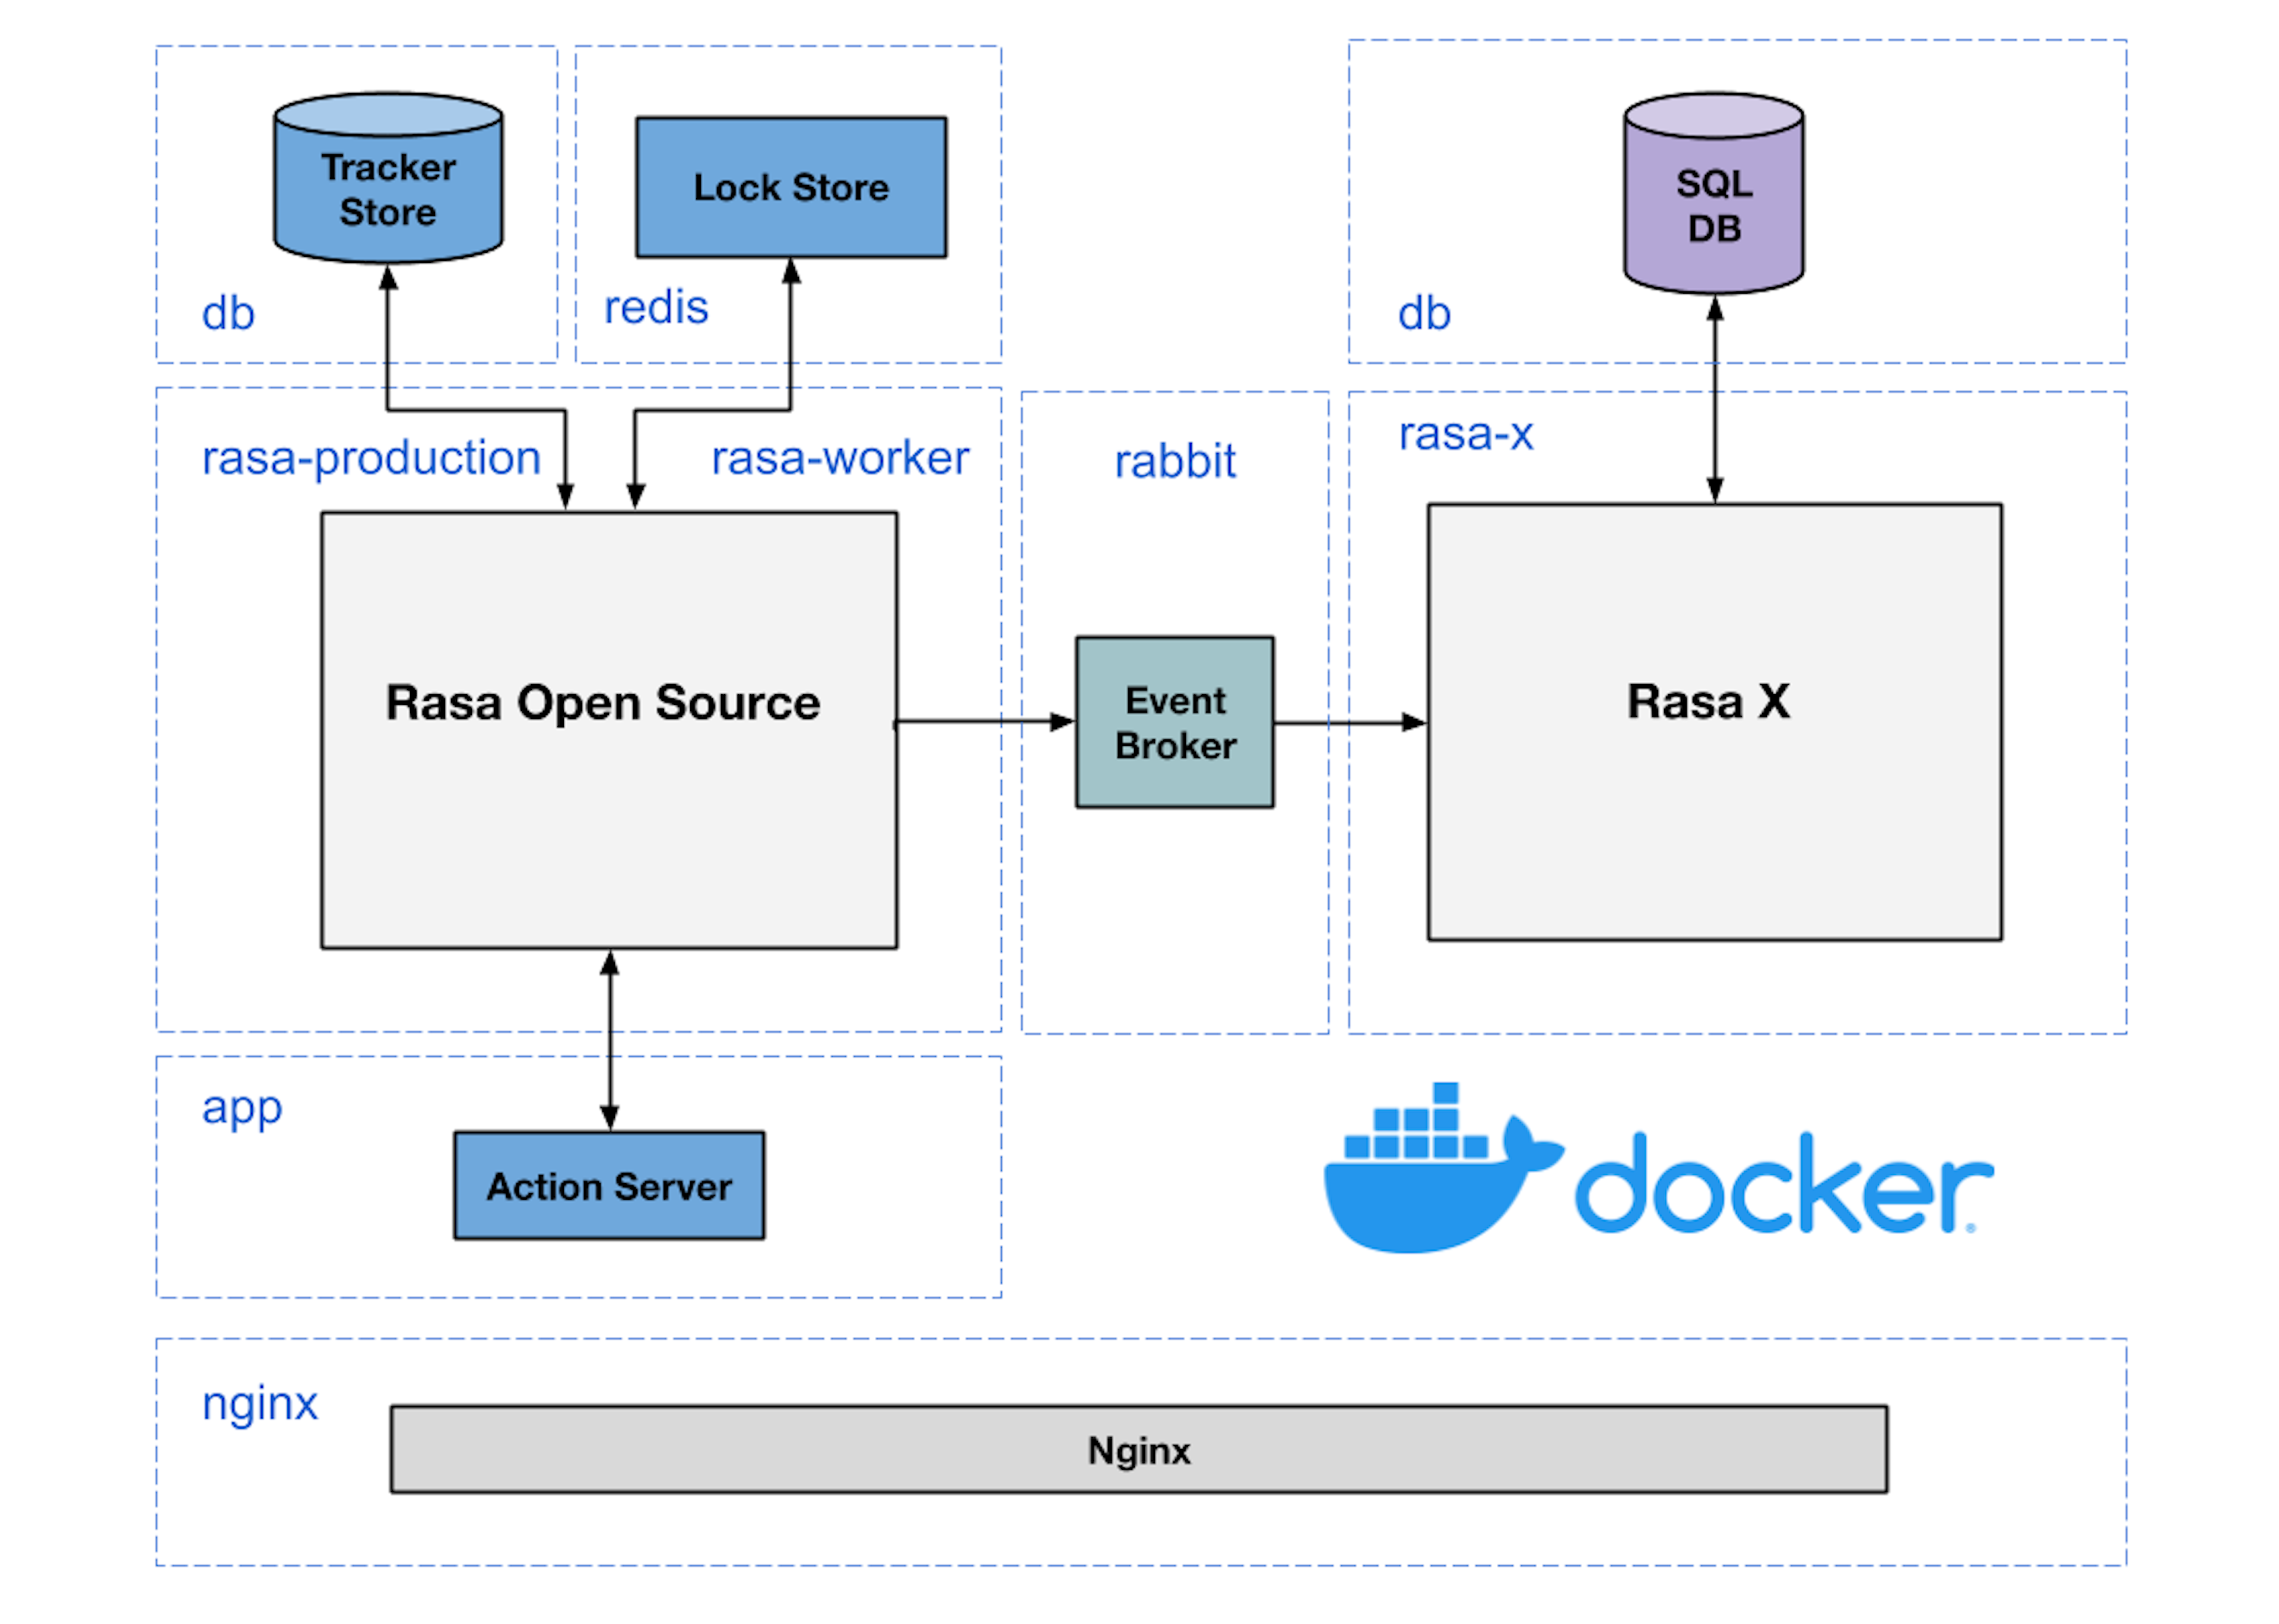
The docker-compose.yml file describes how your application's containers and services should be configured. For example, each component in the Rasa architecture runs in its own container, as you see in the diagram below. Services like databases and event streaming run in their own containers as well. Docker Compose networks the containers together, allowing the services to reach each other and making it possible to start or stop all containers with a single command.
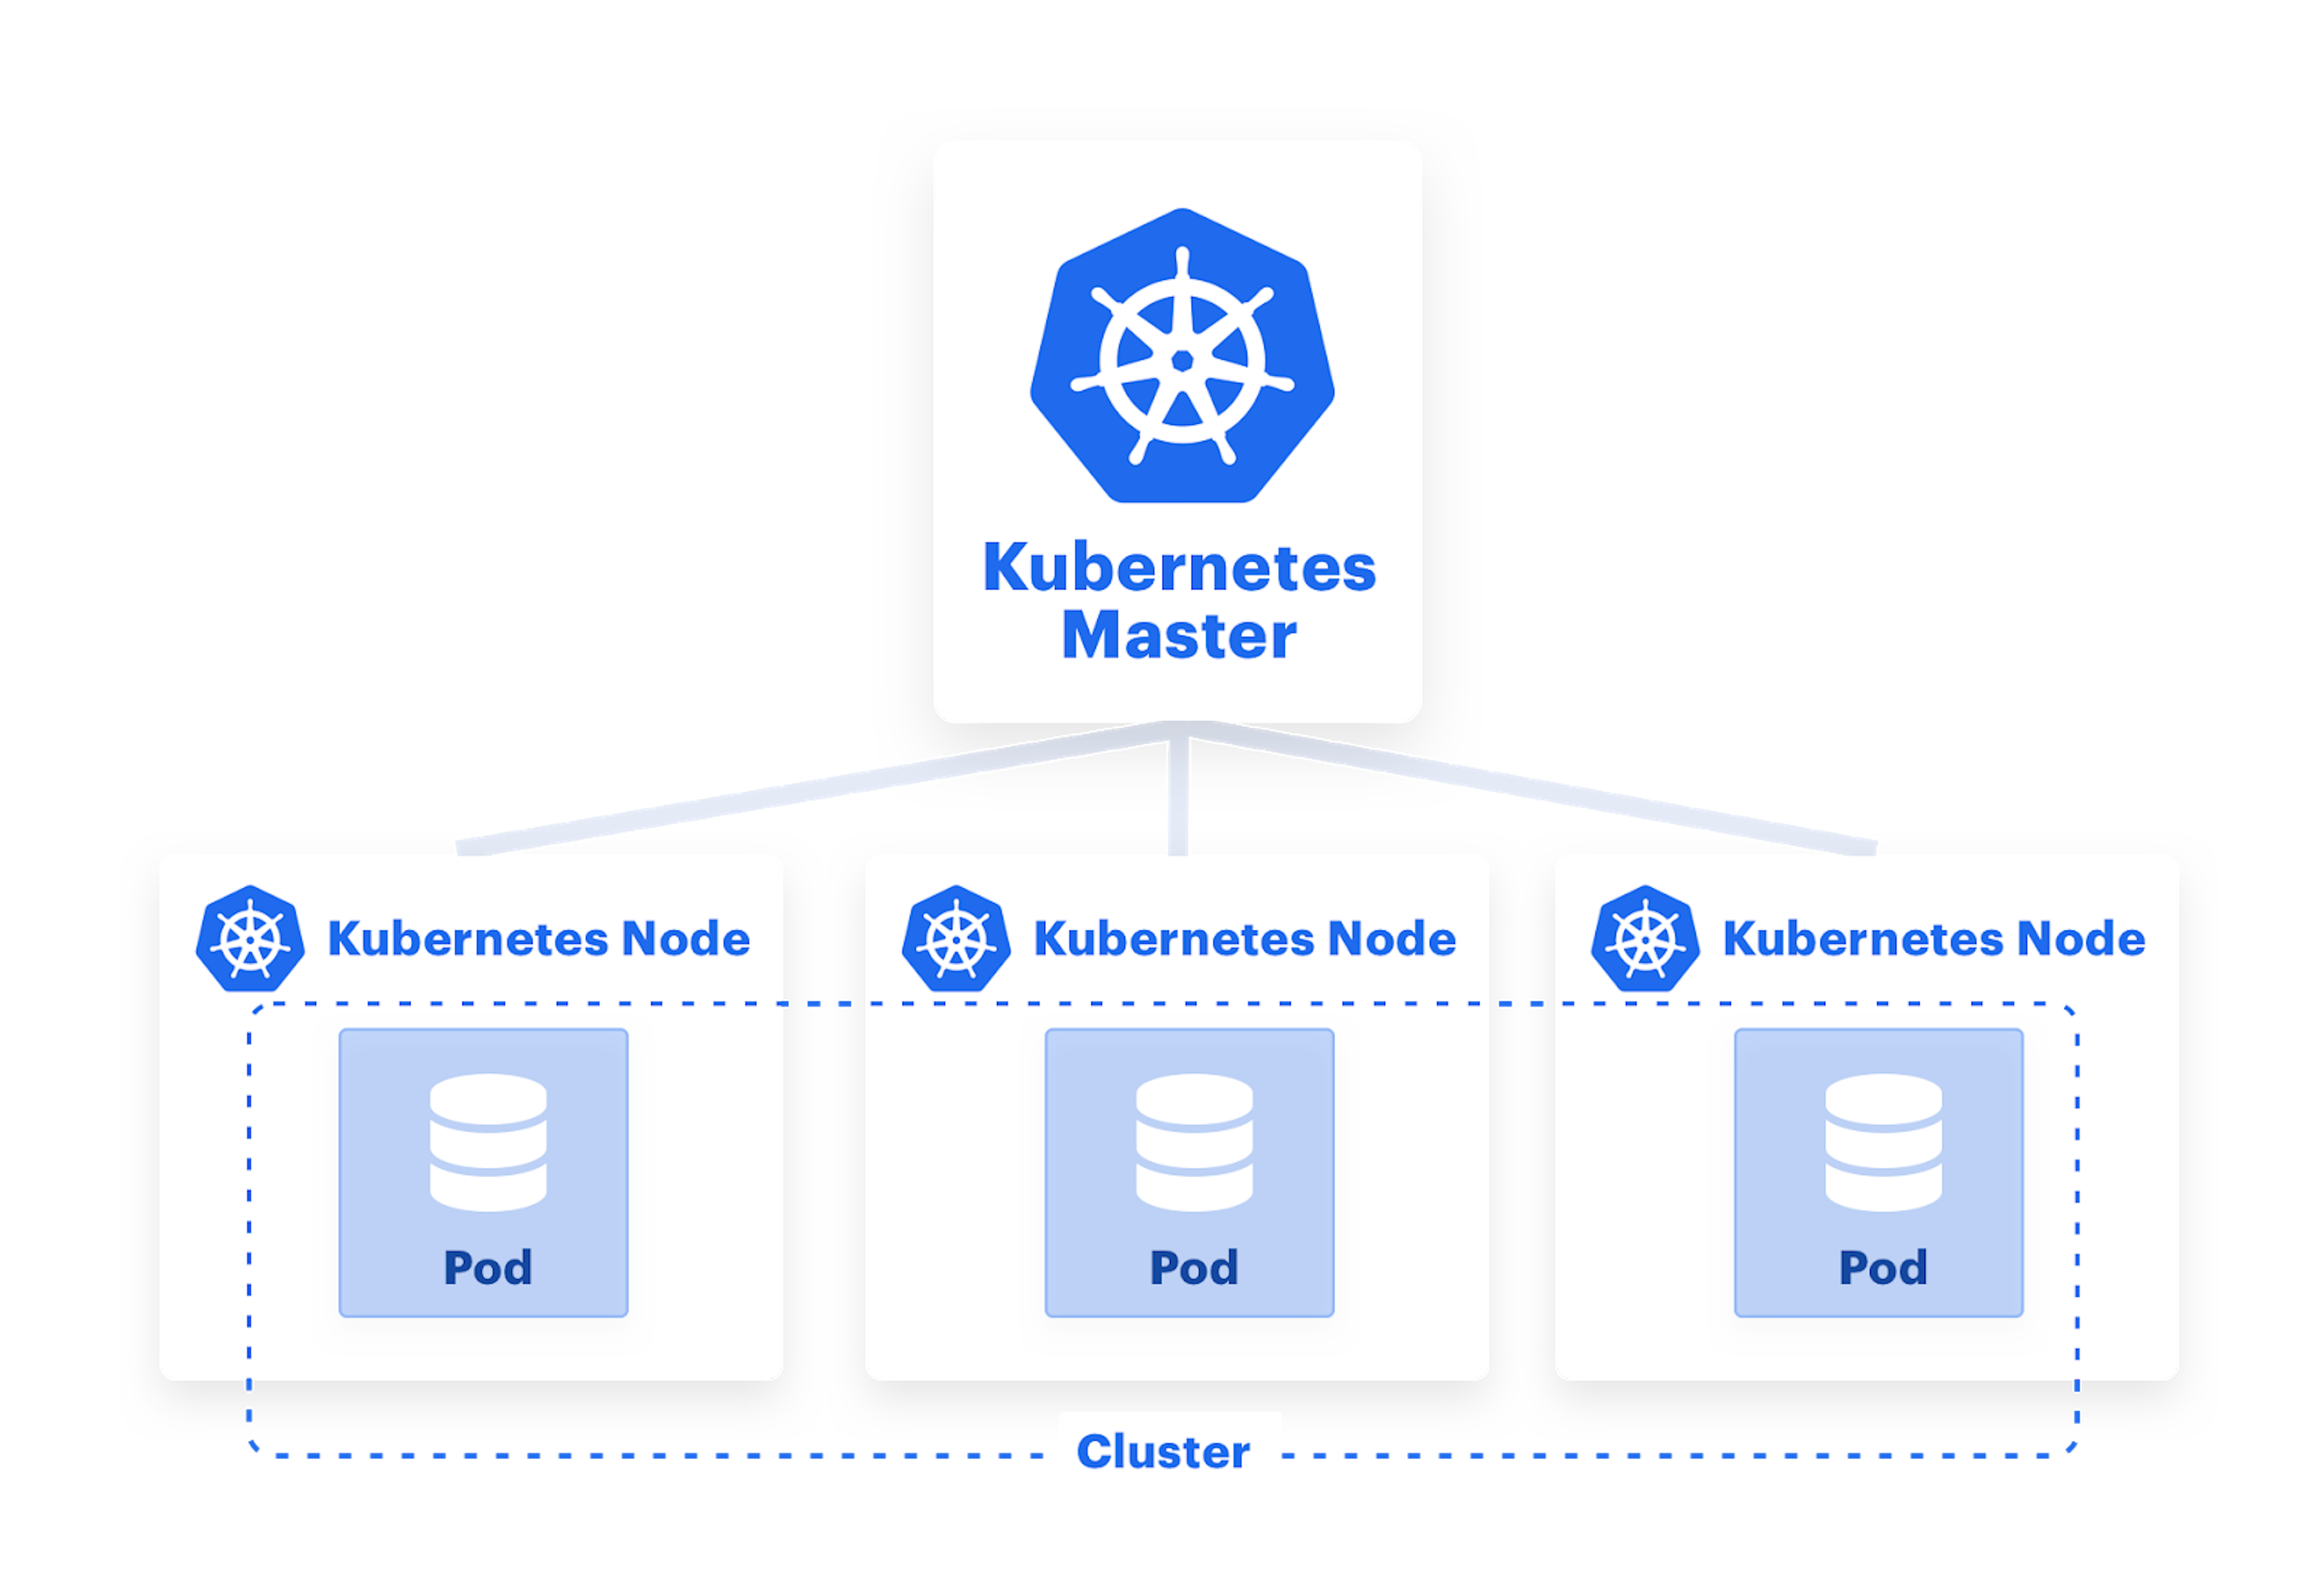
Like Docker Compose, Kubernetes (and platforms based on Kubernetes, like Openshift) also use a YAML file to configure the deployment. In Kubernetes, a container, or sometimes multiple containers, run inside a pod. In the Rasa deployment for example, rasa-production, rasa-worker, rasa-x, etc. all run inside their own pods.
The Kubernetes deployment file defines the pods' configuration and also how many pod replicas should be created and distributed on multiple host machines, or nodes. The Kubernetes service maintains the number of pod replicas defined in the deployment, even if one of the nodes goes down. In that situation, the service would create enough pod replicas to reach the desired number and re-distribute them on the remaining nodes. Kubernetes can also be configured to automatically scale infrastructure in response to external traffic, making it the go-to choice for applications where latency and uptime are critical.
But, Kubernetes doesn't have to run on multiple machines-you can also run Kubernetes on a single host. When you run the one-click deploy script on a VM, it creates a lightweight Kubernetes cluster using k3s, which runs on a single server node. If you need the uptime assurance of multiple nodes, you can install the one-line deploy script on a Kubernetes cluster you've already created to your specifications or add worker nodes to the cluster later.
So, Which Deployment Option Do I Choose?
Rasa offers three different methods you can use to deploy your Rasa assistant: the one-line deploy script, Kubernetes/Openshift, and Docker Compose. Each of these methods deploys Rasa X + your Rasa assistant. Below, we'll discuss the differences so you can choose which method is right for you.
If you want a fast and scalable deployment
Use the new one-line deploy script. This method installs Rasa X on a Kubernetes cluster, or it will create one for you if you don't already have a cluster running on your machine.
curl -s get-rasa-x.rasa.com | sudo -E bash
What happens when you use the one-line deploy script to create your cluster and install Rasa X at the same time? When you run the script on a fresh new VM, it spins up a lightweight Kubernetes cluster, using k3s. This gives you the benefit of Kubernetes' scalability, but with less overhead. Then, Rasa X is automatically installed using the Rasa X Helm chart. If you're running the script on a cluster that already exists, kubectl needs to be installed on your machine and connected to the cluster.
You can customize the script to configure some of the most common settings while you install, like your Rasa X password, action server image, and messaging channel credentials. This saves you the step of configuring them afterwards.
export INITIAL_USER_PASSWORD="my-safe-password"
export ADDITIONAL_CHANNEL_CREDENTIALS='facebook.verify="rasa-bit",facebook.secret="secret",facebook.page-acess-token="token"'
# -E flag applies environment variables from the current user for `sudo`
curl -s get-rasa-x.rasa.com | sudo -E bash
We've surfaced some of the most common settings for you to configure this way, but those aren't the only settings you can customize. Because the one-line script installs Rasa X using the Helm chart, you can configure additional settings using the chart at any point after you install. In summary, the one-line deploy script makes it quick and easy to get started, but if you want more configuration options later on, they're available to you.
Note that the one-line deploy script is compatible with Linux. You can find full details, including minimum system requirements, in the docs.

If you want full control over your cluster
Use Kubernetes or OpenShift. Before we released the one-line deploy script, the Rasa X Helm chart was the go-to method for deploying your assistant to a Kubernetes cluster. You might still choose this method today if you have complex or specific requirements for your infrastructure-something we often see with large enterprises. The Helm chart gives you access to additional configuration options like connecting an external database to Rasa X or specifying that Rasa pods should run on machines with GPU.
Keep in mind though-the one-line deploy script lets you deploy to an existing cluster, and you don't lose the ability to configure Helm chart values-they're still available if you need to use them after you deploy. The one-line script is a good option for most deployment scenarios, unless you have extensive customization requirements.
If you want a pared-down option for development
Use Docker Compose. We recommend Docker Compose for situations where you need a scaled down architecture suitable for smaller deployments, development, or personal projects. If you're running Rasa in production, especially in high-traffic or mission-critical situations, we recommend opting for Kubernetes.
There's also a Docker Compose method for deploying a standalone Rasa assistant. Unlike the other methods we've discussed in this guide, this method only deploys your assistant, not Rasa X. If you use this method but would like to try Rasa X later on, you can check out our updated migration guide for connecting your assistant to Rasa X when they're running on two separate systems.
After You Deploy Rasa X...
Now that you've deployed Rasa X, what's next? No matter which method you've chosen to deploy Rasa X, the deployment process also creates a production-ready container for your assistant. That container is empty right now, but next we'll discuss how to get your assistant live and in production, by connecting its Git repository to Rasa X.
Push your assistant to Git
If you haven't already pushed your assistant's code to a Git repository, now's the time. Your repository can be public or private, on any Git-based code hosting platform, like GitHub, GitLab, or Bitbucket. Your remote Git repository is the record of truth for the state of your assistant's code. Whether you're making changes to the code on your local machine or working with your training data in Rasa X, all changes get pushed to the remote repository.
Note that there are a few files you won't want to push to your Git repository. Exclude your models and any files that contain API tokens or passwords, like credentials.yml or .env. You can list these in a .gitignore file to avoid pushing them to the remote. Later, you can recreate your credentials securely on the server.
Connect Integrated Version Control
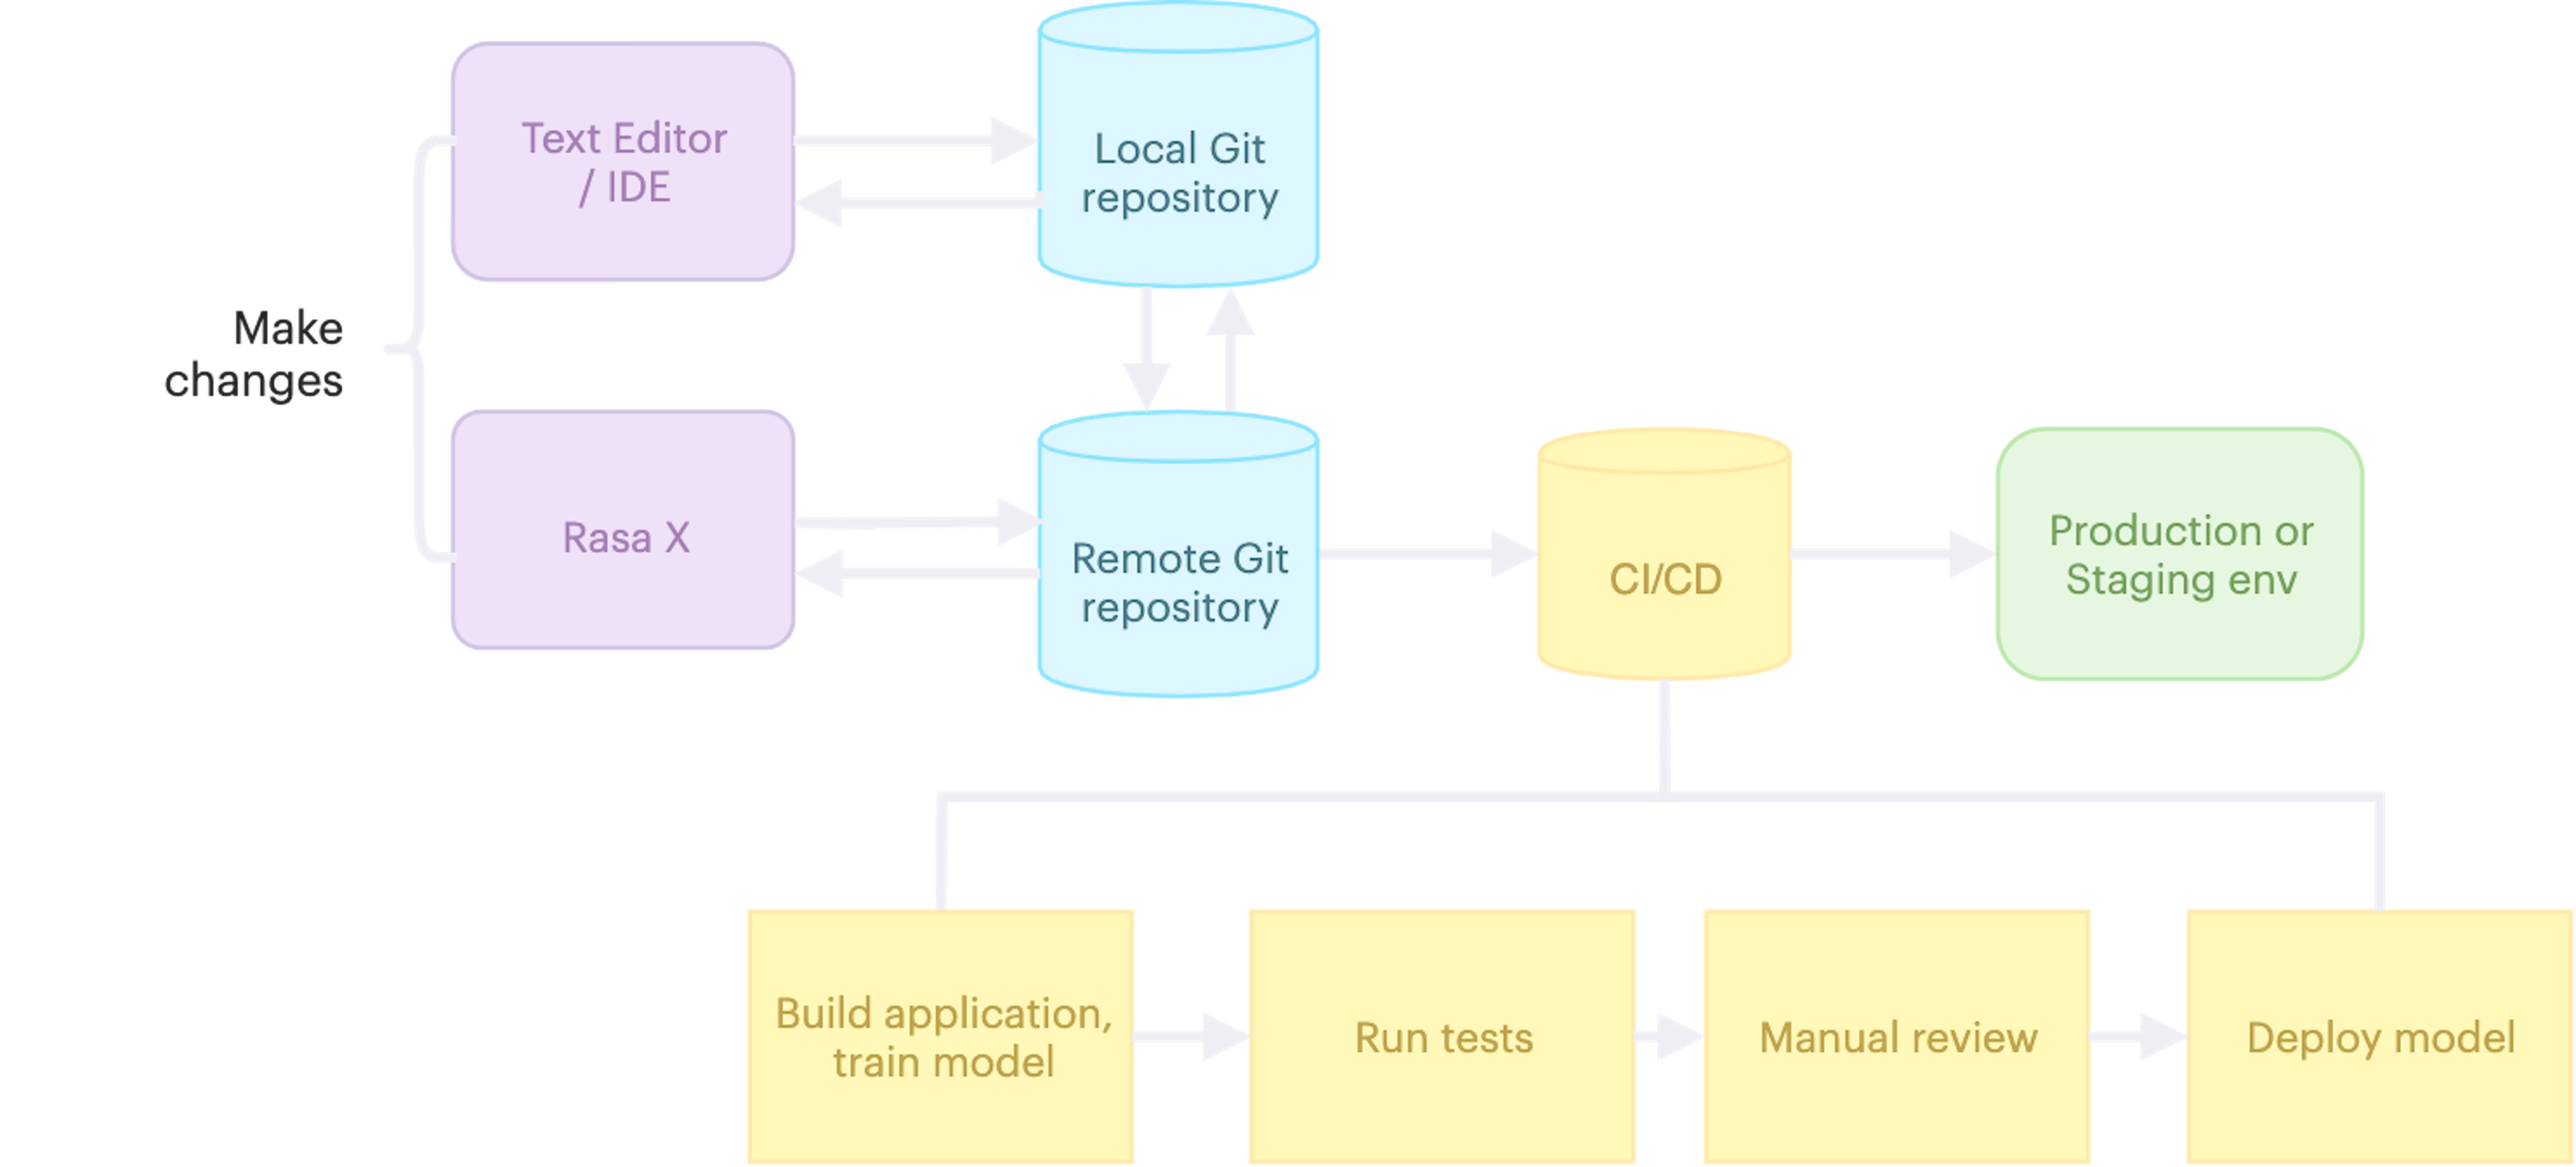
Integrated Version Control syncs your Rasa X instance with a remote Git repository. It's a 2-way sync; changes to the Git repository are automatically pulled in to Rasa X and changes that you make to your training data in Rasa X can be pushed to Git. When you have changes in Rasa X that aren't yet in your repository, Integrated Version Control lets you push the changes to a new or existing branch on your remote. From there, you can create a PR, run tests, and review the changes before merging them.
The first time you connect Integrated Version Control, it pulls your assistant's project files from your Git repository into a Rasa Open Source-ready container-effectively, deploying your assistant.
Once you've connected Integrated Version Control and trained or uploaded a model, you can talk to your assistant via Interactive learning and send it to testers with Share your bot. But, before your assistant will be fully functional, you'll need to take the additional steps of setting up the custom action server and providing messaging channel credentials-see more on that in the next sections.
Find detailed instructions for connecting Integrated Version Control in the docs.
Upload your model
After connecting your assistant via Integrated Version Control, your training data is present in Rasa X, but not your model. You'll need to hit the Train button or upload a model you've trained locally using the REST API (check the Models screen in Rasa X for a pre-formatted cURL command you can copy/paste).
Set up your action server
If your assistant runs custom actions, you'll need to build a Docker image for your custom action server and reference the image in your deployment. To do this, create a Dockerfile that uses the rasa/rasa-sdk image as a parent. Below is an example Dockerfile that copies the action code to the container, installs the code's dependencies, and starts the server.
FROM rasa/rasa-sdk:latest

COPY actions.py /app/actions.py
COPY requirements-actions.txt /app

USER root
RUN pip install --no-cache-dir -r requirements-actions.txt

USER 1001
CMD ["start", "--actions", "actions"]
Build the image from the Dockerfile and push it to a public (or private) container registry, like Dockerhub.
If you're deploying using the one-line script, you can pass the image for your action server as an additional argument when you run the installation script:
export INITIAL_USER_PASSWORD="<your secure password>"
export ACTION_SERVER_IMAGE="<username/customaction>"
export ACTION_SERVER_TAG="<version1.0>"
# -E flag applies environment variables from the current user for `sudo`
curl -s get-rasa-x.rasa.com | sudo -E bash
Didn't specify your action server when you first deployed? You can link your action server later on by re-running the one-line deploy script, with the ACTION_SERVER_IMAGE argument. This updates your deployment to the latest version of Rasa X and applies any changes. You'll use a similar process to update your action server if you make changes to your custom action code: first, build a new image based on the updated code and tag it with a new version, then reference the new version in your deployment by re-running the deploy script.
To link your action server to a Kubernetes cluster deployed with Helm, see the docs, and check here for instructions on connecting a custom action server with a Docker Compose deployment.
Add domain and SSL
Securing your server with an SSL certificate is a good practice-and it's required to connect with many messaging platforms. Before you can add an SSL, you'll need to configure DNS for your server. Check with your hosting provider for specific instructions, but in most cases, you'll need to create an A record with your domain registrar, pointing your domain to your VM's external IP address.
We recommend using cert-manager to issue the SSL certificate for your cluster. Cert-manager is a certificate management controller, and it's included with Kubernetes by default. You can use the method below to install an SSL certificate on your cluster (deployed using the one-line script or Helm chart).
First, install the CustomResourceDefinitions and cert-manager by running this command on your server:
kubectl apply --validate=false -f [https://github.com/jetstack/cert-manager/releases/download/v0.14.0/cert-manager.yaml](https://github.com/jetstack/cert-manager/releases/download/v0.14.0/cert-manager.yaml)
Next, create a new file on your server and name it letsencrypt-issuer-production.yml. Add the following to the contents, replacing the placeholder with your email address:
apiVersion: cert-manager.io/v1alpha2
kind: ClusterIssuer
metadata:
  name: letsencrypt-prod
spec:
  acme:
   # The ACME server URL
    server: https://acme-v02.api.letsencrypt.org/directory
    # Email address used for ACME registration
    email: <your email address>
    # Name of a secret used to store the ACME account private key
    privateKeySecretRef:
        name: letsencrypt-prod
    # Enable the HTTP-01 challenge provider
    solvers:
    - http01:
        ingress:
            class: traefik
Save the file, and then apply it to your cluster with this command:
sudo kubectl apply -f letsencrypt-issuer-production.yml
Now, create another file and name it cert-request.yml. Add the following to the contents, replacing the placeholder for secret name and domain name.
apiVersion: cert-manager.io/v1alpha2
kind: Certificate
metadata:
  name: letsencrypt-prod
  namespace: rasa
spec:
  secretName: <name for your secret, e.g. rasa-tls>
  issuerRef:
    name: letsencrypt-prod
    kind: ClusterIssuer
  commonName: <domain name for your Rasa X server, e.g. myassistant.com>
  dnsNames:
  - <domain name for your Rasa X server>
Save the file and apply it to your cluster:
sudo kubectl apply -f cert-request.yml
Finally, update the ingress in your Helm chart settings. Create a file called values.yml and add the following, replacing the placeholders for secret name and domain:
ingress:
  annotations:
    ingress.annotations.certmanager.k8s.io/cluster-issuer: letsencrypt-prod
    kubernetes.io/ingress.class: traefik
  hosts:
    - host: <your domain name>
      paths:
      - /
  tls:
   - secretName: <secret name you specified in cert-request.yml>
     hosts:
       - <your domain name>
Run the helm upgrade command so the new chart settings can take effect:
helm upgrade \
    --values values.yml \
    --namespace rasa \
    --reuse-values \
    rasa rasa-x/rasa-x
That's it! You can test your setup by navigating to https://<your domain> in the browser-you should now see a secure lock symbol.
To add an SSL to a Docker Compose deployment, see the docs.
Connect messaging channels
Much like the process for connecting your action server, you can also pass in messaging channel credentials when you run the one-line deploy script.
export ADDITIONAL_CHANNEL_CREDENTIALS='facebook.verify="rasa-bit",facebook.secret="secret",facebook.page-acess-token="token"'
If you deployed Kubernetes with the Helm chart, connect messaging channels by providing your credentials in a values.yml override file.
For a step-by-step walkthrough of configuring messaging channels with a Docker Compose installation, have a look at the Rasa Masterclass episode 11.
More Resources
To see a video walkthrough of deploying Rasa X on Kubernetes using the Helm chart, watch episode 12 of the Rasa Masterclass. This video shows you how to build and reference a Docker image for your action server, as well as how to customize settings using the values.yml override file-helpful whether you've deployed Rasa X to your cluster using the one-line deploy script or using the Helm chart.
And although we've since simplified the setup process for Integrated Version Control, Rasa Masterclass episode 9 shows how Integrated Version Control loads your assistant into Rasa X and demonstrates how to set up an action server for an assistant deployed using Docker Compose. No matter which deployment method you choose, this video is a great conceptual starting point for understanding how to run Rasa X on a server.
Conclusion
There's no one-size-fits-all deployment method that's right for every Rasa assistant, but with its combination of speed, simplicity, and scalable architecture, the one-line deploy script comes pretty close. Whether you have special requirements or want a quick-and-easy setup, you have the freedom to deploy your assistant using the method that makes sense for you.
After you deploy your assistant, the work isn't done-it's important to take what you learn from users and channel it back into improving your assistant. Rasa X allows you to convert interactions with users into valuable training data and identify patterns in conversations that can help you iterate and refine the user experience. Now that you've deployed your assistant, you're ready to take it to the next level.
We want every Rasa developer to be successful when they make the leap from local development to production. But if you get stuck, we're here to help. Head over to the forum to ask questions, share your feedback, or tell us what you're building-and stay in touch on Twitter to get the latest Rasa news.