

November 14th, 2019
Build a Mobile Voice Assistant with Rasa and Aimybox
Dmitriy Chechyotkin


Mobile voice assistants are becoming increasingly prevalent-including familiar names like Google Assistant, Siri and Alexa. Some platforms allow you to add your own voice skills that perform any kind of custom actions.
But, there are a lot of restrictions that go along with building into those ecosystems. For example, you have to find a unique activation phrase for your skill even if it only opens your garage doors. And you have to publish your voice skill to the skills marketplace, diving into the complicated administrative process from platform vendors like Google or Amazon. Moreover, you can't embed your assistant into your own mobile app.
With the open source Rasa NLU platform and the Aimybox voice assistant SDK from Just AI, all of these restrictions can be eliminated. You can easily build your own mobile voice assistant with only the voice features you really want.
In this post, we'll show you how easy and fast it can be to build and run your own Android voice assistant, using only open source tools and with minimal programming.
Voice Assistant Overview
In general, all mobile voice assistants follow this basic architecture:
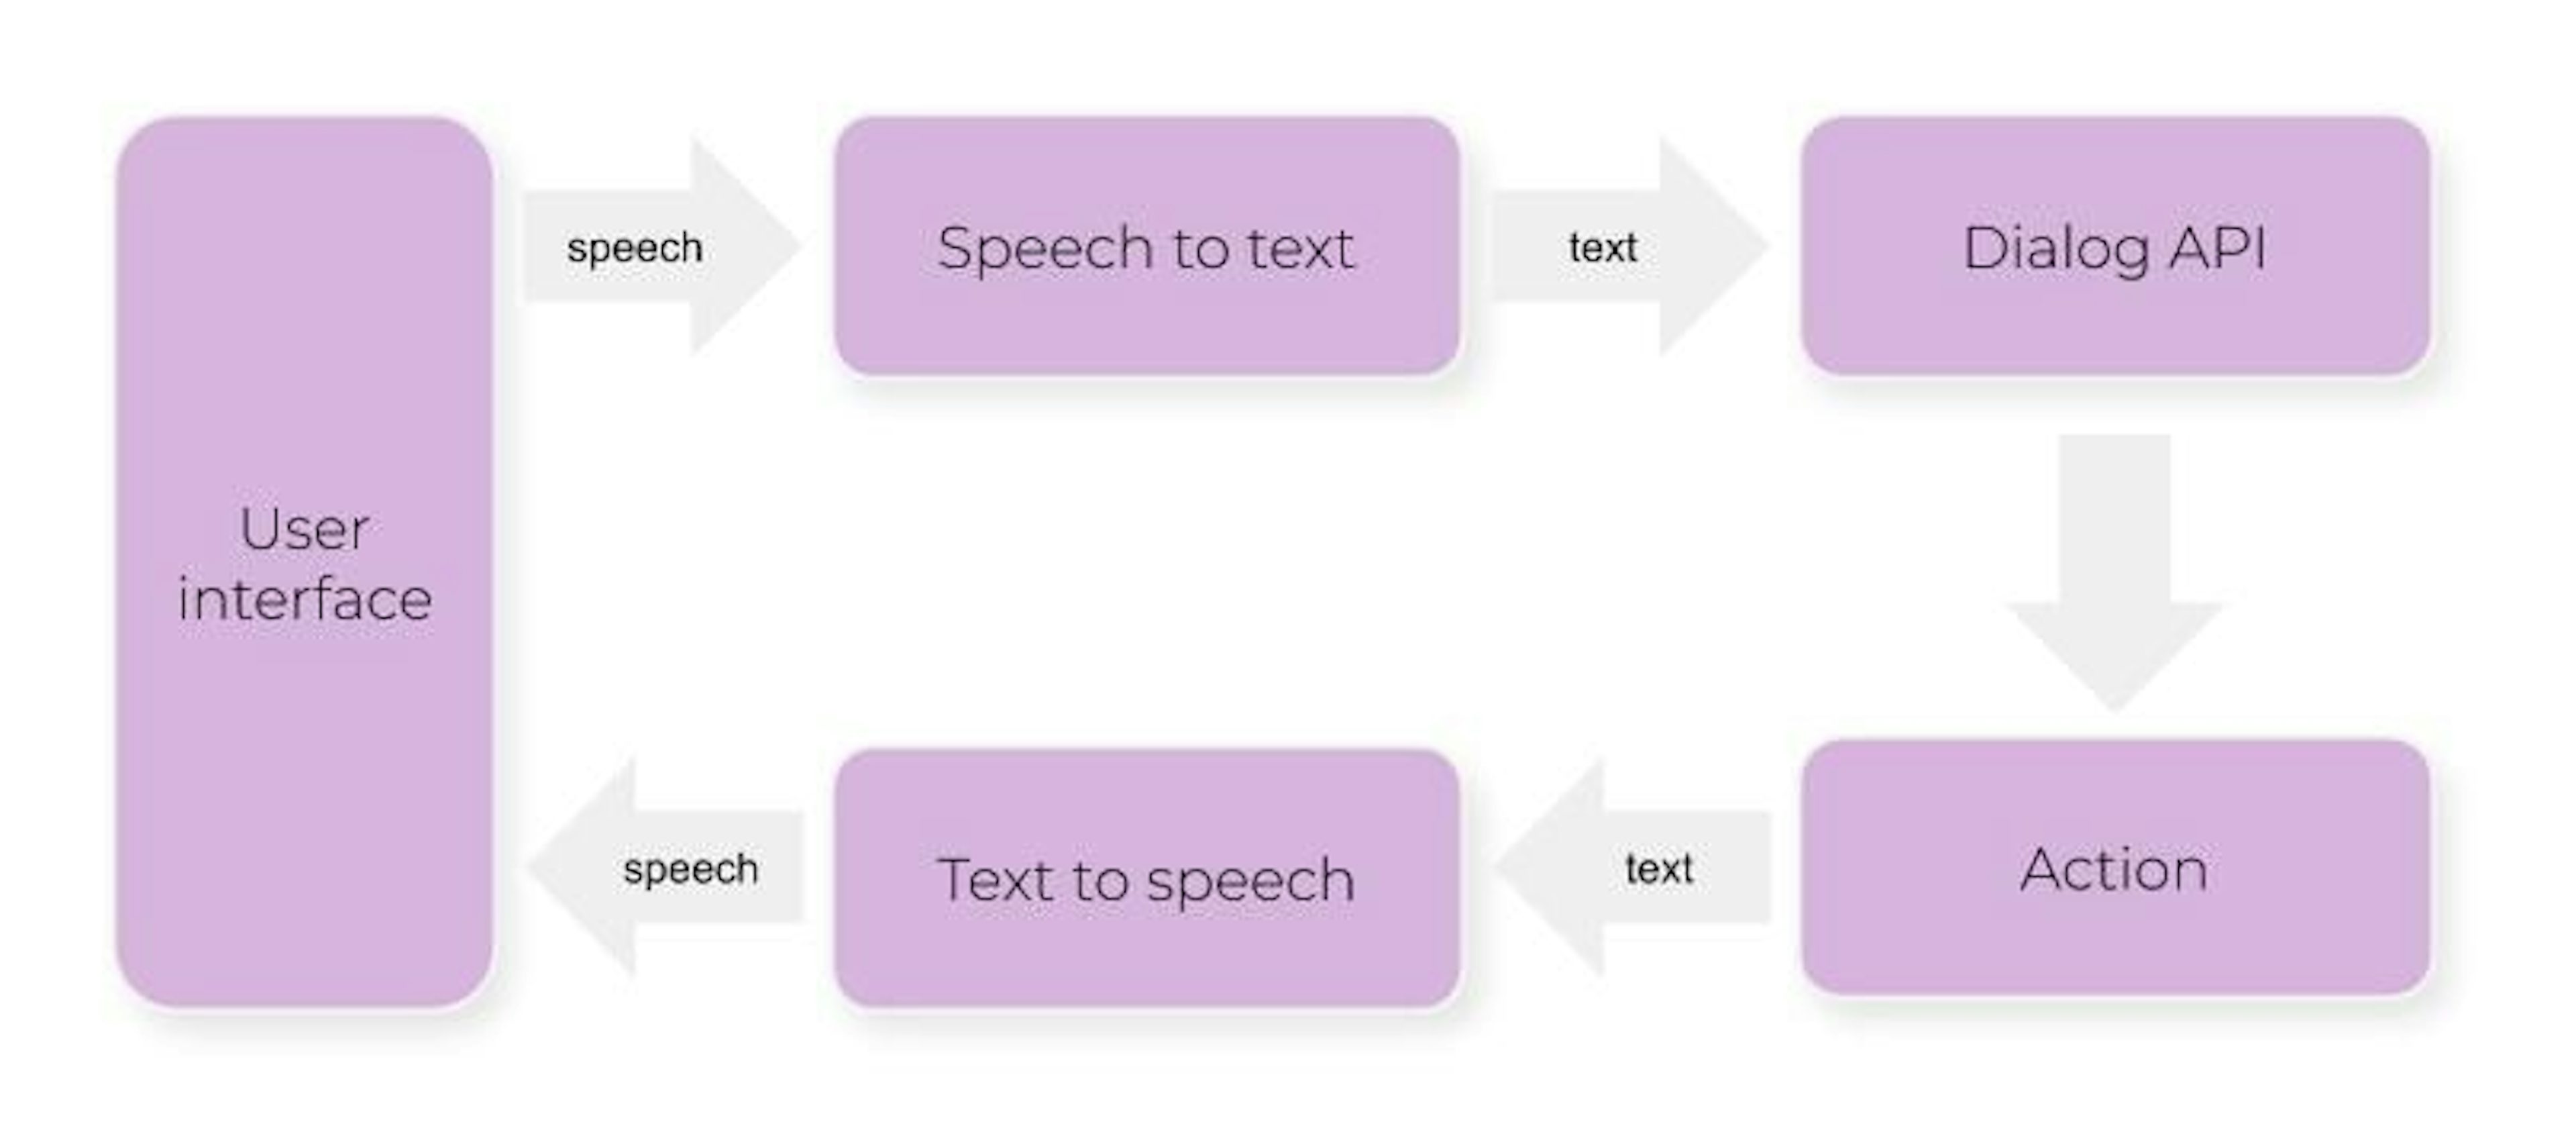
First, the user clicks the mic button and speaks a phrase. A speech-to-text component recognises the speech and converts it to text. Then, the raw text is processed by an NLUengine that recognises the user's language-independent intention from the text. Once an intent has been recognised, an action could be performed (like opening a garage door). Finally, a text-to-speech component synthesises a voice response so the user can hear assistant's reply and continue the conversation.
Implementing all of these steps and components from scratch can eat up a lot of time, even if you have the programming skills. You'd need to implement a whole list of individual technologies: speech-to-text, text-to-speech an NLU engine, as well as a user interface with elements like auto-scrolling, speech recognition process animation and more.
With Rasa and the Aimybox SDK, it becomes much easier to achieve all of these features with minimal effort.
Here are the technologies we'll use in this tutorial:
In the following sections, we'll discuss how these tools work together and take you through the steps to build a mobile voice assistant of your own!
Create a New Rasa Project
We'll base our assistant on the built-in Rasa starter project: moodbot. Moodbot is a boilerplate application that includes the basic file structure for a Rasa assistant. It performs a simple function: it asks users how they're feeling, and if they're sad, it sends them a funny image.
Here are the steps to install Rasa on your local machine and create the moodbot project. We'll keep it brief in this tutorial and link out to detailed instructions in the Rasa docs:
- Install Rasa. Here is an excellent step-by-step guide on how to do this.
- Run the rasa init --no-prompt command in your terminal. This command creates the moodbot project in the current directory.
Make it public
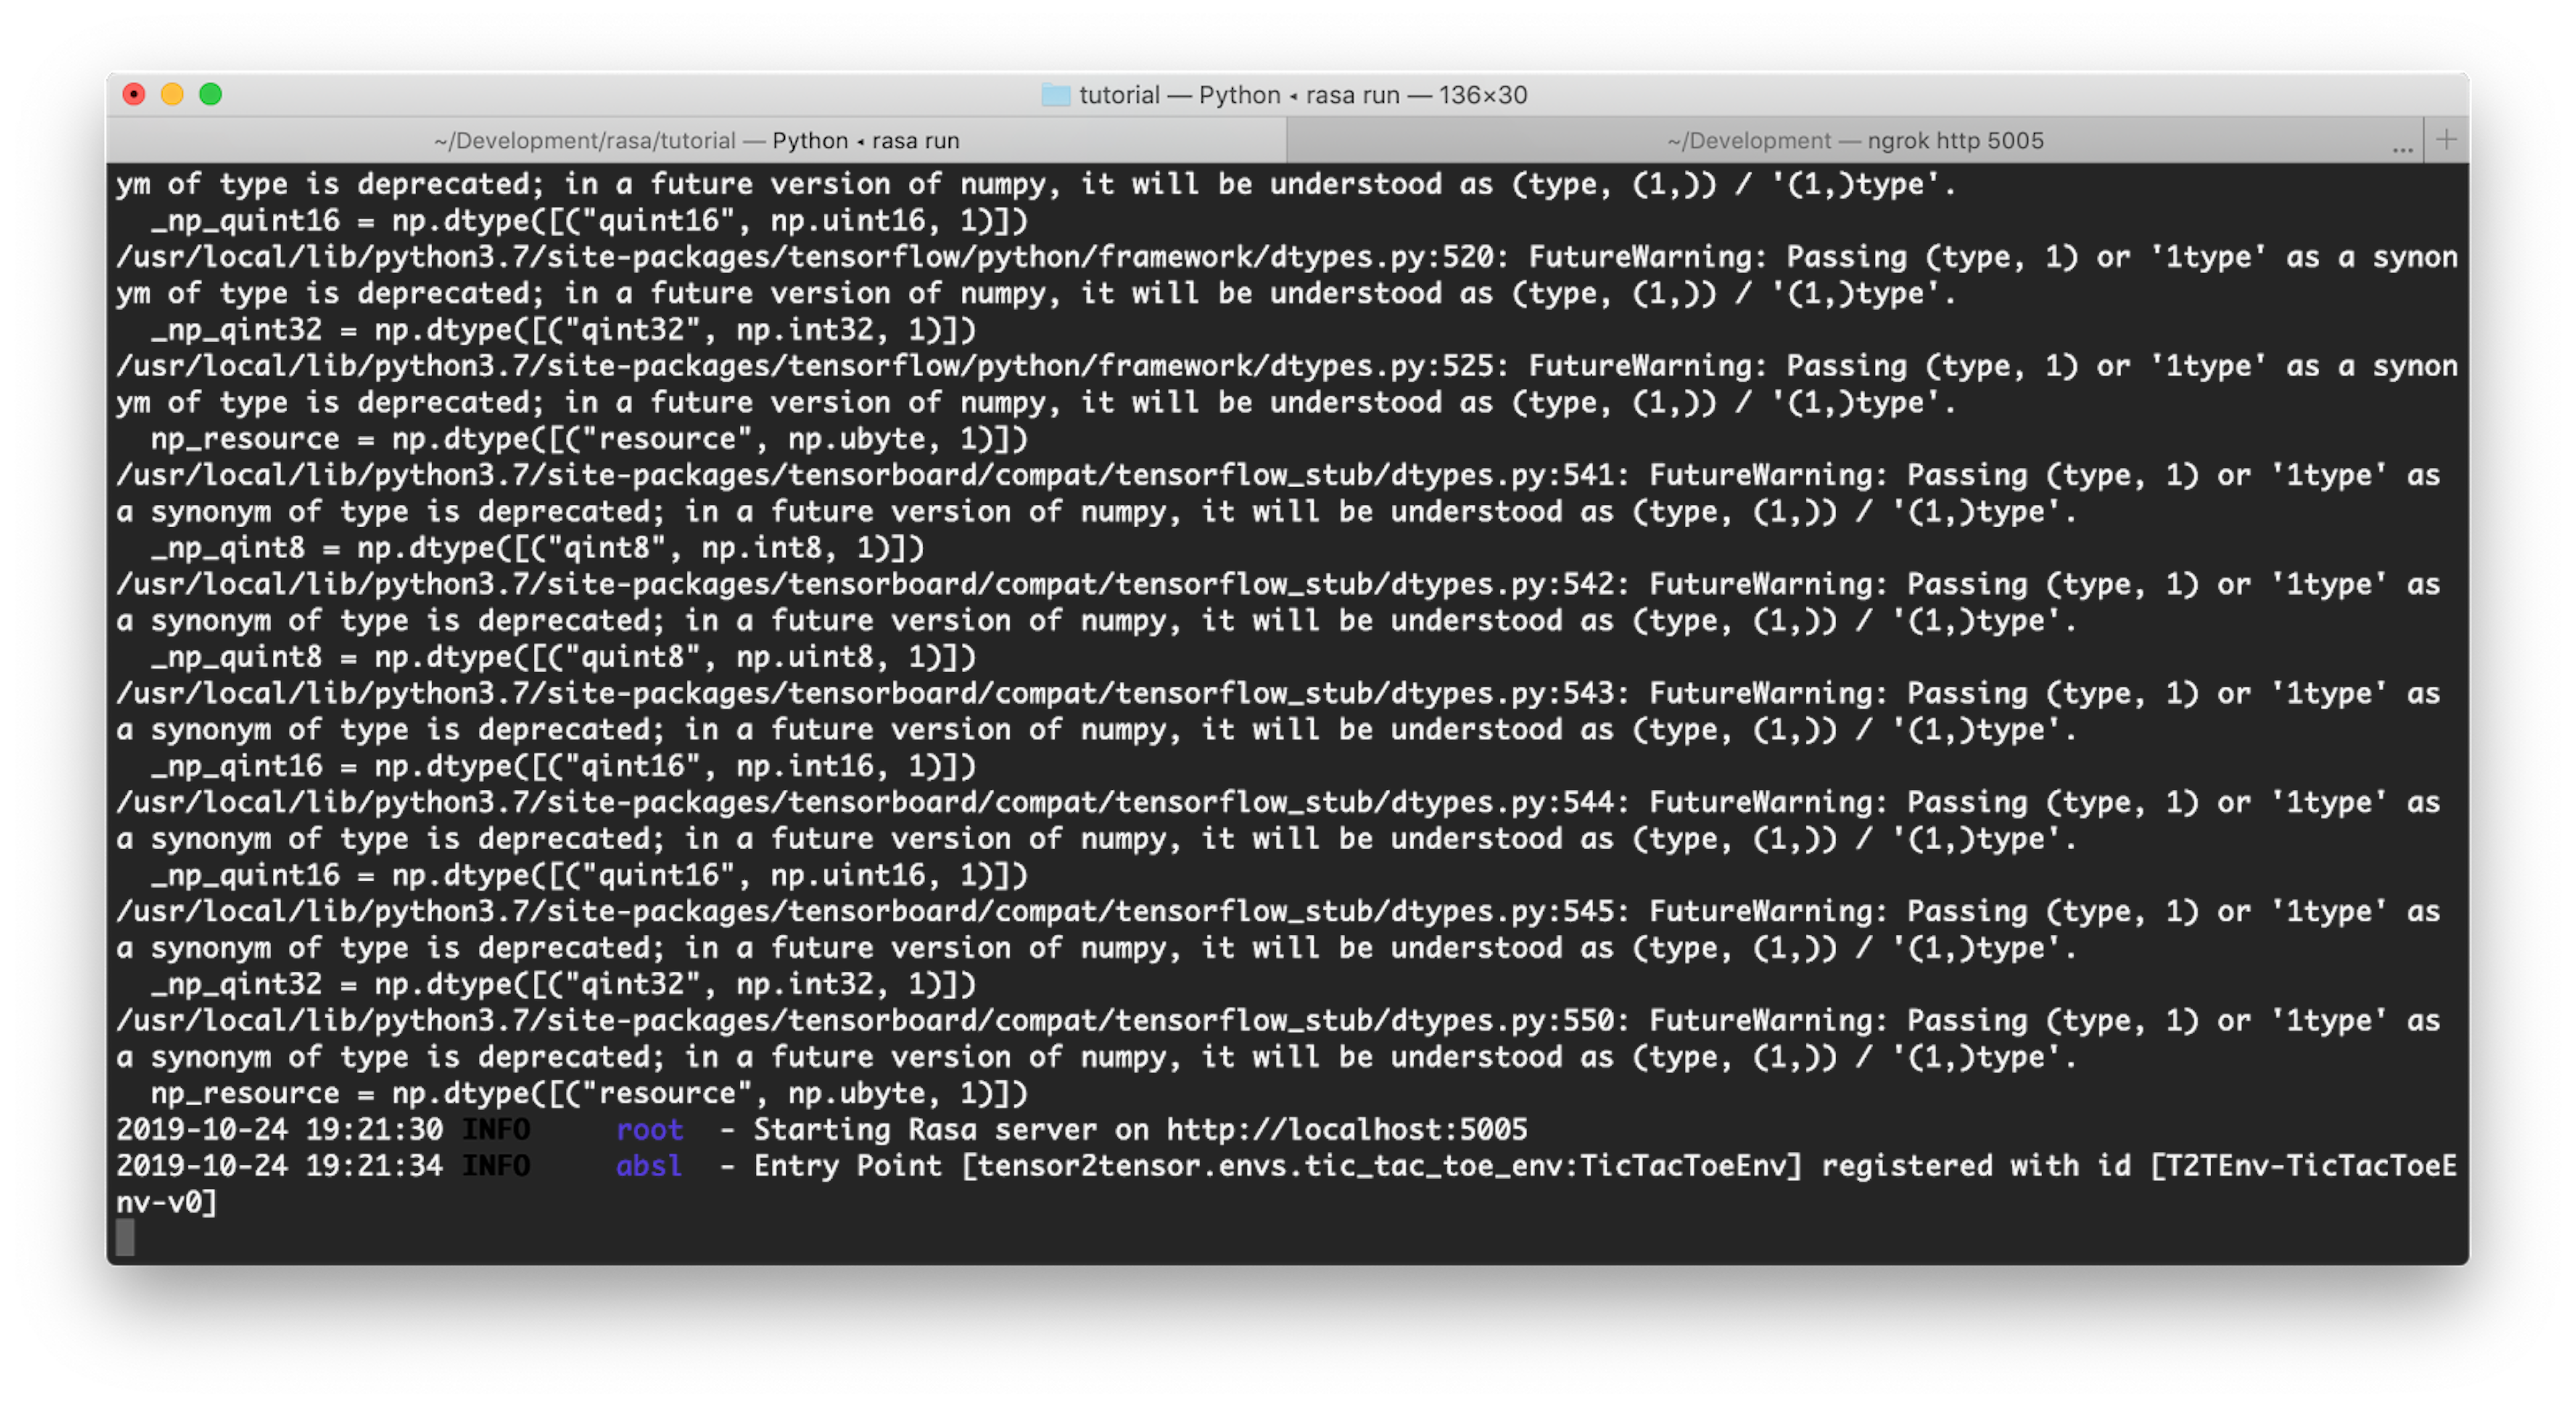
Once you've created the starter project, you'll need to start the Rasa server. To do this, run the rasa run command in the terminal. In your terminal output, you'll see a URL pointing to your Rasa server: http://localhost:5005
The server is running, but right now it's only accessible on your local machine. To build our voice assistant, we'll need to make the process available over the public internet.
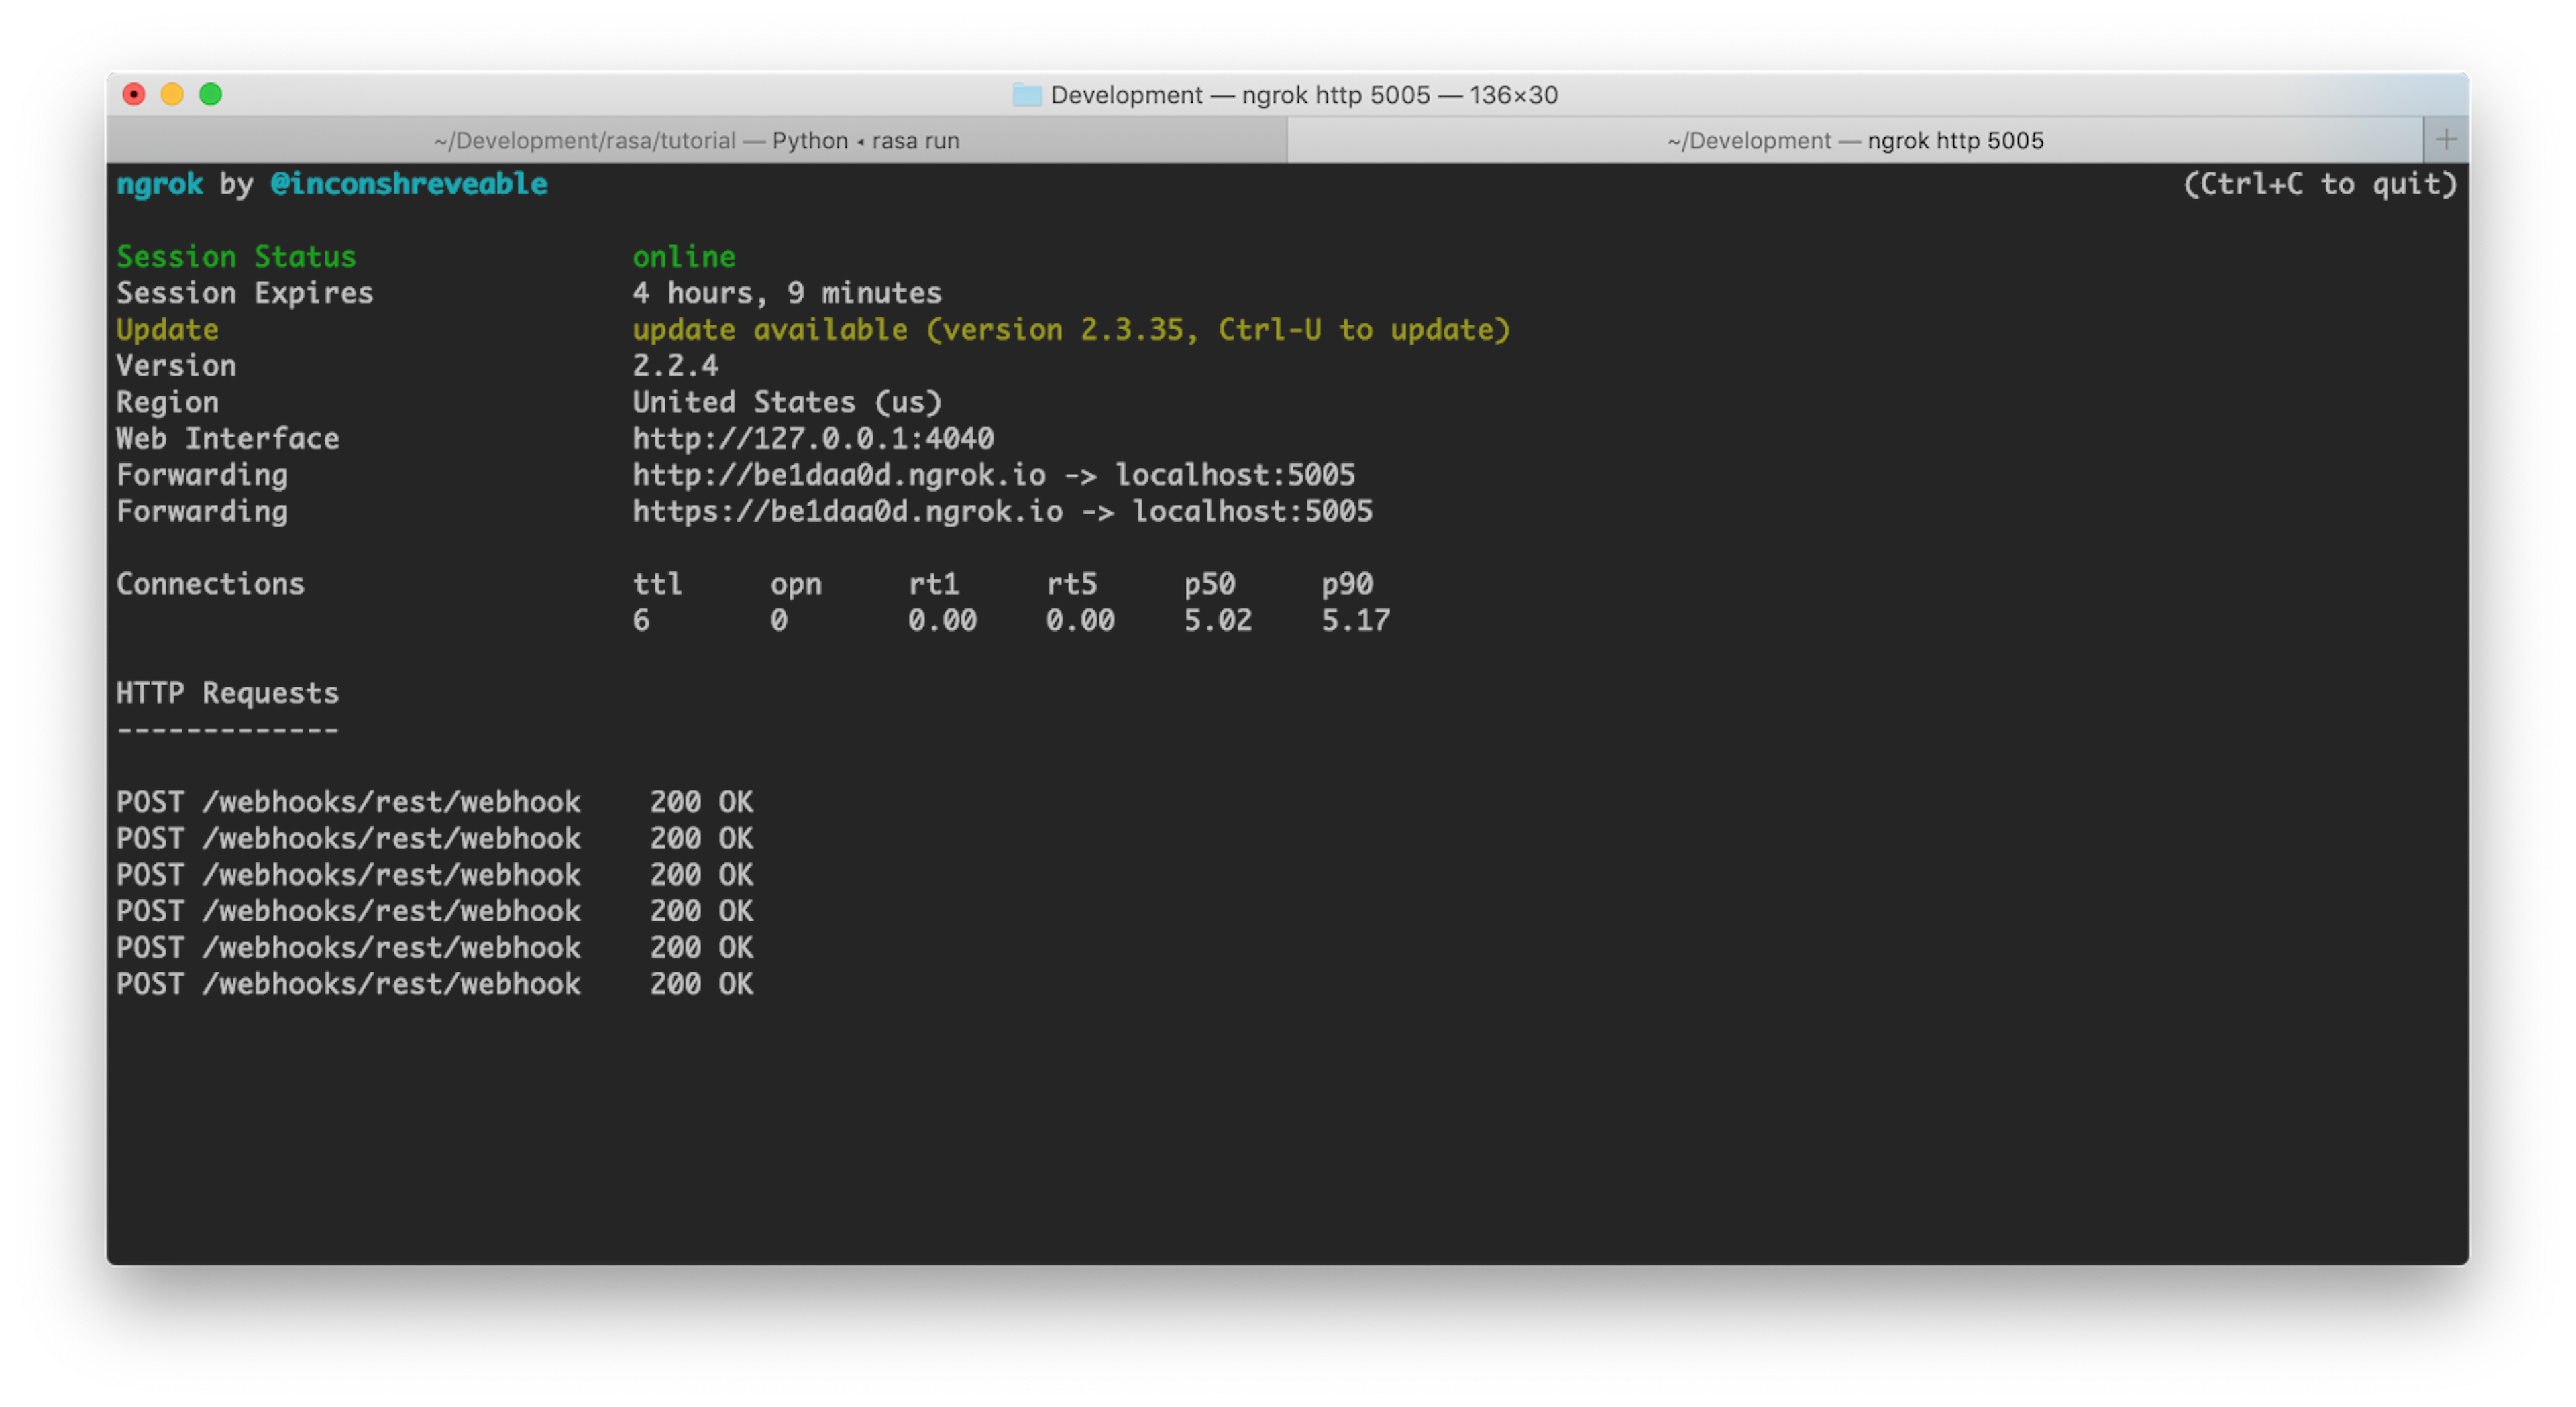
To achieve this, we'll use ngrok. Ngrok generates a temporary tunnel URL for a process running locally, which allows you to publish any local service to the internet, making it accessible from any point in the world.
Download ngrok and run ngrok http 5005 in a new terminal window to generate a public URL pointing to your local Rasa server, which is running on port 5005. In the terminal output, you'll see two forwarding URLS: an http and an https version (we'll use the https). In the example below, it's https://be1daa0d.ngrok.io
Note the REST input channel endpoint
The Rasa REST input channel allows you to connect a custom channel to Rasa. A channel is essentially a messaging client where users interface with your assistant. It could be Slack, Facebook, a chat interface embedded on a website, or a voice assistant framework like Aimybox.
The Rasa REST input channel is pre-configured to receive POST requests from custom messaging channels at this endpoint: /webhooks/rest/webhook. The webhook payload sent from the custom messaging channel to this endpoint should contain the identity of the user and their message. In return, Rasa sends the assistant's utterance back to the custom channel.
In this example, the Rasa REST input endpoint is available at https://be1daa0d.ngrok.io/webhooks/rest/webhook
This publicly accessible webhook endpoint is all that we need to connect our voice assistant to the Rasa project. Let's do it!
Create the Voice Assistant
Aimybox provides a ready-to-use, open source Android voice assistant with all of the nested components you need to implement speech-to-text, text-to-speech, NLU and great UI/UX.
Note: Aimybox makes it possible to assemble a mobile voice assistant with any NLU engine (as well as speech-to-text and text-to-speech components).
In this section, we'll assemble the mobile voice assistant and connect it to our Rasa project, creating an assistant that will understand all of the intents defined in the Rasa moodbot project. Our finished assistant will be able to understand the user's greeting, ask them how they are doing, and interpret whether their mood is good or bad.
Here are the steps:
- Install and run Android Studio
- Create a new project from version control
- Define https://github.com/just-ai/aimybox-android-assistant as a version control URL
After a few moments your Android project will be ready. Next, we need to connect it to our Rasa server.
Within the app folder, locate the build.gradle.kts file. Add this line just after implementation("com.justai.aimybox:google-platform-speechkit:$aimyboxVersion":
implementation("com.justai.aimybox:rasa-api:$aimyboxVersion")
The dependencies section should look like this:
dependencies {

    debugImplementation("com.squareup.leakcanary:leakcanary-android:2.0-beta-3")

    implementation("androidx.appcompat:appcompat:1.1.0")
    implementation("androidx.recyclerview:recyclerview:1.0.0")
    implementation("androidx.constraintlayout:constraintlayout:1.1.3")
    implementation("androidx.core:core-ktx:1.1.0")
    implementation("androidx.lifecycle:lifecycle-extensions:2.1.0")

    implementation(kotlin("stdlib"))
    implementation("org.jetbrains.kotlinx:kotlinx-coroutines-android:1.3.1")

    implementation("com.justai.aimybox:components:$componentsVersion")
    implementation("com.justai.aimybox:core:$aimyboxVersion")
    implementation("com.justai.aimybox:google-platform-speechkit:$aimyboxVersion")
    implementation("com.justai.aimybox:rasa-api:$aimyboxVersion")
}
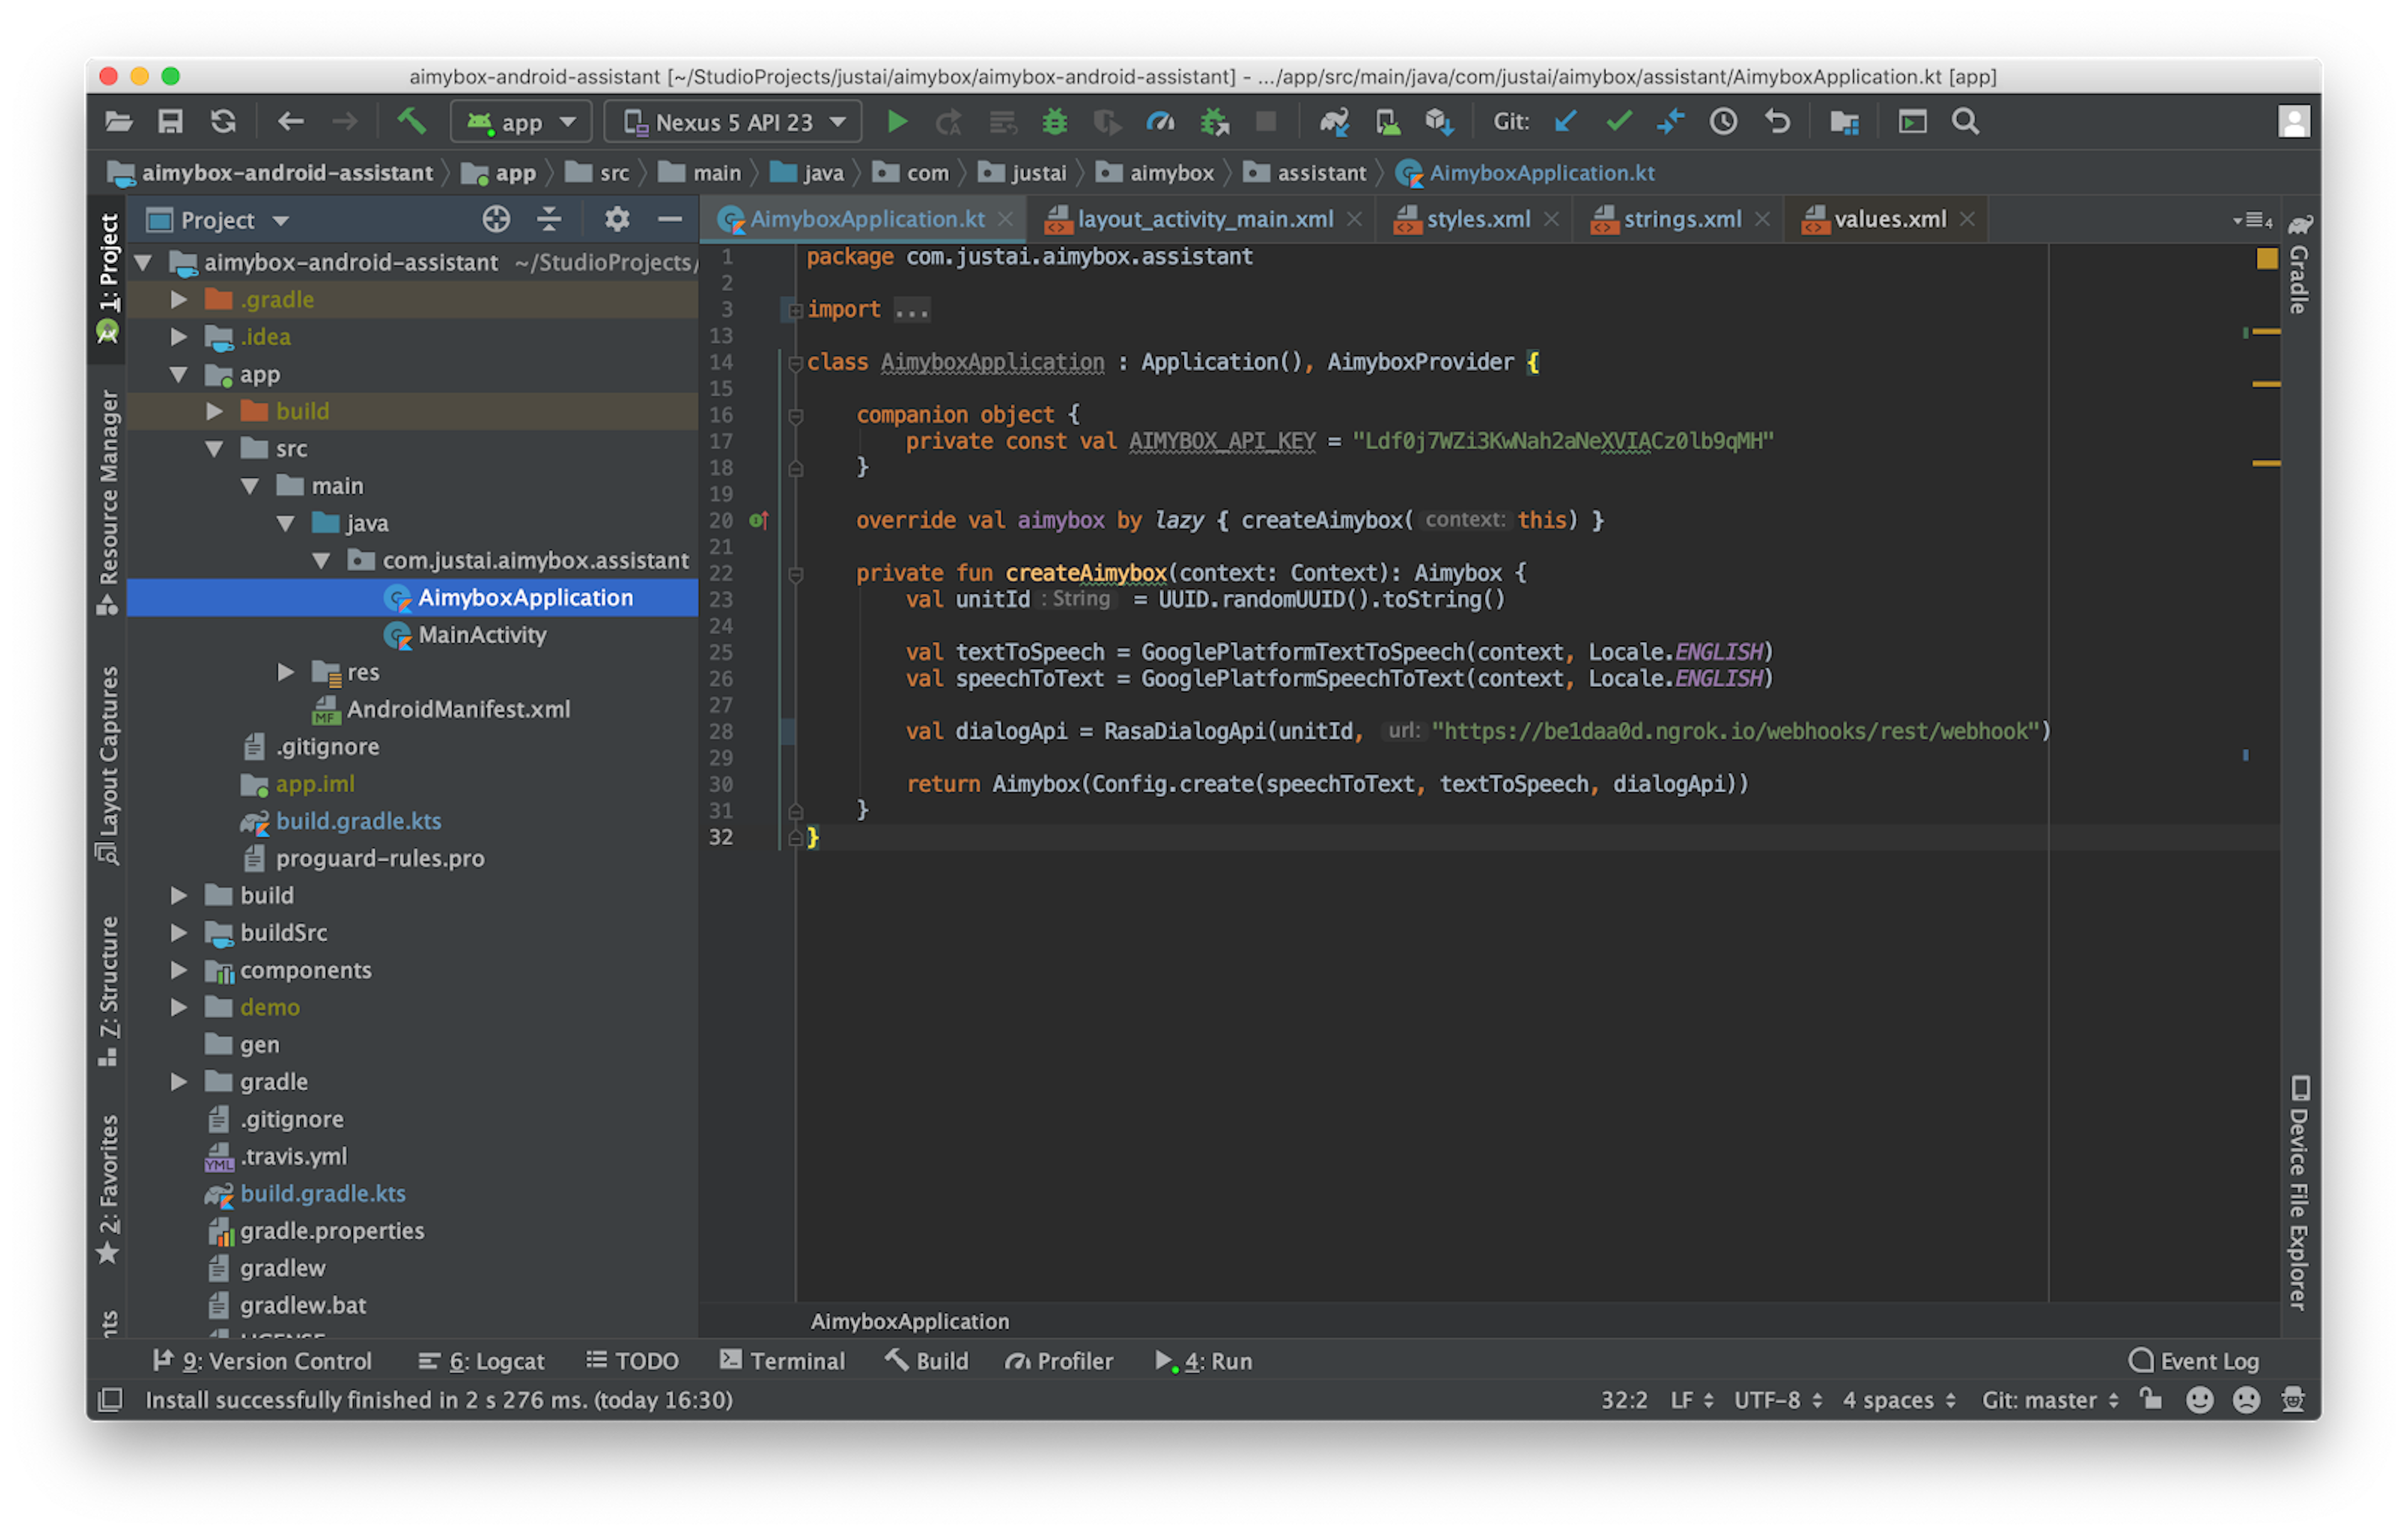
Click the Sync Now button and open the AimyboxApplication class under app/src/main/java/com.justai.aimybox.assistant. This is where you'll configure the Rasa connection for the voice assistant.
Replace import com.justai.aimybox.api.aimybox.AimyboxDialogApi with
import com.justai.aimybox.dialogapi.rasa.RasaDialogApi
Replace val dialogApi = AimyboxDialogApi(AIMYBOX_API_KEY, unitId) with
val dialogApi = RasaDialogApi(unitId, "https://be1daa0d.ngrok.io/webhooks/rest/webhook")
Note: Be sure to replace the Rasa webhook URL in this example with your ngrok URL!
Run it!
And that's it! The only thing left is to build and run your assistant on an Android device. Connect your Android device to your local machine using a USB cable and click on the green play button in the Android Studio toolbar.
Before running this step, you'll need to enable developer options on your device before.Here is a great guideon how to do this.
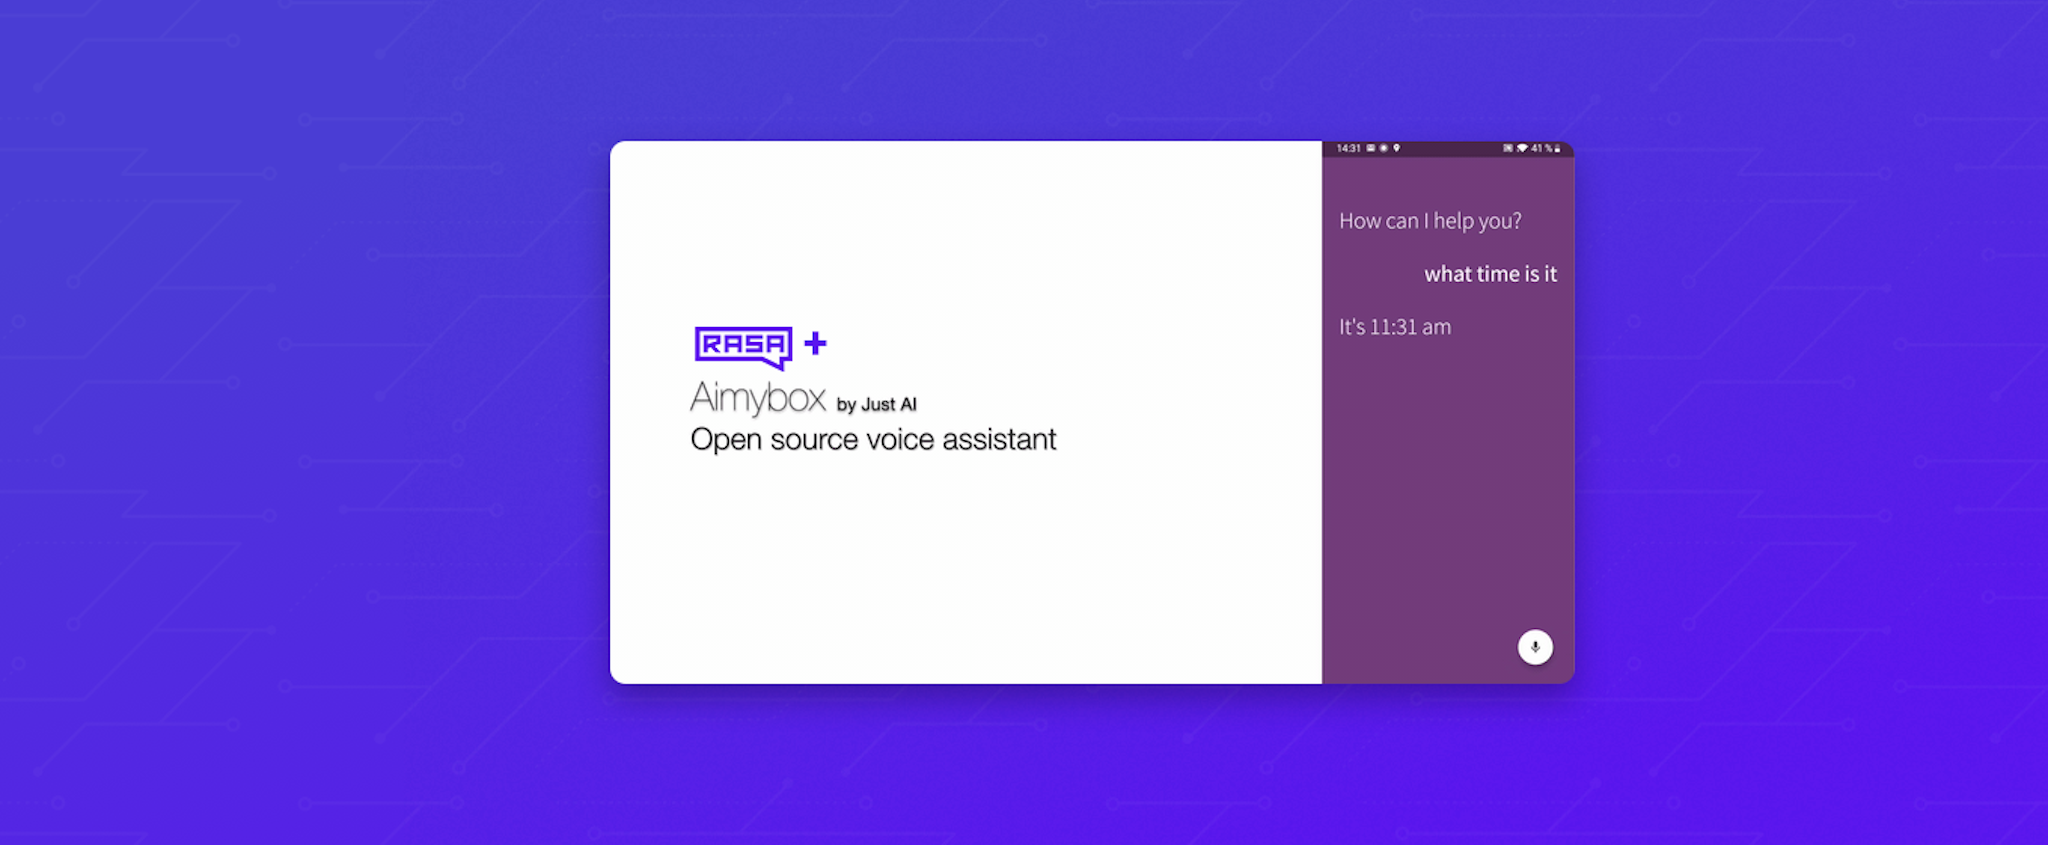
Use it!

Once the assistant is running, you'll see a simple application with a mic button in the bottom right corner of the screen. Tap on it, and a voice assistant UI appears with a welcome message. Say hello to start a conversation with your Rasa project.
This tutorial uses the Android built-in speech-to-text and text-to-speech engines. It's easy to useanother componentfor this if you would like.
What's next?
We now have a working mobile voice assistant for Android connected to our Rasa server, which implements the voice features we need. Great! But Rasa and Aimybox are both open solutions, meaning we can modify anything we want to make it more personalised. Let's try to change some things!
Add buttons
Sometimes it's easier and faster to click on the button instead of speaking. The Aimybox assistant can render buttons and react to users' taps.
To add buttons, open the domain.yml file in your Rasa project. Locate the utter_greet and utter_did_that_help templates and add button options like this:
templates:  utter_greet:  - text: "Hey! How are you?"    buttons:    - title: "Good"    - title: "Bad"
  utter_cheer_up:  - text: "Here is something to cheer you up:"    image: "https://i.imgur.com/nGF1K8f.jpg"
  utter_did_that_help:  - text: "Did that help you?"    buttons:    - title: "Yes"    - title: "Nope"
You'll need to retrain the model to see your changes. Stop the Rasa server by running Ctrl-C in the terminal window and then run the rasatrain command. Once Rasa has finished training, run the rasa run command to start the server again.
Now your mobile assistant will render buttons and react on the clicks. The button click just sends the text of the button's title as a new command to your Rasa server.
Style your assistant
The Aimybox voice assistant is fully customisable. That means that you can change the assistant's behavior as well as its look-and-feel through styles. Let's change the color of our assistant and the prompt phrase.
Open the styles.xml file in Android Studio (you can locate it in the app/src/main/res/values folder). This file contains the style rules for your assistant, and you're free to change it as you'd like. Let's change the primary color to the color of the Rasa logo:
<style name="AppTheme" parent="Theme.MaterialComponents.Light.NoActionBar">        <item name="android:colorPrimary">#5A17EE</item>        <item name="android:colorPrimaryDark">#4011AA</item>        <item name="android:colorAccent">#6F33F4</item>
        <item name="aimybox_assistantButtonTheme">@style/CustomAssistantButtonTheme</item>        <item name="aimybox_recognitionTheme">@style/CustomRecognitionWidgetTheme</item>        <item name="aimybox_responseTheme">@style/CustomResponseWidgetTheme</item>        <item name="aimybox_imageReplyTheme">@style/CustomImageReplyWidgetTheme</item>        <item name="aimybox_buttonReplyTheme">@style/CustomButtonReplyWidgetTheme</item>    </style>
<style name="CustomAssistantButtonTheme" parent="DefaultAssistantTheme.AssistantButton">         <item name="aimybox_backgroundColor">#5A17EE</item></style>
Change the prompt
You can also change the prompt message that appears on the screen when the user taps on your assistant's mic button. This message should describe the next step expected from the user. In our case, our assistant expects that the user says hello to start a conversation.
Open the strings.xml file in the app/src/main/res/values folder and make these changes:
<resources> <string name="app_name">Aimybox Assistant</string> <string name="prompt">Your assistant is ready! Tap on the button below to start recognition.</string> <string name="initial_phrase">Say hello</string></resources>Re-build and start the assistant by clicking the green Play button in the toolbar. Now the assistant displays the color you've defined in styles.xml and shows a Say hello prompt message when you click on the mic button.
Summary
Using open source tools like Rasa plus Aimybox enables everybody to build mobile voice assistants free from the restrictions of platforms like Google Assistant or Alexa. At the same time, this construction is fully customisable from both sides: NLU and mobile, including styling, content and behaviour.
Now that you've built a working mobile voice assistant, try taking your project a step further by customising the UI or adding new intents for your assistant to understand. You can learn more about Rasa and Aimybox at the links below!